
리엑트 라우터에서 제공하는 action함수에 대한 전반적인 기능을 다뤄 봤지만, 여전히 더 다양한 기능이 있다.
사용자가 준 입력에 대해 유효한 값인지 판별하여 대응을 해야하는 건 매우 중요한 부분이다.
즉, 피드백을 적절하게 사용자한테 돌려줘야하고 프로그래밍적으로는 어떻게 오류 처리를 사용자 경험을 토대로 잘 처리할지 고민해야하는 부분이라고 생각한다.
✔️사용자 입력 검증 및 검증 오류 출력하기
사용자 입력 검증은 프론트와 백엔드 둘다 필요하다.
프론트 쪽에서 폼 양식에 required를 통해 사용자의 입력을 요구해야하는 식으로 유도 할 수도 있지만, 개발 툴로 비활성화 할 수 있는 가능성이 있기때문에 좋은 사용자 경험을 제공하려면 양쪽 모두 두는게 좋다.
먼저 사용자가 잘못된 입력을 수행했을때, 기본으로 정해진 오류 페이지를 바로 라우팅 하는게 아닌, 백엔드에서 어떠한 검증 오류를 발견했을때 상태코드 422로 된 오류 응답을 회신하는것을 이용해 잠재적인 검증 오류를 대응하는 쪽으로 처리해보도록 하자.
(nodeJs)
const express = require('express');

const router = express.Router();

router.post('/', async (req, res, next) => {
 const data = req.body;

 let errors = {};

 if (!isValidText(data.title)) {
   errors.title = 'Invalid title.';
 }

 if (!isValidText(data.description)) {
   errors.description = 'Invalid description.';
 }

 if (!isValidDate(data.date)) {
   errors.date = 'Invalid date.';
 }

 if (!isValidImageUrl(data.image)) {
   errors.image = 'Invalid image.';
 }

 if (Object.keys(errors).length > 0) {
   return res.status(422).json({
     message: 'Adding the event failed due to validation errors.',
     errors,
   });
 }
이렇게 하면 좋은 이유는
사용자가 이전에 입력했던 모든 데이터를 버려지게 하지 않아 사용자 경험 컨디션을 보존할 수 있을것이기 때문이다.
우선 사용자의 입력값을 받는 폼 양식이 있는 페이지인 NewEventPage에서 action함수에서 출력하는 데이터를 오류 상태를 기반으로 출력하도록 수정한다.
NewEventPage.js
export async function action({ request, params }) {
  const data = await request.formData();

  const eventData = {
    title: data.get("title"),
    image: data.get("image"),
    date: data.get("date"),
    description: data.get("description"),
  };

  const response = await fetch(`http://localhost:8080/events`, {
    method: "POST",
    headers: {
      "Content-type": "application/json",
    },
    body: JSON.stringify(eventData),
  });

  // 검증 로직 추가
  if(response.status === 422){
    return response;
  };

  if (!response.ok) {
    throw json({ message: "Could not save new event!" }, { status: 500 });
  };


  return redirect("/events");
}
백엔드의 응답객체의 상태값으로 422를 전달 받은 경우에 한에서만 응답객체를 온전히 반환하도록 코드를 수정했다.
-> 그럼 events페이지로 리디렉션과 오류를 throw하지 않을것이다.
이렇게 해당 조건에 맞게 리턴된 response는 어떤 작용을 하게 되는걸까?
loader함수처럼 action함수 또한 안에서 response 데이터를 반환할 수 있고, 그걸 컴포넌트와 페이지에서 response데이터를 사용할 수 있다.
물론 action보다는 loader에서 데이터를 반환해서 활용하는 부분이 많겠지만 내가 하려는 작업인 오류페이지에 검증오류를 표시하지 않고 현재 활성화되어있는 페이지에 오류피드백을 가볍게 주기위해선 이 방법을 사용해야한다.
NewEventPage에서 렌더링되는 EventForm컴포넌트에서 이제 action으로 부터 받은 response를 사용해보자.
이때 리엑트 라우터에서 제공하는 useActionData 훅을 사용한다!
useActionData훅은 useLoaderData훅과 거의 비슷한 역할을 한다. 바로 해당 action이 리턴해준 데이터에 접근할 수 있도록 해준다.
그리고 접근 가능한 action은 가장 가까운 action을 정의하고 생성한 페이지이다.
-> 바로 NewEventPage가 등록되어있는 라우터이다.
import { Form, useNavigate, useNavigation, useActionData } from "react-router-dom";


function EventForm({ method, event }) {

  const data = useActionData(); //data === response

  const navigate = useNavigate();
  const navigation = useNavigation();

  const isSubmitting = navigation.state === "submitting";

  const cancelHandler = () => {
    navigate("..");
  };

  return (jsx코드)
}
이렇게 설정하게 되면 response는 loader에서와 같이 리엑트 라우터에 의해 자동으로 파싱이 되며 이때 보내주는 response는 아까 action에서 설정한 검증 오류가 있을경우에 대해서 반환되는 response이다.
data에는 백엔드에서 리턴해준 데이터이며 위에서 체크했던 중첩된 오류 객체가 있고, 입력에대한 각각 다른 메시지도 설정되어있다.
그리고 나서 이제 사용자가 폼을 제출하게 되면 action이 트리거 될테고 그때 온 response의 존재 유무에 따라서 오류 메시지를 조건부 렌더링 해줄 수 있다.
import {
  Form,
  useNavigate,
  useNavigation,
  useActionData,
} from "react-router-dom";

import classes from "./EventForm.module.css";

function EventForm({ method, event }) {
  const data = useActionData();
  const navigate = useNavigate();
  const navigation = useNavigation();

  const isSubmitting = navigation.state === "submitting";

  const cancelHandler = () => {
    navigate("..");
  };

  return (
    <Form method="post" className={classes.form}>
      {data && data.errors && (
        <ul>
          {Object.values(data.errors).map((err) => (
            <li key={err}>{err}</li>
          ))}
        </ul>
      )}
      <p>
        <label htmlFor="title">Title</label>
        <input
          id="title"
          type="text"
          name="title"
          // required
          defaultValue={event && event.title}
        />
      </p>
      <p>
        <label htmlFor="image">Image</label>
        <input
          id="image"
          type="url"
          name="image"
          // required
          defaultValue={event && event.image}
        />
      </p>
      <p>
        <label htmlFor="date">Date</label>
        <input
          id="date"
          type="date"
          name="date"
          // required
          defaultValue={event && event.date}
        />
      </p>
      <p>
        <label htmlFor="description">Description</label>
        <textarea
          id="description"
          name="description"
          rows="5"
          // required
          defaultValue={event && event.description}
        />
      </p>
      <div className={classes.actions}>
        <button type="button" onClick={cancelHandler} disabled={isSubmitting}>
          Cancel
        </button>
        <button disabled={isSubmitting}>
          {isSubmitting ? "Submitting..." : "Save"}
        </button>
      </div>
    </Form>
  );
}

export default EventForm;
위와 같은식으로 백엔드에서 받을 수 있는 검증 오류 메시지를 출력하는 방법을 확인했다.
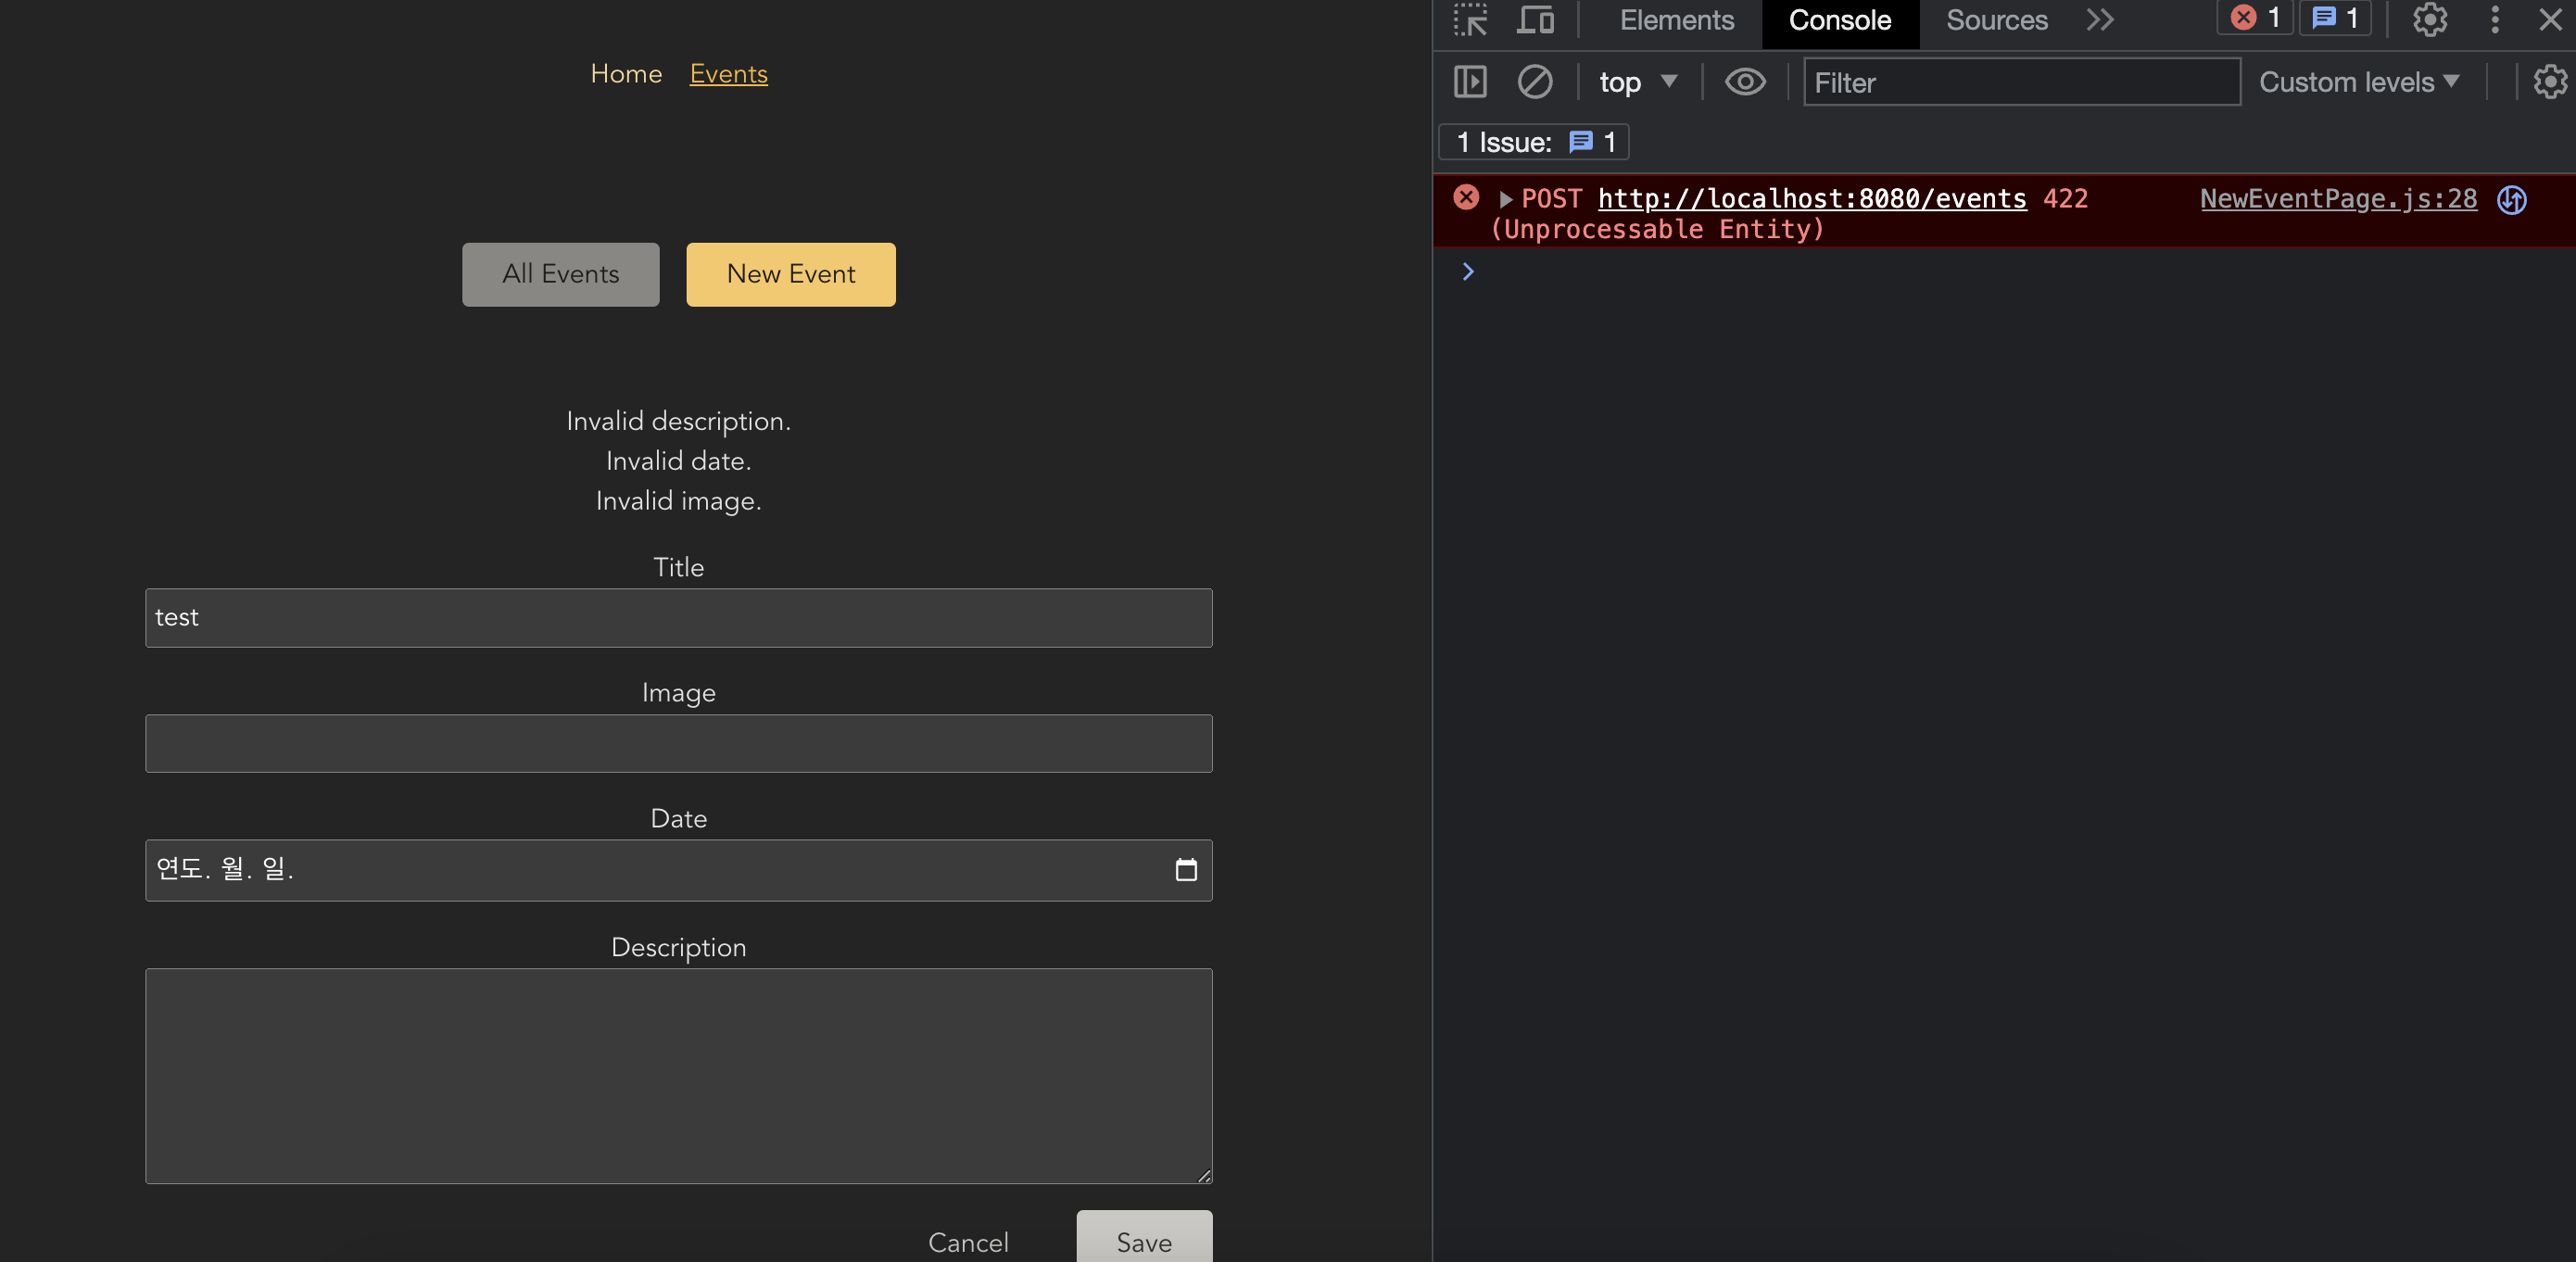
위 브라우저에서 확인해보면 title을 제외한 나머지 입력을 받지 않았을 경우 오류가 나온걸 볼 수 있다.
해당 플로우를 정리해보면, 우선 action에서 백엔드에서 받은 response를 리턴했던걸 해당 컴포넌트안에서 useActionData훅을 통해 data를 추출하여 처리를 해주었다고 이해하면 될것같다.
✔️ requset()메서드로 action 재사용하기
현재 loader와 action함수를 통해 서버와 통신하고 그에 해당하는 응답으로 여러 기능을 수행하는 로직을 구성했지만, 한가지 글을 수정하는 부분을 업데이트 하지 못했다.
즉, 수정페이지에서도 EventForm컴포넌트를 사용하여 제출을 시도하지만 해당하는 라우터에 action이 정상적으로 등록되지 않았기 때문에 오류가 난다.
사실 수정페이지에서 트리거하려는 action은 생성페이지(NewEventPage)에서 하는 action과 보내는 URL만 다르고 다른 메소드인건을 제외하고는 거의 동일하다.
그래서 따로 만들지 않고 재사용을 해볼까 한다.
기존 생성페이지에 정의한 action을 생성과 수정페이지에서 동시에 렌더링 하고 있는 이 EventForm컴포넌트로 옮겨 다시 수정하자.
EventForm.js
import {
  Form,
  useNavigate,
  useNavigation,
  useActionData,
  json, redirect
} from "react-router-dom";

import classes from "./EventForm.module.css";

function EventForm({ method, event }) {
  const data = useActionData();

  const navigate = useNavigate();
  const navigation = useNavigation();

  const isSubmitting = navigation.state === "submitting";

  const cancelHandler = () => {
    navigate("..");
  };

  return (
    <Form method={method} className={classes.form}>
      {data && data.errors && (
        <ul>
          {Object.values(data.errors).map((err) => (
            <li key={err}>{err}</li>
          ))}
        </ul>
      )}
      <p>
        <label htmlFor="title">Title</label>
        <input
          id="title"
          type="text"
          name="title"
          // required
          defaultValue={event && event.title}
        />
      </p>
      <p>
        <label htmlFor="image">Image</label>
        <input
          id="image"
          type="url"
          name="image"
          // required
          defaultValue={event && event.image}
        />
      </p>
      <p>
        <label htmlFor="date">Date</label>
        <input
          id="date"
          type="date"
          name="date"
          // required
          defaultValue={event && event.date}
        />
      </p>
      <p>
        <label htmlFor="description">Description</label>
        <textarea
          id="description"
          name="description"
          rows="5"
          // required
          defaultValue={event && event.description}
        />
      </p>
      <div className={classes.actions}>
        <button type="button" onClick={cancelHandler} disabled={isSubmitting}>
          Cancel
        </button>
        <button disabled={isSubmitting}>
          {isSubmitting ? "Submitting..." : "Save"}
        </button>
      </div>
    </Form>
  );
}

export default EventForm;

// 제출 action
export async function action({ request, params }) {
  const data = await request.formData(); // Form으로 받은 입력값들에 접근하기 위한 방법이다.
  // data.get('')

  // 다양한 입력양식을 받았다면 객체를 활요하자!
  const eventData = {
    title: data.get("title"),
    image: data.get("image"),
    date: data.get("date"),
    description: data.get("description"),
  };

  const response = await fetch(`http://localhost:8080/events`, {
    method: "POST",
    headers: {
      "Content-type": "application/json",
    },
    body: JSON.stringify(eventData),
  });

  // 백엔드에서 응답으로 준 상태가 422라면 그 오류에 대한 응답을 리턴해준다
  if (response.status === 422) {
    return response;
  }

  if (!response.ok) {
    throw json({ message: "Could not save new event!" }, { status: 500 });
  }

  return redirect("/events");
}
해당 컴포넌트에서 Form으로 렌더링하는 메소드 속성이 생성과 수정의 역할에 따라 post 혹은 patch로 사용할 수 있겠다.
-> 현재 EventForm에서 받는 props중 method가 있기때문에 기대하는 method로 Form안의 method 속성을 교체해 주어야 한다.
그리고 나서 생성과 수정페이지에 props로 각각 적절한 method를 내려준다.
NewEventPage.js
import EventForm from "../components/EventForm";

function NewEventPage() {
  return (
    <>
      <EventForm method="post" />
    </>
  );
}

export default NewEventPage;
EditEventPage.js
import { useRouteLoaderData } from "react-router-dom";

import EventForm from "../components/EventForm";

function EditEventPage() {
  const data = useRouteLoaderData("event-detail");
  const event = data.event;

  return <EventForm event={event} method="patch" />;
}

export default EditEventPage;
이렇게 해서 상황에 맞게 method에 따라 공유하는 action에서는 파라미터로 전달하는 requset객체 안에 방금 설정한 method가 있으며 이에 접근할 수 있다!!
EventForm.js
// 생성 or 수정 action
export async function action({ request, params }) {
  const formData = await request.formData(); // Form으로 받은 입력값들에 접근하기 위한 방법이다.
  // data.get('')
  const method = request.method;

  const eventData = {
    title: formData.get("title"),
    image: formData.get("image"),
    date: formData.get("date"),
    description: formData.get("description"),
  };

  let url = 'http://localhost:8080/events'; // 생성시 보내는 엔드포인트

  if(method === 'PATCH'){
    const id = params.eventId;
    url = `http://localhost:8080/events/${id}` // 수정시 보내는 엔드포인트
  }

  const response = await fetch(url, {
    method: method,
    headers: {
      "Content-type": "application/json",
    },
    body: JSON.stringify(eventData),
  });

  // 백엔드에서 응답으로 준 상태가 422라면 그 오류에 대한 응답을 리턴해준다
  if (response.status === 422) {
    return response;
  }

  if (!response.ok) {
    throw json({ message: "Could not save new event!" }, { status: 500 });
  }

  return redirect("/events");
}
이런 식으로 이 action함수를 보내는 메소드에 따라서 재사용하기 위해 유연하게 수정해 보았다.
이 action 함수가 사용해야하는 모든 라우터에서 적용 되도록 App 다시 재설정 해주도록 하자
import { action as newOrEditEventAction } from "./components/EventForm";

const router = createBrowserRouter([
  {
    path: "/",
    element: <RootPage />,
    errorElement: <ErrorPage />,
    children: [
      {
        index: true,
        element: <HomePage />,
      },
      {
        path: "events",
        element: <EventsRootPage />,
        children: [
          {
            index: true,
            element: <EventsPage />,
            loader: eventsLoader,
          },
          {
            path: ":eventId",
            id: "event-detail",
            loader: eventDetailLoader,
            children: [
              {
                index: true,
                element: <EventDetailPage />,
                action: deleteDetailAction,
              },
              {
                path: "edit",
                element: <EditEventPage />,
                action: newOrEditEventAction,
              },
            ],
          },
          {
            path: "new",
            element: <NewEventPage />,
            action: newOrEditEventAction,
          },
        ],
      },
    ],
  },
]);
이렇게 해서 다이내믹한 action을 재사용하기 위해 공통적으로 사용되고있는 폼양식 컴포넌트(EventForm)로 부터 리엑트 라우터가 제공한 Form컴포넌트에서 받은 method를 전달받았고,
이것을 action에서 requset안에서 접근하여 추출해서 적절히 백엔드로 전송하는 코드를 설정한 것이다.