
A progressive Node.js Framework
: Node.js 런타임 위에서 동작하는 TypeScript용 오픈 소스 백엔드 웹 프레임워크
TypeORM
: 객체와 관계형 데이터베이스의 데이터를 자동으로 연결 시켜주는 프레임워크라고 한다.
프로젝트 생성
nest new [프로젝트 이름]
CRUD Generator
밑의 명령어를 통해 매번 crud를 작성하지 않아도 기본적인 구조를 자동으로 생성한다.
nest g resource [폴더이름]
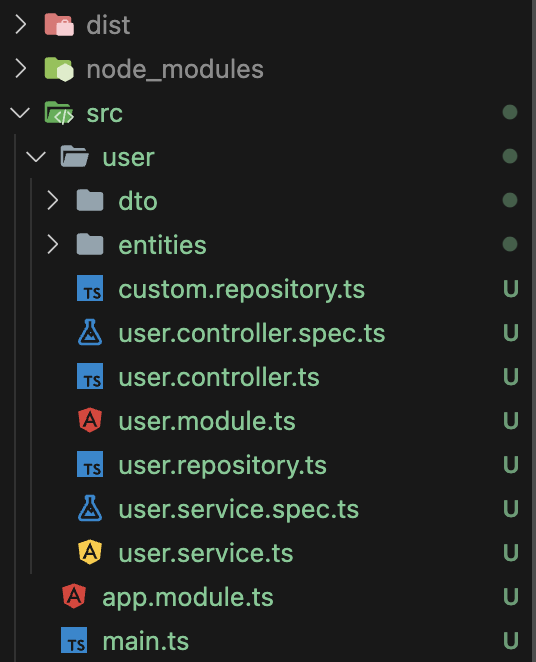
먼저 오늘 진행한 프로젝트의 구조는 이렇다.
그럼 본격적으로 시작!
User
Controller
import { Controller, Get, Post, Body, Patch, Param, Delete } from '@nestjs/common';

@Controller('user')
export class UserController {
  constructor(private readonly userService: UserService) {}

  @Post()
  create(@Body() createUserDto: CreateUserDto) {
    return this.userService.create(createUserDto);
  }

  @Get()
  findAll() {
    return this.userService.findAll();
  }

  @Get(':id')
  findOne(@Param('id') id: string) {
    return this.userService.findOne(+id);
  }

  @Patch(':id')
  update(@Param('id') id: string, @Body() updateUserDto: UpdateUserDto) {
    return this.userService.update(+id, updateUserDto);
  }

  @Delete(':id')
  remove(@Param('id') id: string) {
    return this.userService.remove(+id);
  }
}
constructor
userService를 사용하기 위하여 constructor를 정의할 수 있다. 생성자는 클래스의 인스턴스를 만들 때 호출하는 메서드이다. 생성자를 통해 외부에서 주입된 userService를 클래스 내부에서 사용할 수 있다.
Param
쿼리 스트링으로 url의 원하는 파라미터를 얻을 수 있다. 함수의 파라미터로 해당 값을 받아야 합니다. @Param("파라미터") 변수 이름 : 변수 Type으로 작성한다.
Body
SpringBoot의 RequestBody와는 다르게 @Body라는 어노테이션으로 요청한 값을 받을 수 있다. @Body() 변수 이름 : 변수 Type으로 작성한다.
NestJs가 Nodejs + Typescript 기반이라 Type을 명시해줘야한다.
Service
import { Injectable } from '@nestjs/common';
import { InjectRepository } from '@nestjs/typeorm';
import { Repository } from 'typeorm';

@Injectable()
export class UserService {
  constructor(
    @InjectRepository(User)
    private userRepository: Repository<User>
  ) {}

  async create(createUserDto: CreateUserDto): Promise<User> {
    // 1. 인스턴스 생성
    const user = this.userRepository.create(createUserDto);

    // 2. 인스턴스 Database에 저장
    return await this.userRepository.save(user);
  }

  async findAll(): Promise<User[]> {
    return await this.userRepository.find();
  }


  async findOne(id: number) : Promise<User>{
    return await this.userRepository.findOne( { where: {id}});
  }

  async update(id: number, updateUserDto: UpdateUserDto) : Promise<User> {
    // 1. 해당 아이디 유저 찾기
    const user = await this.userRepository.findOne({where : {id}});
    if (!user) {
      throw new Error("유저를 찾을 수 없습니다.");
    }

    // 2. 기존 user와 새로운 updateUserDto와 병합
    this.userRepository.update(id, updateUserDto);

    // 3. 변경사항 저장
    const updatedUser = await this.userRepository.save(user);
    return updatedUser;
  }

  async remove(id: number): Promise<void> {
    await this.userRepository.delete(id);
  }

}
Decorator
Injectable()
Injectable 데코레이터는 클래스가 의존성 주입 가능하게 해준다.
InjectRepository()
InjectRepository 데코레이터는 TypeORM 리포지토리를 주입하기 위해 사용한다.
Repository()
Repository는 TypeORM에서 데이터베이스와 상호작용하기 위한 클래스이다.
async/await
우선 비동기라는 개념부터 알고가자. 비동기는 쉽게 말하자면 A라는 작업을 처리 여부와는 상관없이 B라는 작업을 하는 것과 같다. async/await는 콜백 함수와 프로미스의 단점을 보완하고 가독성있는 코드를 작성하도록 도와준다. 이를 통해서 더 간결한 코드와, 에러를 쉽게 처리할 수 있다. 특히 API 호출과 데이터베이스를 사용할 때 주로 사용한다.
async function 함수명() {
  await 비동기_처리_메서드_명();
}
function 앞에 async를 붙이면 해당 함수는 Promise를 반환한다.
Repository
import { Repository } from "typeorm";
import { SetMetadata } from "@nestjs/common";

export const TYPEORM_CUSTOM_REPOSITORY = 'TYPEORM_CUSTOM_REPOSITORY';

export function CustomRepository(entity: Function): ClassDecorator{
    return SetMetadata(TYPEORM_CUSTOM_REPOSITORY, entity);
}
위 코드가 @EntityRepository()의 대체 코드이다.
import { extname } from "path";
import { Repository } from "typeorm";

@CustomRepository(User)
export class UserRepository extends Repository<User>{

}
얼마 전까지 @EntityRepository을 사용하여 간편하게 Repository를 만들 수 있었지만, 버전이 업그레이드 되면서 사용이 중지되었다. 하지만 커스텀 Repository를 통하여 구성할 것이다.
CustomRepository에서 정의한대로 entity를 받게 된다. 여기서는 User Entity를 뜻한다. 또한 @EntityRepository()를 대신 @CustomRepository를 주입시켜 줄 것이다.
Module
NestJs에서는 Module이라는 개념이 존재한다. @Module() 데코레이터로 주석이 달린 클래스입니다. @Module() 데코레이터는 Nest가 어플리케이션 구조를 이용하고 정리하게 해주는 메타데이터를 제공합니다.

import { Module } from '@nestjs/common';
import { TypeOrmModule } from '@nestjs/typeorm';

@Module({
  imports: [
    TypeOrmModule.forFeature([UserRepository, User])
  ],
  controllers: [UserController],
  providers: [UserService],
})
export class UserModule {}
User와 아주 밀접한 관련이 있기 때문에 같은 모듈로 묶어서 사용한다. 여기서 TypeOrmModule.forFeature 메소드가 사용되고, 이 메소드는 TypeORM에서 특정 엔티티를 모듈에 등록하고 사용할 수 있도록 한다.
Database 연동
import { Module } from '@nestjs/common';
import { TypeOrmModule } from '@nestjs/typeorm';
import { ConfigModule } from '@nestjs/config';

@Module({
  imports: [UserModule,
    ConfigModule.forRoot(),
    TypeOrmModule.forRoot({
      type: 'mysql',
      host: process.env.DB_HOST,
      port: +process.env.DB_PORT,
      username: process.env.DB_USER,
      password: process.env.DB_PASSWORD,
      entities: [User],
      database: process.env.DB_DATABASE,
      synchronize: true,
      autoLoadEntities: true
    }),
  ]
})
export class AppModule {}
forRoot() 메서드는 createConnection() 함수에 들어가게 되는 설정 값을 넣어줄 수가 있다. 따라서 env에서 설정한 DB 관련 정보들을 process.env.[변수명]을 통해 Database에 접근한다.
autoLoadEntities는 Entity를 자동으로 로딩해준다. 이때 synchronize는 true로 하면 현재 설정한 entity가 자동으로 생성된다.
참고 링크
Repository Constructor
[ExceptionHandler] Nest can't resolve dependencies of the UserService (?). Please make sure that the argument RoleRepository at index [1] is available in the UserModule context.
env 파일 설정
TypeORM
ERROR [ExceptionHandler] Nest can't resolve dependencies of the TypeOrmCoreModule (TypeOrmModuleOptions, ?). Please make sure that the argument ModuleRef at index [1] is available in the TypeOrmCoreModule context.