1. 개체명 인식
문장 내에 포함된 인물, 장소, 날짜 등을 의미하는 단어인지 인식하는 것
-
개체명 인식기: 딥러닝 모델이나 확률 모델 등을 이용해 문장에서 개체명을 인식하는 프로그램
-
BIO 표기법
- B : 개체명이 시작되는 단어에 ‘B-개체명’ 태그
- I : ‘B-개체명‘과 연결되는 단일 때 ‘I-개체명'으로 태그
- O : 게체명 이외의 모든 토큰에 태그
실습1. 개체명 인식
- 데이터: HLCT 2016에서 제공하는 말뭉치 데이터를 수정한 KoreanNERCorpus
- Code
!pip install seqeval

import matplotlib.pyplot as plt
import tensorflow as tf
from tensorflow.keras import preprocessing
from sklearn.model_selection import train_test_split
import numpy as np


# 학습 파일 불러오기
def read_file(file_name):
    sents = []
    with open(file_name, 'r', encoding='utf-8') as f:
        lines = f.readlines()
        for idx, l in enumerate(lines):
            if l[0] == ';' and lines[idx + 1][0] == '$':
                this_sent = []
            elif l[0] == '$' and lines[idx - 1][0] == ';':
                continue
            elif l[0] == '\n':
                sents.append(this_sent)
            else:
                this_sent.append(tuple(l.split()))
    return sents


# 학습용 말뭉치 데이터를 불러옴
corpus = read_file('train.txt')

# 말뭉치 데이터에서 단어와 BIO 태그만 불러와 학습용 데이터셋 생성
sentences, tags = [], []
for t in corpus:
    tagged_sentence = []
    sentence, bio_tag = [], []
    for w in t:
        tagged_sentence.append((w[1], w[3]))
        sentence.append(w[1])
        bio_tag.append(w[3])

    sentences.append(sentence)
    tags.append(bio_tag)

print("샘플 크기 : \n", len(sentences))
print("0번째 샘플 문장 시퀀스 : \n", sentences[0])
print("0번째 샘플 bio 태그 : \n", tags[0])
print("샘플 문장 시퀀스 최대 길이 :", max(len(l) for l in sentences))
print("샘플 문장 시퀀스 평균 길이 :", (sum(map(len, sentences))/len(sentences)))


# 토크나이저 정의
sent_tokenizer = preprocessing.text.Tokenizer(oov_token='OOV') # 첫 번째 인덱스에는 OOV 사용
sent_tokenizer.fit_on_texts(sentences)
tag_tokenizer = preprocessing.text.Tokenizer(lower=False) # 태그 정보는 lower= False 소문자로 변환하지 않는다.
tag_tokenizer.fit_on_texts(tags)

# 단어 사전 및 태그 사전 크기
vocab_size = len(sent_tokenizer.word_index) + 1
tag_size = len(tag_tokenizer.word_index) + 1
print("BIO 태그 사전 크기 :", tag_size)
print("단어 사전 크기 :", vocab_size)

# 학습용 단어 시퀀스 생성
x_train = sent_tokenizer.texts_to_sequences(sentences)
y_train = tag_tokenizer.texts_to_sequences(tags)
print(x_train[0])
print(y_train[0])

# index to word / index to NER 정의
index_to_word = sent_tokenizer.index_word # 시퀀스 인덱스를 단어로 변환하기 위해 사용
index_to_ner = tag_tokenizer.index_word # 시퀀스 인덱스를 NER로 변환하기 위해 사용
index_to_ner[0] = 'PAD'

# 시퀀스 패딩 처리
max_len = 40
x_train = preprocessing.sequence.pad_sequences(x_train, padding='post', maxlen=max_len)
y_train = preprocessing.sequence.pad_sequences(y_train, padding='post', maxlen=max_len)

# 학습 데이터와 테스트 데이터를 8:2 비율로 분리
x_train, x_test, y_train, y_test = train_test_split(x_train, y_train, test_size=.2, random_state=0)

# 출력 데이터를 원-핫 인코딩
y_train = tf.keras.utils.to_categorical(y_train, num_classes=tag_size)
y_test = tf.keras.utils.to_categorical(y_test, num_classes=tag_size)

print("학습 샘플 시퀀스 형상 : ", x_train.shape)
print("학습 샘플 레이블 형상 : ", y_train.shape)
print("테스트 샘플 시퀀스 형상 : ", x_test.shape)
print("테스트 샘플 레이블 형상 : ", y_test.shape)

# 모델 정의(Bi-LSTM)
from tensorflow.keras.models import Sequential
from tensorflow.keras.layers import LSTM, Embedding, Dense, TimeDistributed, Dropout, Bidirectional
from tensorflow.keras.optimizers import Adam
model = Sequential()
model.add(Embedding(input_dim=vocab_size, output_dim=30, input_length=max_len, mask_zero=True))
model.add(Bidirectional(LSTM(200, return_sequences=True, dropout=0.50, recurrent_dropout=0.25)))
model.add(TimeDistributed(Dense(tag_size, activation='softmax')))
model.compile(loss='categorical_crossentropy', optimizer=Adam(0.01), metrics=['accuracy'])
model.fit(x_train, y_train, batch_size=128, epochs=10)
print("평가 결과 : ", model.evaluate(x_test, y_test)[1])


# 시퀀스를 NER 태그로 변환
def sequences_to_tag(sequences):
    result = []
    for sequence in sequences:
        temp = []
        for pred in sequence:
            pred_index = np.argmax(pred)
            temp.append(index_to_ner[pred_index].replace("PAD", "O"))
        result.append(temp)
    return result


# 테스트 데이터셋의 NER 예측
y_predicted = model.predict(x_test) # (711, 40) => model => (711, 40, 8)
pred_tags = sequences_to_tag(y_predicted) # 예측된 NER
test_tags = sequences_to_tag(y_test) # 실제 NER

# F1 스코어 계산을 위해 사용
from seqeval.metrics import f1_score, classification_report
print(classification_report(test_tags, pred_tags))
print("F1-score: {:.1%}".format(f1_score(test_tags, pred_tags)))


# 새로운 유형의 문장 NER 예측
word_to_index = sent_tokenizer.word_index
new_sentence = '삼성전자 출시 스마트폰 오늘 애플 도전장 내밀다.'.split()
new_x = []
for w in new_sentence:
    try:
        new_x.append(word_to_index.get(w, 1))
    except KeyError:
        # 모르는 단어의 경우 OOV
        new_x.append(word_to_index['OOV'])

print("새로운 유형의 시퀀스 : ", new_x)
new_padded_seqs = preprocessing.sequence.pad_sequences([new_x], padding="post", value=0, maxlen=max_len)

# NER 예측
p = model.predict(np.array([new_padded_seqs[0]]))
p = np.argmax(p, axis=-1) # 예측된 NER 인덱스값 추출
print("{:10} {:5}".format("단어", "예측된 NER"))
print("-" * 50)

for w, pred in zip(new_sentence, p[0]):
    print("{:10} {:5}".format(w, index_to_ner[pred]))
- read_file() 함수: 학습 데이터 구조에 맞게 파일을 읽어와 문장 라인별로 토큰 번호, 단어 토큰, 품사 태그, BIO 태그 정보 불러옴
- 말뭉치 데이터에서 단어와 BIO 태그만 이용해 학습용 데이터셋을 생성
- 0번째 원본 문장에서 분리된 단어 토큰들이 sentences 리스트에 저장
- 단어 시퀀스에 해당하는 BIO 태그 정보들이 tags 리스트에 저장
- 앞서 만들어진 단어 시퀀스와 태그 시퀀스를 사전으로 만들기 위해 토크나이저를 정의한 후 fit_on_texts() 함수를 호출
- OOV: 사전에 들어있지 않은 단어
- 사전 데이터를 시퀀스 번호 형태로 인코딩
- 개체명 인식 모델의 입출력 벡터 크기를 동일하게 맞추기 위해 시퀀스 패딩 작업
- 학습과 테스트용 출력 데이터(y_train, y_test)를 태그 사전 크기에 맞게 원-핫 인코딩
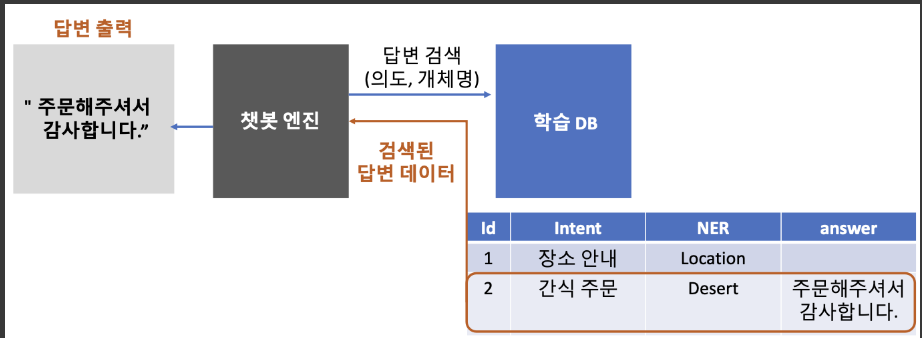
2. 챗봇 엔진 만들기
- 처리과정
1) docker image
docker pull apptools/chatbot-db:1.0
도커 이미지 조회
docker images

도커 이미지 실행 - 생성하기
docker run --privileged -d -p 3306:3306 --name chatbot-db apptools/chatbot-db:1.0
--privileged=Ture : 시스템 주요 자원에 사용 권한 부여하기 (/sbin/init 과 함께 사용)
-p : 사용할 포트
--name : 컨테이너 이름

도커 컨테이너 조회
docker ps

도커 컨테이너 안으로 들어가기
docker exec -e LC_ALL=C.UTF-8 -it chatbot-db /bin/bash
-it : 이 옵션을 줘야 컨테이너 안에서 터미널 이용 가능

MySQL 접속하기
mysql -u root -p
password : apptools

데이터베이스 생성
create database flyai;

데이터베이스 선택
use flyai;

챗봇 메시지 저장할 테이블 추가
create table chatbot(
num int not null auto_increment,
type varchar(4),
msg varchar(200),
indate varchar(50),
primary key(num)
);

desc chatbot;


챗봇 메시지 샘플 저장해보기
insert into chatbot set
type = 'bot',
msg = '안녕하세요! 저는 귀염둥이 챗봇 입니다.',
indate = now();

select * from chatbot;
2) VScode에서 데이터 조작
- 테이블 생성
import pymysql

db = None
try:
    # DB 호스트 정보에 맞게 입력해주세요
    db = pymysql.connect(host='172.23.253.35', user='root', password='apptools', charset='utf8',db='flyai')

    # 테이블 생성 sql 정의
    sql ='''
    CREATE TABLE tb_student (
        id int primary key auto_increment not null,
        name varchar(32),
        age int,
        address varchar(32)
    ) ENGINE=InnoDB DEFAULT CHARSET=utf8
    '''

    # 테이블 생성
    with db.cursor() as cursor:
        cursor.execute(sql)

except Exception as e:
    print(e)

finally:
    if db is not None:
        db.close()
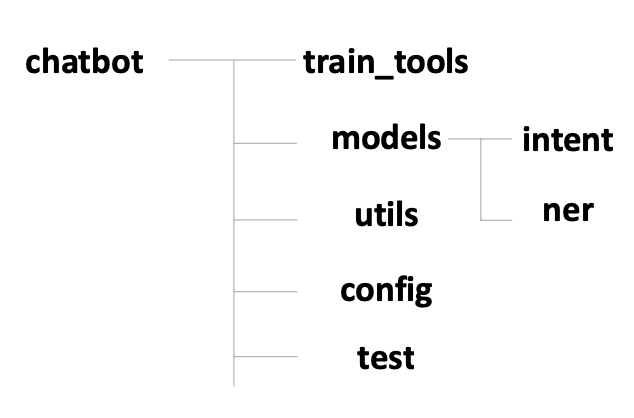
3) 프로젝트 구조
-
train_tools: 챗봇 학습툴 관련 파일
-
models: 챗봇 엔진에서 사용하는 딥러닝 모델 관련 파일
-
intent: 의도 분류 모델 관련 파일
-
ner: 개체 인식 모델 관련 파일
-
utils: 챗봇 개발에 필요한 유틸리티 라이브러리
-
config: 챗봇 개발에 필요한 설정
-
test: 챗봇 개발에 필요한 테스트 코드
-
DB 새로 만들기
CREATE TABLE IF NOT EXISTS chatbot_train_data (
    id INT UNSIGNED NOT NULL AUTO_INCREMENT,
    intent VARCHAR(45) NULL,
    ner VARCHAR(1024) NULL,
    query TEXT NULL,
    answer TEXT NOT NULL,
    answer_image VARCHAR(2048) NULL,
    PRIMARY KEY (id)
);
4) 챗봇 학습툴
- /config/DatabaseConfig.py
DB_HOST = "172.23.253.35"
DB_USER = "root"
DB_PASSWORD = "apptools"
DB_NAME = "flyai"

def DatabaseConfig():
global DB_HOST, DB_USER, DB_PASSWORD, DB_NAME- /train_tools/qna/create_train_data_table.py
import pymysql
import sys
sys.path.append('C:/FLY AI/Chatbot')
from config.DatabaseConfig import * # DB 접속 정보 불러오기

db = None
try:
		db = pymysql.connect(
					host=DB_HOST,
					user=DB_USER,
					passwd=DB_PASSWORD,
					db=DB_NAME,
					charset='utf8'
		)

		# 테이블 생성 sql 정의
		sql = '''
            CREATE TABLE IF NOT EXISTS chatbot_train_data (
                id INT UNSIGNED NOT NULL AUTO_INCREMENT,
                intent VARCHAR(45) NULL,
                ner VARCHAR(1024) NULL,
                query TEXT NULL,
                answer TEXT NOT NULL,
                answer_image VARCHAR(2048) NULL,
                PRIMARY KEY (id)
            );
		'''

		# 테이블 생성
		with db.cursor() as cursor:
				cursor.execute(sql)

except Exception as e:
		print(e)

finally:
		if db is not None:
db.close()- /train_tools/qna/chatbot_data.csv
import pymysql
import openpyxl
import sys
#sys.path.append('C:/FLY AI/Chatbot')
#from config.DatabaseConfig import * # DB 접속 정보 불러오기

DB_HOST = "172.23.253.35"
DB_USER = "root"
DB_PASSWORD = "apptools"
DB_NAME = "flyai"


# 학습 데이터 초기화
def all_clear_train_data(db):
    # 기존 학습 데이터 삭제
    sql = '''
            delete from chatbot_train_data
        '''
    with db.cursor() as cursor:
        cursor.execute(sql)

    # auto increment 초기화
    sql = '''
    ALTER TABLE chatbot_train_data AUTO_INCREMENT=1
    '''
    with db.cursor() as cursor:
        cursor.execute(sql)


# db에 데이터 저장
def insert_data(db, xls_row):
    intent, ner, query, answer, answer_img_url = xls_row

    sql = '''
        INSERT chatbot_train_data(intent, ner, query, answer, answer_image)
        values(
         '%s', '%s', '%s', '%s', '%s'
        )
    ''' % (intent.value, ner.value, query.value, answer.value, answer_img_url.value)

    # 엑셀에서 불러온 cell에 데이터가 없는 경우, null 로 치환
    sql = sql.replace("'None'", "null")

    with db.cursor() as cursor:
        cursor.execute(sql)
        print('{} 저장'.format(query.value))
        db.commit()


train_file = 'C:/FLY AI/Chatbot/train_tools/qna/train_data.xlsx'
db = None
try:
    db = pymysql.connect(
        host=DB_HOST,
        user=DB_USER,
        passwd=DB_PASSWORD,
        db=DB_NAME,
        charset='utf8'
    )

    # 기존 학습 데이터 초기화
    all_clear_train_data(db)

    # 학습 엑셀 파일 불러오기
    wb = openpyxl.load_workbook(train_file)
    sheet = wb['Sheet1']
    for row in sheet.iter_rows(min_row=2): # 해더는 불러오지 않음
        # 데이터 저장
        insert_data(db, row)

    wb.close()

except Exception as e:
    print(e)

finally:
    if db is not None:
        db.close()
5) 챗봇 엔진
- utils/Preprocess.py : 데이터 전처리
from konlpy.tag import Komoran
import pickle

class Preprocess:
	# 생성자
	def __init__(self, word2index_dic="", userdic=None):
		# 단어 인덱스 사전 불러오기
		if word2index_dic != "":
			f = open(word2index_dic, "rb")
			self.word_index = pickle.load(f)
			f.close()
		else:
			self.word_index = None

		# 형태소 분석기 초기화
		self.komoran = Komoran(userdic=userdic)

		# 제외할 품사
		# 참조: https://docs.komoran.kr/firststep/postypes.html
		self.exclusion_tags = [
			"JKS", "JKC", "JKG", "JKO", "JKB", "JKV", "JKQ", "JX", "JC", # 관계언 제거
			"SF", "SP", "SS", "SE", "SO", # 기호 제거
			"EP", "EF", "EC", "ETN", "ETM", # 어미 제거
			"XSN", "XSV", "XSA", # 접미사 제거
		]

	# 형태소 분석기 POS tagger (래퍼 함수)
	def pos(self, sentence):
		return self.komoran.pos(sentence)

	# 불용어 제거 후 필요한 품사 정보만 가져오기
	def get_keywords(self, pos, without_tag=False):
		f = lambda x: x in self.exclusion_tags
		word_list = []
		for p in pos:
			if f(p[1]) is False: # 불용어 리스트에 없는 경우에만 저장
				word_list.append(p if without_tag is False else p[0])
		return word_list

	# 키워드를 단어 인덱스 시퀀스로 변환
	def get_wordidx_sequence(self, keywords):
		if self.word_index is None:
			return []
		w2i = []
		for word in keywords:
			try:
				w2i.append(self.word_index[word])
			except KeyError:
				# 해당 단어가 사전에 없는 경우 OOV 처리
				w2i.append(self.word_index["OOV"])
return w2i- /train_tools/dict/create_dict.py
import sys
sys.path.append('/mnt/c/FLY AI/Chatbot')
from utils.Preprocess import Preprocess
from keras import preprocessing
import pickle

# 말뭉치 데이터 읽어오기
def read_corpus_data(filename):
	with open(filename, "r", encoding="UTF-8") as f:
		data = [line.split("\t") for line in f.read().splitlines()]
		data = data[1:] # 헤더 제거
	return data

# 말뭉치 데이터 가져오기
corpus_data = read_corpus_data("/mnt/c/FLY AI/Chatbot/train_tools/dict/corpus.txt")

# 말뭉치 데이터에서 키워드만 추출해서 사전 리스트 생성
p = Preprocess()
dict = []
for c in corpus_data:
	pos = p.pos(c[1])
	for k in pos:
		dict.append(k[0])

# 사전에 사용될 단어 인덱스 딕셔너리(word_index) 생성
tokenizer = preprocessing.text.Tokenizer(oov_token="OOV")
tokenizer.fit_on_texts(dict)
word_index = tokenizer.word_index

# 사전 파일 생성
f = open("chatbot_dict.bin", "wb")
try:
	pickle.dump(word_index, f)
except Exception as e:
	print(e)
finally:
	f.close()