
1. AWS LoadBalancer Controller?
AWS Load Balancer Controller is a controller to help manage Elastic Load Balancers for a Kubernetes cluster.
- It satisfies Kubernetes Ingress resources by provisioning Application Load Balancers.
- It satisfies Kubernetes Service resources by provisioning Network Load Balancers.
AWS Loadbalancer Controller는 ELB와 연계하여 k8s Ingress, Serivce와 연계하는 기능을 제공한다.
우선, 기존 Serive의 Loadbalancer type과 비교를 해보자.
[Loadbalancer]
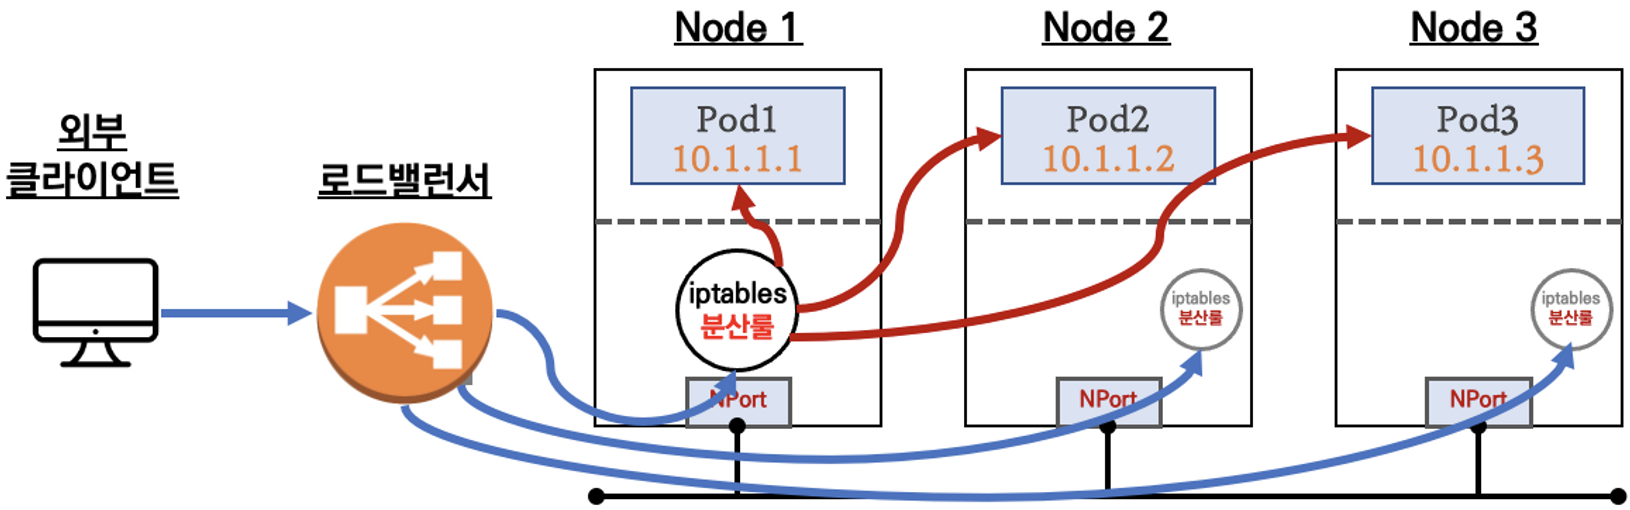
기존 Loadbalancer type의 서비스는 클라이언트 요청이 왔을 때 Node로 분기를 해주는데, 각 Node의 iptables 분산룰에 따라 Target Pod에 요청을 전달한다.
[AWS Loadbalancer Controller]
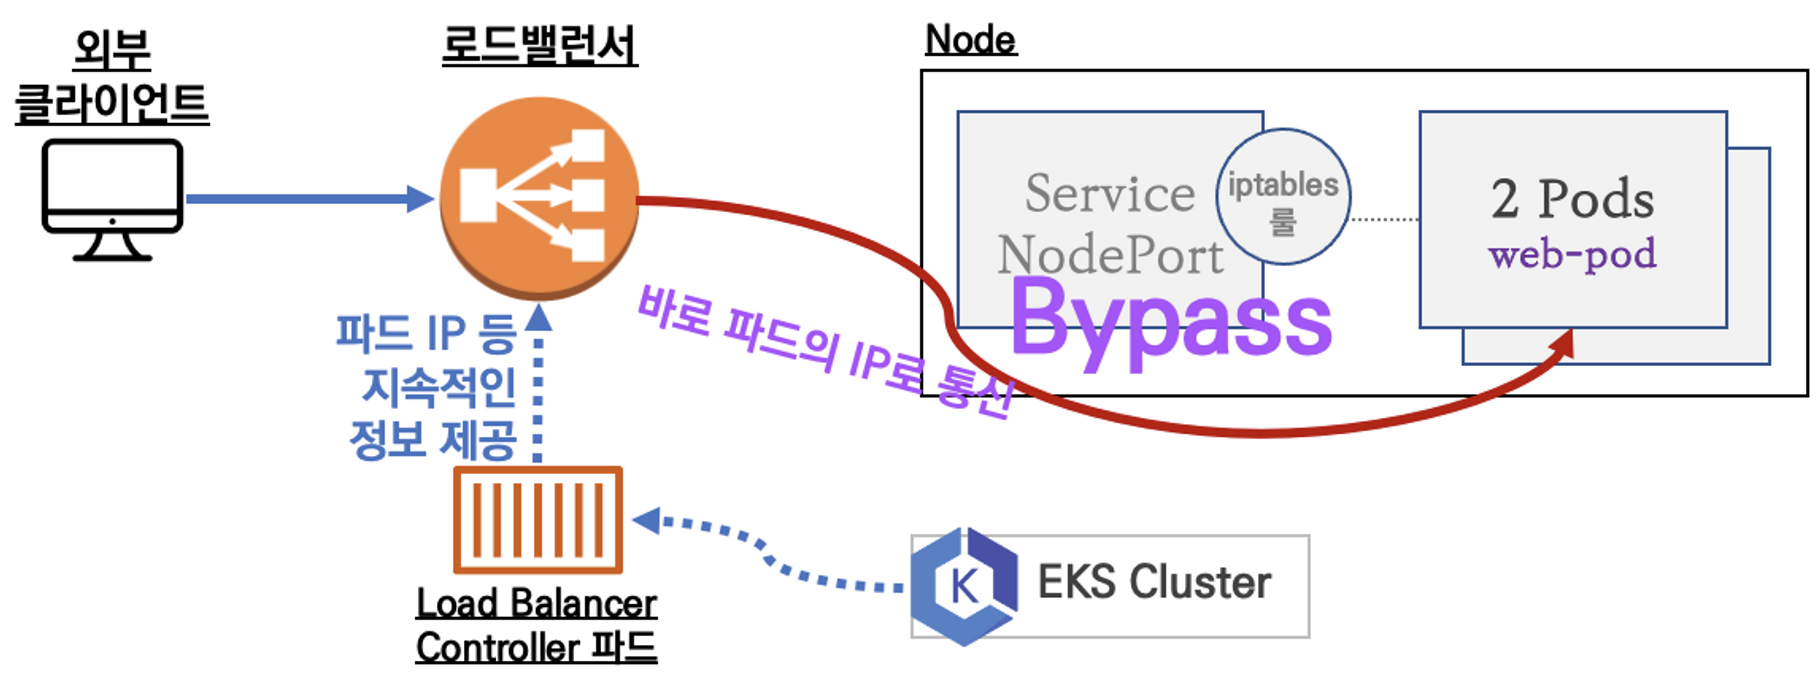
AWS Loadbalancer Controller는 기존과 다르게 Node의 iptables 분산룰을 Loadbalancer Controller Pod가 대신하여, 클라이언트 요청을 Target Pod로 바로 Bypass 되게하는 이점이 있다.
이전 포스팅에서 설명했던 AWS VPC CNI 사용 시 Pod간 통신의 네트워크 홉이 한단계 줄어든 것과 같은 이점을 갖게 되어 네트워크 성능이 더 좋을 수 있겠다.
각 Node의 iptables 분산룰에 저장,수정,삭제가 필요가 없으므로 안정성이 보장만 된다면, 훨씬 좋은 네트워크를 유지할 수 있을 것이다.
2.실습하기
# 작업용 EC2 - 디플로이먼트 & 서비스 생성
cat ~/pkos/2/echo-service-nlb.yaml | yh
kubectl apply -f ~/pkos/2/echo-service-nlb.yaml
AWS VPC CNI (이전포스팅)의 cloudformation으로 배포를 했다면 위와 같은 yaml파일이 있을 것이다. Deployment와 Service가 있다.
IAM Policy와 Role도 이전 포스팅 내용이 적용되었다고 생각한다.
apiVersion: apps/v1
kind: Deployment
metadata:
  name: deploy-echo
spec:
  replicas: 2
  selector:
    matchLabels:
      app: deploy-websrv
  template:
    metadata:
      labels:
        app: deploy-websrv
    spec:
      terminationGracePeriodSeconds: 0
      containers:
      - name: akos-websrv
        image: k8s.gcr.io/echoserver:1.5
        ports:
        - containerPort: 8080
---
apiVersion: v1
kind: Service
metadata:
  name: svc-nlb-ip-type
  annotations:
    service.beta.kubernetes.io/aws-load-balancer-nlb-target-type: ip
    service.beta.kubernetes.io/aws-load-balancer-scheme: internet-facing
    service.beta.kubernetes.io/aws-load-balancer-healthcheck-port: "8080"
    service.beta.kubernetes.io/aws-load-balancer-cross-zone-load-balancing-enabled: "true"
spec:
  ports:
    - port: 80
      targetPort: 8080
      protocol: TCP
  type: LoadBalancer
  loadBalancerClass: service.k8s.aws/nlb
  selector:
    app: deploy-websrv
Service에서 AWS Loadbalancer Controller를 나타내는 것은 annotation으로 세팅할 수 있는데, service.beta.kubernetes.io/aws-load-balancer-nlb-target-type 값이 ip이면, AWS Loadbalancer Controller 이고, instance면 기본적인 Loadbalancer가 등록이 된다.
# 확인
kubectl get deploy,pod
kubectl get crd
kubectl get svc,ep,ingressclassparams,targetgroupbindings
kubectl get targetgroupbindings -o json | jq

# AWS ELB(NLB) 정보 확인
aws elbv2 describe-load-balancers | jq
aws elbv2 describe-load-balancers --query 'LoadBalancers[*].State.Code' --output text

# 웹 접속 주소 확인
kubectl get svc svc-nlb-ip-type -o jsonpath={.status.loadBalancer.ingress[0].hostname} | awk '{ print "Pod Web URL = http://"$1 }'

------------------------------
# CLB에 ExternanDNS 로 도메인 연결
kubectl annotate service svc-nlb-ip-type "external-dns.alpha.kubernetes.io/hostname=nginx.$KOPS_CLUSTER_NAME"

# 확인
dig +short nginx.$KOPS_CLUSTER_NAME
kubectl logs -n kube-system -l k8s-app=external-dns

# 웹 접속 주소 확인 및 접속
echo -e "Nginx Web URL = http://nginx.$KOPS_CLUSTER_NAME"
------------------------------

# 파드 로깅 모니터링
kubectl logs -l app=deploy-websrv -f

# 분산 접속 확인
NLB=$(kubectl get svc svc-nlb-ip-type -o jsonpath={.status.loadBalancer.ingress[0].hostname})
curl -s $NLB
for i in {1..100}; do curl -s $NLB | grep Hostname ; done | sort | uniq -c | sort -nr
     53 Hostname: deploy-echo-5c4856dfd6-4f8s4
     47 Hostname: deploy-echo-5c4856dfd6-95plj

# 지속적인 접속 시도 : 아래 상세 동작 확인 시 유용(패킷 덤프 등)
while true; do curl -s --connect-timeout 1 $NLB | egrep 'Hostname|client_address'; echo "----------" ; date "+%Y-%m-%d %H:%M:%S" ; sleep 1; done
참고로, 위 실습에서 External DNS는 Service에 annotation만 추가해서, 자동으로 DNS Record를 추가해주는 기능을 한다.
실습 결과를 보면, 100번 호출 시 Target Pod로 모든 요청이 잘 들어가고 있다. 그러면 정말로 NLB에서 바로 Pod로 트래픽을 쏴주는 지 확인해보자.
Pod IP 확인
k get po -owide
NAME                           READY   STATUS    RESTARTS   AGE   IP              NODE                  NOMINATED NODE   READINESS GATES
deploy-echo-5c4856dfd6-4f8s4   1/1     Running   0          11m   172.30.62.210   i-05bcd0c33e3822d67   <none>           <none>
deploy-echo-5c4856dfd6-95plj   1/1     Running   0          11m   172.30.89.213   i-084bcce46543d44d7   <none>           <none>
NLB의 Target Group 확인
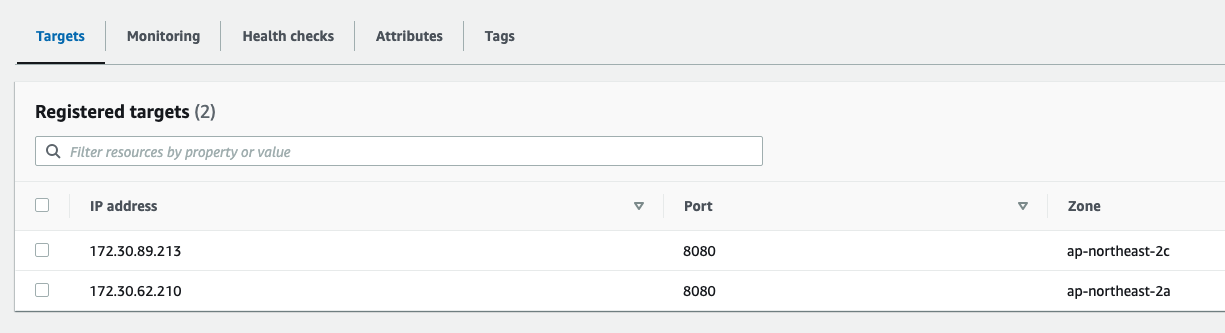
IP가 일치한다! 이렇게 트래픽이 Bypass 되는 것이다. 그럼 Deployment 수를 늘려서 테스트해보자.
kubectl scale deployment deploy-echo --replicas=3
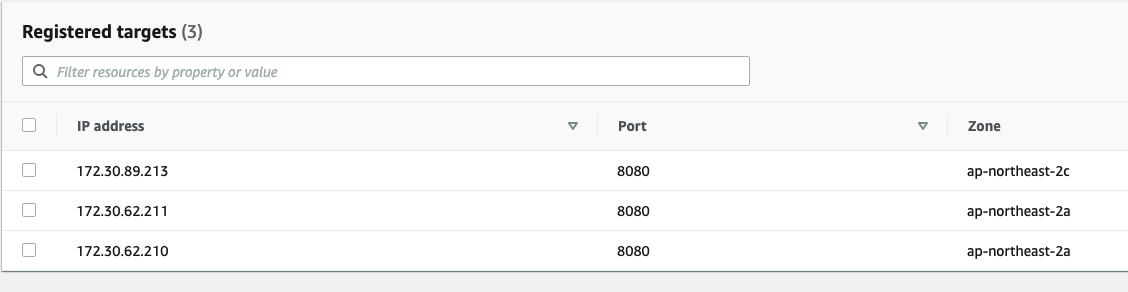
바로 target group이 3개로 늘어났다. 트래픽이 새로 생긴 Pod에 전달되기 까지는 몇초가 걸리긴 한다. 처음에는 기존 2개의 Pod로만 트래픽이 가다가, target group의 healthy status가 healthy로 바뀐 후 부터 새로운 파드로 트래픽이 가는 것이다.
2-1. AWS Loadbalancer Controller + Ingress (ALB) IP 모드 동작 with AWS VPC CNI
보통 k8s에서 네트워크를 구성할 때, Ingress-Service-Deployment 조합을 많이 사용하는데, 이때도 AWS Loadbalancer Controller를 사용할 수 있다.
$ cat ~/pkos/3/ingress1.yaml

apiVersion: v1
kind: Namespace
metadata:
  name: game-2048
---
apiVersion: apps/v1
kind: Deployment
metadata:
  namespace: game-2048
  name: deployment-2048
spec:
  selector:
    matchLabels:
      app.kubernetes.io/name: app-2048
  replicas: 2
  template:
    metadata:
      labels:
        app.kubernetes.io/name: app-2048
    spec:
      containers:
      - image: public.ecr.aws/l6m2t8p7/docker-2048:latest
        imagePullPolicy: Always
        name: app-2048
        ports:
        - containerPort: 80
---
apiVersion: v1
kind: Service
metadata:
  namespace: game-2048
  name: service-2048
spec:
  ports:
    - port: 80
      targetPort: 80
      protocol: TCP
  type: NodePort
  selector:
    app.kubernetes.io/name: app-2048
---
apiVersion: networking.k8s.io/v1
kind: Ingress
metadata:
  namespace: game-2048
  name: ingress-2048
  annotations:
    alb.ingress.kubernetes.io/scheme: internet-facing
    alb.ingress.kubernetes.io/target-type: ip
spec:
  ingressClassName: alb
  rules:
    - http:
        paths:
        - path: /
          pathType: Prefix
          backend:
            service:
              name: service-2048
              port:
                number: 80
Service는 기존방식대로 NodePort 또는 ClusterIP로 두고, Ingress의 annotation alb.ingress.kubernetes.io/target-type 값을 ip로 둔다.
$ kubectl get targetgroupbindings -n game-2048

NAME                               SERVICE-NAME   SERVICE-PORT   TARGET-TYPE   AGE
k8s-game2048-service2-85c505d625   service-2048   80             ip            7m27s
targetgroupbindings이 생성된 것을 볼 수 있다. 이놈이 바로 AWS에서 target group를 건들이는 녀석이다.
3.권한확인
자, 그럼 어떻게 이런일이 가능한 것인가? 먼저 AWS Loadbalacer Controller는 2가지 종류의 권한이 있어야 한다.
위에서 본 그림을 다시 보면,
AWS Loadbalancer Controller는 AWS NLB의 Target group을 관리할 수 있는 권한이 있어야하고, k8s에서도 endpoint를 가져올 수 있는 권한이 있어야한다.
AWS 권한은 위에서 IAM Policy와 Role로 해결이 되었는데, k8s는 어떻게 한 것일까?
$ kubectl describe clusterrolebindings.rbac.authorization.k8s.io aws-load-balancer-controller-rolebinding

Name:         aws-load-balancer-controller-rolebinding
Labels:       addon.kops.k8s.io/name=aws-load-balancer-controller.addons.k8s.io
              app.kubernetes.io/managed-by=kops
              app.kubernetes.io/name=aws-load-balancer-controller
              k8s-addon=aws-load-balancer-controller.addons.k8s.io
Annotations:  <none>
Role:
  Kind:  ClusterRole
  Name:  aws-load-balancer-controller-role
Subjects:
  Kind            Name                          Namespace
  ----            ----                          ---------
  ServiceAccount  aws-load-balancer-controller  kube-system
aws-load-balancer-controller-rolebinding 을 describe 해보면 aws-load-balancer-controller-role 이라는 clusterrole이 바인딩 되어있음을 알 수 있다.
다시 이 clusterrole을 describe 해보자.
$ kubectl describe clusterroles.rbac.authorization.k8s.io aws-load-balancer-controller-role

Name:         aws-load-balancer-controller-role
Labels:       addon.kops.k8s.io/name=aws-load-balancer-controller.addons.k8s.io
              app.kubernetes.io/managed-by=kops
              app.kubernetes.io/name=aws-load-balancer-controller
              k8s-addon=aws-load-balancer-controller.addons.k8s.io
Annotations:  <none>
PolicyRule:
  Resources                                 Non-Resource URLs  Resource Names  Verbs
  ---------                                 -----------------  --------------  -----
  targetgroupbindings.elbv2.k8s.aws         []                 []              [create delete get list patch update watch]
  events                                    []                 []              [create patch]
  services                                  []                 []              [get list patch update watch]
  ingresses.extensions                      []                 []              [get list patch update watch]
  ingresses.networking.k8s.io               []                 []              [get list patch update watch]
  endpoints                                 []                 []              [get list watch]
  namespaces                                []                 []              [get list watch]
  nodes                                     []                 []              [get list watch]
  pods                                      []                 []              [get list watch]
  endpointslices.discovery.k8s.io           []                 []              [get list watch]
  ingressclassparams.elbv2.k8s.aws          []                 []              [get list watch]
  ingressclasses.networking.k8s.io          []                 []              [get list watch]
  pods/status                               []                 []              [patch update]
  services/status                           []                 []              [patch update]
  targetgroupbindings.elbv2.k8s.aws/status  []                 []              [patch update]
  ingresses.extensions/status               []                 []              [patch update]
  ingresses.networking.k8s.io/status        []                 []              [patch update]
endpoints에 대한 조회권한이 있는 것을 볼 수 있다. 결국 이렇게 권한 세팅이 되어 있어서 AWS Loadbalancer Controller가 위와 같은 작업을 할 수 있는 것이다.
Wrap up
AWS Loadbalancer Controller에 대해서 배웠다. 확실히 iptables 분산룰이 아닌 crd(targetgroupbindings)가 target group을 세팅해줘서 트래픽이 Bypass 되는 것은 큰 장점인 것 같다.
AWS 콘솔에서도 정확히 target group을 확인해 볼 수 있어서 직관적인 것 같기도 하다. 다만, Bypass 되는 것이 실사용자 관점에서 차이를 느낄 수 있는 지가 의문이다.
일반적인 Loadbalancer type의 Service에서도 externalTrafficPolicy 설정에 따라 네트워크를 거치는 단계가 달라지는데, 이게 정말 사용자 체감상 빠르게 느껴지는가가 항상 궁금했다.
이런 부분은 측정방법이나 차이점을 조금 더 공부해 봐야겠다.