
이번 포스팅에서는 kops로 구축한 AWS기반 k8s의 Storage에 대한 내용이다. 포스팅은 PKOS 스터디에서 '24단계 실습으로 정복하는 쿠버네티스' 책과 함께 진행되는 내용임을 밝힌다.
실습환경은 AWS VPC CNI 포스팅을 참고한다.
1. AWS Instance Store
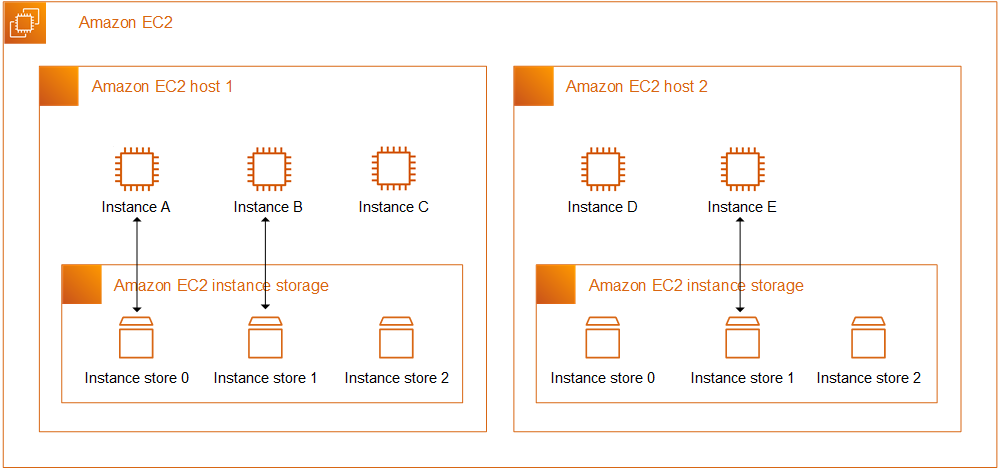
Instance Store 정의
An instance store provides temporary block-level storage for your instance. This storage is located on disks that are physically attached to the host computer. Instance store is ideal for temporary storage of information that changes frequently, such as buffers, caches, scratch data, and other temporary content.
Instance Store는 중요하지 않은 캐시,버퍼 등의 임시 데이터를 저장하는 용도로 쓰이는 저장소이다. Host에 위치하고 있으며, 수명 주기는 아래와 같다.
수명주기
- 기본 디스크 드라이브 오류
- 인스턴스가 중지됨
- 인스턴스가 최대 절전 모드로 전환됨
- 인스턴스가 종료됨
Host가 재부팅되는 것은 데이터를 유지해주는데, 위 조건에서는 데이터가 유실되게 된다.
2. Instance Store 세팅
그럼 실제로 Instance Store가 어떻게 구성이 되어있는지 확인해보자.
# 인스턴스 스토어 볼륨이 있는 c5 모든 타입의 스토리지 크기
aws ec2 describe-instance-types \
 --filters "Name=instance-type,Values=c5*" "Name=instance-storage-supported,Values=true" \
 --query "InstanceTypes[].[InstanceType, InstanceStorageInfo.TotalSizeInGB]" \
 --output table

 --------------------------
|  DescribeInstanceTypes |
+---------------+--------+
|  c5d.12xlarge |  1800  |
|  c5d.large    |  50    |
|  c5d.4xlarge  |  400   |
|  c5d.18xlarge |  1800  |
|  c5d.24xlarge |  3600  |
|  c5d.2xlarge  |  200   |
|  c5d.xlarge   |  100   |
|  c5d.metal    |  3600  |
|  c5d.9xlarge  |  900   |
+---------------+--------+

# 워커 노드 Public IP 확인
$ aws ec2 describe-instances --query "Reservations[*].Instances[*].{PublicIPAdd:PublicIpAddress,InstanceName:Tags[?Key=='Name']|[0].Value}" --filters Name=instance-state-name,Values=running --output table

# 워커 노드 Public IP 변수 지정
$ W1PIP=<워커 노드 1 Public IP>
$ W2PIP=<워커 노드 2 Public IP>

# 워커 노드 스토리지 확인 : NVMe SSD 인스턴스 스토어 볼륨 확인
$ ssh -i ~/.ssh/id_rsa ubuntu@$W1PIP sudo apt install -y nvme-cli
$ ssh -i ~/.ssh/id_rsa ubuntu@$W2PIP sudo apt install -y nvme-cli

$ ssh -i ~/.ssh/id_rsa ubuntu@$W1PIP sudo nvme list
Node             SN                   Model                                    Namespace Usage                      Format           FW Rev
---------------- -------------------- ---------------------------------------- --------- -------------------------- ---------------- --------
/dev/nvme0n1     vol0a9c68ab487549d1c Amazon Elastic Block Store               1         137.44  GB / 137.44  GB    512   B +  0 B   1.0
/dev/nvme1n1     AWS222656CF40062552F Amazon EC2 NVMe Instance Storage         1          50.00  GB /  50.00  GB    512   B +  0 B   0

$ ssh -i ~/.ssh/id_rsa ubuntu@$W2PIP sudo nvme list
Node             SN                   Model                                    Namespace Usage                      Format           FW Rev
---------------- -------------------- ---------------------------------------- --------- -------------------------- ---------------- --------
/dev/nvme0n1     vol046a4f920dad771e7 Amazon Elastic Block Store               1         137.44  GB / 137.44  GB    512   B +  0 B   1.0
/dev/nvme1n1     AWS21BF9F69DC5D1BA56 Amazon EC2 NVMe Instance Storage         1          50.00  GB /  50.00  GB    512   B +  0 B   0
Worker Node가 c5.large type 이므로, 위 표와 같이, /dev/nvme1n1 에 50GB가 할당되어 있다. 참고로, nvme는 SSD의 한 종류라고 할 수 있는 것 같다.
Instance Store는 바로 사용이 불가능하다. 파일시스템을 만들고, 마운트를 해야 비로소 사용이 가능하다. 그럼, 할당되어 있는 Instance Store에 파일시스템 생성 및 마운트 작업을 해보자.
# 파일시스템 생성 및 /data 마운트
$ ssh -i ~/.ssh/id_rsa ubuntu@$W1PIP sudo mkfs -t xfs /dev/nvme1n1
$ ssh -i ~/.ssh/id_rsa ubuntu@$W2PIP sudo mkfs -t xfs /dev/nvme1n1
$ ssh -i ~/.ssh/id_rsa ubuntu@$W1PIP sudo mkdir /data
$ ssh -i ~/.ssh/id_rsa ubuntu@$W2PIP sudo mkdir /data
$ ssh -i ~/.ssh/id_rsa ubuntu@$W1PIP sudo mount /dev/nvme1n1 /data
$ ssh -i ~/.ssh/id_rsa ubuntu@$W2PIP sudo mount /dev/nvme1n1 /data
$ ssh -i ~/.ssh/id_rsa ubuntu@$W1PIP df -hT -t ext4 -t xfs
$ ssh -i ~/.ssh/id_rsa ubuntu@$W2PIP df -hT -t ext4 -t xfs

Filesystem     Type  Size  Used Avail Use% Mounted on
/dev/root      ext4  124G  3.4G  121G   3% /
/dev/nvme1n1   xfs    47G  365M   47G   1% /data
파일시스템은 리눅스에서 데이터를 보다 빠르고 안정적으로 찾을 수 있게하는 기능이라고 한다. 위 mkfs의 -t xfs 의 의미는 xfs 타입의 파일시스템을 만들라는 뜻인데, 인스턴스 스토어 볼륨을 인스턴스에서 사용 가능하도록 만들기에서 xfs 타입을 사용하고 있다.
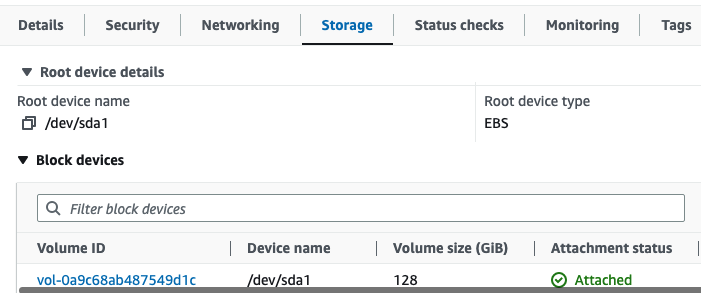
그리고, Instance Store는 EC2의 Storage 콘솔에 나타나지 않는다.
3. Instance Store host-path Volume
이제 host에 Instance Store가 세팅되었으니, 실제로 파드를 생성해서 데이터가 보존이 되는 지 확인해보자.
먼저 host directory를 StorageClass로 등록하고, PV/PVC와 연동되게 하기 위해 local-path-provider를 설치해준다.
# 마스터노드의 이름 확인해두기
kubectl get node | grep control-plane | awk '{print $1}'
i-066cdb714fc6545c0

# 배포 : vim 직접 편집할것
curl -s -O https://raw.githubusercontent.com/rancher/local-path-provisioner/v0.0.23/deploy/local-path-storage.yaml
vim local-path-storage.yaml
----------------------------
# 아래 빨간 부분은 추가 및 수정
apiVersion: apps/v1
kind: Deployment
metadata:
  name: local-path-provisioner
  namespace: local-path-storage
spec:
  replicas: 1
  selector:
    matchLabels:
      app: local-path-provisioner
  template:
    metadata:
      labels:
        app: local-path-provisioner
    spec:
      nodeSelector:
        kubernetes.io/hostname: "<각자 자신의 마스터 노드 이름 입력>"
      tolerations:
        - effect: NoSchedule
          key: node-role.kubernetes.io/control-plane
          operator: Exists
...
kind: ConfigMap
apiVersion: v1
metadata:
  name: local-path-config
  namespace: local-path-storage
data:
  config.json: |-
    {
            "nodePathMap":[
            {
                    "node":"DEFAULT_PATH_FOR_NON_LISTED_NODES",
                    "paths":["/data/local-path"]
            }
            ]
    }
----------------------------

# 배포
kubectl apply -f local-path-storage.yaml

# 확인 : 마스터노드에 배포됨
kubectl get-all -n local-path-storage
kubectl get pod -n local-path-storage -owide
kubectl describe cm -n local-path-storage local-path-config
kubectl get sc local-path
NAME         PROVISIONER             RECLAIMPOLICY   VOLUMEBINDINGMODE      ALLOWVOLUMEEXPANSION   AGE
local-path   rancher.io/local-path   Delete          WaitForFirstConsumer   false                  7m9s
local-path-provider로 StorageClass가 설정되었으면, 이제 PV/PVC를 사용하여, Pod 마운트를 해보자.
# PVC 생성
cat ~/pkos/3/localpath1.yaml | yh
kubectl apply -f ~/pkos/3/localpath1.yaml

# PVC 확인
kubectl get pvc
kubectl describe pvc

# 파드 생성
cat ~/pkos/3/localpath2.yaml | yh
kubectl apply -f ~/pkos/3/localpath2.yaml

# 파드 확인 : df-pv는 인스턴스 스토어라서 정보가 나오지 않음 >> 뒤 EBS Ctrl PV/PVC 실습에서는 확인됨
kubectl get pod,pv,pvc
kubectl krew install df-pv && kubectl df-pv
kubectl exec -it app -- tail -f /data/out.txt
Fri Mar 17 11:21:00 UTC 2023
Fri Mar 17 11:21:05 UTC 2023
Fri Mar 17 11:21:10 UTC 2023
Fri Mar 17 11:21:15 UTC 2023
Fri Mar 17 11:21:20 UTC 2023
Fri Mar 17 11:21:25 UTC 2023
Fri Mar 17 11:21:30 UTC 2023
Fri Mar 17 11:21:35 UTC 2023
Fri Mar 17 11:21:40 UTC 2023
Fri Mar 17 11:21:45 UTC 2023
...

# 워커노드에 툴 설치
ssh -i ~/.ssh/id_rsa ubuntu@$W1PIP sudo apt install -y tree jq sysstat
ssh -i ~/.ssh/id_rsa ubuntu@$W2PIP sudo apt install -y tree jq sysstat

# 워커노드 중 현재 파드가 배포되어 있다만, 아래 경로에 out.txt 파일 존재 확인
ssh -i ~/.ssh/id_rsa ubuntu@$W1PIP tree /data
/data
└── local-path
    └── pvc-5709bc63-b4b4-4bdd-a1c6-cf35053a4b33_default_localpath-claim
        └── out.txt

2 directories, 1 file

# 해당 워커노드 자체에서 out.txt 파일 확인 : 아래 굵은 부분은 각자 실습 환경에 따라 다름
ssh -i ~/.ssh/id_rsa ubuntu@$W1PIP tail -f /data/local-path/pvc-5709bc63-b4b4-4bdd-a1c6-cf35053a4b33_default_localpath-claim/out.txt
Fri Mar 17 11:22:45 UTC 2023
Fri Mar 17 11:22:50 UTC 2023
Fri Mar 17 11:22:55 UTC 2023
Fri Mar 17 11:23:00 UTC 2023
Fri Mar 17 11:23:05 UTC 2023
로그가 잘 찍히고 있다. 그럼, 생성된 Pod를 삭제 후 다시 실행했을 때 데이터가 보존되는 지 확인해보자.
# 파드 삭제 후 PV/PVC 확인
kubectl delete pod app
kubectl get pod,pv,pvc
ssh -i ~/.ssh/id_rsa ubuntu@$W1PIP tree /data
ssh -i ~/.ssh/id_rsa ubuntu@$W2PIP tree /data

# 파드 다시 실행
kubectl apply -f ~/pkos/3/localpath2.yaml

# 확인
kubectl  exec -it app -- head /data/out.txt
Fri Mar 17 11:18:15 UTC 2023
Fri Mar 17 11:18:20 UTC 2023
Fri Mar 17 11:18:25 UTC 2023
kubectl  exec -it app -- tail -f /data/out.txt
기존 데이터가 잘 유지된다! 당연한 결과인데, local path provider로 PV/PVC와 연계를 하는게 신기하다.
4.Volume 성능 측정
kubestr로 방금 생성한 local-ptah의 성능 측정을 해보자.
# kubestr 툴 다운로드
wget https://github.com/kastenhq/kubestr/releases/download/v0.4.37/kubestr_0.4.37_Linux_amd64.tar.gz
tar xvfz kubestr_0.4.37_Linux_amd64.tar.gz && mv kubestr /usr/local/bin/ && chmod +x /usr/local/bin/kubestr

# 스토리지클래스 점검
kubestr -h
kubestr

# 모니터링
watch 'kubectl get pod -owide;echo;kubectl get pv,pvc'
ssh -i ~/.ssh/id_rsa ubuntu@$W1PIP iostat -xmdz 1 -p nvme1n1
ssh -i ~/.ssh/id_rsa ubuntu@$W2PIP iostat -xmdz 1 -p nvme1n1
--------------------------------------------------------------
# rrqm/s : 초당 드라이버 요청 대기열에 들어가 병합된 읽기 요청 횟수
# wrqm/s : 초당 드라이버 요청 대기열에 들어가 병합된 쓰기 요청 횟수
# r/s : 초당 디스크 장치에 요청한 읽기 요청 횟수
# w/s : 초당 디스크 장치에 요청한 쓰기 요청 횟수
# rMB/s : 초당 디스크 장치에서 읽은 메가바이트 수
# wMB/s : 초당 디스크 장치에 쓴 메가바이트 수
# await : 가장 중요한 지표, 평균 응답 시간. 드라이버 요청 대기열에서 기다린 시간과 장치의 I/O 응답시간을 모두 포함 (단위: ms)
iostat -xmdz 1 -p xvdf
Device:         rrqm/s   wrqm/s     r/s     w/s    rMB/s    wMB/s avgrq-sz avgqu-sz   await r_await w_await  svctm  %util
xvdf              0.00     0.00 2637.93    0.00    10.30     0.00     8.00     6.01    2.28    2.28    0.00   0.33  86.21
--------------------------------------------------------------

# 측정 : Read
curl -s -O https://raw.githubusercontent.com/wikibook/kubepractice/main/ch10/fio-read.fio
kubestr fio -f fio-read.fio -s local-path --size 10G

# [NVMe] 4k 디스크 블록 기준 Read 평균 IOPS는 20309 >> 4분 정도 소요
kubestr fio -f fio-read.fio -s local-path --size 10G

# 측정 : Write
curl -s -O https://raw.githubusercontent.com/wikibook/kubepractice/main/ch10/fio-write.fio
sed -i '/directory/d' fio-write.fio
kubestr fio -f fio-write.fio -s local-path --size 10G
kubestr로 성능측정 시 각 노드의 nvme1n1에 iostat 커맨드를 통해 테스트를 실시간으로 확인 할 수 있다.
결과화면
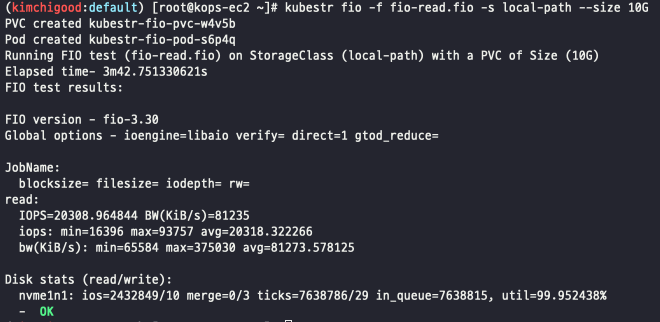
IOPS가 평균 20318이 나왔다. kubestr은 정말 유용한 플러그인 같다.
Wrap up
스토리지 스터디 역시 배울 게 많았다. PV/PVC, k8s Volume에 대해 다시 한 번 더 개념확인을 할 수 있었다. 특히 kubestr은 현업에서도 정말 유용할 것 같다. 프로젝트를 진행할 때 이렇게 볼륨을 붙여다 쓰면, CSP에서 제공하는 docs의 IOPS값을 참고해서, 이정도면 되겠지.. 했었는데, 이런 툴로 미리 테스트해본다면 더욱 정확히 눈으로 확인할 수 있으니.. 후~ 열공하자.