기존의 EDA는 주로 tabular data를 처리하는 내용이었다.
Computer Vision 분야에서는 당연하게도 이미지 데이터에 대한 EDA를 진행해야 한다.
이미지 데이터 EDA
이미지 데이터에 대한 EDA는 아래 단계를 거치게 된다.
Target 중심 : 분포 위주의 초기 비교
- 범주 또는 값의 분포가 균등하지 않고 편향되어 있는지?
- 특정 범주의 이미지의 수가 지나치게 적지는 않은지?
- 전체 이미지의 개수가 적지는 않은지?
Input 중심 : 도메인 지식을 활용하여 이미지 데이터 개별 확인
Process 중심 : 전처리 → 모델 → 결과 해석 반복
이미지 데이터 전처리
우리가 이용할 수 있는 이미지 데이터 라이브러리로는 OpenCV, PIL, scikit-image, albumentations, torchvision, scipy 등이 있다.
먼저 이미지를 하나 불러오자.
import requests
from PIL import Image
from io import BytesIO

img_url = 'https://images.pexels.com/photos/1056251/pexels-photo-1056251.jpeg'

response = requests.get(img_url)
img = Image.open(BytesIO(response.content))
img_np = np.array(img)

# from matplotlib import pyplot as plt
# plt.imshow(img)
with torchvision
torchvision은 PyTorch에 기반하여 이미지를 전처리하는 라이브러리이다.
from torchvision import transforms

# Define transformation functions
t1 = transforms.ColorJitter(brightness=n)    # 밝기 조정
t2 = transforms.ColorJitter(contrast=n)    # 대비 조정
t3 = transforms.ColorJitter(saturation=n)    # 채도 조정
t4 = transforms.ColorJitter(hue=n)    # 색상 조정

# transform the image
newimg1 = t1(img)
newimg2 = t2(img)
newimg3 = t3(img)
newimg4 = t4(img)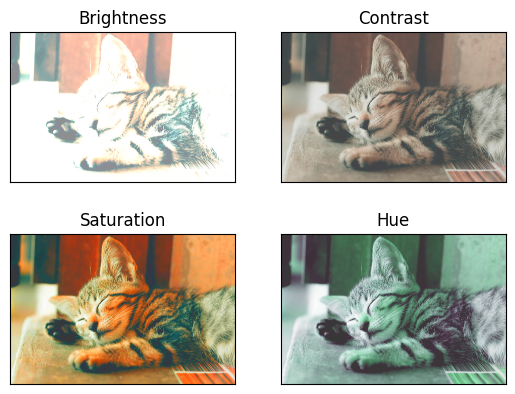
with Albumentations
이미지 전처리 등의 다양한 기능을 포함하고 있는, 데이터 증강에 특화된 라이브러리이다.
import albumentations

# Define transformation functions
t1 = albumentations.HorizontalFlip(p=1)     # 좌우 반전
t2 = albumentations.ShiftScaleRotate(p=1)   # 이미지 이동/크기 조절/회전
t3 = albumentations.CLAHE(p=1)    # 색도 분표 균등화 적용
t4 = albumentations.ChannelDropout(p=1)    # 색상 채널을 임의로 drop
t5 = albumentations.ChannelShuffle(p=1)    # RGB를 임의로 설정
t6 = albumentations.RandomCrop(height=2400, width=3000)

# transform the image
newimg1 = t1(image=img_np)['image']
newimg2 = t2(image=img_np)['image']
newimg3 = t3(image=img_np)['image']
newimg4 = t4(image=img_np)['image']
newimg5 = t5(image=img_np)['image']
newimg6 = t6(image=img_np)['image']
* parameter p는 documentation을 확인해보니 "probability of applying the transform. Default: 0.5." 라고 하는데 그러면 p=0.5면 50%의 확률로 뒤집어지지 않을 수도 있다는 뜻인가....?
이외에도 아래와 같은 기능들이 있으므로 필요에 따라 사용할 수 있다.
Cutout: 이미지 일부 영역 제거CoarseDropout: 이미지 일부 영역에 랜덤 사각형 추가GaussianBlur: 이미지에 Gaussian Blur (흐림) 효과 추가Normalize: 이미지의 픽셀 값을 정규화Resize: 이미지의 크기 조정Rotate: 이미지를 일정 각도로 회전BrightnessContrast: 이미지의 밝기와 대비 조절ColorJitter: 이미지의 색상, 채도, 밝기 등을 무작위로 변경
Let it code