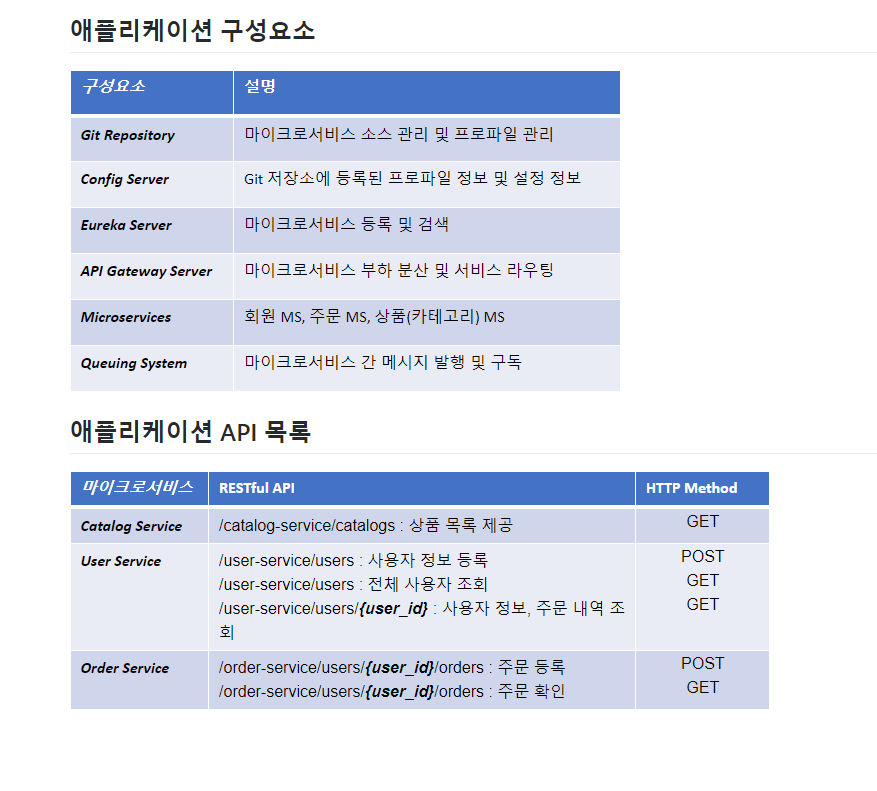
- Catalog-service : 상품조회
- User-Service: 사용자조회, 주문확인
- Order-service : 상품 주문
- User service <>Order service : 주문조회
- OrderServce <> CatalogService : 상품 수량 업데이트 > 이때 kafka로 데이터 동기화
- OrderService는 kafka에 produce한다(수량), Catalog service는 subscribe한다(수량)
터미널에서 eureka 실행하기
eurkea directory로 이동 >
mvn spring-boot:run//build가 되어있다며 java -jar ./target/jar파일입력 으로 실행yml 파일 등록된거 갖고오는 방법
1.생성자로 environemt를 주입받는다
private Environment env;

@Autowired
    public UserController(Environment env) {
        this.env = env;
    }

@GetMapping("/welcome")
    public String welcome(){
        return env.getProperty("greeting.message");
    }
- @Value를 이용한다.
@Component
@Data
//@AllArgsConstructor
//@NoArgsConstructor
public class Greeting {
    @Value("${greeting.message}")
    private String message;

}

@GetMapping("/welcome")
    public String welcome(){
        return greeting.getMessage();
    }
부팅시 db자동생성을 위해 다운그레이드 버전을 사용
<dependency>
            <groupId>com.h2database</groupId>
            <artifactId>h2</artifactId>
            <version>1.3.176</version>
            <scope>runtime</scope>
        </dependency>
Controller
package com.example.usersmicroservices1.controller;
import com.example.usersmicroservices1.Service.UserService;
import com.example.usersmicroservices1.dto.UserDto;
import com.example.usersmicroservices1.vo.Greeting;
import com.example.usersmicroservices1.vo.RequestUser;
import com.example.usersmicroservices1.vo.ResponseUser;
import org.modelmapper.ModelMapper;
import org.modelmapper.convention.MatchingStrategies;
import org.springframework.beans.factory.annotation.Autowired;
import org.springframework.core.env.Environment;
import org.springframework.http.HttpStatus;
import org.springframework.http.ResponseEntity;
import org.springframework.web.bind.annotation.*;
@RestController
@RequestMapping("/")
public class UserController {
private Environment env;
private UserService userService;
@Autowired
private Greeting greeting;
@Autowired
public UserController(Environment env, UserService userService) {
this.env = env;
this.userService = userService;
}
@GetMapping("/health_check")
public String status(){
return "It's Wokring in User Service";
}
// @GetMapping("/welcome")
// public String welcome(){
// return env.getProperty("greeting.message");
// }
@GetMapping("/welcome")
public String welcome(){
return greeting.getMessage();
}
@PostMapping("/users")
public ResponseEntity<ResponseUser> creatUser(@RequestBody RequestUser user){ //requestUser를 받아서 파라미터로 받음
ModelMapper mapper = new ModelMapper();
mapper.getConfiguration().setMatchingStrategy(MatchingStrategies.STRICT); //mapper환경설정해주고
UserDto userDto = mapper.map(user, UserDto.class); //모델 멥퍼로 request user -> userdto로 변환
userService.createUser(userDto); //서비스로 전달
ResponseUser responseUser = mapper.map(userDto, ResponseUser.class); //response 객체로 반환해서 body에 추가하여 보냄
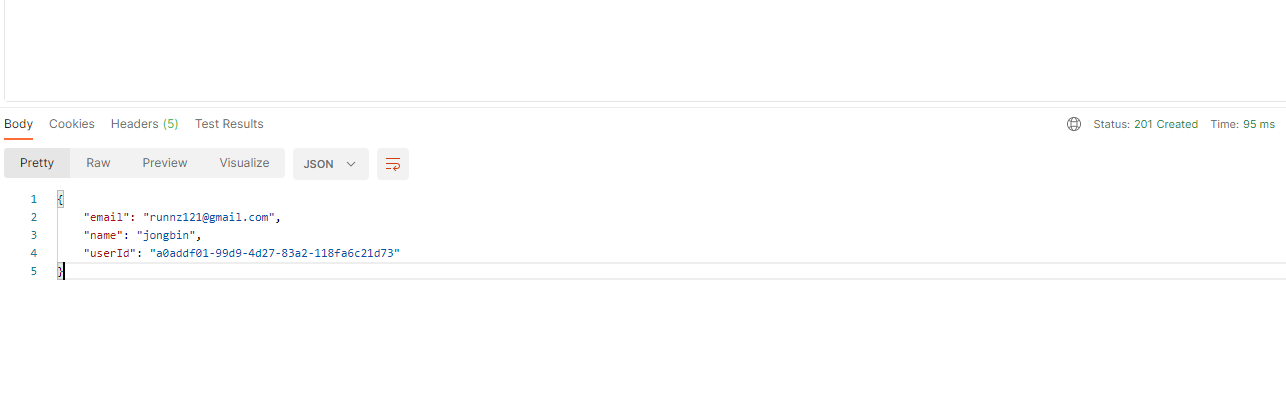
return ResponseEntity.status(HttpStatus.CREATED).body(responseUser);
}
}UserDto
package com.example.usersmicroservices1.dto;

import lombok.Data;

import java.util.Date;

@Data
public class UserDto {
    private String email;
    private String name;
    private String pwd;
    private String userId;
    private Date createAt;

    private String encryptedPwd;
}
UserEntity
package com.example.usersmicroservices1.jpa;

import lombok.Data;

import javax.persistence.*;

@Data
@Entity
@Table(name ="users")
public class UserEntity {

    @Id
    @GeneratedValue(strategy = GenerationType.IDENTITY)
    private Long id;

    @Column(nullable = false, length = 50, unique = true)
    private String email;

    @Column(nullable = false, length = 50)
    private String name;

    @Column(nullable = false, unique = true)
    private String userId;

    @Column(nullable = false, unique = true)
    private String encryptedPwd;
}
UserRepository
package com.example.usersmicroservices1.jpa;

import org.springframework.data.repository.CrudRepository;

public interface UserRepository extends CrudRepository<UserEntity, Long> {

}
WebSecurity
package com.example.usersmicroservices1.security;

import org.springframework.context.annotation.Configuration;
import org.springframework.security.config.annotation.web.builders.HttpSecurity;
import org.springframework.security.config.annotation.web.configuration.EnableWebSecurity;
import org.springframework.security.config.annotation.web.configuration.WebSecurityConfigurerAdapter;

@Configuration //이렇게 등록하면 다른 bean들보다 우선선위를 갖고 작동된다.
@EnableWebSecurity //security용도로 사용
public class WebSecurity extends WebSecurityConfigurerAdapter {

    @Override
    protected void configure(HttpSecurity http) throws Exception {
        http.csrf().disable();
        http.authorizeRequests().antMatchers("/users/**").permitAll();

        http.headers().frameOptions().disable(); //frame옵션을 disable함으로서 h2 console사용가능

    }
}
UserService
package com.example.usersmicroservices1.Service;

import com.example.usersmicroservices1.dto.UserDto;

public interface UserService {
    UserDto createUser(UserDto userDto);
}
UserServiceImpl
package com.example.usersmicroservices1.Service;

import com.example.usersmicroservices1.dto.UserDto;
import com.example.usersmicroservices1.jpa.UserEntity;
import com.example.usersmicroservices1.jpa.UserRepository;
import org.modelmapper.ModelMapper;
import org.modelmapper.convention.MatchingStrategies;
import org.modelmapper.spi.MatchingStrategy;
import org.springframework.beans.factory.annotation.Autowired;
import org.springframework.security.crypto.bcrypt.BCryptPasswordEncoder;
import org.springframework.stereotype.Service;

import java.util.UUID;

@Service
public class UserServiceImpl implements UserService{

    UserRepository userRepository;
    BCryptPasswordEncoder passwordEncoder;

    @Autowired //스프링이 기동되면서 등록할 수 있는 빈을 찾아서 메모리에 생성해주는 것이다.
    public UserServiceImpl(UserRepository userRepository, BCryptPasswordEncoder passwordEncoder){ //이것도 초기화가 되어있어야 주입이 되는데 주입이 안되면 에러남
        this.userRepository = userRepository;
        this.passwordEncoder = passwordEncoder;
    }

    @Override
    public UserDto createUser(UserDto userDto) {
        userDto.setUserId(UUID.randomUUID().toString());

        //model mapper를 통해 request요청을 dto로 변환 , entity로 변환할 수 있다.

        ModelMapper mapper = new ModelMapper();
        mapper.getConfiguration().setMatchingStrategy(MatchingStrategies.STRICT); //모델 메퍼가  변환시, 얼마나 정확하게 매칭되게끔 할지 정하는 전략환경설정을 지정
        UserEntity userEntity = mapper.map(userDto, UserEntity.class); //mapper의 map메소드를 통해 userdto를 userentity.class로 변환시킬 수 있다.
        userEntity.setEncryptedPwd(passwordEncoder.encode(userDto.getPwd()));
        userRepository.save(userEntity);

        UserDto returnUserDto = mapper.map(userEntity, UserDto.class);

        return returnUserDto;
    }
}
RequestUser
package com.example.usersmicroservices1.vo;

import lombok.Data;
import org.hibernate.validator.constraints.EAN;

import javax.validation.constraints.Email;
import javax.validation.constraints.NotNull;
import javax.validation.constraints.Size;

@Data
public class RequestUser {

    @NotNull(message = "Email cannot be null")
    @Size(min = 2, message = "Email not be less than two characters")
    @Email
    private String email;

    @NotNull(message = "Name cannot be null")
    @Size(min = 2, message = "Name not be less than two characters")
    private String name;

    @NotNull(message = "Password cannot be null")
    @Size(min = 8, message = "Password not be less than 8 characters")
    private String pwd;
}
Response User
package com.example.usersmicroservices1.vo;

import lombok.Data;

@Data
public class ResponseUser {

    private String email;

    private String name;

    private String userId;
}
application.yml
server:
  port: 0

spring:
  application:
    name: user-service
  h2:
    console:
      enabled: true
      settings:
        web-allow-others: true #외부 접속 여부
      path: /h2-console #접속할 주소
  datasource: # 테이블 자동 생성을 위한 설정!!!
    driver-class-name: org.h2.Driver
    url: jdbc:h2:mem:testdb
#    username: sa
#

eureka:
  instance:
    instance-id: ${spring.application.name}:${spring.application.instance-id:${random.value}}
  client:
    register-with-eureka: true
    fetch-registry: true
    service-url:
      defaultZone: http://127.0.0.1:8761/eureka

greeting:
message: Welcome to the Simple E-commerce.- Request → Dto → Entity의 과정을 Mapper을 통해 해결할 수 있다.
- service도 service interface 와 impl클래스 2개로 만들어서 interface안에 구현할 클래스를 명시해놓고 impl에 구현하는것이 좋다.
- 반환타입의 dto를 만들어서 반환하는 것이 좋다.
- jpa 사용시 CRUDRepository<관련엔티티, 해당엔티티의 ID값이 타입> 을 적어준다
반환타입이 지정한 대로 잘 나왔다, 상태코드까지
스프링 시큐리티 작업
Authentication + Authorization
- spring security 추가
- WebSecurityConfiguerAdapter를 상속 받는 security Configuration클래스 생성
- @EnableWebSecurity추가
- Authentication → configure(AuthenticationManagerBuidler auth)메서드 재정의
- PasswordEncode를 위한 BcryptPasswordEncoder 재정의
- Authorizaion→ configurer(HttpSecurity http)메서드 재정의
Catalogs and Orders Microservice
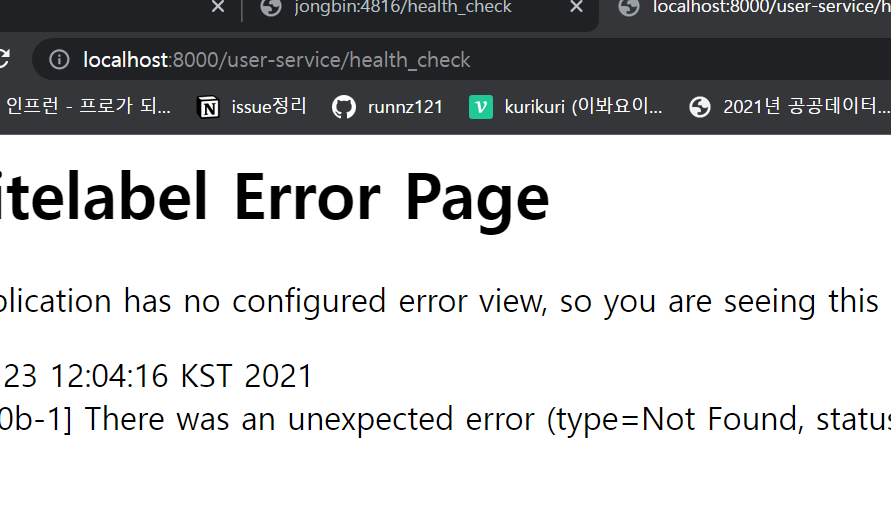
- user service를 현재 작동중인 포트로 호출시 잘 작동된다
- localhost:4869/health_check → 정상작동
- 그런데 apigateway 를 통해서 yml파일에 명시해 놓은 id로 호출하면 404 에러뜬다
```jsx
routes:
- id: user-service #user-service에 대한 라우팅 설정
uri: lb://USER-SERVICE # 유레카에 등록된 서비스를 적어줘야 함
predicates:
- Path=/user-service/**
```
왜?
user service의 uri와 api gateway가 다르기 때문
user-service/health_check 가 api gateway로 가고 이게 user service로 가게되는데,
user service 컨트롤러에는
```jsx
@GetMapping("/health_check")
public String status(){
return String.format( "It's Wokring in User Service on PORT %s",env.getProperty("local.server.port"));
}
```
이렇게 heatlh_check만으로 getmaping이 된다 따라서 이것을 아래와 바꿔준다
```jsx
@GetMapping("/user-service/health_check")
public String status(){
return String.format( "It's Wokring in User Service on PORT %s",env.getProperty("local.server.port"));
}
```
@JsonInclude → json객체에서null값은 취급하지 않는다.
```java
List<ResponseUser> result =newArrayList<>();
userList.forEach(v -> {
//v가 들어왔을떄(리스트 안에 있는 단일값) 어떻게 할지 {}안에 구현해서 쓰면됨
}
이렇게 쓰면 userEntity 를 responseUser로 ModelMapper를 이용해서 바꿀 수 있다.
@GetMapping("/users")
public ResponseEntity<List<ResponseUser>> getUsers(){
Iterable<UserEntity> userList = userService.getUserByAll();
List<ResponseUser> result = new ArrayList<>();
userList.forEach(v -> {
result.add(new ModelMapper().map(v, ResponseUser.class));
});
return ResponseEntity.status(HttpStatus.OK).body(result);
}
```
OrderService에 주문 넣기

# Users Microservice ➁ 로그인 구현
AuthenticationFilter → 로그인 요청시 작업을 처리해줌
1. Authentication → usernamepasswordAuthenticationFilter 를 상속 받음 → 인증관련
2. websecurity → 권한에 관련(인증 후 처리되는 곳) → authenticationfilter→configuer구현
```java
package com.example.usersmicroservices1.vo;
import lombok.Data;
import javax.validation.constraints.Email;
import javax.validation.constraints.NotNull;
import javax.validation.constraints.Size;
@Data
public class RequestLogin {
@NotNull(message = "Email cannot be null")
@Size(min = 2, message = "Email not be less than two characters")
@Email
private String email;
@NotNull(message = "Password cannot be null")
@Size(min = 8, message = "Password must be equals or grater than 8 characters")
private String password;
}
```
```java
package com.example.usersmicroservices1.security;
import com.example.usersmicroservices1.vo.RequestLogin;
import com.fasterxml.jackson.databind.ObjectMapper;
import org.springframework.security.authentication.UsernamePasswordAuthenticationToken;
import org.springframework.security.core.Authentication;
import org.springframework.security.core.AuthenticationException;
import org.springframework.security.web.authentication.UsernamePasswordAuthenticationFilter;
import javax.servlet.FilterChain;
import javax.servlet.ServletException;
import javax.servlet.http.HttpServletRequest;
import javax.servlet.http.HttpServletResponse;
import java.io.IOException;
import java.util.ArrayList;
public class AuthenticationFilter extends UsernamePasswordAuthenticationFilter {
//로그인 요청이 들어왔을시 처리하는 메소드
@Override
public Authentication attemptAuthentication(HttpServletRequest request,
HttpServletResponse response) throws AuthenticationException {
try{
//어떠한 값이 들어왔을때 그 값을 java.class타입으로 변경시켜 주기 위해 사용
//post형태로 전달되는 것은 RequestParam으로 전달 받을 수가 없다!
//따라서 inputstreamd으로 받으면 수작업으로 처리할 수 있다.
RequestLogin credentials = new ObjectMapper().readValue(request.getInputStream(), RequestLogin.class);
//사용자 이름과 패스워드를 security가 사용하도록 token으로 바꿔주는 작업이 필요함
//arraylist는 권한용
//작성한 것을 인증을 얻기 위해 authenticaftionmanager로 보냄(get) -> 아이디와 패스워드를 비교해줌
return getAuthenticationManager()
.authenticate(
new UsernamePasswordAuthenticationToken(
credentials.getEmail(),
credentials.getPassword(),
new ArrayList<>()
)
);
} catch (IOException e){
throw new RuntimeException(e);
}
}
//성공시 처리할 메소드
//로그인 성공시 어떠한 처리를 해줄 것인지를 정의(ex토큰 발급, 토큰 완료시간, 반환값 등등)
@Override
protected void successfulAuthentication(HttpServletRequest request,
HttpServletResponse response,
FilterChain chain,
Authentication authResult) throws IOException, ServletException {
}
}
```
```java
package com.example.usersmicroservices1.security;
import com.example.usersmicroservices1.Service.UserService;
import com.netflix.discovery.converters.Auto;
import org.springframework.beans.factory.annotation.Autowired;
import org.springframework.context.annotation.Configuration;
import org.springframework.core.env.Environment;
import org.springframework.security.config.annotation.authentication.builders.AuthenticationManagerBuilder;
import org.springframework.security.config.annotation.web.builders.HttpSecurity;
import org.springframework.security.config.annotation.web.configuration.EnableWebSecurity;
import org.springframework.security.config.annotation.web.configuration.WebSecurityConfigurerAdapter;
import org.springframework.security.crypto.bcrypt.BCryptPasswordEncoder;
import javax.servlet.Filter;
@Configuration //이렇게 등록하면 다른 bean들보다 우선선위를 갖고 작동된다.
@EnableWebSecurity //security용도로 사용
public class WebSecurity extends WebSecurityConfigurerAdapter {
private UserService userService;
private BCryptPasswordEncoder bCryptPasswordEncoder;
private Environment env;
@Autowired
public WebSecurity(UserService userService, BCryptPasswordEncoder bCryptPasswordEncoder, Environment env){
this.userService=userService;
this.bCryptPasswordEncoder = bCryptPasswordEncoder;
this.env =env;
}
//권한에 관련한 설정(http security)
@Override
protected void configure(HttpSecurity http) throws Exception {
http.csrf().disable();
//http.authorizeRequests().antMatchers("/users/**").permitAll();
http.authorizeRequests().antMatchers("/**") //모든 코드를 통과시키지 않음
.hasIpAddress("172.31.80.1")//아이피 제약조건 설정
.and()
.addFilter(getAuthenticationFilter()); //필터를 추가 -> 이 필터를 통과하면 그제서야 서비스 이용가능
http.headers().frameOptions().disable(); //frame옵션을 disable함으로서 h2 console사용가능
}
//여기서 AuthenticationFilter는 우리가 만든 필터인데, 이 클래스는 어차피 filter를 상속 받았기 때문에 상관없다.
private AuthenticationFilter getAuthenticationFilter() throws Exception
{
//authenticationFilter로 반환하기 위해 인스턴스 생성
AuthenticationFilter authenticationFilter = new AuthenticationFilter();
authenticationFilter.setAuthenticationManager(authenticationManager()); //->인증 처리를 위해 manager를 사용
return authenticationFilter;
}
//인증 설정을 위함함 (authenticationManager builder)
//select pwd from users where email =?
//db_pwd(encrypted) == input_pwd(encrypted)
@Override
protected void configure(AuthenticationManagerBuilder auth) throws Exception {
//userdetailservice -> 사용자 이름과 비밀번호를 갖고옴(select부분을 이게 처리)
auth.userDetailsService(userService).passwordEncoder(bCryptPasswordEncoder);
}
}
```
```java
@Service
public class UserServiceImpl implements UserService{
UserRepository userRepository;
BCryptPasswordEncoder passwordEncoder;
//userservicedetials 구현
//username == email
@Override
public UserDetails loadUserByUsername(String username) throws UsernameNotFoundException {
UserEntity userEntity = userRepository.findByEmail(username);
if (userEntity == null){
throw new UsernameNotFoundException(username);
}
//security user 객체
//모두 검색이 잘 되었다면 해당 유저를 반환하겠다
//마지막은 권한값
return new User(userEntity.getEmail(), userEntity.getEncryptedPwd(),
true, true, true, true, new ArrayList<>());
}
@Autowired //스프링이 기동되면서 등록할 수 있는 빈을 찾아서 메모리에 생성해주는 것이다.
public UserServiceImpl(UserRepository userRepository, BCryptPasswordEncoder passwordEncoder){ //이것도 초기화가 되어있어야 주입이 되는데 주입이 안되면 에러남
this.userRepository = userRepository;
this.passwordEncoder = passwordEncoder;
}
```

### 시큐리티 기동과정
1. 먼저 @Configuragion이라고 붙은 클래스들이 메뫼레 올라간다(여기선 websecurity.class)
2. 그다음 AuthenticationFilter extends UsernamePasswordAuthenticatinfilter .class 가 실행된다
3. 여기서 atttemptAuthentcation()이 실행됨
4. 그 다음 UsernamePasswordAuthenticationToken으로 자바언어로 변경(email, password를 변경)
5. UserDetailService클래스의 loadUserByUsername()메서드가 실행됨
6. 여기서 repository에서 findbyEmail로 해당 유저를 db에서 검색함
7. 그리고 이 값을 User객체로 변환
8. 성공했으면 AuthenticationFilter의 successfulAuthentication()이 실행됨
9. successfulauthenticaion메서드에서 jwt를 생성함
10. 그리고 이 jwt를 클라이언트에 반환
```java
@Slf4j
public class AuthenticationFilter extends UsernamePasswordAuthenticationFilter {
private UserService userService;
private Environment env;
public AuthenticationFilter(AuthenticationManager authenticationManager,
UserService userService,
Environment env) {
super.setAuthenticationManager(authenticationManager); //부모클래스가 갖고있는 이 객체를 여기서 set으로 바꿔 직접 전달할 수 있음
this.userService = userService;
this.env = env;
}
//로그인 요청이 들어왔을시 처리하는 메소드
@Override
public Authentication attemptAuthentication(HttpServletRequest request,
HttpServletResponse response) throws AuthenticationException {
try{
//어떠한 값이 들어왔을때 그 값을 java.class타입으로 변경시켜 주기 위해 사용
//post형태로 전달되는 것은 RequestParam으로 전달 받을 수가 없다!
//따라서 inputstreamd으로 받으면 수작업으로 처리할 수 있다.
RequestLogin credentials = new ObjectMapper().readValue(request.getInputStream(), RequestLogin.class);
//사용자 이름과 패스워드를 security가 사용하도록 token으로 바꿔주는 작업이 필요함
//arraylist는 권한용
//작성한 것을 인증을 얻기 위해 authenticaftionmanager로 보냄(get) -> 아이디와 패스워드를 비교해줌
return getAuthenticationManager()
.authenticate(
new UsernamePasswordAuthenticationToken(
credentials.getEmail(),
credentials.getPassword(),
new ArrayList<>()
)
);
} catch (IOException e){
throw new RuntimeException(e);
}
}
//성공시 처리할 메소드
//로그인 성공시 어떠한 처리를 해줄 것인지를 정의(ex토큰 발급, 토큰 완료시간, 반환값 등등)
@Override
protected void successfulAuthentication(HttpServletRequest request,
HttpServletResponse response,
FilterChain chain,
Authentication authResult) throws IOException, ServletException {
//생성된 user객체에서 정보를 빼옴 -> 캐스팅해서 빼옴
String userName = ((User)authResult.getPrincipal()).getUsername();
UserDto userDetails = userService.getUserDetailsByEmail(userName);
//jwt token생성
String token = Jwts.builder()
.setSubject(userDetails.getUserId())
.setExpiration(new Date(System.currentTimeMillis() +
Long.parseLong(env.getProperty("token.expiration_time"))))
.signWith(SignatureAlgorithm.HS512, env.getProperty("token.secret"))
.compact();
response.addHeader("token", token);
response.addHeader("userId", userDetails.getUserId());
}
}
```
json webtoken을 api gateway에도 추가하고 구현해야된다,
그래야 jwt를 주고받을 수 있기 때문
API gateway .yml 파일
```java
#login -> no need authorization
- id: user-service
uri: lb://USER-SERVICE
predicates:
- Path=/user-service/login
- Method=POST
filters:
- RemoveRequestHeader=Cookie #post로 전달되는 데이터는 매번 새롭게 인식하는 것처럼 하기위해서 쿠키 제거
- RewritePath=/user-service/(?<segment>.*), /$\{segment} #/user-service/(?<segment>.*) 이형태로 데이터가 들어오면 /$\{segment} 이렇게 바꾸겠다
#이렇게 작성하게되면 더이상 controller에 RequestMapping(user-service) 안해도됨
#sign up -> no need authorization
- id: user-service
uri: lb://USER-SERVICE
predicates:
- Path=/user-service/users
- Method=POST
filters:
- RemoveRequestHeader=Cookie
- RewritePath=/user-service/(?<segment>.*), /$\{segment}
#need authorization
- id: user-service
uri: lb://USER-SERVICE
predicates:
- Path=/user-service/**
- Method=GET
filters:
- RemoveRequestHeader=Cookie
- RewritePath=/user-service/(?<segment>.*), /$\{segment}
- AuthorizationHeaderFilter # write class name to add filter!!!!!!!!!!!!
맨 마지막의 라우팅 경우 인증된 사용자만 접근시키기 위해 authorizationheaderfilter클래스를
통과하는 필터를 추가한다
```
```java
@Component
@Slf4j
public class AuthorizationHeaderFilter extends AbstractGatewayFilterFactory<AuthorizationHeaderFilter.Config> {
Environment env;
public AuthorizationHeaderFilter(Environment env){
this.env = env;
}
public static class Config {
}
//다른 서버에서 받은 토큰을 확인하고 전달
//login -> token을 받음 -> users에 토큰과 함께 요청 -> 이 토큰은 헤더에 있음
@Override
public GatewayFilter apply(Config config) {
return ((exchange, chain)-> {
ServerHttpRequest request = exchange.getRequest();
//헤더값에서 인증에관한 값이 있는지를 확인함 -> 인증헤더가 없는 경우
if (!request.getHeaders().containsKey(HttpHeaders.AUTHORIZATION)){
return onError(exchange, "no autorization header", HttpStatus.UNAUTHORIZED);
}
//인증헤더가 있는 경우 -> 반환값은 배열형태이기 때문에 0번째 데이터를 갖고온다고 적음
//이 객체에는 jwt토큰값이 있을 것이다.
String authorizationHeader = request.getHeaders().get(HttpHeaders.AUTHORIZATION).get(0);
//토큰은 string값으로 들어옴 -> Bearer dasasdfasd 이런식으로 들어옴으로 이 Bearer부분을 없에주고 토큰값만 비교
String jwt = authorizationHeader.replace("Bearer", "");
if(!isJwtValid(jwt)) {
return onError(exchange, "Jwt token is not valid", HttpStatus.UNAUTHORIZED);
}
return chain.filter(exchange);
});
}
private boolean isJwtValid(String jwt) {
boolean returnValue = true;
String subject = null;
try{
//복호화 처리
subject = Jwts.parser().setSigningKey(env.getProperty("token.secret"))
.parseClaimsJws(jwt).getBody() //파싱하고 그 안의 값에서
.getSubject(); //스트링값을 추출(인코딩된 값을 디코딩한 것)
} catch (Exception ex) {
returnValue = false;
}
if (subject == null || subject.isEmpty()){
returnValue = false;
}
return returnValue;
}
//webflux라 mono로 반환(단일값으로 반환한다는 뜻) <-> 단일 값이 아니면 flux임
private Mono<Void> onError(ServerWebExchange exchange, String err, HttpStatus httpStatus) {
//flux라서 servlet이 아니다
ServerHttpResponse response = exchange.getResponse();
response.setStatusCode(httpStatus);
log.error(err);
return response.setComplete();
}
}
```
## java.lang.ClassCastException: class java.lang.Object cannot be cast to class com.example.apigatewayservice.filter.AuthorizationHeaderFilter$Config
→ 생성자에서 configuration정보를 부모클래스에 정보를 전달해주어야 한다.
```java
오류난 코드
@Component
@Slf4j
public class AuthorizationHeaderFilter extends AbstractGatewayFilterFactory<AuthorizationHeaderFilter.Config> {
Environment env;
public AuthorizationHeaderFilter(Environment env){
this.env = env;
}
public static class Config {
}
```
```java
수정된 코드
@Component
@Slf4j
public class AuthorizationHeaderFilter extends AbstractGatewayFilterFactory<AuthorizationHeaderFilter.Config> {
Environment env;
public AuthorizationHeaderFilter(Environment env){
super(Config.class);
this.env = env;
}
public static class Config {
}
즉 여기 Config클래스에는 아무것도 없지만 , 필터에 적용되는 부가정보로서 부모클래스에
알려줘야 하는데, 알려주지 않아서 뜨는 에러이다!!!!!super로 해당 클래스 정보를 생성자에
추가
```