
스나이퍼팩토리 플러터 23일차
23일차에서는 클래스의 연장으로 데이터를 매핑하는 방법과 부모 클래스의 메소드를 재정의하는 방법을 학습했다.
학습한 내용
- 데이터 매핑 (fromMap, toMap)
- 메소드 재정의 (overrride)
- hashCode
추가 내용 정리
fromMap
fromMap은 Map 데이터 구조를 초기화하는 생성자 메소드이다. 즉, 이름 있는 생성자를 사용해 Map형태의 데이터를 전달 받아 멤버 변수에 매핑하는 것이다.
주로 모델 클래스에 데이터베이스에서 받아온 데이터를 미리 지정한 변수 구조에 초기 설정하는데 사용된다.
아래는 fromMap의 사용 예시이다.
class PostModel {
  PostModel({
    required this.id,
    required this.title,
    required this.content,
    required this.createdAt,
  });

  int id;
  String title;
  String content;
  DateTime createdAt;

  factory PostModel.fromMap(Map<String, dynamic> json) => PostModel(
        id: json['id'],
        title: json['title'],
        content: json['content'],
        createdAt: DateTime.parse(json['create_at']),
      );
}
toMap
toMap은 멤버 함수로 작성하는데 멤버 변수들을 Map형태로 만들어 주는 기능을 한다.
서버에 해당 객체 내용을 보내야할 때 주로 사용된다.
class PostModel {
  PostModel({
    required this.id,
    required this.title,
    required this.content,
    required this.createdAt,
  });

  int id;
  String title;
  String content;
  DateTime createdAt;

  Map<String dynamic> toMap() => {
  		'id': id,
        'title': title,
        'content: content,
        'createAt': createAt,
  };
}
Extends (상속)
클래스는 다른 클래스를 상속 받을 수 있다. 이 때, extends 키워드를 사용한다.
상속 받은 클래스에서 부모 클래스에 접근하기 위해서는 super 키워드를 사용하면 된다.
아래 코드에서 Fruit 클래스는 Food 클래스를 상속받는다. Futuit 클래스의 생성자는 부모 클래스의 생성자를 호출한다.
Fruit는 부모의 멤버 함수인 printName()을 사용할 수 있지만 Food로 생성된 객체는 Fruit의 멤버 함수인 printFruit()를 사용할 수는 없다.
class Food {
  String? name;

  Food(String name) : this.name = name;

  void printName() {
    print('My name is ${this.name}!');
  }
}

// Inheritance
class Fruit extends Food {
  // Call parent constructor
  Fruit(String name) : super(name);

  void printFruit() {
    print('${this.name} is Fruit!');
  }
}

void main() {
  Fruit fruit = new Fruit('Apple');
  fruit.printName();
  fruit.printFruit();

  Food food = new Food('Rice');
  food.printName();
  food.printFruit(); // << ERROR
}
override (재정의)
자식 클래스에서 부모 클래스의 함수를 재정의 할 수 있다.
이 때, 메소드를 override 하는데 @override 키워드를 사용한다.
아래 예시 코드에서 Fruit의 부모 클래스는 Food 클래스인데 printName()을 override했다. main() 함수에서 Food 객체는 Food 클래스의 printName() 메소드를 호출하고, Fruit 객체는 Fruit 클래스의 재정의된 printName()을 사용한다.
class Food {
String? name;
Food(String name) : this.name = name;
void printName() {
print('My name is ${this.name}!');
}
}
class Fruit extends Food {
Fruit(String name) : super(name);
void printName() {
print('${this.name} is Fruit!');
}
}
void main() {
Fruit fruit = new Fruit('Apple');
fruit.printName(); // Apple is Fruit!
Food food = new Food('Rice');
food.printName(); // My name is Rice!
}toString과 operator override
Dart의 모든 클래스는 Object클래스를 상속 받는다. Object 클래스에는 toString 메소드가 있는데 이 메소드도 override해서 사용할 수 있다.
class Word {
String word;
String meaning;
String example;
Word({
required this.word,
required this.meaning,
required this.example,
});
String toString() {
return 'Word($word, $meaning, $example)'
}
}위의 코드에서 만든 클래스를 사용하여 두 개의 객체를 만들었을 때 멤버 변수의 값이 같더라도 ==을 통해 비교하면 false가 나온다.
값을 비교하려면 operator를 override해서 사용할 수 있다. 아래는 ==을 override 한 예시이다.
class Word {
String word;
String meaning;
String example;
Word({
required this.word,
required this.meaning,
required this.example,
});
operator ==(Objcet other) => other is Word && word == other.word;
}위의 예시 코드는 other에 전달된 객체가 Word 타입이고, word의 값이 같다면 true를 반환해 준다.
23일차 과제
- UserData의 toString 재정의
- Class를 사용하여 주어진 화면 만들기
- 지하철과 사람을 표현하는 클래스 구현
1. UserData의 toString 재정의
22일차 과제와 마찬가지로 UserData 클래스를 작성하고 toString을 재정의하고자 한다.
main함수의 내용은 다음과 같다.

아래의 실행결과가 출력되도록 코드를 작성하시오.
코드 작성
class UserData {
//클래스 멤버 변수
String id; //아이디
DateTime birth; //생일
String email; //이메일
DateTime lastLoginDate; //마지막 로그인 날짜
String name; //이름
String phoneNumber; //전화번호
//생성자
UserData({
required this.id,
required this.birth,
required this.email,
required this.lastLoginDate,
required this.name,
required this.phoneNumber,
});
String toString() =>
'id: $id\nname: $name\nbirth: $birth\nphoneNumber: $phoneNumber\nemail: $email\nlastLoginData: $lastLoginDate';
}
void main(List<String> arguments) {
UserData userData = UserData(
id: 'sniperFactory',
birth: DateTime.now(),
email: 'sniperfactory@naver.com',
lastLoginDate: DateTime.now(),
name: '스나이퍼',
phoneNumber: '01023456789');
print(userData);
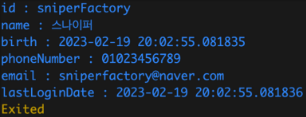
}UserData의 멤버 변수는 main함수의 내용에 맞게 6개의 정보를 넣었다. 생성자에서는 각 변수를 입력받아 초기화한다.
toString메소드는 각 멤버 변수를 줄바꿈으로 구분하여 출력할 수 있도록 override를 사용하여 재정의 했다.
결과
toString을 UserData의 인스턴스 변수들을 출력할 수 있도록 작성해 아래 콘솔 화면과 같은 결과가 출력된다.

2. Class를 사용하여 주어진 화면 만들기
[Flutter] 스나이퍼팩토리 15일차의 과제 4번의 화면을 클래스를 사용하여 모델을 만들어 사용해 보고자 한다.
요구사항은 아래와 같다.
요구사항
- 아래의 URL에 네트워크 요청을 보내 데이터를 받아온다.
- 제작하는 Class명은 자유
- 받아온 네트워크 데이터를 Class에 적용시키고, 플러터를 사용하여 화면을 제작한다.
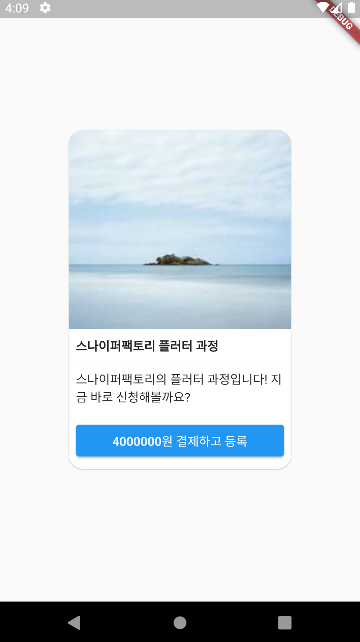
결과물 예시

코드 작성
-main.dart
import 'package:flutter/material.dart';
import 'package:my_app/page/home_page.dart';
void main() {
runApp(const MyApp());
}
class MyApp extends StatelessWidget {
const MyApp({super.key});
// root Widget
Widget build(BuildContext context) {
return MaterialApp(
home: HomePage(), // 홈 페이지 호출
);
}
}main.dart에서는 HomePage를 호출한다.
- home_page.dart
import 'package:flutter/material.dart';
import 'package:dio/dio.dart';
import 'package:my_app/model/Course.dart';
class HomePage extends StatelessWidget {
const HomePage({super.key});
Future<Course> getData() async {
var url = "https://sniperfactory.com/sfac/http_json_data"; //URL
var dio = Dio(); //Dio 객체
//데이터 요청
try {
return await dio
.get(url)
.then((value) => Course.fromMap(value.data['item']));
} catch (e) {
throw Exception('Could not get Data!');
}
}
Widget build(BuildContext context) {
return Scaffold(
body: FutureBuilder(
future: getData(), //데이터 바인딩
builder: (context, snapshot) {
// 받아온 데이터가 있을 경우 카드 출력
if (snapshot.hasData) {
return Card(
margin: const EdgeInsets.symmetric(horizontal: 80, vertical: 150),
clipBehavior: Clip.antiAlias,
shape: RoundedRectangleBorder(
borderRadius: BorderRadius.circular(16.0),
),
child: Column(
crossAxisAlignment: CrossAxisAlignment.start,
children: [
//이미지
Expanded(
child: Image(
image: NetworkImage(
snapshot.data!.image,
),
height: MediaQuery.of(context).size.height,
width: MediaQuery.of(context).size.width,
fit: BoxFit.cover,
),
),
//타이틀 텍스트
Padding(
padding: const EdgeInsets.all(8.0),
child: Text(
style: const TextStyle(
fontWeight: FontWeight.bold,
),
snapshot.data!.name,
),
),
const Divider(
height: 2,
indent: 8,
endIndent: 8,
),
//설명 텍스트
Padding(
padding: const EdgeInsets.all(8.0),
child: Text(
snapshot.data!.description,
),
),
//신청 버튼
Container(
width: double.infinity,
padding: const EdgeInsets.all(8.0),
child: ElevatedButton(
onPressed: () {},
child: Text(
'${snapshot.data!.price}원 결제하고 등록',
),
),
)
],
),
);
} else {
return const Center(child: CircularProgressIndicator()); //데이터 로딩 중
}
},
),
);
}
}HomPage에서는 우선 네트워크에 데이터를 요청하는 getData를 작성했는데 dio의 get을 사용해 받아온 테이터를 직접 만든 Course 데이터 모델을 사용해 매핑했다.
본문은 FutureBuilder에 앞에서 작성한 getData를 연결해서 만들었다.
데이터를 받아온 경우에는 Card를 사용해 내용을들을 출력해 주었는데 내부 요소는 Column으로 구성했다.
로딩 중에는 CircularProgressIndicator()를 그려주었다.
- Course.dart
class Course {
  //멤버 변수
  String name; //제목
  String description; //설명
  String image; //이미지
  int price; //가격

  //생성자
  Course(
      {required this.name,
      required this.description,
      required this.image,
      required this.price});

  //데이터 매핑
  Course.fromMap(Map<String, dynamic> map)
      : name = map['name'],
        description = map['description'],
        image = map['image'],
        price = map['price'];
}
Course 클래스는 네트워크에서 받아온 데이터의 타입을 나타내는 모델이다. 멤버 변수에는 제목을 나타내는 name, 설명 텍스트인 description, 이미지 url인 image, 코스 가격인 price를 가지고 있다.
기본 생성자를 작성하고, 추가로 Course.fromMap 생성자를 작성하여 Map 데이터를 넣었을 때 각 멤버 변수에 매핑될 수 있도록 했다.
결과
3. 지하철과 사람을 표현하는 클래스 구현
아래의 예시 코드에서 지하철과 사람을 표현하는 Subway와 Human 클래스를 작성하고자 한다.
class Subway {
  //...
}

class Human {
  //...
}

void main() {
  // 인스턴스 생성
  var subway = Subway(line:'2호선', current: '홍대입구역', passengers:[]);
  var human1 = Human(name: '사람1', money: 5000, curSubway: null);
  var human2 = Human(name: '사람2', money: 3450, curSubway: null);
  var human3 = Human(name: '사람3', money: 450, curSubway: null);

  // 사람 탑승
  print(human1.getOn(subway));
	print(human2.getOn(subway));
  print(human3.getOn(subway));

  // 현재 지하철 탑승
  print(subway.toString());

  // 각 사람들의 현재 상태를 출력
  print(human1.toString());
	print(human2.toString());
  print(human3.toString());
}
요구사항은 아래와 같다.
요구사항
- 반드시 각 클래스는 생성자를 포함해야 한다.
- 이 때, Subway 클래스는 생성시에 생성되었다는 안내 문구가 출력된다.
- 메인함수(void main)은 수정할 필요가 없다.
- 각 클래스는 toString의 메소드를 이용하여 실행 결과 예시와 일치하게 나올 수 있도록 한다.
- 그 외의 멤버 변수와 멤버 함수는 자유
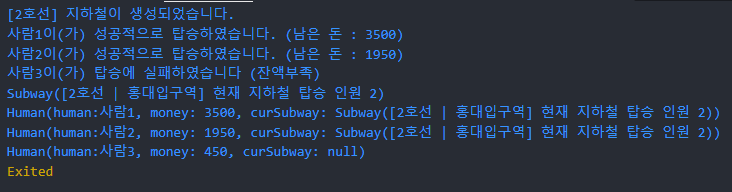
실행 결과의 예시는 다음과 같습니다.
[2호선] 지하철이 생성되었습니다.
사람1이(가) 성공적으로 탑승하였습니다. (남은 돈 : 3500)
사람2이(가) 성공적으로 탑승하였습니다. (남은 돈 : 1950)
사람3이(가) 탑승에 실패하였습니다 (잔액부족)
Subway([2호선 | 홍대입구] 현재 지하철 탑승인원 2명)
Human(human:사람1, money: 3500, curSubway: Subway([2호선 | 홍대입구] 현재 지하철 탑승인원 2명))
Human(human:사람2, money: 1950, curSubway: Subway([2호선 | 홍대입구] 현재 지하철 탑승인원 2명))
Human(human:사람3, money: 450, curSubway: null)
코드 작성
class Subway {
String line; //지하철 라인
String current; //현재 정류장
List<Human> passengers; //승객 리스트
//생성자
Subway({
required this.line,
required this.current,
required this.passengers,
}) {
print('[$line] 지하철이 생성되었습니다.');
}
//toString 재정의
String toString() =>
'Subway([$line | $current] 현재 지하철 탑승 인원 ${passengers.length})';
//승객 탑승 메소드
addPassenger(Human human) => passengers.add(human);
}
class Human {
String name; //이름
int money; //돈
Subway? curSubway; //현재 탑승 지하철
Human({
required this.name,
required this.money,
this.curSubway,
});
//toString 재정의
String toString() =>
'Human(human:$name, money: $money, curSubway: $curSubway)';
//승객 탑승 메소드
String getOn(Subway subway) {
//지하철 비용보다 많은 돈이 있을 경우 탑승 가능
if (money >= 1500) {
money -= 1500; // 돈 차감
curSubway = subway; // 현재 지하철 갱신
subway.addPassenger(this); // 지하철 탑승
return '$name이(가) 성공적으로 탑승하였습니다. (남은 돈 : $money)'; //탑승 성공 메세지 리턴
}
return '$name이(가) 탑승에 실패하였습니다 (잔액부족)'; //탑승 실패 메세지 리턴
}
}
void main() {
// 인스턴스 생성
var subway = Subway(line: '2호선', current: '홍대입구역', passengers: []);
var human1 = Human(name: '사람1', money: 5000, curSubway: null);
var human2 = Human(name: '사람2', money: 3450, curSubway: null);
var human3 = Human(name: '사람3', money: 450, curSubway: null);
// 사람 탑승
print(human1.getOn(subway));
print(human2.getOn(subway));
print(human3.getOn(subway));
// 현재 지하철 탑승
print(subway.toString());
// 각 사람들의 현재 상태를 출력
print(human1.toString());
print(human2.toString());
print(human3.toString());
}Subway 클래스는 지하철 라인을 의미하는 line과 현재 정류장인 current, 승객 리스트인 passengers를 멤버 변수로 가진다.
생성자에서는 각 멤버 변수를 입력 받아 초기화하고, 지하철이 생성되었다는 안내 문구를 출력한다.
toString은 현재 지하철 정보와 탑승 인원을 출력하도록 재정의했다.
승객이 탑승했을 때 passengers 리스트에 승객 정보를 저장할 수 있도록 addPassenger라는 메소드를 작성했다.
Human 클래스는 이름을 나타내는 name과 현재 보유하고 있는 돈인 money, 현재 탑승 중인 지하철인 curSubway를 멤버 변수로 선언했다. 생성된 사람이 지하철을 타고있지 않을 수 있으므로 curSubway는 Nullable로 선언했다.
생성자는 각 멤버 변수를 초기화하는데 curSubway는 null이 가능하므로 required 키워드를 사용하지 않았다.
toString은 사람의 정보를 출력하도록 재정의했다.
승객이 탑승할 때 getOn메소드를 실행하는데 해당 메소드에서는 현재 사람이 지하철 비용인 1500원 보다 많은 돈을 가진 경우에는 성공하고 적은 돈을 가진 경우에는 탑승에 실패한다.
탑승에 성공한 경우 money에서 1500원을 차감하고, curSubway에 현재 지하철 정보를 매개변수로 전달 받은 값으로 갱신한다. 마지막으로 Subway 클래스에서 작성했던 addPassenger()메소드를 사용해 현재 사람의 정보를 지하철 승객 리스트에 저장한 뒤 성공 메세지를 리턴한다.
결과
이번주가 몇주차더라...
갑자기 이번주가 몇주차인지 기억이 안나는데 어쨌든 이번주도 마무리했다. ㅋㅋㅋㅋ 추가 내용 정리에 강의에 나오지 않은 내용을 따로 학습해서 정리를 많이 했는데 오늘은 뭔가 집중이 잘 안돼서 학습한 내용만 정리하고 끝냈다. ㅠㅠ 공부해야될 내용이 많지만 오늘은 여기서 끝내겠습니다 ㅎㅎ 이번주부터 클래스를 사용해 모델을 만들기 시작했는데 코드가 좀 더 깔끔해지고, 데이터 관리가 편리해지는것 같다.
📄 Reference