
스나이퍼팩토리 플러터 5주차 주간평가
- Nature웹 클론
- 클래스 연습
- 추가 내용 정리
1. Nature 클론
Nature 웹 사이트의 휴대폰 화면을 클론하여 앱으로 제작하고자한다. 어떻게 클래스를 제작할 것인지 고민하고, 플러터로 구현해보자
Nature 앱 요구사항
- 7개 이상의 News Article을 포함하시오.
- 이 때 사용되는 뉴스 제목을 포함한 모든 데이터는 아래와 같다.
Researchers fear growing COVID vaccine hesitancy in developing nations
/articles/d41586-021-03830-7
Smriti Mallapaty
23 Dec 2021

Fatal lab explosion in China highlights wider safety fears
/articles/d41586-021-03589-x
Andrew Silver
22 Dec 2021

Journals adopt AI to spot duplicated images in manuscripts
/articles/d41586-021-03807-6
Richard Van Noorden
21 Dec 2021
- 데이터는 3개만 제공되며, 그 외에 본인이 원하는 기사는 아래의 URL에서 수집해 사용한다.
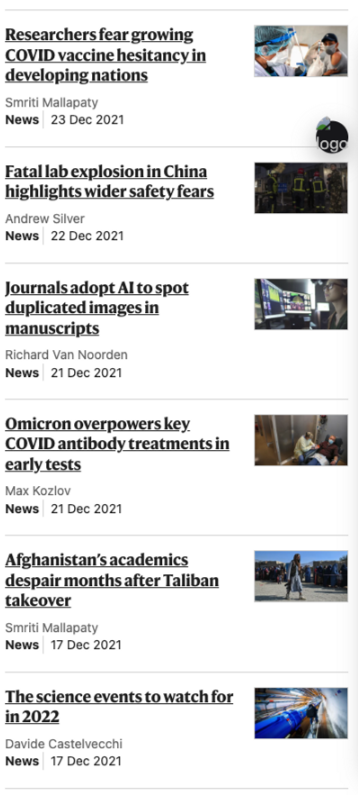
Nature 웹사이트의 모바일 화면
Nature 앱 코드 작성
- pubspec.yaml
dependencies:
  cached_network_image: ^3.2.3
  cupertino_icons: ^1.0.2
  flutter:
    sdk: flutter
  intl: ^0.18.0
url_launcher: ^6.1.10pubspec.yaml에 cached_network_image와 intl과 url_launcher를 설치했다.
- nature_data.dart
//기사 리스트
List<Map<String, dynamic>> natureData = [
  {
    'title':
        'Researchers fear growing COVID vaccine hesitancy in developing nations',
    'url': '/articles/d41586-021-03830-7',
    'author': 'Smriti Mallapaty',
    'createdDate': DateTime(2021, 12, 23),
    'image':
        'https://media.nature.com/lw767/magazine-assets/d41586-021-03830-7/d41586-021-03830-7_19972466.jpg?as=webp',
  },
  {
    'title': 'Fatal lab explosion in China highlights wider safety fears',
    'url': '/articles/d41586-021-03589-x',
    'author': 'Andrew Silver',
    'createdDate': DateTime(2021, 12, 22),
    'image':
        'https://media.nature.com/lw767/magazine-assets/d41586-021-03589-x/d41586-021-03589-x_19914056.jpg?as=webp',
  },
  {
    'title': 'Journals adopt AI to spot duplicated images in manuscripts',
    'url': '/articles/d41586-021-03807-6',
    'author': 'Richard Van Noorden',
    'createdDate': DateTime(2021, 12, 21),
    'image':
        'https://media.nature.com/lw767/magazine-assets/d41586-021-03807-6/d41586-021-03807-6_19969478.jpg?as=webp',
  },
  {
    'title': 'How COVID vaccines shaped 2021 in eight powerful charts',
    'url': '/articles/d41586-021-03772-0',
    'author': 'Davide Castelvecchi',
    'createdDate': DateTime(2021, 12, 17),
    'image':
        'https://media.nature.com/w1248/magazine-assets/d41586-021-03772-0/d41586-021-03772-0_19962224.jpg?as=webp',
  },
  {
    'title': 'Evidence of racism found at prestigious London university',
    'url': '/articles/d41586-021-03755-1',
    'author': 'Linda Nordling',
    'createdDate': DateTime(2021, 12, 15),
    'image':
        'https://media.nature.com/lw767/magazine-assets/d41586-021-03755-1/d41586-021-03755-1_19957958.jpg?as=webp',
  },
  {
    'title':
        'Giant cracks push imperilled Antarctic glacier closer to collapse',
    'url': '/articles/d41586-021-03758-y',
    'author': 'Alexandra Witze',
    'createdDate': DateTime(2021, 12, 14),
    'image':
        'https://media.nature.com/lw767/magazine-assets/d41586-021-03758-y/d41586-021-03758-y_19957854.jpg?as=webp',
  },
  {
    'title': 'This tiny iron-rich world is extraordinarily metal',
    'url': '/articles/d41586-021-03587-z',
    'author': 'Alexandra Witze',
    'createdDate': DateTime(2021, 12, 02),
    'image':
        'https://media.nature.com/lw767/magazine-assets/d41586-021-03587-z/d41586-021-03587-z_19918996.jpg?as=webp',
  },
];
주어진 3개의 데이터에 추가로 4개를 더해서 총 7개의 기사 데이터를 natureData에 저장했다.
여기서 작성일은 DateTime으로 저장하기 위해 형태를 약간 변형하였고, 이미지를 출력하기 위해 이미지 URL을 저장하는 image를 추가하였다.
- main.dart
import 'package:flutter/material.dart';
import 'package:nature_app/pages/main_page.dart';
void main() {
runApp(const MyApp());
}
class MyApp extends StatelessWidget {
const MyApp({super.key});
Widget build(BuildContext context) {
return MaterialApp(
home: MainPage(), //메인 페이지 호출
);
}
}main.dart에서는 MainPage()를 호출한다.
- main_page.dart
import 'package:flutter/material.dart';
import 'package:nature_app/models/Article.dart';
import 'package:nature_app/nature_data.dart';
import 'package:nature_app/widgets/ArticleTile.dart';
import 'package:url_launcher/url_launcher.dart';
class MainPage extends StatelessWidget {
MainPage({super.key});
//사용할 데이터 가져오기
final List<Article> _dataList =
natureData.map((e) => Article.fromMap(e)).toList();
//웹 페이지 열기
Future<void> _launchUrl(url) async {
Uri webUrl = Uri.parse(url);
if (!await launchUrl(webUrl)) {
throw Exception('Could not lanch $url');
}
}
Widget build(BuildContext context) {
return Scaffold(
body: SafeArea(
child: Container(
margin: const EdgeInsets.all(16.0),
decoration: const BoxDecoration(
border: Border.symmetric(
// 위아래 구분선 적용
horizontal: BorderSide(
color: Colors.black38,
width: 1,
),
),
),
child: ListView.separated(
itemCount: _dataList.length,
itemBuilder: (context, index) {
//커스텀 기사 타일
return ArticleTile(
title: _dataList[index].title, //기사 제목
image: _dataList[index].image, //기사 이미지
author: _dataList[index].author, //기자
createdDate: _dataList[index].createdDate, //작성일
onTap: () =>
_launchUrl(_dataList[index].url), //눌렀을 때 기사 본문 페이지로 이동
);
},
separatorBuilder: (context, index) {
//구분선으로 각 요소를 구분
return const Divider(
thickness: 1,
color: Colors.black38,
);
},
),
),
),
);
}
}MainPage에서는 앞에서 저장했던 데이터 리스트를 가져와 Article타입만 받는 리스트에 저장한다. Article은 뒤에서 작성할 모델이다.
웹 페이지를 열기 위해 _lanchUrl()을 작성했다.
본문에서는 Container를 사용해 위아래에 구분선을 적용했다. child로 ListView.separated를 사용해 각 기사를 Divider로 구분해주었다.
리스트 뷰에서는 각 기사를 커스텀 위젯인 ArticleTile로 출력했고, 여기서 onTap이벤트에는 앞에서 작성한 _lanchUrl()을 사용해 본문 기사 웹페이지로 이동되도록 했다.
- ArticleTile.dart
import 'package:cached_network_image/cached_network_image.dart';
import 'package:flutter/material.dart';
import 'package:intl/intl.dart';
class ArticleTile extends StatelessWidget {
const ArticleTile(
{super.key,
required this.title,
required this.image,
required this.author,
required this.createdDate,
required this.onTap});
final String title; //기사 제목
final String image; //기사 이미지
final String author; //기자
final DateTime createdDate; //작성일
final VoidCallback onTap; //onTap 핸들러
Widget build(BuildContext context) {
return InkWell(
onTap: onTap,
child: Padding(
padding: const EdgeInsets.symmetric(vertical: 16.0),
child: Row(
crossAxisAlignment: CrossAxisAlignment.start,
children: [
Expanded(
child: Column(
crossAxisAlignment: CrossAxisAlignment.start,
children: [
//기사 제목
Text(
style: const TextStyle(
fontSize: 18,
fontWeight: FontWeight.w900,
decoration: TextDecoration.underline,
),
title,
),
const SizedBox(height: 8),
//기자
Text(
style: const TextStyle(
fontWeight: FontWeight.w500,
color: Colors.grey,
),
author,
),
Text.rich(
TextSpan(
children: [
const TextSpan(
style: TextStyle(
fontWeight: FontWeight.w900,
),
text: 'News',
),
const TextSpan(
style: TextStyle(
color: Colors.grey,
),
text: ' | ',
),
//작성일
TextSpan(
style: const TextStyle(
fontWeight: FontWeight.w500,
),
text: DateFormat('dd MMM yyyy').format(createdDate),
),
],
),
),
],
),
),
const SizedBox(width: 16),
//기사 이미지
CachedNetworkImage(
height: 60,
width: 110,
fit: BoxFit.cover,
imageUrl: image,
)
],
),
),
);
}
}ArticleTile은 기사 정보를 출력한다. 매개변수로 기사 제목인 title 기사 이미지인 image 기자 이름인 author 작성일인 createdDate과 onTap 핸들러를 전달받는다.
전체 위젯은 InkWell로 onTap이벤트를 작성했고, 전달받은 텍스트들을 출력했다. 여기서 날짜는 intl 패키지의 DateFormat을 사용했고, 이미지는 CachedNetworkImage를 사용했다.
- Article.dart
class Article {
String title; //기사 제목
String url; //본문 기사 url
String author; //기자
String image; //기사 이미지
DateTime createdDate; //작성일
Article({
required this.title,
required this.url,
required this.author,
required this.image,
required this.createdDate,
});
//데이터 매핑
Article.fromMap(Map<String, dynamic> map)
: title = map['title'],
url = 'https://www.nature.com${map['url']}',
author = map['author'],
image = map['image'],
createdDate = map['createdDate'];
//toString 재정의
String toString() {
return '$title / $url / $author / $image / $createdDate';
}
}Article 클래스는 기사의 정보를 담는 모델로 멤버변수로 기사 제목, 본문 기사 url, 기자, 기사 이미지, 작성일을 가진다.
이름있는 생성자로 fromMap을 작성해 Map을 받아 데이터를 매핑했다. 여기서 url은 데이터에서 앞의 https://www.nature.com이 생략되어 있기 때문에 이를 붙여서 저장했다.
toString은 재정의하여 데이터를 테스트 출력할 때 사용했다.
Nature 앱 결과

2. 클래스 연습
JSON으로 받아오는 네트워크 데이터를 이름있는 생성자 (fromMap)을 만들고자 한다. 이 때, 제공되는 소스코드에서 빈 공간을 채워 결과물 예시와 같은 화면을 만들어보자.
요구사항
- 아래의 URL에서 JSON으로 네트워크 데이터를 받아온다.
- 해당 데이터에는 중복되는 값이 포함된다. operator ==을 재정의 하고, 함수인 dismissDuplicatedData 내용을 채워서 중복된 값을 리스트에 출력되지 않게 한다.
예시 코드
- userdata.dart
class UserData {
	///이곳 채우기.
}- assignment23_page.dart
class Assignment23 extends StatefulWidget {
const Assignment23({super.key});
State<Assignment23> createState() => _Assignment23State();
}
class _Assignment23State extends State<Assignment23> {
Future<Map<String, dynamic>> getJsonData() async {
///이곳 채우기.
}
Widget build(BuildContext context) {
return Scaffold(
appBar: AppBar(title: Text('23일차 과제')),
body: Center(
child: FutureBuilder(
future: getJsonData(),
builder: (context, snapshot) {
if (snapshot.connectionState == ConnectionState.waiting) {
return const CupertinoActivityIndicator();
}
if (!snapshot.hasData) return const Text("데이터가 없습니다");
Map<String, dynamic> data = snapshot.data as Map<String, dynamic>;
List<dynamic> users = data['users'];
List<dynamic> dismissDuplicatedUsers = _dismissDuplicatedData(users);
return ListView.separated(
itemBuilder: (context, index) {
UserData userData = UserData.fromMap(dismissDuplicatedUsers[index]);
return _buildItemWidget(userData);
},
separatorBuilder: (context, index) {
return const Divider();
},
itemCount: dismissDuplicatedUsers.length,
);
}
)
),
);
}
Widget _buildItemWidget(UserData userData) {
return ListTile(
leading: Image.network(userData.imageUrl),
title: Text('${userData.firstName} ${userData.lastName}'),
subtitle: Text('${userData.phoneNumber}'),
);
}
List<dynamic> _dismissDuplicatedData(List<dynamic> data) {
///이곳 채우기.
}
}예시 코드는 네트워크에서 JSON 데이터를 받아와 리스트뷰로 출력하는 코드이다. 여기서 UserData모델과 네트워크에서 데이터를 받아오는 getJsonData()와 리스트의 중복 요소를 제거하는 _dismissDuplicatedData(List<dynamic> data)를 작성하고자 한다.
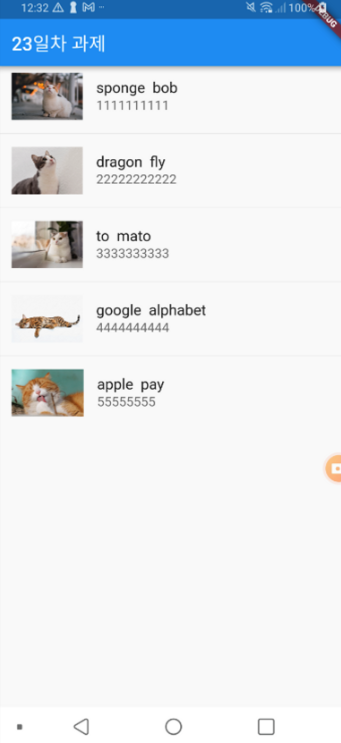
결과물 예시
코드 작성
- pubspec.yaml
dependencies:
  flutter:
    sdk: flutter
  cupertino_icons: ^1.0.2
dio: ^5.0.0pubspec.yaml에 필요한 패키지를 설치했다.
- main.dart
import 'package:flutter/material.dart';
import 'package:my_app/assignment23_page.dart';
void main() {
runApp(const MyApp());
}
class MyApp extends StatelessWidget {
const MyApp({super.key});
// root Widget
Widget build(BuildContext context) {
return MaterialApp(
home: Assignment23(), // 홈 페이지 호출
);
}
}main.dart에서는 Assignment23을 호출한다.
- userdata.dart
class UserData {
String imageUrl; //이미지 url
String firstName; //이름
String lastName; //성
String phoneNumber; //전화번소
int userId; //유저 아이디
UserData({
required this.imageUrl,
required this.firstName,
required this.lastName,
required this.phoneNumber,
required this.userId,
});
//Map을 전달받아 UserData 객체를 생성하는 생성자
UserData.fromMap(Map<String, dynamic> map)
: imageUrl = map['imageUrl'],
firstName = map['firstName'],
lastName = map['lastName'],
phoneNumber = map['phoneNumber'],
userId = map['userId'];
//UserData를 Map으로 전환
Map<String, dynamic> toMap() => {
'imageUrl': imageUrl,
'firstName': firstName,
'lastName': lastName,
'phoneNumber': phoneNumber,
'userId': userId,
};
//== 재정의
operator ==(Object other) => other is UserData && userId == other.userId;
}UserData 클래스는 imageUrl, firstName, lastName, phoneNumber, userId를 멤버 변수로 가지고, 이름있는 생성자로 User.fromMap을 작성했다. 이 생성자는 Map을 전달받아 멤버변수에 데이터를 매핑하여 객체를 생성한다.
UserData를 Map형식으로 만드는 멤버 함수도 작성했다. ==은 두 객체가 모두 UserData이고, userId가 같다면 true를 반환하도록 작성했다.
- assignment23_page.dart
import 'package:dio/dio.dart';
import 'package:flutter/cupertino.dart';
import 'package:flutter/material.dart';
import 'package:my_app/model/userdata.dart';
class Assignment23 extends StatefulWidget {
const Assignment23({super.key});
State<Assignment23> createState() => _Assignment23State();
}
class _Assignment23State extends State<Assignment23> {
Future<Map<String, dynamic>> getJsonData() async {
Dio dio = Dio(); //dio 객체
//데이터 요청 url
String url =
'https://sfacassignment23-default-rtdb.europe-west1.firebasedatabase.app/.json';
try {
return await dio.get(url).then((value) => value.data); //데이터 요청
} catch (e) {
throw Exception('Could not get Data');
}
}
Widget build(BuildContext context) {
return Scaffold(
appBar: AppBar(title: Text('23일차 과제')),
body: Center(
child: FutureBuilder(
future: getJsonData(),
builder: (context, snapshot) {
if (snapshot.connectionState == ConnectionState.waiting) {
return const CupertinoActivityIndicator();
}
if (!snapshot.hasData) return const Text("데이터가 없습니다");
Map<String, dynamic> data = snapshot.data as Map<String, dynamic>;
List<dynamic> users = data['users'];
List<dynamic> dismissDuplicatedUsers =
_dismissDuplicatedData(users);
return ListView.separated(
itemBuilder: (context, index) {
UserData userData =
UserData.fromMap(dismissDuplicatedUsers[index]);
return _buildItemWidget(userData);
},
separatorBuilder: (context, index) {
return const Divider();
},
itemCount: dismissDuplicatedUsers.length,
);
},
),
),
);
}
Widget _buildItemWidget(UserData userData) {
return ListTile(
leading: Image.network(userData.imageUrl),
title: Text('${userData.firstName} ${userData.lastName}'),
subtitle: Text('${userData.phoneNumber}'),
);
}
List<dynamic> _dismissDuplicatedData(List<dynamic> data) {
//전달 받은 데이터를 List<UserData>로 변환하여 저장
List<UserData> tempList = data.map((e) => UserData.fromMap(e)).toList();
//중복을 제거한 리스트
List<UserData> result = [tempList[0]];
//중복 검사
for (int i = 1; i < tempList.length; i++) {
for (int j = 0; j < result.length; j++) {
if (tempList[i] == result[j]) {
break;
} else if (j == result.length - 1) {
result.add(tempList[i]);
}
}
}
return result.map((e) => e.toMap()).toList(); //결과 리턴
}
}
getJsonData()는 dio를 사용하여 네트워크에 요청을 보내 JSON 데이터를 받아온다.
_dismissDuplicatedData()는 우선 매개변수로 받은 데이터를 List<UserData>로 변경하여 tempList에 저장하고, 리턴될 결과를 저장할 리스트인 result를 선언한다. result에는 초기 값으로 tempList[0]가 저장된다.
이중 for문을 사용하여 중복 검사를 수행하는데 tempList[1]의 값 부터 마지막 값까지 result의 값과 비교하여 result에 없는 값이라면 값을 추가해 주는 방식으로 작성했다.
마지막으로 UserData에서 작성한 toMap()을 사용하여 형식을 변환한 뒤 리턴했다.
결과
코드 수정
앞의 코드에서 _dismissDuplicatedData의 중복 검사를 할 때 이중 for문을 사용하여 직접 값을 비교했었는데 리스는의 contains() 메소드를 사용하면 코드가 간결해질 것 같아서 아래와 같이 함수를 수정해 보았다.
List<dynamic> _dismissDuplicatedData(List<dynamic> data) {
//전달 받은 데이터를 List<UserData>로 변환하여 저장
List<UserData> tempList = data.map((e) => UserData.fromMap(e)).toList();
//중복을 제거한 리스트
List<UserData> result = [tempList[0]];
//중복 검사
tempList.forEach((element) {
if (!result.contains(element)) {
result.add(element);
}
});
return result.map((e) => e.toMap()).toList(); //결과 리턴
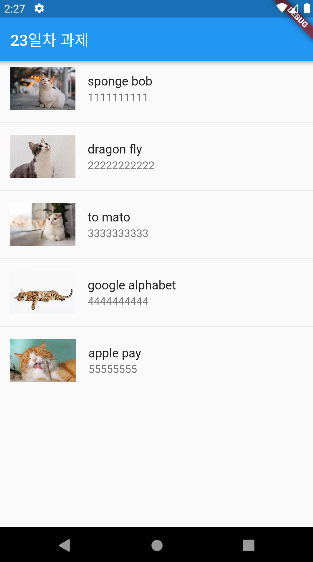
}코드가 훨씬 간결해지고, 이해하기 쉽게 변경되었다. 그리고 결과도 중복을 제거하여 같은 화면을 출력할 수 있었다.
UserData에서 ==를 재정의하지 않았을 때는 contains()를 사용해도 중복이 제거되지 않았는데, 이를 통해서 contains() 메소드는 리스트 내부의 요소가 존재하는지 검사를 할 때 == 연산자를 사용한다는 것을 예상해 볼 수 있었다.
3. 추가 내용 정리
Dart as
2번 과제의 예시 코드에 as가 사용되어 있었는데 이를 간단하게 정리해보고자 한다.
as는 데이터의 타입을 변환하는 키워드로 int, String, double 등 데이터 타입을 다른 타입으로 변환을 하는 것이다. 하지만 아예 다른 데이터 타입으로의 변환은 불가능 하고, 상위 타입이 하위 타입으로 변환되는 다운캐스팅이나. 하위 타입이 상위 타입으로 변환되는 업캐스팅에 사용된다.
(하위 타입을 상위 타입으로 캐스팅하는 업캐스팅은 거의 사용되지 않는다.)
int, String, double 등의 타입 이외에 직접 작성한 클래스에도 사용할 수 있는데 아래는 Point 타입의 데이터를 자식 클래스인 PointDetail로 다운캐스팅 하는 예시이다.
class Point {
  int x;
  int y;
}

class PointDetail extends Point {
  int z;
}

void main() {
  Point point = Point();
  point.x = 4; // Use the setter method for x.
  point.y = 5;

  PointDetail p = point as PointDetail; //다운 캐스팅
Dart is
is는 데이터의 타입을 검사하는 키워드이다. 변수에 is 키워드를 사용하고 뒤에 데이터 타입을 넣으면 해당 데이터 타입이 맞을 경우 true를 반환하고, 데이터 타입이 다를 경우 false를 반환한다. 반대로 is!를 사용하면 변수가 해당 데이터 타입이 아닐 경우에 true를 반환하게 된다.
as와 마찬가지로 직접 작성한 클래스 모델에도 사용할 수 있다.
아래는 is를 사용하여 데이터 타입을 검사하는 예시이다.
void main() {
  int a = 20;
  if (a is int) { //true
    print('a is int type');
  } else {
    print('a is not int type');
  }

  int b = 333;
  if (b is! double) { // true
    print('b is not double type');
  } else {
    print('b is double type');
  }

  String str = "BlockDMask";
  if (str is int) { // false
    print("str is int type");
  } else {
    print("str is not int type");
  }
}
작성한 코드가 조금 애매하다...
Nature 앱의 코드는 괜찮은 것 같은데 과제 2번의 코드가 약간 애매하다고 생각된다...ㅠㅠ 특히 중복 검사를 하는 함수에서 리스트의 타입을 List<UserData>로 만들었다가 다시 Map형태로 바꿔서 리턴을 하는 방식으로 작성했는데 뭔가 효율적이지 않아 보인다. 다른 사람의 코드에서 의도에 맞게 빈 부분을 작성하다보니 맞게 잘 작성한건지 헷갈린다 ㅋㅋㅋㅋ 일단 도전과제부터 끝내고 다시 한 번 살펴봐야겠다. (추가 내용 정리는 간단하게 코드에 나온 문법을 짧게 정리했다.)
📄 Reference