[React] 생명주기(1) - 초기화단계(constructor, getDerivedStateFromProps, render, ComponentDidMount), Memoization, 완전제어, 완전비제어 컴포넌트
React
안녕하세요!
리액트에서 굉장히 중요한 부분을 차지하는 생명주기에 대해 알아보겠습니다.
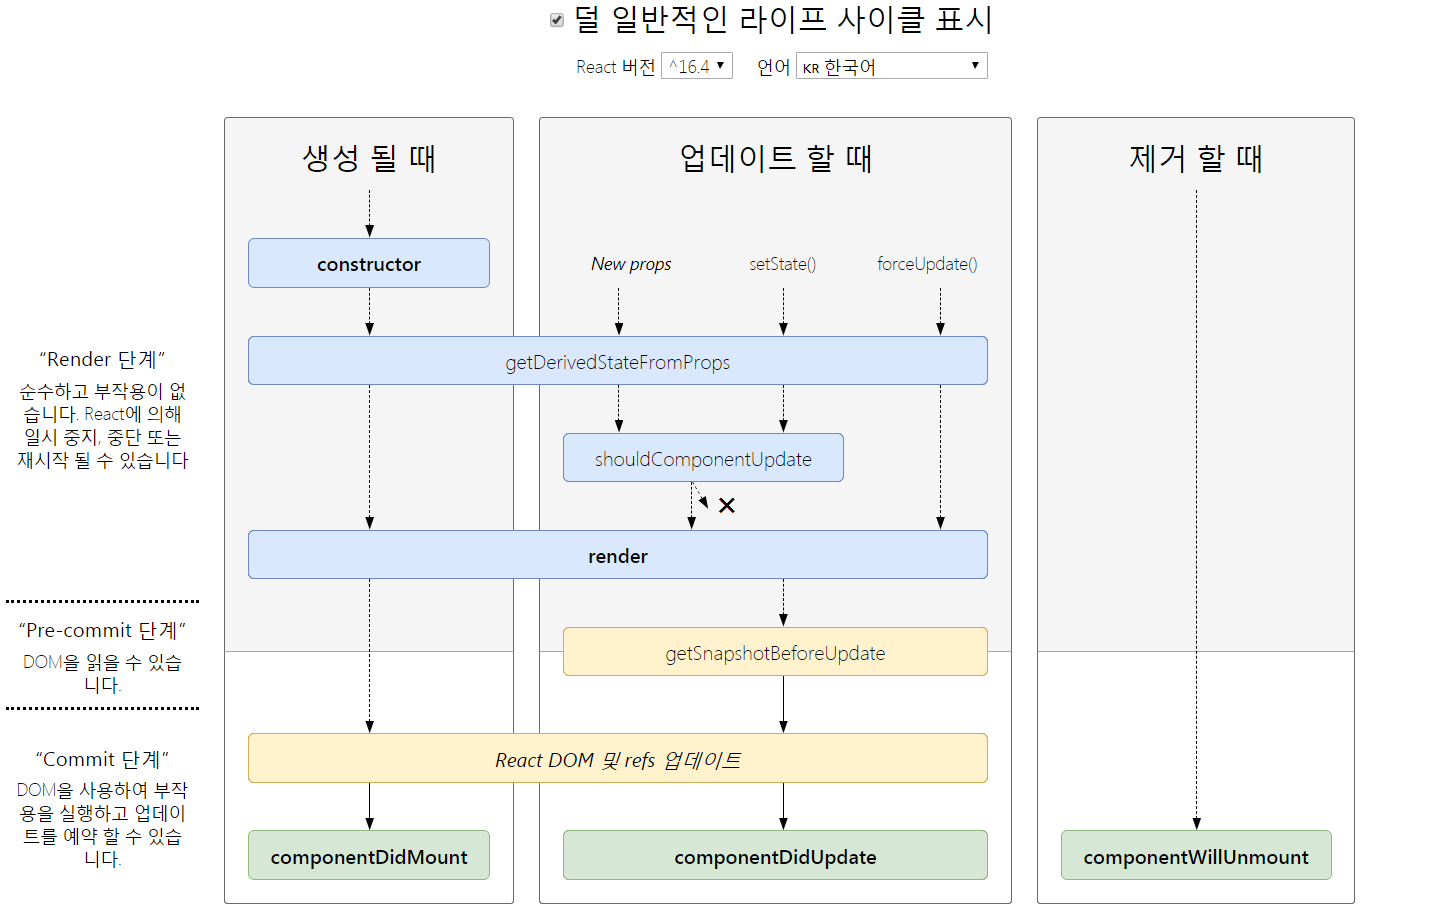
모든 컴포넌트는 다음과 같이 세 가지 단계를 거칩니다.
- 초기화단계
- 업데이트단계
- 소멸단계
각 단계에서 몇 개의 메서드들이 정해진 순서대로 되며, 각 단계 속에서 호출되는 메서드를 생명주기 메서드라고 부릅니다.
- 초기화단계는 최초에 컴포넌트 객체가 생성될 때 한 번 수행되는 과정을 말합니다.
- 업데이트단계는 컴포넌트가 마운트된 이 후, 컴포넌트의 속성값(props), 상태값(state)가 변경되면 업데이트 단계가 수행합니다..
- 소멸단계는 말 그대로 소멸될 때 수행되는 과정입니다.
리액트는 웹에서 UI데이터가 변경되면 자동으로 컴포넌트가 업데이트되며 동적으로 화면을 그려줍니다.
제대로 된 기능을 수행하려면 이런 자동으로 업데이트되는 과정에 끼어들어 API를 호출하기도 하고 데이터를 가공하기도 해야 합니다.
따라서 생명주기의 각 단계별로 필요한 순간에 필요한 작업들을 끼워넣을 수 있는 메서드들이 존재합니다.
그럼 앞으로 두 개의 포스팅에 걸쳐 생명주기를 살펴보겠습니다.
초기화단계
- constructor()
- getDerivedStateFromProps()
- render()
- componentDidMount()
constructor()
기본구조
class MyComponent() extends React.Component{
  constructor(props){
    super(props)
    //...
  }
}
super함수를 호출해야 React.Component클래스의 constructor메서드가 호출됩니다. super를 호출하지 않으면 컴포넌트가 제대로 동작하지 않습니다.
props는 상위 컴포넌트에서 전달해주는 속성값입니다.
이 props를 이용해 초기 상태값을 만들 때 constructor가 유용합니다.
class MyComponent() extends React.Component{
  constructor(props){
    super(props);
    this.state = {
      currentMovie : props.age < 10? '뽀로로':'어벤져스
    }
  }
}
초기 속성값(props)로부터 age가 10미만이면 '뽀로로' 아닐경우 '어벤져스를 초기 상태값으로 설정합니다.
this.state 처럼 직접 상태값을 설정하는 것은 constructor에서만 허용됩니다. 다른 곳에서는 setState를 통해 설정해야 컴포넌트가 자동으로 업데이트됩니다.
클래스필드
클래스필드는 자바스크립트 표준은 아니지만, 곧 될 것이라고합니다. 사용하려면 바벨 플러그인을 설치하면 사용할 수 있고 CRA에서도 지원합니다.
class MyComponent extends React.Component {
  state = {
    currentMovie: this.props.age < 10 ? '뽀로로':'어벤져스'
  }
}
동등한 코드입니다.
constructor에서는 setState를 사용할 수 없습니다. 그리고 초기단계에서 API를 이용해 통신하고 State를 변경하고 싶다면, 다른 생명주기 메서드를 사용해야합니다. (적절한 메서드가 따로있음)
static getDerivedStateFromProps()
메서드 이름에서 말하는 것 처럼 props를 이용해 state값을 얻습니다.또, 정적 메서드기 때문에 this를 호출할 수 없습니다.
static getDerivedStateFromProps(props,state)인수에 전달받은 props와 현재 state가 있기 때문에 this대신 이 것을 사용합니다.
return 값이 있으면 state를 변경합니다.
return null을 하게되면 아무것도 하지 않습니다.
getDerivedStateFromProps()메서드는 사실 많이 쓰이지 않습니다. 꼭 필요한 경우는 거의없다고 합니다.
공식문서 getDerivedStateFromProps()에 관한 글
- props 변화에 대응한 부수 효과를 발생시켜야 한다면 (예를 들어, 데이터 가져오기 또는 애니메이션), componentDidUpdate 생명주기를 대신해서 사용하세요.
- props가 변화했을 때에만 일부 데이터를 다시 계산 하고 싶다면, Memoization Helper를 대신해서 사용하세요.
- props가 변화할 때에 일부 state를 재설정 하고 싶다면, 완전 제어 컴포넌트 또는 key를 사용하는 완전 비제어 컴포넌트로 만들어서 사용하세요.
첫 번째, props변화에 대응한 부수효과는 API를 이용해 비동기통신을 하는 경우가 대표적입니다. 이럴 경우에는 componentDidUpdate 생명주기에서 사용해야합니다. 그 이유는 getDerivedStateFromProps에서는 static메서드라서 this에 접근할 수 없기 때문입니다.
두 번째, memoization은 불필요한 계산량을 줄이기 위한 기술입니다. 같은 입력값에 대해 항상 같은 출력값이 나오는 순수 함수의 경우에는 이 기술을 사용할 수 있습니다. 이럴 경우, 입력값이 동일하면 굳이 반복해서 같은값을 입력하여 결과를 확인할 필요가 없으므로, 입력값이 같다면 저장해 둔 결과값을 사용하게됩니다.
memoization을 getDerivedStateFromProps()에서 만들어야한다고 가정해보겠습니다.
export default class Memo extends React.Component {
    constructor (props) {
        super(props);
        this.state = {
         prevProducts : [
         ],
         filteredProducts : []
        }
    }
    static getDerivedStateFromProps(props, state) {
        const {products} = props;
        if(products !== state.prevProducts) {
            return {
                filteredProducts : products.filter(product => product.price < 1000),
                prevProducts : products
            }
        }
        return null
    }
    render () {
        const {filteredProducts} = this.state;
        return (<div>{filteredProducts.map((product,index)=> <span key={index}>{product.name}</span>)}</div>);
    }
}
Memo클래스는 상위 컴포넌트로부터 props를 받아서 현재 state의 products와 비교해 다르다면 state를 업데이트합니다.
이 방법은 지양해야합니다. getDerivedStateFromProps안의 코드들이 간단한 코드인데도 복잡합니다. 이전의 props에 대한 상태값도 관리해야합니다.
이럴 경우에는 render메서드에 직접 메모이제이션을 이용하는게 좋습니다.
export default class Memo extends React.PureComponent {
    constructor (props) {
        super(props);
        this.state = {
        }
    }
    render () {
        const filteredProducts = this.props.products.filter(product=>product.price<1000);
        return (<div>{filteredProducts.map((product,index)=> <span key={index}>{product.name}</span>)}</div>);
    }
}
코드가 훨씬 줄었습니다. 하지만 많은 목록의 경우 느려질 수 있습니다.
lodash/memoize를 이용해보겠습니다 lodash패키지의 memoize함수입니다.
export default class Memo extends React.PureComponent {
    constructor (props) {
        super(props);
        this.state = {
        }
    }
    getFilteredProducts = memoize(function(products) {
        return products.filter(product => product.price <1000)
    })
    render () {
        const {products} = this.props;
        const filteredProducts = this.getFilteredProducts(products)
        return (<div>{filteredProducts.map((product,index)=> <span key={index}>{product.name}</span>)}</div>);
    }
}
getFilteredProducts함수가 products매개변수가 변경되는 경우에만 계산하고, 변경되지 않으면 이전의 결과를 반환해줍니다.
결과적으로 memoize를위해 상태값을 추가할 필요가 없어졌습니다.
- getDerivedStateFromProps를 지양해야 하는 세 번째 로 props가 변화할 때 일부 state를 재설정하고 싶은 경우입니다.
React > 문서에서는 대안으로 두 가지 방법을 소개합니다.
- key를 이용한 완전비제어 컴포넌트
- 완전제어 컴포넌트
- key를 이용한 완전비제어컴포넌트입니다.
class ParentComponent extends React.Component {
// ...
render () {
    const {product} = this.state;
    return <ChildComponent key={product.id} price={product.price}/>
  }
}
ChildComponent는 key값으로 product.id가 바뀔 때마다 컴포넌트의 인스턴스가 다시생성됩니다. 따라서 constructor에서 초기 props에대해서만 state를 설정하면 됩니다.
2. 완전 제어컴포넌트
완전제어컴포넌트는 부모컴포넌트가 자식컴포넌트에 대한 모든 것을 제어합니다. 자식컴포넌트는 state와 메서드를 관리하지않고 props를 받아 컴포넌트를 리턴하는 일만 합니다.
function ChildComponent ({price,onChange}) {
  return <input onChange={onChange} value={price} />
}
부모컴포넌트의 onChange메서드도 props로 전달합니다.
자식컴포넌트에서 이벤트가 발생해도 부모컴포넌트에서 실행되도록 this바인딩을 잘 해줘야 합니다.
여기까지 getDerivedStateFromProps메서드를 잘 못 사용하는 경우를 봤는데, 그럼 언제 사용해야 할까요
이전 속성값과 이후 속성값 모두에 의존적인 상탯값이 필요한 경우에 사용합니다.
일반적으로는 드문 경우입니다.
export default class Parent extends React.Component {
    state = {
        price : 0
    }
    ref = React.createRef();
    handleClick () {
        console.log(this.ref.current.value)
        this.setState({price : this.ref.current.value});
    }
    render () {
        return (<div>
                <Child price={this.state.price}/>
                <input type='text' ref={this.ref}></input>
                <button onClick={()=>this.handleClick()}>확인</button>
            </div>
        )
    }
}
class Child extends React.Component {
    state = {
        prevPrice : this.props.price,
        isExpensive : undefined,
    }
    static getDerivedStateFromProps (props, state) {
        console.log(`state.prevPrice : ${state.prevPrice} , props.price : ${props.price}`)
        const isExpensive = state.prevPrice - props.price <0? true:false;
        return {prevPrice : props.price, isExpensive}
    }
    render(){
        const isExpensive = this.state.isExpensive;
        return (
            <div>
                {this.state.prevPrice!==0 && <h3 style={{color:isExpensive?'red':'blue'}}>이전 값보다 {isExpensive?'큼':'작음'}</h3>}
            </div>
        )
    }
}
부모 컴포넌트로부터 price를 받아 이전의 price와 비교해 큰지 작은지 출력합니다.
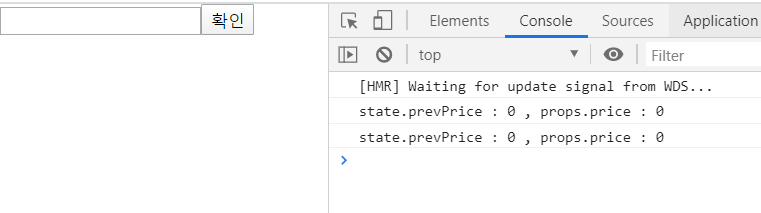
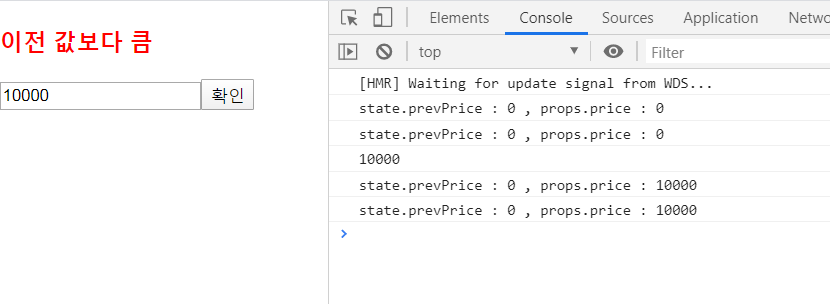
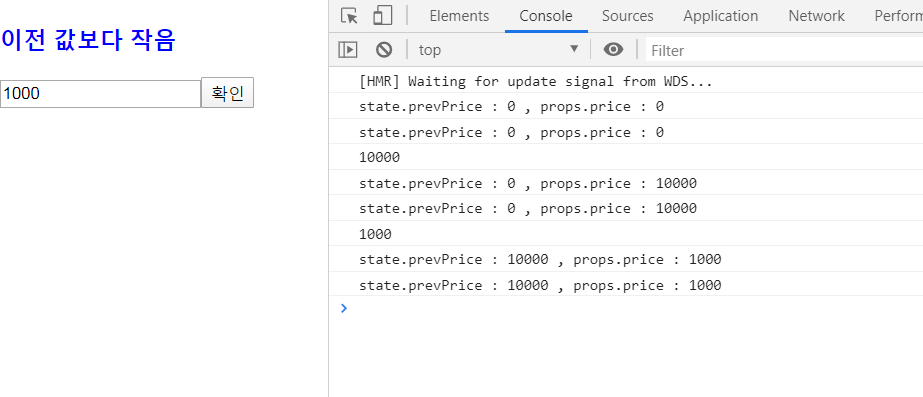
이렇게 이전의 props와 이후 props모두 의존적인 상탯값이 필요한 경우에 getDerivedStateFromProps를 사용합니다.
render()
render 메서드는 컴포넌트를 정의할 때 반드시 작성해야합니다. 화면에서 보여질 render메서드의 반환값이 내용을 결정합니다.
주의할 점
- render함수 내부에서 setState를 호출하면 안된다.
- render함수 반환값은 속성값과 상태값만으로 결정되어야 한다.
- 부수 효과를 발생시키면 안된다.
setState를 render내부에서 호출하면 무한루프에 빠집니다. 비동기 통신이나 쿠키사용등 부수효과는 다른 생명주기에서 사용합니다.
순수하게 렌더링만 해야합니다.
componentDidMount()
componentDidMount()는 render메서드의 첫 번째 return값이 실제 돔에 반영된 직 후 호출됩니다. 따라서
- componentDidMount()에서 돔 요소에 접근할 수 있다.
- setState()도 마운트 후에 호출할 수 있기 때문에 componentDidMount()에서 비동기 통신을 수행하기 적합하다.
비동기통신, 돔 요소에 접근은 마운트이후이므로 componentDidMount()메서드에서 수행하는 것을 유념하면됩니다!
마지막으로 정리해보겠습니다.
초기화단계에 대해서 알아봤는데요
- constructor
- getDerivedStateFromProps
- render
- componentDidMount
네 가지가 있었습니다.
constructor는 초기 상태값을 만들고 setState를 사용할 수 없습니다.
this.state로 초기 상태값을 설정합니다.
getDerivedStateFromProps는 이전 속성값과 이후 속성값 둘 다에게 의존성있는 state를 만들 때 사용합니다.
비동기통신,memoization,속성값에따른 state설정 은 지양해야합니다.
render는 화면에 보여질 반환값을 결정합니다. render는 부수효과를 발생시키면 안됩니다. render에서 지나치게 많은 연산을 할 경우 업데이트마다 수행하므로 간결하게 props와 state를 이용해 결정되는 return값에 대해서만 작성하는게 좋습니다.
componentDidMount는 render메서드의 첫 번째 return값이 실제 돔에 반영된 직 후 호출됩니다. 비동기통신, 돔 요소에 접근시 유용합니다.
이상으로 초기화단계에 대한 포스팅을 마치겠습니다
감사합니다.

DumpsWrap offers Salesforce Salesforce Certified B2C Solution Architect (WI24) real exam questions and practice test engine with real questions and verified answers. Try Salesforce Certified B2C Solution Architect (WI24) exam questions for free. You can also download a free PDF demo of Salesforce Salesforce Certified B2C Solution Architect (WI24) exam.
B2C-Solution-Architect exam questions