Welcome Page 만들기
Welcome Page: 도메인 치고 들어왔을 때 첫화면
<!DOCTYPE HTML>
<html>
<head>
    <title>Hello</title>
    <meta http-equiv="Content-Type" content="text/html; charset=UTF-8" />
</head>
<hody>
    Hello
    <a href="/hello">Hello</a>
</hody>
</html>
src.main.resources.static.index.html 에 파일을 올려두면 Welcome page기능을 제공한다.
참고:
스프링은 어마어마하게 거대하기때문에 필요한 게 있으면 찾아보는 능력이 중요하다.
1. spring.io 에 접한다
2. Projects -> Spring Boot -> Learn 으로 들어가서 document로 들어간다
3. 원하는 검색어로 찾아본다.
템플릿 엔진
정적페이지는 프로그램이 아니라 그냥 "static"하게 파일만 던져주고 출력되도록 하는 것이다.
템플릿 엔진을 쓰면 원하는대로 loop를 넣거나해서 모양을 바꿀 수 있다.
지금은 thymeleaf라는 템플릿 엔진을 써볼것이다 https://www.thymeleaf.org/
controller
hellospring 패키지 밑에 controller 패키지를 만든다
controller 패키지 안에 HelloController 클래스를 만들고 다음과 같은 코드를 작성한다
@Controller
public class HelloController {

    @GetMapping("hello")
    public String hello(Model model) {
        model.addAttribute("data", "hello!!");
        return "hello";
    }
}
그리고 resources.templates 패키지안에 hello.html을 만들고 다음과 같이 작성한다
<!DOCTYPE HTML>
<html xmlns:th="http://www.thymeleaf.org">
<head>
    <title>Hello</title>
    <meta http-equiv="Content-Type" content="text/html; charset=UTF-8" />
</head>
<hody>
<p th:text="'안녕하세요. ' + ${data}" >안녕하세요. 손님</p>
</hody>
</html>
2번째 라인에 thymelaf.org를 저렇게 넣어주면 타임리프 문법을 쓸 수 있다.
HelloController에서 작성한 model.addAttribute("data", "hello!!"); 으로부터 hello.html에 작성한 ${data} 부분에 hello!!가 들어온다.
다시 실행해서 웹에서 http://localhost:8080/hello 를 확인해보자.
동작원리
HelloController 에 있는 @GetMapping("Hello")는 http에서 get방식을 말한다. 인자로 있는 "Hello"는 url과 매칭이 되는 것이다
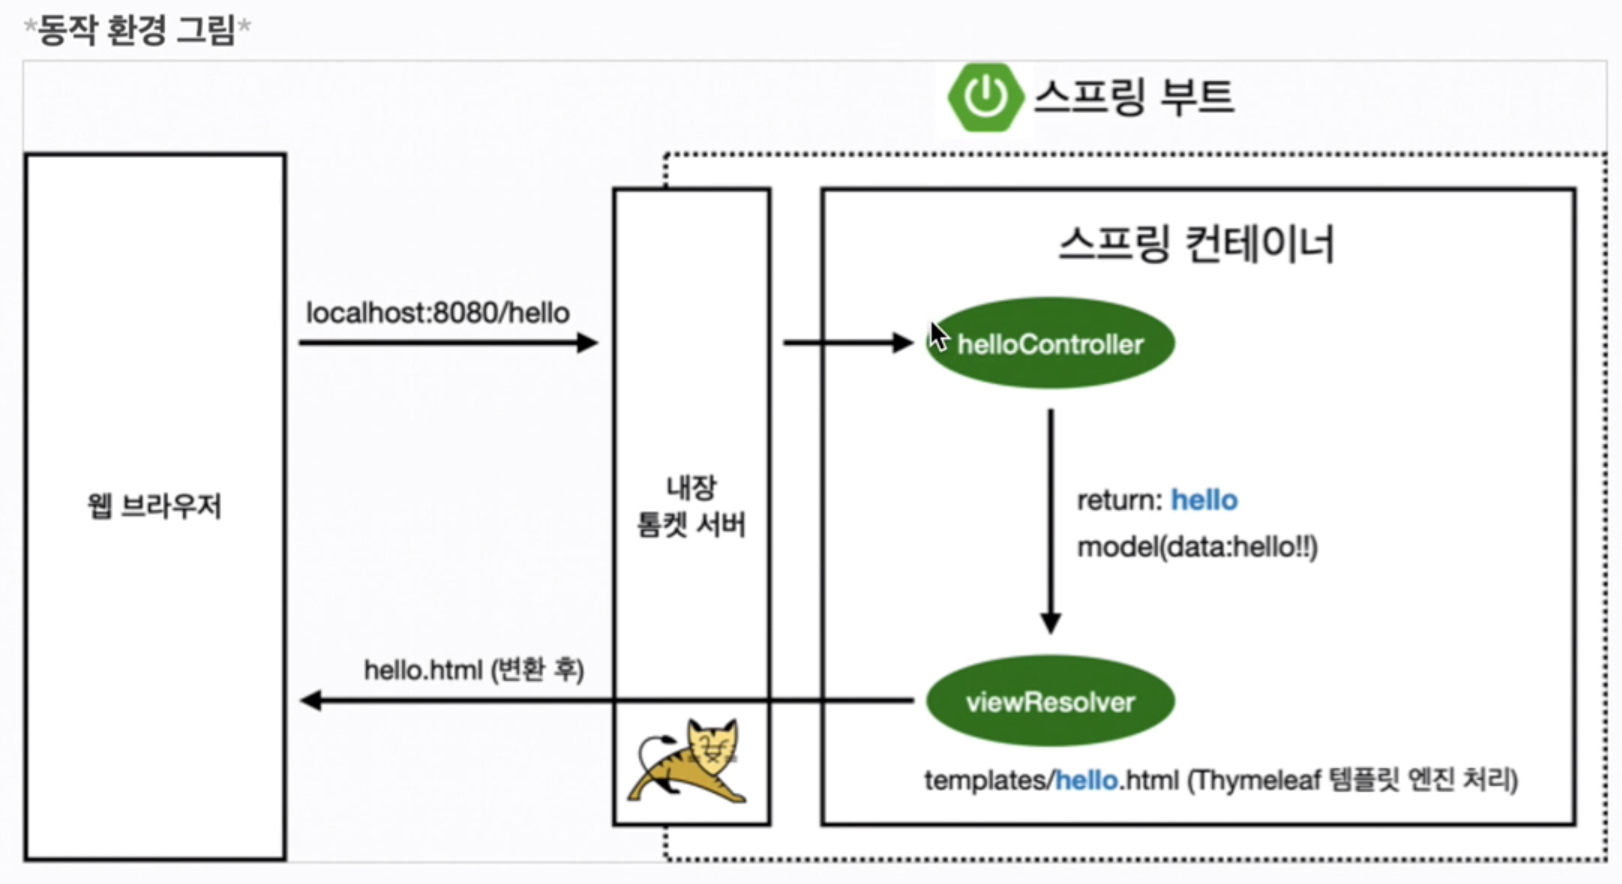
스프링이 model 이라는 것을 만들어서 매개변수로 넣어준다.
controller에서 리턴 값을 문자를 반환하면 viewResolver가 아래 경로를 통해 화면을 찾아서 처리한다.
resource:temlplates/ + {ViewName} + .html
참고 :
spring-boot-devtools라이브러리를 추가하면html파일을 컴파일만 해주면 서버 재시작 없이 View 파일 변경이 가능하다. 인텔리제이 컴파일 방법: 메뉴 build -> Recompile
빌드하기
먼저 서버를 종료한다
터미널에서 프로젝트 파일로 들어가서 다음 명령어를 치면 빌드가 된다
$ ./gradlew build 빌드가 끝나면 자바로 jar 파일을 실행하면 인텔리제이에서 실행했던 그 서버가 작동한다
kyu@Dongkyus-MBP: ~/study/hello-spring
$ cd build                                                           [13:04:57]

kyu@Dongkyus-MBP: ~/study/hello-spring/build
$ ll                                                                 [13:06:12]
total 8
-rw-r--r--  1 kyu  staff    40B Feb  3 13:04 bootJarMainClassName
drwxr-xr-x  3 kyu  staff    96B Feb  2 12:43 classes
drwxr-xr-x  3 kyu  staff    96B Feb  2 12:43 generated
drwxr-xr-x  3 kyu  staff    96B Feb  3 13:04 libs
drwxr-xr-x  3 kyu  staff    96B Feb  3 13:04 reports
drwxr-xr-x  3 kyu  staff    96B Feb  2 12:44 resources
drwxr-xr-x  3 kyu  staff    96B Feb  3 13:04 test-results
drwxr-xr-x  5 kyu  staff   160B Feb  3 13:04 tmp

kyu@Dongkyus-MBP: ~/study/hello-spring/build
$ cd libs                                                            [13:06:17]

kyu@Dongkyus-MBP: ~/study/hello-spring/build/libs
$ ll                                                                 [13:06:52]
total 36208
-rw-r--r--  1 kyu  staff    18M Feb  3 13:04 hello-spring-0.0.1-SNAPSHOT.jar

kyu@Dongkyus-MBP: ~/study/hello-spring/build/libs
$ ls -arlth                                                          [13:06:53]
total 36208
drwxr-xr-x   3 kyu  staff    96B Feb  3 13:04 .
-rw-r--r--   1 kyu  staff    18M Feb  3 13:04 hello-spring-0.0.1-SNAPSHOT.jar
drwxr-xr-x  10 kyu  staff   320B Feb  3 13:04 ..

kyu@Dongkyus-MBP: ~/study/hello-spring/build/libs
$ java -jar hello-spring-0.0.1-SNAPSHOT.jar
--생략--
서버 배포할때는 그 파일만 복사해서 서버에 넣어주고 java -jar에서 실행하면된다
그러면 서버에서 스프링이 동작하게 된다
참고:
$ ./gradlew clean하면 빌드 파일이 사라진다
