[Refactor] 사용자 회원가입시 중복성 검사 기능 추가
로그인과 회원가입 진행할때 사용자의 중복성을 체크하기 위해 Security에서 default로 전달받는 username 값을 통해서 진행했습니다. 하지만 동명이인이 있을 수 있으므로 현재 프로젝트에선 email을 통해 중복성 체크를 진행하겠습니다.
이를 위해서 아래의 과정이 필요합니다.
- "/join" 상에서 사용자로 부터 정보를 입력받고 "회원가입"버튼 클릭시 DB에 해당 email이 존재하는지 체크 후 존재한다면 "redirect:join"
- "/login" 상에서 입력받아 서버로 전달되는 input태그의 name을 username에서 email로 변경
- UserRepository에서 findByEmail() 추상함수 추가
- Spring Security를 사용한다면 로그인시 default로 실행되는 UserDetailsService안의 loadByUsername()함수와 OAuth를 활용한 소셜로그인시 default 실행되는 DefaultOAuth2UserService안의 loadUser()함수를 userRepository.findByEmail(email);을 통해 중복성 검사
1을 위한 controller/IndexController.java
@PostMapping("/join")
    public String join_post(User user){
        System.out.println(user);
        System.out.println(user.getUsername()); // Entity에서 @Data로 getter/setter생성했기 때문에 가능
        User userEntity = userRepository.findByEmail(user.getEmail());
        // 동일한 이메일로 회원가입할 수 없도록 막는 로직
        if(userEntity != null){
            System.out.println("\n** IndexController.join_post/이미 동일한 이메일이 존재합니다! 다른이메일로 회원가입 해주시기 바랍니다 **");
            return "redirect:/join";
        }
        String rawPassword = user.getPassword();
        String encPassword = bCryptPasswordEncoder.encode(rawPassword);
        user.setPassword(encPassword); // 일반적인 String 타입의 password는 Security를 통한 회원가입이 되지 않기 때문에 암호화 필요함o
        user.setRole("ROLE_USER");
        userRepository.save(user);
        return "redirect:/login"; //  "/login" url로 redirect 시킴
    }
2를 위한 templates/login.html
<!DOCTYPE html>
<html lang="en">
<head>
    <meta charset="UTF-8">
    <title>로그인 페이지</title>
</head>
<body>
<h1>로그인 페이지</h1>
<br/>
<form action="/login" method="POST">
<!--    <input type="text" name="username" placeholder="username을 입력해주세요"/>-->
    <input type="email" name="email" placeholder="email을 입력해주세요"/>
    <br/>
    <input type="password" name="password" placeholder="password을 입력해주세요"/>
    <button>로그인</button>
</form>
<a href="/oauth2/authorization/google">구글 로그인</a>
<a href="/join">회원가입</a>
</body>
</html>
3을 위한 repository/UserRepository.java
public interface UserRepository extends JpaRepository<User, Long> {
    // findBy 규칙 -> Username 문법
    // select * from user where username = 1?
    public User findByUsername(String username); // JPA Query methods참고
    public User findByEmail(String email); // 중복성 체크를 위해 username 대신 email을 사용함
}
4를 위한 config/auth/PrincipalDetailsService.java
@Service // 해당 어노테이션을 통해 PrincipalDetailService 클래스를 IoC에 등록시킴
public class PrincipalDetailsService implements UserDetailsService {

    @Autowired
    private UserRepository userRepository;


    // Security seesion 안에있는 Authentication 타입객체의 안에 UserDetails 타입객체가 있다.
    // Security session(내부 Authentication(내부 UserDetails))
    // 아래의 함수는 UserDetails를 구현한 PrincipalDetails를 return한다
    // 함수종료시 @AuthenticationPrincipal 어노테이션이 만들어짐
    @Override
    public UserDetails loadUserByUsername(String email) throws UsernameNotFoundException {
//        User userEntity = userRepository.findByUsername(username);
        User userEntity = userRepository.findByEmail(email);
        if(userEntity != null){
            return new PrincipalDetails(userEntity);
        }
        return null;
    }
}
4를 위한 config/oauth/PrincipalOauth2UserService
@Service
public class PrincipalOauth2UserService extends DefaultOAuth2UserService {
    @Autowired
    private UserRepository userRepository;
    @Autowired
    private BCryptPasswordEncoder bCryptPasswordEncoder;

    // 함수종료시 @AuthenticationPrincipal 어노테이션이 만들어짐
    @Override // 구글소셜로그인 후 구글로 부터 받은 userRequest 데이터에 대한 후처리되는 함수
    public OAuth2User loadUser(OAuth2UserRequest userRequest) throws OAuth2AuthenticationException {

        String provider = userRequest.getClientRegistration().getRegistrationId(); // google
        String providerId = oAuth2User.getAttribute("sub"); // sub키에 저장된 값은 google에서 사용자에게 부여한 pk이다
        String username = oAuth2User.getAttribute("name");
        String password = bCryptPasswordEncoder.encode("password") ; // 소셜로그인이기 때문에 굳이 저장안해도되지만 임의로 생성해서 저장함
        String email = oAuth2User.getAttribute("email");
        String role = "ROLE_USER";
        System.out.println("PrincipalOauth@UserService.java/username = " + username);
        System.out.println("PrincipalOauth@UserService.java/getAttributes() = " + oAuth2User.getAttributes());
//        User userEntity = userRepository.findByUsername(username); // **username이외의 필드로 중복성검사 체크 필요!**
        User userEntity = userRepository.findByEmail(email); // 이메일로 회원조회
        System.out.println("userEntity = " + userEntity);
        if(userEntity == null){
            // User에 생성자를 통해 새로운 User를 생성시킴(회원가입)
            System.out.println("PrincipalOauth2UserService.loadUser/처음 로그인하는군요 회원가입 진행하겠습니다");
            userEntity = User.builder()
                    .username(username)
                    .password(password)
                    .email(email)
                    .role(role)
                    .provider(provider)
                    .providerId(providerId)
                    .birthday(null)
                    .imageUrl(null)
                    .build();
            userRepository.save(userEntity);
        } else{
            System.out.println("PrincipalOauth2UserService.loadUser/회원가입이 이미 되어있습니다.");
        }
        // 회원가입이 이미 되어있다면 그냥 앞서받은 userEntity사용해도 됨
        return new PrincipalDetails(userEntity, oAuth2User.getAttributes()); // Authentication에 저장된다.
    }
}
구글외(外) 다른 사이트의 소셜로그인을 위한 설정
구글과 네이버로 사용자가 로그인해서 접속했을때 사용자를 인증하고 사용자 정보를 제공해주는 사이트가 다르기 때문에 userRequest으로 전달되는 변수가 다릅니다.
따라서 각 소셜로그인 사이트마다 다른 정보를 매핑해주는 작업이 기반되어야합니다.
config/oauth/provider 패키지를 생성합니다.
그후 안에 OAuth2UserInfo 인터페이스를 생성합니다.
package team_project.beer_community.config.oauth.provider;

public interface OAuth2UserInfo {
    // getAttributes()를 통해 전달받은 변수들에 접근하기위함
    String getProvider();
    String getProviderId();
    String getEmail();
    String getUsername();

}
그리고 oauth/provider 패키지 안에 먼저 GoogleUserInfo클래스를 생성합니다.
package team_project.beer_community.config.oauth.provider;

import java.util.Map;

public class GoogleUserInfo implements OAuth2UserInfo{

    private Map<String, Object> attributes; // oauth2User.getAttributes()

    public GoogleUserInfo(Map<String, Object> attributes) {
        this.attributes = attributes;
    }

    @Override
    public String getProvider() {
        return (String) attributes.get("sub"); // google에서 사용자에게 부여하는 pk
    }

    @Override
    public String getProviderId() {
        return "google";
    }

    @Override
    public String getEmail() {
        return (String) attributes.get("email");
    }

    @Override
    public String getUsername() {
        return (String) attributes.get("name");
    }
}
네이버 소셜로그인을 위한 설정
Application 탭> 애플리케이션 등록 클릭> 약관동의 단계> 개정정보등록 단계> 애플리케이션등록 단계 까지 오시면
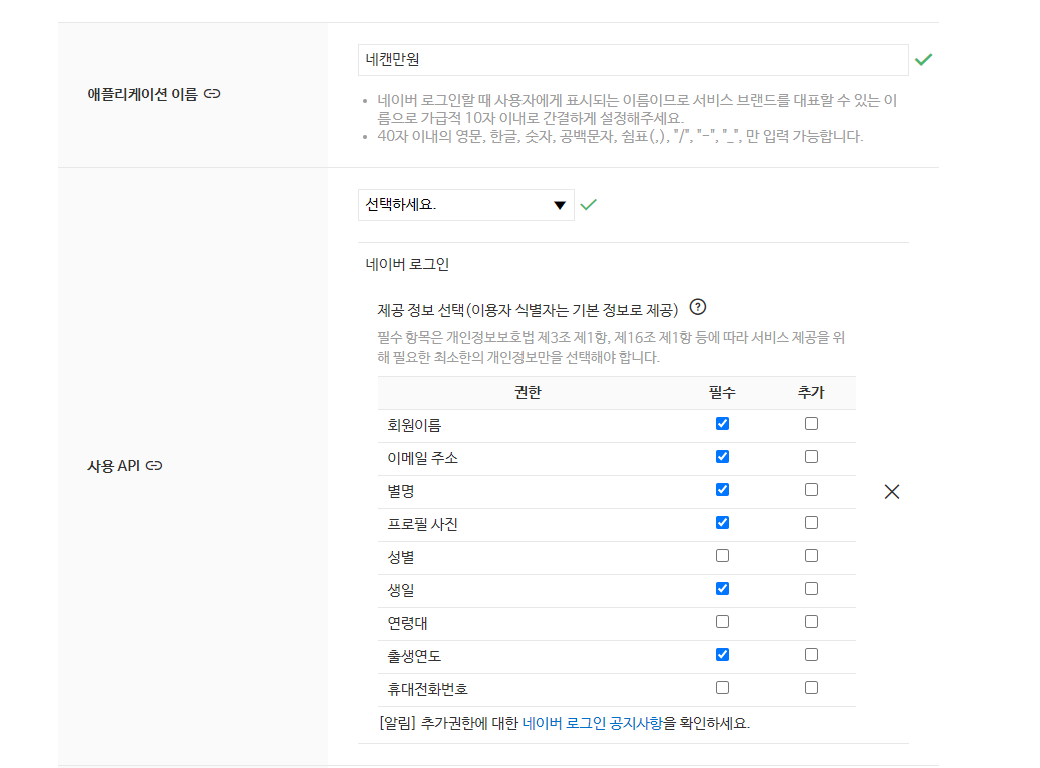
추출 필요한 필드들을 체크해주고
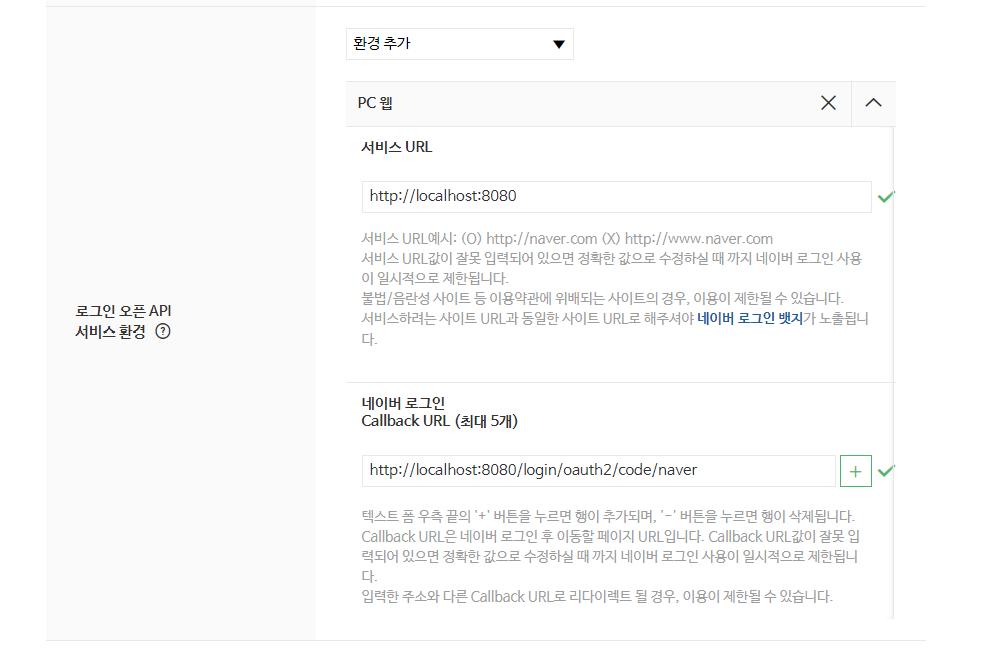
위 부분이 가장 중요한대 서비스 URL은 아직 배포하지않고 로컬환경에서 개발하고 있기 때문에 http://localhost:8080로 적어주시고 Callback URL로는 OAuth2.0에서 정해져있는 url패턴에 맞게 http://localhost:8080/login/oauth2/code/naver 으로 작성해줍니다.
이후 등록하기 버튼을 클릭해서 나오는 Client id와 Client secret을 잘 기록해두기 바랍니다.
네이버 로그인을 프로젝트에 반영시키기 위해 application.yml파일을 수정해보겠습니다.
참고할 블로그: https://blog.naver.com/getinthere/222064999924
해당 블로그 내용을 통해 보면 OAuth2.0을 통해 인증받는 방법은 두가지가 있습니다.
1. Authorization Code Grant Type방식
2. Client Credentials Grant Type방식
여기서 네이버는 첫번째 방법인 code를 활용해 AccessToken을 발급하는 방법을 따르기 때문에
application.yml을 다음과 같이 작성합니다.
그리고 redirect-uri 같은 경우 앞서 설명드린바와 같이 Naver는 Spring에서 기본적으로 provider로 제공해주지 않기때문에 따로 명시를 해주어야 합니다.(google, facebook같은 경우는 default로 redirect-url가 설정되어있습니다.)
  security:
    oauth2:
      client:
        registration:
          google:
            client-id: {클라이언트 id}
            client-secret: {클라이언트 secret}
            scope:
            - email
            - profile

          naver:
            client-id: {클라이언트 id}
            client-secret: {클라이언트 secret}
            scope:
            - name
            - email
            - profile_image
            client-name: Naver
            authorization-grant-type: authorization_code
            redirect-uri: http://localhost:8080/login/oauth2/code/naver
위와 같이 작성 후 서버를 실행시키면 에러가 뜰것입니다.
org.springframework.beans.factory.UnsatisfiedDependencyException: Error creating bean with name 'securityConfig': Unsatisfied dependency expressed through method 'setContentNegotationStrategy' parameter 0; nested exception is org.springframework.beans.factory.UnsatisfiedDependencyException: Error creating bean with name 'org.springframework.boot.autoconfigure.web.servlet.WebMvcAutoConfiguration$EnableWebMvcConfiguration': Unsatisfied dependency expressed through method 'setConfigurers' parameter 0; nested exception is org.springframework.beans.factory.UnsatisfiedDependencyException: Error creating bean with name 'org.springframework.security.config.annotation.web.configuration.OAuth2ClientConfiguration$OAuth2ClientWebMvcSecurityConfiguration': Unsatisfied dependency expressed through method 'setAuthorizedClientRepository' parameter 0; nested exception is org.springframework.beans.factory.UnsatisfiedDependencyException: Error creating bean with name 'authorizedClientRepository' defined in class path resource [org/springframework/boot/autoconfigure/security/oauth2/client/servlet/OAuth2WebSecurityConfiguration.class]: Unsatisfied dependency expressed through method 'authorizedClientRepository' parameter 0; nested exception is org.springframework.beans.factory.UnsatisfiedDependencyException: Error creating bean with name 'authorizedClientService' defined in class path resource [org/springframework/boot/autoconfigure/security/oauth2/client/servlet/OAuth2WebSecurityConfiguration.class]: Unsatisfied dependency expressed through method 'authorizedClientService' parameter 0; nested exception is org.springframework.beans.factory.BeanCreationException: Error creating bean with name 'clientRegistrationRepository' defined in class path resource [org/springframework/boot/autoconfigure/security/oauth2/client/servlet/OAuth2ClientRegistrationRepositoryConfiguration.class]: Bean instantiation via factory method failed; nested exception is org.springframework.beans.BeanInstantiationException: Failed to instantiate [org.springframework.security.oauth2.client.registration.InMemoryClientRegistrationRepository]: Factory method 'clientRegistrationRepository' threw exception; nested exception is java.lang.IllegalStateException: Provider ID must be specified for client registration 'naver'요약하면 네이버는 Spring에 default로 등록된 provider가 아니기 때문에 저장할 수 없다는 뜻입니다.
(참고: Spring에선 기본적으로 Google, FaceBook, Twitter와 같은 사이트에선 provider로써 제공해주지만 Naver. Kakao와 같은 국내기업은 제공해주지 않기때문에 별도의 등록과정이 필요합니다.)
따라서 application.yml파일을 provider로 등록시키기 위해 다음과 같이 수정해줘야합니다.
  security:
    oauth2:
      client:
        registration:
          google:
            client-id: 1053412945892-im65lr8vu1dlsmjpdip3sh02130pc4it.apps.googleusercontent.com
            client-secret: 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
            scope:
            - email
            - profile

          naver:
            client-id: u1ummtkDr_kylpyQhkz3
            client-secret: TKuY8hEIZ0
            scope:
            - name
            - email
            - profile_image
            client-name: Naver
            authorization-grant-type: authorization_code
            redirect-uri: http://localhost:8080/login/oauth2/code/naver

        provider:
          naver:
            authorization-uri: https://nid.naver.com/oauth2.0/authorize
            token-uri: https://nid.naver.com/oauth2.0/token
            user-info-uri: https://openapi.naver.com/v1/nid/me
            user-name-attribute: response # 회원정보를 json으로 받는데 response라는 키값으로 네이버가 return해줌.(value에는 getAttributes()한 값들이 들어가있음)
추가적으로 네이버로그인 페이지에 접속하기 위해 login.html페이지를 수정해줍니다.
# templates/login.html
...
<a href="/oauth2/authorization/naver">네이버 로그인</a>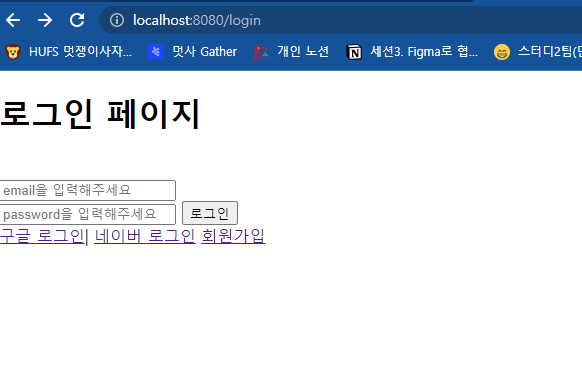
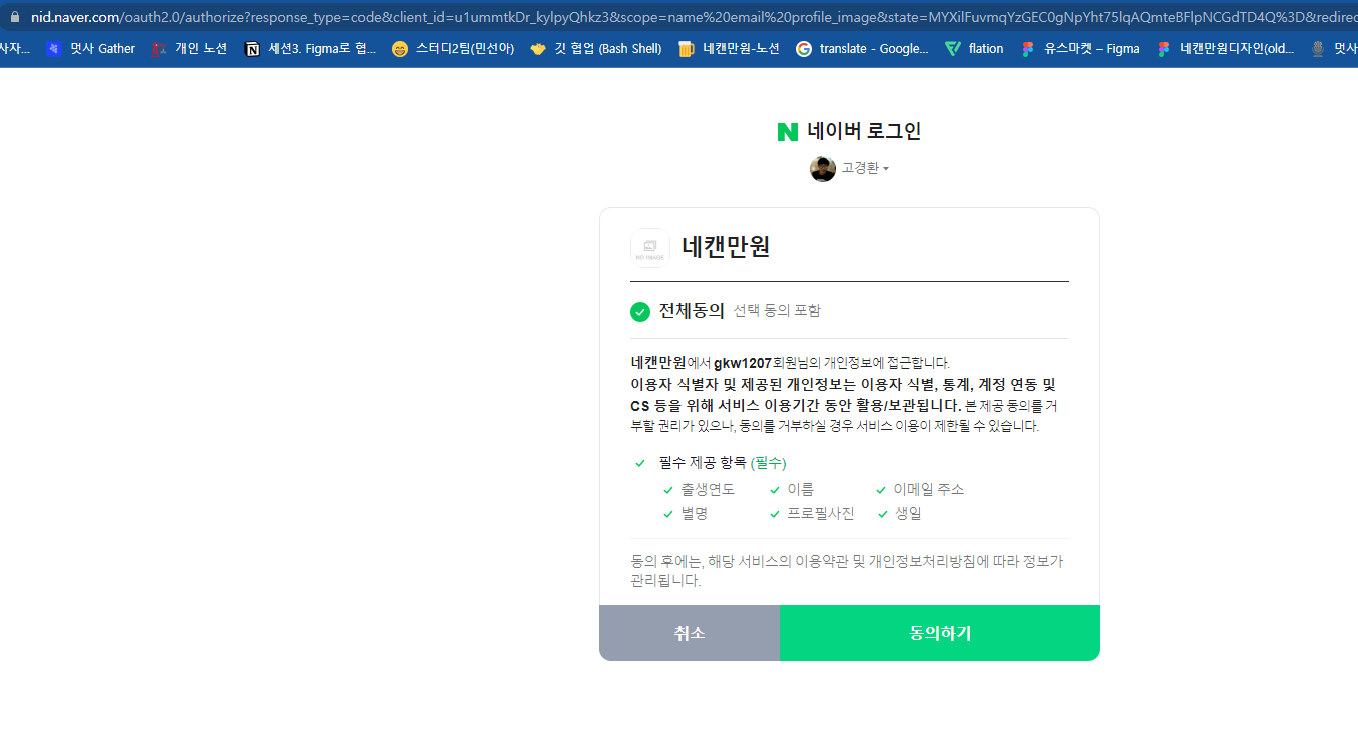
여기서 동의하기를 클릭하면 아래와 같이 500에러가 뜰것입니다.
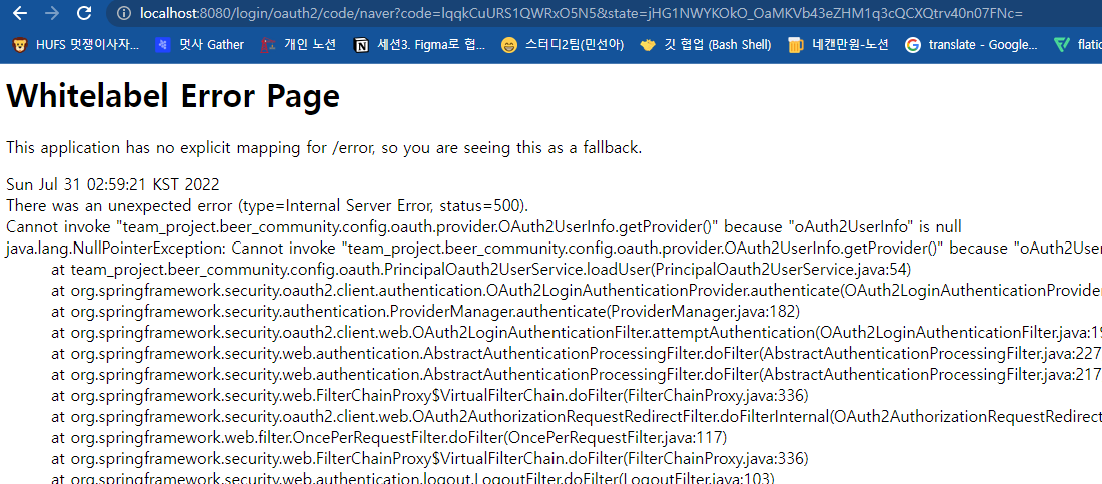
그 이유는 아직 Naver로 접근했을 때 UserInfo를 저장하는 로직을 구현하지 않아서 그렇습니다.
GoogleUserInfo와 유사하게 NaverUserInfo 클래스 파일을 만들고
package team_project.beer_community.config.oauth.provider;

import java.util.Map;

public class NaverUserInfo implements OAuth2UserInfo{
    // oAuth2User.getAttributes() = {resultcode=00, message=success, response={id=gemgDkrwZwCX-gA3TE7mHR0OAW4doONhq7ZUTonE1YU, nickname=고경환, profile_image=https://phinf.pstatic.net/contact/20220316_119/1647425542931YWABt_JPEG/image.jpg, email={이메일}, name=고경환, birthday=12-07, birthyear=1998}}
    // 중에서 response={id=gemgDkrwZwCX-gA3TE7mHR0OAW4doONhq7ZUTonE1YU, nickname=고경환, profile_image=https://phinf.pstatic.net/contact/20220316_119/1647425542931YWABt_JPEG/image.jpg, email={이메일}, name=고경환, birthday=12-07, birthyear=1998}}
    // 만 augments로 받아서 생성자로 초기화시킴.
    private Map<String, Object> attributes; // oauth2User.getAttributes()

    public NaverUserInfo(Map<String, Object> attributes) {
        this.attributes = attributes;
    }

    @Override
    public String getProvider() {
        return (String) attributes.get("id");
    }

    @Override
    public String getProviderId() {
        return "naver";
    }

    @Override
    public String getEmail() {
        return (String) attributes.get("email");
    }

    @Override
    public String getUsername() {
        return (String) attributes.get("name");
    }

    public String getProfileImage() {return (String) attributes.get("profile_image");}

    public String getBirthDay() {return (String) attributes.get("birthyear") + "-" + (String) attributes.get("birthday");}
}
위와 같이 작성합니다. 그리고
# config/oauth/PrincipalOauth2UserService.java

,,,

@Override // 구글소셜로그인 후 구글로 부터 받은 userRequest 데이터에 대한 후처리되는 함수
    public OAuth2User loadUser(OAuth2UserRequest userRequest) throws OAuth2AuthenticationException {

        OAuth2User oAuth2User = super.loadUser(userRequest);
        System.out.println("oAuth2User.getAttributes() = " + oAuth2User.getAttributes());
        // oAuth2User.getAttributes() = {resultcode=00, message=success, response={id=gemgDkrwZwCX-gA3TE7mHR0OAW4doONhq7ZUTonE1YU, nickname=고경환, profile_image=https://phinf.pstatic.net/contact/20220316_119/1647425542931YWABt_JPEG/image.jpg, email={이메일}, name=고경환, birthday=12-07, birthyear=1998}}

        OAuth2UserInfo oAuth2UserInfo = null;
        if(userRequest.getClientRegistration().getRegistrationId().equals("google")){
            System.out.println("구글 로그인 요청");
            oAuth2UserInfo = new GoogleUserInfo(oAuth2User.getAttributes());

        }else if(userRequest.getClientRegistration().getRegistrationId().equals("naver")){

            // getAttributs()한것에서 key값이 response에 해당하는 value를 param으로 넘겨줘야한다.
            oAuth2UserInfo = new NaverUserInfo((Map)oAuth2User.getAttributes().get("response"));
            System.out.println("네이버 로그인 요청");

        }else{
            System.out.println("\n** 구글과 네이버만 소셜로그인이 가능합니다! **");
        }
네이버는 userRequest 의 형태가 다르기 때문에 전달받은 userRequest에서 response에 해당하는 value값을 생성자에게 넘겨줌으로써 정상적으로 로그인을 진행할 수 있습니다.
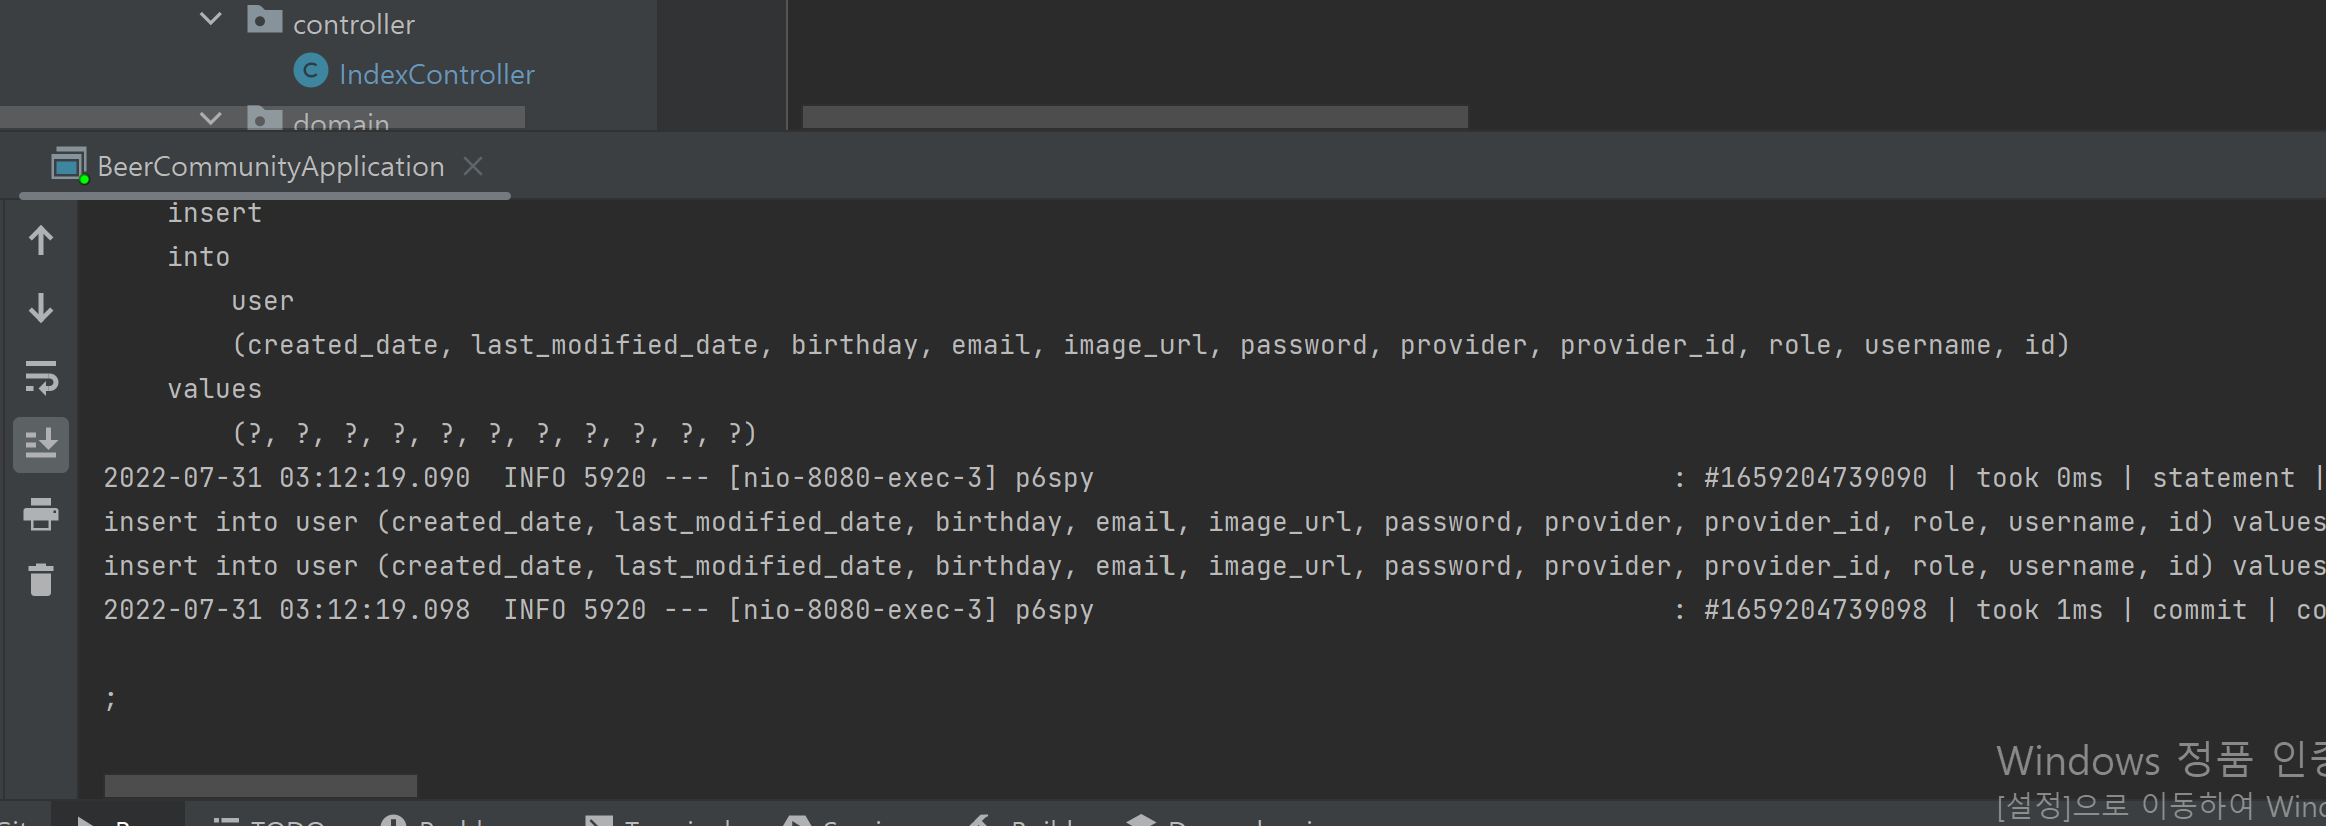
아래 이미지는 정상적으로 네이버 로그인을 하고 나서 발생한 insert쿼리문입니다.