기존에 진행했던 투두리스트를 리액트와 스타일 컴포넌트를 공부 한 후에 다시 만들어 보았다. 상태관리를 해주는 리덕스를 경험 해보고자하여 리덕스 또한 적용 하였으며, 리덕스 툴킷을 최대한 이용하고자 노력 하였다.
1. 폴더트리 구성
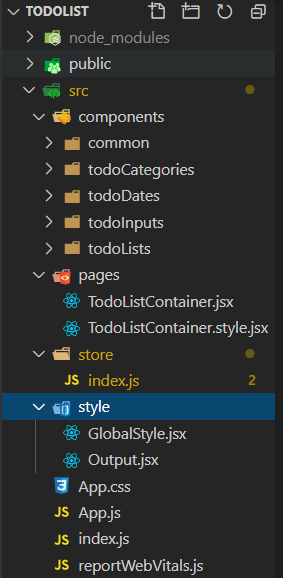
reset css와 아웃풋을 잡아주는 css는 style폴더에 따로 만들었으며, 큰 페이지를 구성하는 파일은 page폴더,나머지 컴포넌트는 components폴더에 넣어서 폴더트리를 구성하였다.
상태관리를 하기 위한 리덕스페이지는 store 폴더에 따로 담아 두었다.
2. 기본 파일 구조
// App.js
function App() {
  return (
    <>
      <GlobalStyle />
      <Output>
        <TodoListContainer />
      </Output>
    <>
  );
}
가장 첫번째 파일인 App.js는 reset css와 아웃풋이 담긴 스타일로 감싸주었으며
//TodoListContainer.js
function TodoList() {
  return (
    <Styled.Container>
      <TodoCategory />
      <TodoDates />
      <TodoInputs />
      <TodoLists />
    </Styled.Container>
  );
}
첫번째 페이지인 todoListContainer파일 안에 컴포넌트를 나누어서 구성하였다.
3. 리덕스 페이지 대략적인 구조 만들기
기본적인 코드를 작성하기 전에 헷갈리지 않기 위해서 리덕스 툴킷의 기능구현을 먼저 확인하는 작업을 진행 하였다.
3-1. 필요한 디펜던시 import 해오기
// store/index.js
import {
  combineReducers,
  configureStore,
  createAction,
  createReducer,
} from "@reduxjs/toolkit";
3-2. initialState와 action 만들기
// store/index.js
import {
combineReducers,
configureStore,
createAction,
createReducer,
} from "@reduxjs/toolkit";
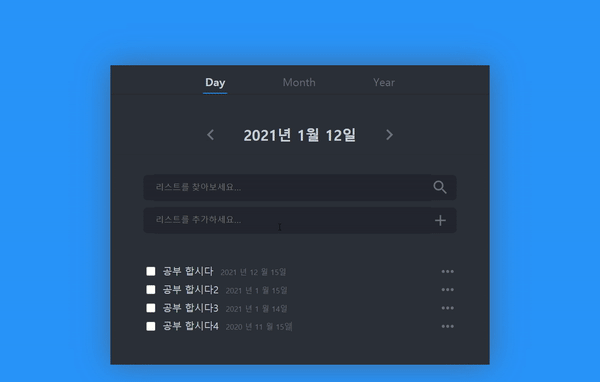
export const todos = [
{
id: 1,
dates: "2021 - 12 - 15",
content: "공부 합시다",
clicked: false,
done: false,
},
{
id: 2,
dates: "2021 - 1 - 15",
content: "공부 합시다2",
clicked: false,
done: false,
},
{
id: 3,
dates: "2021 - 1 - 14",
content: "공부 합시다3",
clicked: false,
done: false,
},
{
id: 4,
dates: "2020 - 11 - 15",
content: "공부 합시다4",
clicked: false,
done: false,
},
];
export const createList = createAction("CREATE_LIST");
export const deleteList = createAction("DELETE_LIST");
export const toggleDeleteList = createAction("TOGGLE_DELETE");
export const toggleDoneList = createAction("TOGGLE_DONE");3-3. 리듀서 만들기
// store/index.js
import {
  combineReducers,
  configureStore,
  createAction,
  createReducer,
} from "@reduxjs/toolkit";

export const todos = [
  {
    id: 1,
    dates: "2021 - 12 - 15",
    content: "공부 합시다",
    clicked: false,
    done: false,
  },
  {
    id: 2,
    dates: "2021 - 1 - 15",
    content: "공부 합시다2",
    clicked: false,
    done: false,
  },
  {
    id: 3,
    dates: "2021 - 1 - 14",
    content: "공부 합시다3",
    clicked: false,
    done: false,
  },
  {
    id: 4,
    dates: "2020 - 11 - 15",
    content: "공부 합시다4",
    clicked: false,
    done: false,
  },
];

export const createList = createAction("CREATE_LIST");
export const deleteList = createAction("DELETE_LIST");
export const toggleDeleteList = createAction("TOGGLE_DELETE");
export const toggleDoneList = createAction("TOGGLE_DONE");

const todoReducer = createReducer(todos, {
  [createList]: (state, { payload }) => {},
  [deleteList]: (state, { payload }) => {},
  [toggleDeleteList]: (state, { payload }) => {},
  [toggleDoneList]: (state, { payload }) => {},
});
3-4. 리듀서combine하고 store만들기
// store/index.js
import {
  combineReducers,
  configureStore,
  createAction,
  createReducer,
} from "@reduxjs/toolkit";

export const todos = [
  {
    id: 1,
    dates: "2021 - 12 - 15",
    content: "공부 합시다",
    clicked: false,
    done: false,
  },
  {
    id: 2,
    dates: "2021 - 1 - 15",
    content: "공부 합시다2",
    clicked: false,
    done: false,
  },
  {
    id: 3,
    dates: "2021 - 1 - 14",
    content: "공부 합시다3",
    clicked: false,
    done: false,
  },
  {
    id: 4,
    dates: "2020 - 11 - 15",
    content: "공부 합시다4",
    clicked: false,
    done: false,
  },
];

export const createList = createAction("CREATE_LIST");
export const deleteList = createAction("DELETE_LIST");
export const toggleDeleteList = createAction("TOGGLE_DELETE");
export const toggleDoneList = createAction("TOGGLE_DONE");

const todoReducer = createReducer(todos, {
  [createList]: (state, { payload }) => {},
  [deleteList]: (state, { payload }) => {},
  [toggleDeleteList]: (state, { payload }) => {},
  [toggleDoneList]: (state, { payload }) => {},
});

const reducer = combineReducers({ todoReducer });

export const store = configureStore({ reducer });
combineReducers를한 이유는 추후에 리듀서가 추가 될수도 있기 때문이다.
3-5. Provider 만들기
//App.js
import { Provider } from "react-redux";
import { store } from "./store/index";

function App() {
  return (
    <Provider store={store}>
      <GlobalStyle />
      <Output>
        <TodoListContainer />
      </Output>
    </Provider>
  );
}

export default App;
이렇게 Provider로 감싸면 하위 컴포넌트에서 store에 모두 접근 할 수 있다.
4. 기본 jsx및 style만들기
컴포넌트마다 폴더를 만들어서 폴더안에 jsx파일과 style.jsx파일을 구성하였다.
//TodoLists.jsx
import * as Styled from "./TodoLists.style";
import { useSelector, useDispatch } from "react-redux";
function TodoLists() {

  let todos = useSelector((state) => {
    return state.todoReducer;
  });

  let dates = null;

  return (
    <Styled.ListContainer>
      {todos.map((data) => {
        dates = data.dates.split("-");
        const listYear = dates[0];
        const listMonth = dates[1];
        const listDate = dates[2];

        return (
          <Styled.List done={data.done} key={data.id}>
            <Styled.ListLeft>
              <input type='checkbox' />
              <Styled.TodoContent done={data.done}>
                {data.content}
                <span>
                  {listYear}년 {listMonth}월 {listDate}일
                </span>
              </Styled.TodoContent>
            </Styled.ListLeft>
            <Styled.MoreIcon
              fontSize='small'
            />
            <Styled.MoreContainer clicked={data.clicked}>
              <Styled.DeleteBox >
                <Styled.DeleteIcon fontSize='small' />
                <p>Delete</p>
              </Styled.DeleteBox>
              <Styled.DoneBox >
                <Styled.CheckIcon fontSize='small' />
                <p>Done</p>
              </Styled.DoneBox>
            </Styled.MoreContainer>
          </Styled.List>
        );
      })}
    </Styled.ListContainer>
  );
}

export default TodoLists;
react-redux 훅인 useSelector를 사용하여 리덕스에서 state를 가져올 수 있었으며, 가져온 state에 map을 사용하여 리스트를 화면에 나오게 하였다. 또한 태그가 스타일 컴포넌트에서 온 태그라는것을 보여주기 위하여 'Styled.태그이름' 구조로 작성 하였다.
//TodoList.style.jsx
import Styled, { css } from "styled-components";
import { whiteFontColor } from "../common/Common.style";
import { grayFontColor } from "./../common/Common.style";
import MoreHorizIcon from "@material-ui/icons/MoreHoriz";
import DeleteForeverIcon from "@material-ui/icons/DeleteForever";
import DoneIcon from "@material-ui/icons/Done";

export const ListContainer = Styled.ul`
  width:100%;
  padding:0 45px;
  margin:40px 0;
`;

export const List = Styled.li`
  list-style:none;
  display:flex;
  justify-content:space-between;
  align-items:center;
  position:relative;
`;

export const ListLeft = Styled.div`
  display:flex;
  input {
    margin-right:10px;
  }
  p {
    span {
      color: ${grayFontColor};
      font-size:0.51rem;
      margin:0 10px;
    }
  }
`;

export const TodoContent = Styled.p`
  color:${whiteFontColor};
  font-size:0.65rem;
  position:relative;

  :after {
    content:'';
    width:0;
    height:1px;
    position:absolute;
    background-color:${whiteFontColor};
    top:50%;
    left:0;
    transition:.2s linear;
    ${({ done }) =>
      done &&
      css`
        width: 100%;
      `}
  }

  ${({ done }) =>
    done &&
    css`
      color: ${grayFontColor};
    `}
`;

export const MoreIcon = Styled(MoreHorizIcon)`
  &&{
  color: ${grayFontColor};
  cursor:pointer;
  transition:.1s linear;
  }
  &:hover {
    color:${whiteFontColor}
  }
`;

const iconStyle = css`
  color: #aab0b6;
  margin-right: 5px;
  && {
    transition: 0.1s linear;
  }
`;

export const DeleteIcon = Styled(DeleteForeverIcon)`
  ${iconStyle}
`;

export const MoreContainer = Styled.div`
  background-color: rgb(58, 58, 58);
  position:absolute;
  right:-4px;
  bottom:-72px;
  padding: 11px 12px;
  border-radius: 5px;
  box-shadow: 0 0 3px rgb(36, 36, 36);
  cursor:pointer;
  z-index:1;

  ${({ clicked }) =>
    !clicked &&
    css`
      display: none;
    `}

  &:before {
    content:"";
    position:absolute;
    top:-4px;
    right:12.5px;
    width:8px;
    height:8px;
    transform:rotate(45deg);
    background-color: rgb(58, 58, 58);
  }
`;

const moreListStyle = css`
  display: flex;
  align-items: center;

  &:hover {
    p {
      color: ${whiteFontColor};
    }
    ${DeleteIcon} {
      color: ${whiteFontColor};
    }
  }

  p {
    font-size: 0.6rem;
    color: #aab0b6;
    transition: 0.1s linear;
  }
`;

export const DeleteBox = Styled.div`
  ${moreListStyle}
`;

export const DoneBox = Styled.div`
  ${moreListStyle}
`;

export const CheckIcon = Styled(DoneIcon)`
  ${iconStyle}
`;
간단한 트랜지션이 들어간 기능들은 styled-component를 씀으로써 훨씬 간단해진것 같다.
5. 클릭 기능 구현하기
이제 대략적인 아웃풋이 완성 되었다고 생각되어, 클릭할때 나타날 기능들을 구현 하였다.
리스트 추기, 삭제, 리스트에서 끝낸일 표시하기를 만들었다.
//TodoLists.jsx
import { useSelector, useDispatch } from "react-redux";
import {
  toggleDeleteList,
  deleteList,
  toggleDoneList,
} from "../../store/index";

  const dispatch = useDispatch();

  const moreOnClick = (currentId) => {
    dispatch(toggleDeleteList({ id: currentId }));
  };

  const doneOnClick = (currentId) => {
    dispatch(toggleDoneList({ id: currentId }));
  };

  const onDelete = (currentId) => {
    dispatch(deleteList({ id: currentId }));
  };
기존에 만들었던 파일 안에 useDispatch를 import하여 dispatch를 먼저 사용할 수 있게 useDispatch를 사용하였다.
또한 각 클릭 기능마다 dispatch()를 사용하였고, 안에는 리듀서안에 액션타입을 실행 시켰으며, 필요한 payload를 넣어 주었다.
6. reducer에 기능 구현하기
// store/index.js
const todoReducer = createReducer(todos, {
  [createList]: (state, { payload }) => state.push(payload.list),

  [deleteList]: (state, { payload }) =>
    state.filter((list) => list.id !== payload.id),

  [toggleDeleteList]: (state, { payload }) => {
    state.map((list) => {
      if (!list.clicked) {
        if (list.id === Number(payload.id)) {
          return (list.clicked = true);
        }
      } else {
        return (list.clicked = !list.clicked);
      }
    });
  },

  [toggleDoneList]: (state, { payload }) => {
    state.map((list) => {
      if (list.id === Number(payload.id)) {
        list.done = !list.done;
      }
    });
  },
});
각각 payload로 받은 값들을 이용하여 기능을 구현 하였다. redux-toolkit은 리액트에서 가장 중요한 불변성을 지키기 위하여 노력하지 않아도 된다. 불변성을 지키지 않아도 지켜주는 immer라는 라이브러리가 내장되어있기 때문이다. 그리하여 createList 기능에서는 push를 해서 구현해도 상관이 없다.
