Pretrained 된 Inference 모델 로딩 방법
- Weight 모델, config 파일을 Darknet 사이트에서 다운한다 (https://pjreddie.com/darknet/yolo/)
- cv2.dnn.readNetFromDarknet 으로 pretrained된 inference 모델을 로딩한다
- 주의) readNetFromDarknet 에서 config 파일인자는 weight 파일 인자보다 먼저 위치한다. (config파일, weight 파일) 순이다.
Detection 결과 추출
최종적으로 Darknet 고유한 모델에서 3개의 detection 결과를 도출하게 되는데, (FPN 때문에) 이때 추출할 레이어는 82번, 94번, 106번이었다. 이에 해당하는 레이어에서 Object Detection 결과를 각각 추출하고 (코드를 쓰고) NMS 로 최종 결과를 필터링 해야한다.
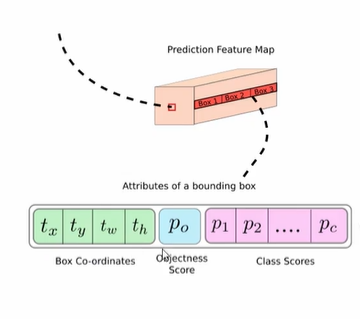
최종적으로 85개의 구성에서 bbox 정보를 추출한다.
- bbox 4개 좌표, 1개 Objec Score, 80개 class score
- clas id, class score: 가장 높은 값의 인덱스
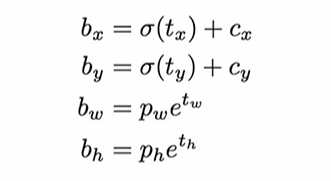
Detected 된 좌표는 center(중심 x, y), width, height 값이므로 이를 가지고 좌상단, 우하단으로 변경한다.
OpenCV Darknet Yolo이용 Object Detection (with Code)
이제 Inference 수행하는 것을 코드와 함께 보자. 해야할 일을 정리하면 다음과 같았다.
- Pretrained model (config, weights) 로딩
- 레이어 3개에서 Object Detection 결과 추출
- NMS
✅ Pretrained model 로딩
현재 로딩해볼 것은 다음 링크 2개에 있는 yolo3 모델이다.
- config: https://raw.githubusercontent.com/pjreddie/darknet/master/cfg/yolov3.cfg
- weights: https://pjreddie.com/media/files/yolov3.weights
코랩에서 실행한다고 가정할 때, !mkdir 로 디렉토리를 만들어주고 !wget -O [output경로][다운로드 경로] 를 실행해주면 된다.
!mkdir ./pretrained
!echo "##### downloading pretrained yolo/tiny-yolo weight file and config file"
!wget -O /content/pretrained/yolov3.weights https://pjreddie.com/media/files/yolov3.weights
!wget -O /content/pretrained/yolov3.cfg https://github.com/pjreddie/darknet/blob/master/cfg/yolov3.cfg?raw=true
tiny 모델도 다운받아보자.
!wget -O /content/pretrained/yolov3-tiny.weights https://pjreddie.com/media/files/yolov3-tiny.weights
!wget -O /content/pretrained/yolov3-tiny.cfg https://github.com/pjreddie/darknet/blob/master/cfg/yolov3-tiny.cfg?raw=true
이제 cv2.dnn.readNetFromDarknet 으로 모델을 로딩하면 된다. 주의해야 할 것은 이때의 경우 config, 가중치 순서이다.
import os
import cv2

weights_path = '/content/pretrained/yolov3.weights'
config_path =  '/content/pretrained/yolov3.cfg'
#config 파일 인자가 먼저 옴.
cv_net_yolo = cv2.dnn.readNetFromDarknet(config_path, weights_path)
✅ 3개의 layer 에서 결과 추출 (레이어 추출)
추출하기 전 라벨과 숫자를 매핑해주자. COCO dataset 의 경우 80개의 클래스가 있고, 해당 딕셔너리는 후에 숫자를 가지고 이름으로 변환하여 캡션을 달 때 사용할 것이다.
labels_to_names_seq = {0:'person',1:'bicycle',2:'car',3:'motorbike',4:'aeroplane',5:'bus',6:'train',7:'truck',8:'boat',9:'traffic light',10:'fire hydrant',
                        11:'stop sign',12:'parking meter',13:'bench',14:'bird',15:'cat',16:'dog',17:'horse',18:'sheep',19:'cow',20:'elephant',
                        21:'bear',22:'zebra',23:'giraffe',24:'backpack',25:'umbrella',26:'handbag',27:'tie',28:'suitcase',29:'frisbee',30:'skis',
                        31:'snowboard',32:'sports ball',33:'kite',34:'baseball bat',35:'baseball glove',36:'skateboard',37:'surfboard',38:'tennis racket',39:'bottle',40:'wine glass',
                        41:'cup',42:'fork',43:'knife',44:'spoon',45:'bowl',46:'banana',47:'apple',48:'sandwich',49:'orange',50:'broccoli',
                        51:'carrot',52:'hot dog',53:'pizza',54:'donut',55:'cake',56:'chair',57:'sofa',58:'pottedplant',59:'bed',60:'diningtable',
                        61:'toilet',62:'tvmonitor',63:'laptop',64:'mouse',65:'remote',66:'keyboard',67:'cell phone',68:'microwave',69:'oven',70:'toaster',
                        71:'sink',72:'refrigerator',73:'book',74:'clock',75:'vase',76:'scissors',77:'teddy bear',78:'hair drier',79:'toothbrush' }
다음으로는 본격적으로 3개의 레이어에서 결과 데이터를 추출할 것이다.
- 모델 로딩한 것으로 cv_net_yolo.getLayerNames() 해보면 해당 모델의 모든 레이어 이름을 확인할 수 있다
cv_net_yolo.getUnconnectedOutputLayers()로 detection 결과 레이어 인덱스를 추출할 수 있고- 인덱싱을 추출한 이름에 넣어 정확한 이름을 확인할 수 있다.
종합하면 다음과 같이 결과를 구한다.
# 전체 이름을 가지는 layer_names 변수
layer_names = cv_net_yolo.getLayerNames()
# 연결되지 않은 결과 레이어의 인덱스를 가지고 layer_names 로 인덱싱해준다
outlayer_names = [layer_names[i - 1] for i in cv_net_yolo.getUnconnectedOutLayers()]
# 결과로 output_layer name: ['yolo_82', 'yolo_94', 'yolo_106']가 출력된다
print('output_layer name:', outlayer_names)
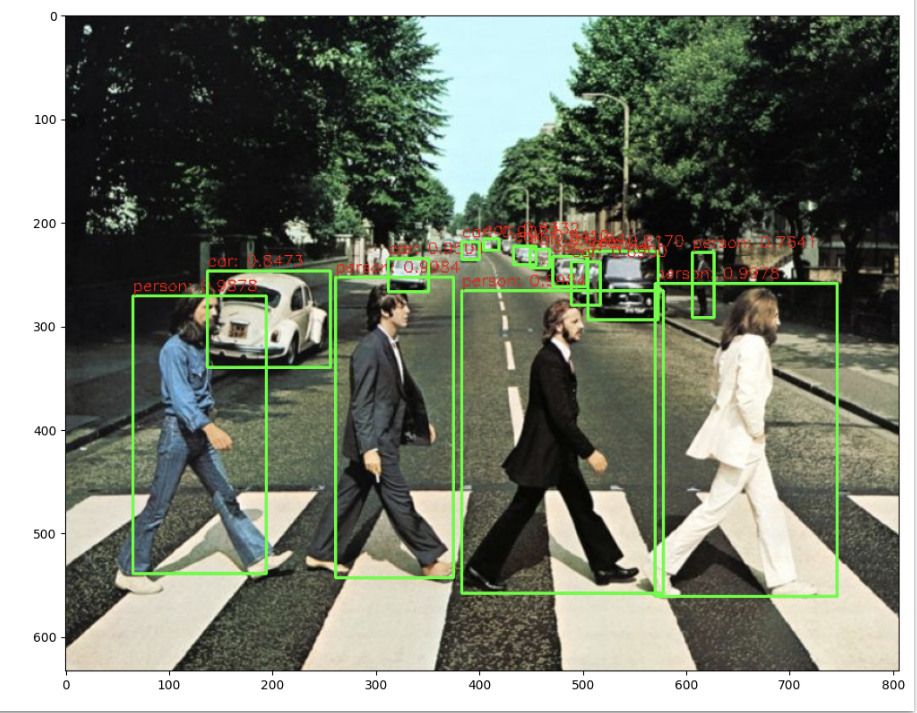
img = cv2.imread('./data/beatles01.jpg')
img_rgb = cv2.cvtColor(img, cv2.COLOR_BGR2RGB)
# 로딩한 모델은 Yolov3 416 x 416 모델이므로 원본 이미지 배열을 사이즈 (416, 416)으로, BGR을 RGB로 변환하여 배열 입력
cv_net_yolo.setInput(cv2.dnn.blobFromImage(img, scalefactor=1/255.0, size=(416, 416), swapRB=True, crop=False))
# Object Detection 수행하여 결과를 cvOut으로 반환
cv_outs = cv_net_yolo.forward(outlayer_names)
# cv_outs 의 개수는 3개이다
print('cv_outs type:', type(cv_outs), 'cv_outs의 내부 원소개수:', len(cv_outs))
print(cv_outs[0].shape, cv_outs[1].shape, cv_outs[2].shape)
print(cv_outs)최종적인 shape 출력결과는 다음과 같다. (507, 85) (2028, 85) (8112, 85) 이들이 tuple 로써 묶여있는데,
- 507은 13X13X3 이다. (각 격자 셀 X 3개 anchor box), 85개 정보
- 2028은 26X26X3
- 8112는 52X52X3
✅ 3개의 layer 에서 결과 추출 (class_ids, confidences, boxes)
이제 각각 반복문을 돌며 리스트를 채워보자.
import numpy as np

# 원본 이미지를 네트웍에 입력시에는 (416, 416)로 resize 함.
# 이후 결과가 출력되면 resize된 이미지 기반으로 bounding box 위치가 예측 되므로 이를 다시 원복하기 위해 원본 이미지 shape정보 필요
rows = img.shape[0]
cols = img.shape[1]

conf_threshold = 0.5
nms_threshold = 0.4

# bounding box의 테두리와 caption 글자색 지정
green_color=(0, 255, 0)
red_color=(0, 0, 255)

class_ids = []
confidences = []
boxes = []
위는 그저 복원을 위해 rows, cols 를 추출한 부분이다. threshold 는 바꿔가며 지정하면 된다. 예측 결과를 담을 리스트 3개를 준비해주자.
# 3개의 개별 output layer별로 Detect된 Object들에 대해서 Detection 정보 추출 및 시각화
for ix, output in enumerate(cv_outs):
    print('output shape:', output.shape)
    # feature map에 있는 anchor 갯수만큼 iteration하면서 Detected 된 Object 추출.(13x13x3, 26x26x3, 52x52x3)
    for jx, detection in enumerate(output):
        # 5번부터 84까지 class score
        class_scores = detection[5:]
        # class_scores배열에서 가장 높은 값을 가지는 값이 class confidence, 그리고 그때의 위치 인덱스가 class id
        class_id = np.argmax(class_scores)
        confidence = class_scores[class_id]

        # confidence가 지정된 conf_threshold보다 작은 값은 제외
        if confidence > conf_threshold:
            print('ix:', ix, 'jx:', jx, 'class_id', class_id, 'confidence:', confidence)
            # 정규화된 좌표들, 따라서 cols, rows 곱하여 복원 (센터 x, 센터 y, 너비, 높이)로.
            center_x = int(detection[0] * cols)
            center_y = int(detection[1] * rows)
            width = int(detection[2] * cols)
            height = int(detection[3] * rows)
            left = int(center_x - width / 2) # 센터에서 너비의 절반을 빼준 값이 좌
            top = int(center_y - height / 2) # 센터에서 높이의 절반을 빼준 값이 상단
            # 3개의 개별 output layer별로 Detect된 Object들에 대한 class id, confidence, 좌표정보를 모두 수집
            class_ids.append(class_id)
            confidences.append(float(confidence))
            boxes.append([left, top, width, height])
output 자체는 반복문을 돌며 다음과 같이 들어가게 된다.
- cv_outs 의 첫번째로 jx:0, output 첫번째 리스트가 들어가게 된다
- 첫번째 output 은 따라서 507, 85 크기이다. detection 은 한 행씩 85개 열을 불러오게 된다. 아래 과정을 507번 반복한다
- class score을 5번부터 끝번까지 가져오고, argmax 로 가장 높은 클래스의 인덱스를 가져온다
- 스코어 아이디와, 스코어 아이디로 인덱싱한 confidence 를 append 할 것이다
- 좌표는 cols, rows를 곱해 센터x, 센터y, 너비, 높이 좌표를 기록하고,
- 왼쪽 좌표는 센터 - 너비/2, 위쪽 좌표는 센터 - 높이/2 로 계산한다
✅ NMS 로 filtering 된 결과를 이용하여 시각화
conf_threshold = 0.5
nms_threshold = 0.4
idxs = cv2.dnn.NMSBoxes(boxes, confidences, conf_threshold, nms_threshold)

idx.flatten()

import matplotlib.pyplot as plt

# cv2의 rectangle()은 인자로 들어온 이미지 배열에 직접 사각형을 업데이트 하므로 그림 표현을 위한 별도의 이미지 배열 생성.
draw_img = img.copy()

# NMS로 최종 filtering된 idxs를 이용하여 boxes, classes, confidences에서 해당하는 Object정보를 추출하고 시각화.
if len(idxs) > 0:
    for i in idxs.flatten():
        box = boxes[i]
        left = box[0]
        top = box[1]
        width = box[2]
        height = box[3]
        # labels_to_names 딕셔너리로 class_id값을 클래스명으로 변경. opencv에서는 class_id + 1로 매핑해야함.
        caption = "{}: {:.4f}".format(labels_to_names_seq[class_ids[i]], confidences[i])
        #cv2.rectangle()은 인자로 들어온 draw_img에 사각형을 그림. 위치 인자는 반드시 정수형.
        cv2.rectangle(draw_img, (int(left), int(top)), (int(left+width), int(top+height)), color=green_color, thickness=2)
        cv2.putText(draw_img, caption, (int(left), int(top - 5)), cv2.FONT_HERSHEY_SIMPLEX, 0.5, red_color, 1)
        print(caption)

img_rgb = cv2.cvtColor(draw_img, cv2.COLOR_BGR2RGB)
plt.figure(figsize=(12, 12))
plt.imshow(img_rgb)
idxs 에는 NMS 거친 후의 인덱스들이 들어있다. 해당 인덱스는 이전에 담은 3개의 리스트 내에서 뽑은 것이므로, boxes, class_id, confidences 의 인덱스가 된다. 반복문을 돌며 캡션 생성 -> 이미지에 사각형 그리기 -> 이미지에 캡션 그리기 순서로 진행해주면 된다.