webgpu 공부 정리 ~ vertex buffer

import shader from "./shaders/shaders.wgsl";
import { TriangleMesh } from './triangle_mesh';

const Initialize = async() => {

    const canvas : HTMLCanvasElement = <HTMLCanvasElement> document.getElementById("gfx-main");
    //adapter: wrapper around (physical) GPU.
    //Describes features and limits
    const adapter : GPUAdapter = <GPUAdapter> await navigator.gpu?.requestAdapter();
    //device: wrapper around GPU functionality
    //Function calls are made through the device
    const device : GPUDevice = <GPUDevice> await adapter?.requestDevice();
    //context: similar to vulkan instance (or OpenGL context)
    const context : GPUCanvasContext = <GPUCanvasContext> canvas.getContext("webgpu");
    const format : GPUTextureFormat = "bgra8unorm";
    context.configure({
        device: device,
        format: format,
        alphaMode: "opaque"
    });

    const triangleMesh: TriangleMesh = new TriangleMesh(device);

    const bindGroupLayout = device.createBindGroupLayout({
        entries: [],
    });

    const bindGroup = device.createBindGroup({
        layout: bindGroupLayout,
        entries: []
    });

    const pipelineLayout = device.createPipelineLayout({
        bindGroupLayouts: [bindGroupLayout]
    });

    const pipeline = device.createRenderPipeline({
        vertex : {
            module : device.createShaderModule({
                code : shader
            }),
            entryPoint : "vs_main",
            buffers: [triangleMesh.bufferLayout]
        },

        fragment : {
            module : device.createShaderModule({
                code : shader
            }),
            entryPoint : "fs_main",
            targets : [{
                format : format
            }]
        },

        primitive : {
            topology : "triangle-list"
        },

        layout: pipelineLayout
    });

    //command encoder: records draw commands for submission
    const commandEncoder : GPUCommandEncoder = device.createCommandEncoder();
    //texture view: image view to the color buffer in this case
    const textureView : GPUTextureView = context.getCurrentTexture().createView();
    //renderpass: holds draw commands, allocated from command encoder
    const renderpass : GPURenderPassEncoder = commandEncoder.beginRenderPass({
        colorAttachments: [{
            view: textureView,
            clearValue: {r: 0.5, g: 0.0, b: 0.25, a: 1.0},
            loadOp: "clear",
            storeOp: "store"
        }]
    });
    renderpass.setPipeline(pipeline);
    renderpass.setBindGroup(0, bindGroup);
    renderpass.setVertexBuffer(0, triangleMesh.buffer);
    renderpass.draw(3, 1, 0, 0);
    renderpass.end();

    device.queue.submit([commandEncoder.finish()]);
}

Initialize();
export class TriangleMesh {
buffer: GPUBuffer;
bufferLayout: GPUVertexBufferLayout;
constructor(device: GPUDevice) {
// x y r g b
const vertices: Float32Array = new Float32Array([
0.0, 0.5, 1.0, 0.0, 0.0,
-0.5, -0.5, 0.0, 1.0, 0.0,
0.5, -0.5, 0.0, 0.0, 1.0
]);
const usage: GPUBufferUsageFlags = GPUBufferUsage.VERTEX | GPUBufferUsage.COPY_DST;
const descriptor: GPUBufferDescriptor = {
size: vertices.byteLength,
usage,
mappedAtCreation: true, // mappedAtCreation: CPU -> GPU에 버퍼 매핑해서 서로 가져가기 쉽게함.
};
// 버퍼 생성
this.buffer = device.createBuffer(descriptor);
// 버퍼에 데이터 쓰기
new Float32Array(this.buffer.getMappedRange()).set(vertices);
this.buffer.unmap();
this.bufferLayout = {
arrayStride: 20, // 5 * 4
attributes: [
{
shaderLocation: 0,
format: "float32x2",
offset: 0,
},
{
shaderLocation: 1,
format: "float32x2",
offset: 2*4,
}
]
}
}
}struct Fragment {
@builtin(position) Position : vec4<f32>,
@location(0) Color : vec4<f32>
};
@vertex
fn vs_main(@location(0) vertexPosition: vec2<f32>, @location(1) vertexColor: vec3<f32>) -> Fragment {
var output : Fragment;
output.Position = vec4<f32>(vertexPosition, 0.0, 1.0);
output.Color = vec4<f32>(vertexColor, 1.0);
return output;
}
@fragment
fn fs_main(@location(0) Color: vec4<f32>) -> @location(0) vec4<f32> {
return Color;
}
webgl과 살짝 달라졌다.
webgpu부터는 개발자가 직접 pipeline을 선언하고 어떤 명령을 GPU에게 수행해야할지 직접 적어야 한다.
webgl은 모든 상태가 전역 상태로 존재했는데 webgpu 부터는 BindGroup 이라는 개념이 생겨나, 텍스처, 버퍼, 유니폼 버퍼등을 Group 단위로 관리한다.
shader 언어도 glsl -> wgsl 언어로 변경되었다.
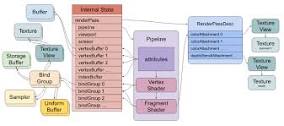
webgpu 그리는 순서를 정리하면 아래와 같다.
// draw something
{
  pass = encoder.beginRenderPass(...)
  pass.setPipeline(...)
  pass.setVertexBuffer(0, …)
  pass.setVertexBuffer(1, …)
  pass.setIndexBuffer(...)
  pass.setBindGroup(0, …)
  pass.setBindGroup(1, …)
  pass.draw(...)
  pass.end()
}
코드에서도 다양한 Layout 선언부분을 제외하곤 위 그림과 동일한 흐름으로 들어간다.
- webgpu 객체 가져오기
    const canvas : HTMLCanvasElement = <HTMLCanvasElement> document.getElementById("gfx-main");
    //adapter: wrapper around (physical) GPU.
    //Describes features and limits
    const adapter : GPUAdapter = <GPUAdapter> await navigator.gpu?.requestAdapter();
    //device: wrapper around GPU functionality
    //Function calls are made through the device
    const device : GPUDevice = <GPUDevice> await adapter?.requestDevice();
    //context: similar to vulkan instance (or OpenGL context)
    const context : GPUCanvasContext = <GPUCanvasContext> canvas.getContext("webgpu");
    const format : GPUTextureFormat = "bgra8unorm";
    context.configure({
        device: device,
        format: format,
        alphaMode: "opaque"
    });
navigator.gpu에 존재함, 크롬에만 정식 릴리즈 되어 있어서 예외처리가 필수적.
- renderPass 정의하기
    const renderpass : GPURenderPassEncoder = commandEncoder.beginRenderPass({
        colorAttachments: [{
            view: textureView,
            clearValue: {r: 0.5, g: 0.0, b: 0.25, a: 1.0},
            loadOp: "clear",
            storeOp: "store"
        }]
    });
loadOp : 새로운 텍스처 load시 기존 텍스처는 지워버림
storeOp: 그린 결과를 gpu에 저장함.
- 파이프라인 정의
    const pipeline = device.createRenderPipeline({
        vertex : {
            module : device.createShaderModule({
                code : shader
            }),
            entryPoint : "vs_main",
            buffers: [triangleMesh.bufferLayout]
        },

        fragment : {
            module : device.createShaderModule({
                code : shader
            }),
            entryPoint : "fs_main",
            targets : [{
                format : format
            }]
        },

        primitive : {
            topology : "triangle-list"
        },

        layout: pipelineLayout
    });
vertex shader정보, fragment shader 정보 필요함. 어떻게 vertex를 그리지는 topology를 통해서 정의
- bindGroup 정의
    const bindGroupLayout = device.createBindGroupLayout({
        entries: [],
    });

    const bindGroup = device.createBindGroup({
        layout: bindGroupLayout,
        entries: []
    });

    const pipelineLayout = device.createPipelineLayout({
        bindGroupLayouts: [bindGroupLayout]
    });
이 코드에선 실질적으로 bindGroup 사용하지않음.
먼저 BindGroupLayout을 선언한다. (GPU에게 이런 bindGroup 이 있다는 description을 하기 위한 객체)
-
BindGroupLayout을 바탕으로 그룹 생성
-
파이프라인 레이아웃에 BindGroupLayout 추가
-
renderpass.setBindGroup으로 바인드 그룹 추가
-
vertex 정보 추가
        // x y r g b
        const vertices: Float32Array = new Float32Array([
            0.0, 0.5, 1.0, 0.0, 0.0,
            -0.5, -0.5, 0.0, 1.0, 0.0,
            0.5, -0.5, 0.0, 0.0, 1.0
        ]);

        const usage: GPUBufferUsageFlags = GPUBufferUsage.VERTEX | GPUBufferUsage.COPY_DST;

        const descriptor: GPUBufferDescriptor = {
            size: vertices.byteLength,
            usage,
            mappedAtCreation: true, // mappedAtCreation: CPU -> GPU에 버퍼 매핑해서 서로 가져가기 쉽게함.
        };

        // 버퍼 생성
        this.buffer = device.createBuffer(descriptor);
        // 버퍼에 데이터 쓰기

        new Float32Array(this.buffer.getMappedRange()).set(vertices);
        this.buffer.unmap();

        this.bufferLayout = {
            arrayStride: 20, // 5 * 4
            attributes: [
                {
                    shaderLocation: 0,
                    format: "float32x2",
                    offset: 0,
                },
                {
                    shaderLocation: 1,
                    format: "float32x2",
                    offset: 2*4,
                }
            ]
        }
여긴 webgl과 유사
4바이트단위로 stride 하는것과 offset으로 뛰어쓰는것 유사
특이점한점은
bufferDescriptor로 어떤 버퍼인지 묘사하고
createBuffer로 생성하고
버퍼레이아웃으로 생성한다는점이 다름
바인딩은 renderpass.setVertexBuffer(0, triangleMesh.buffer); 통해서 이루어짐
mappedAtCreation: true, // mappedAtCreation: CPU -> GPU에 버퍼 매핑해서 서로 가져가기 쉽게함.webgl에는 없는 기능같음
CPU <-> GPU 데이터 가져오기 쉽게하기 위한 매핑
webgpu는 GPU에 직접적인 명령을 내리는 굉장히 low level api임