AOP는 OOP와 특별히 다른 것이 아니라, OOP + a 이다!
AOP란?
: 핵심 로직과 부가적인 기능을 분리하여 유지보수를 쉽게 하는 프로그래밍 패러다임
"그 비즈니스 로직이 실행될 때 추가적으로 수행할 작업"을 담당
AOP가 왜 필요한가?
대부분의 코드는 공통적으로 필요한 부가 기능이 존재한다.
예를 들면...
로깅(Logging): 메서드 실행 전후로 로그 남기기
트랜잭션 관리(Transaction Management):메서드 실행 도중 예외가 발생하면 롤백하기
보안(Security): 특정 메서드 실행 전에 사용자 권한 확인
이를 일일이 추가하기 어려워서 별도의 모듈(aspect)로 분리해서 관리한다.
Joipoint
부가 기능을 적용할 수 있는 실행 지점
(ex. 메서드 실행 전후, 객체 생성 시점, 예외 발생 시점 등 가능)
Pointcut
JoinPoint vs Pointcut
이 둘의 차이점은!?
- AOP를 적용할 수 있는 모든 곳(음식점의 모든 메뉴) vs 그중에서 실제로 적용할 곳 선택(손님이 고른 특정 메뉴)
Pointcut은 advice를 적용할 지점이다!
- Joinpoint 예제
public class ExampleService {
    public void methodA() {}  // 조인포인트 가능
    public void methodB() {}  // 조인포인트 가능
    public void methodC() {}  // 조인포인트 가능
}
위에서 methodA(), methodB(), methodC()는 모두 AOP를 적용할 수 있는 조인포인트
- Pointcut 예제
@Aspect
@Component
public class LoggingAspect {

    @Before("execution(* com.example.service.ExampleService.methodA(..))") // methodA만 선택
    public void logBefore(JoinPoint joinPoint) {
        System.out.println("📌 Before Advice 실행됨! " + joinPoint.getSignature());
    }
}
이건 methodA()만 선택하여 AOP 적용
타겟 메소드 vs pointcut
핵심 로직(타겟 메서드)은 원래 수행해야 할 비즈니스 로직
Pointcut은 "어떤 메서드에서 AOP를 적용할지"를 선택하는 기준
@Service
public class OrderService {
    public void placeOrder() { // ⭐ 핵심 로직 (타겟 메서드)
        System.out.println("🚀 주문을 처리하는 핵심 로직 실행...");
    }
}
ㄴ핵심 로직 (타겟 메서드)
@Before("execution(* com.example.service.OrderService.placeOrder(..))") ㄴ포인트컷 (Pointcut) : 이 포인트컷이 가리키는 대상이 바로 핵심 로직.
하지만 이것 자체는 실행되는 코드x, 적용 기준o
@Advice(Pointcut)
AOP에서 실행할 부가 기능(로깅, 트랜잭션 등)
@Before(포인트컷)어떤 메서드에서 AOP를 실행할지 정의하는 조건이 들어간다.
Spring AOP는 "어디에(Where) AOP를 적용할지"를 포인트컷(Pointcut)으로 지정하고, "무엇을(What) 실행할지"는 어드바이스(Advice) 메서드에서 정의합니다.
Aspect
여러 Advice와 Pointcut을 포함하는 모듈
Target
AOP가 적용되는 실제 객체(서비스 클래스 등)
Proxy
AOP 적용을 위해 스프링이 자동으로 생성하는 가짜 객체
예시
Pointcut 표현식
execution([수식어] 리턴타입 [클래스이름].이름(파라미터))
1. 수식어: public, private 등 수식어를 명시(생략 가능)
2. 리턴 타입: 리턴 타입을 명시
3. 클래스 이름(패키지명 포함) 및 메소드 이름: 클래스이름과 메소드 이름을 명시
4. 파라미터(매개변수): 메소드의 파라미터를 명시
5. " * ": 1개이면서 모든 값이 올 수 있음
6. " .. ": 0개 이상의 모든 값이 올 수 있음
예시1. execution(public Integer com.ohgiraffers.section01.advice..(*))
=> com.ohgiraffers.section01.advice 패키지에 속해 있는 바로 다음 하위 클래스에 파라미터가 1개인 모든 메소드 이자 접근 제어자가 public이고 반환형이 Integer인 경우
예시2. execution( com.ohgiraffers.section01.advice.annotation..stu(..))
=> com.ohgiraffers.section01.advice 패키지 및 하위 패키지에 속해 있고 이름이 stu로 시작하는 파라미터가 0개 이상인 모든 메소드이며 접근제어자와 반환형은 상관 없음
@Pointcut 메서드 재활용
@Pointcut 어노테이션을 사용하면, 포인트컷을 따로 메서드로 선언할 수 있다!
실행 코드x, 단순 정의 o
@Pointcut("execution(* com.ohgiraffers.section01.aop.*Service.*(..))")
public void loggingAspect() {
}
com.ohgiraffers.section01.aop 패키지 내 *Service로 끝나는 클래스의 모든 메서드에 AOP를 적용하겠다는 의미입니다.
@Before("LoggingAspect.loggingAspect()")"LoggingAspect.loggingAspect()"는 우리가 선언한 @Pointcut 메서드를 가리킴.
LoggingAspect 클래스 안에 있는 메소드라서 단순히 LoggingAspect.를 붙인 것 뿐.
/* 설명. 1. Before Advice */
    @Before("LoggingAspect.loggingAspect()")
따라서, 여기서 logBefore(JoinPoint joinPoint) 메서드는
실행 전(@Before이 붙었으므로) 로그를 출력하는 부가 기능을 하는 것입니다.
@EnableAspectJAutoProxy(proxyTargetClass = true)
Spring AOP를 활성화하여 @Aspect 어노테이션이 붙은 클래스를 스프링이 자동으로 인식하고, @Proxy 객체를 생성하여 AOP 기능을 적용할 수 있도록 한다.
인터페이스가 없는 클래스도 프록시를 적용하려면 반드시 proxyTargetClass = true를 설정해야 한다.
@Configuration
@ComponentScan(basePackages = "com.ohgiraffers.section01.aop")
@EnableAspectJAutoProxy(proxyTargetClass = true)
public class ContextConfiguration {
}
<contextConiguration.java>파일로 따로 애플리케이션 설정을 한 곳에서 관리하기 위해 뺀다.
메인 클래스에 넣으면 코드가 복잡해지기 때문이다.
1.@Configuration
Spring 설정 클래스로 인식됨
1. @AfterThrowing
특정 메서드에서 예외가 발생하면, 그 예외를 받아서 처리한다
@AfterThrowing(pointcut="loggingAspect()", throwing="exception")

public void logAfterThrowing(Throwable exception) {
        System.out.println("After Throwing Exception: " + exception);
    }
pointcut="loggingAspect()": loggingAspect()라는 포인트컷을 적용할 메서드를 지정.
throwing="exception": 발생한 예외를 exception이라는 변수에 저장해서 사용할 수 있도록 지정.
2. @AfterReturning
    @AfterReturning(pointcut = "loggingAspect()", returning="result")

    public void logAfterReturning(JoinPoint joinPoint, Object result) {
        System.out.println("After Returning result: " + result);

        if(result != null && result instanceof List) {
            ((List<MemberDTO>) result).add(new MemberDTO(3L, "반환 값 가공"));
        }
    }
returning="result" → result는 AOP가 가로챈 메서드의 반환값
즉, AOP가 적용된 메서드가 실행된 후 반환된 결과값이 result에 들어간다!
3.@Before
 @Before("LoggingAspect.loggingAspect()")
    public void logBefore(JoinPoint joinPoint) {
        System.out.println("Before Advice 동작");
        System.out.println("Before joinPoint.getTarget(): " + joinPoint.getTarget());
        System.out.println("Before joinPoint.getSignature(): " + joinPoint.getSignature());
        if(joinPoint.getArgs().length > 0) {
            System.out.println("Before joinPoint.getArgs()[0]: " + joinPoint.getArgs()[0]);
        }
    }
4.@After
@After("LoggingAspect.loggingAspect()")
   public void logAfter(JoinPoint joinPoint) {
       System.out.println("After Advice 동작");
       System.out.println("After joinPoint.getTarget(): " + joinPoint.getTarget());
       System.out.println("After joinPoint.getSignature(): " + joinPoint.getSignature());
       if(joinPoint.getArgs().length > 0) {
           System.out.println("After joinPoint.getArgs()[0]: " + joinPoint.getArgs()[0]);
       }
   }
5.@Arouond
메서드 실행 전과 후 모두 실행되는 AOP 어드바이스
@Around("loggingAspect()")

    public Object logAround(ProceedingJoinPoint joinPoint) throws Throwable {
        System.out.println("Around Before");

        Object result = joinPoint.proceed();       // 타겟 메소드 동작

        System.out.println("Around After");

        /* 설명. 실행된 타겟 메소드를 반환(다른 어드바이스가 다시 실행될 수 있다.) */
        return result;
    }
proceed()를 호출해야!!, 실제 타겟 메서드가 실행됨.
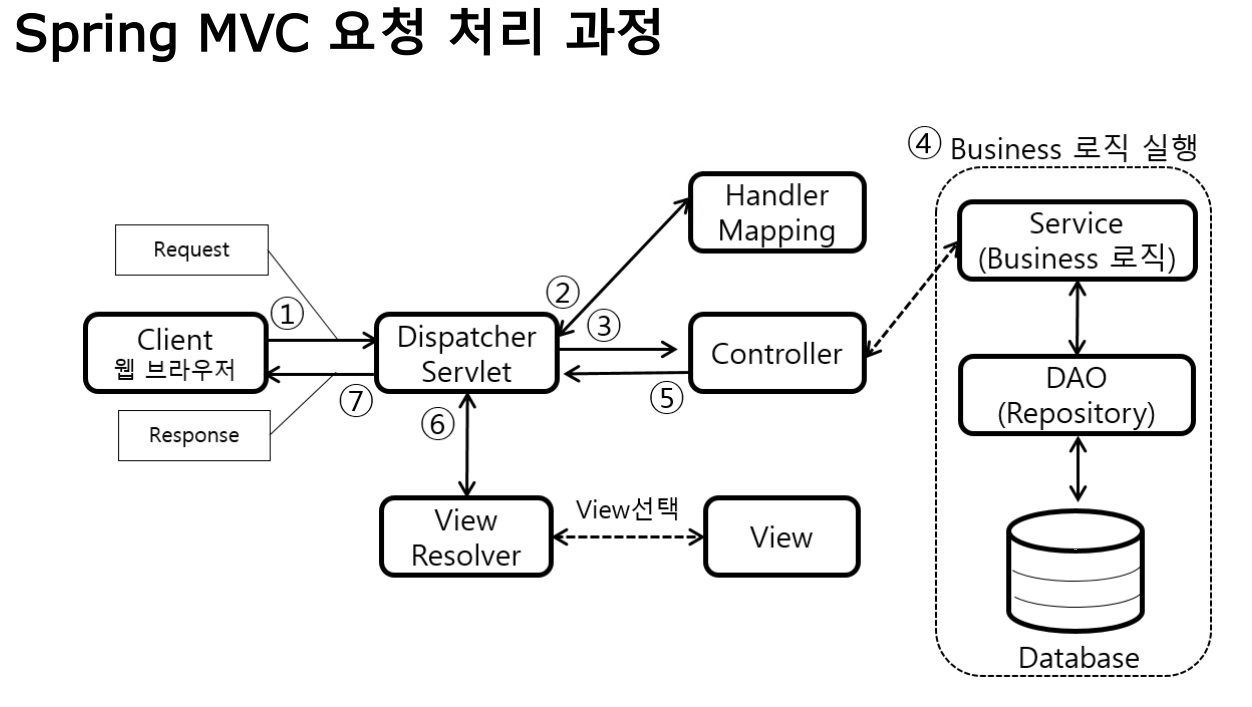
MVC 요청 처리 과정
- M(Model): View와 Controller를 제외한 나머지(비즈니스 로직, 도메인 관련)
- V(View): 화면과 관련된 부분
- C(Controller): 화면에서 넘어온 값을 가공 처리하고 응답 시 화면을 선택하는 부분
dispatcher servlet과 controller의 차이
클라이언트가 요청을 보낼 때 가정
- 클라이언트(브라우저)가 /hello 요청을 보냄
- 톰캣(Tomcat) 같은 웹 서버가 요청을 받음
- 톰캣이 DispatcherServlet에게 요청 전달
- DispatcherServlet이 적절한 Controller를 찾아 실행
- Controller가 로직을 수행하고 뷰를 반환
- DispatcherServlet이 뷰를 렌더링하고 클라이언트에게 응답 반환
Spring에서 Controller가 직접 요청을 받는 게 아니라
DispatcherServlet(서블릿)이 먼저 요청을 받고 Controller로 전달하는 것!
그래서 servlet이 필요하다!