File Upload
1. 개요
파일을 업로드하면 서버에서 저장 후 DB에 정보를 기록하는 방식.
업로드 파일 유형은 단일 파일(single-file)과 다중 파일(multi-file).
2. 주요 개념 정리
1) @Controller
HTTP 요청을 받아서 처리하고, 결과를 반환하는 역할을 한다.
2) @Value("${filepath}")
파일 저장 경로를 외부 설정 파일에서 관리한다.
@Value 애너테이션을 사용해 application.properties나 application.yml에서 filepath 값을 읽어 온다.
3. 단일 파일 업로드 (single-file)
@PostMapping("single-file")
public String singleFile(@RequestParam MultipartFile singleFile,
                         @RequestParam String singleFileDescription,
                         RedirectAttributes rttr)
@RequestParam MultipartFile singleFile: 클라이언트가 업로드한 파일을 MultipartFile 타입의 객체로 받음
@RequestParam String singleFileDescription: 클라이언트가 파일과 함께 보낸 설명 문자열을 받음
RedirectAttributes rttr: 리다이렉트할 때 데이터를 전달하는 역할
파일 처리 과정
1.파일 원본 이름 확인 originFileName
String originFileName = singleFile.getOriginalFilename();
//업로드된 파일의 원래 이름 가져오기
2. 확장자 추출 ext
String ext = originFileName.substring(originFileName.lastIndexOf("."));
// 예: image.jpg → .jpg 추출
원본 파일 이름에서 마지막 . 이후 문자열(확장자) 를 가져온다.
3. 파일 이름 변경 (UUID 사용) + 확장자 savedName
String savedName = UUID.randomUUID().toString().replace("-", "") + ext;
보통 randomUUID()로 랜덤한 파일 이름을 생성하면 -가 붙어서 나오기 때문에,
이를 제거하고 앞에서 추출한 확장자를 붙인다.
4. 파일 저장
singleFile.transferTo(new File(filePath + "/img/single/" + savedName));
지정한 경로(filePath + "/img/single/")에 파일 저장.
transferTo() 메서드는 IOException을 발생시킬 수 있으므로 try-catch로 감싸야 한다.
5. DB에 저장할 데이터 가공
Map<String, String> file = new HashMap<>();
file.put("originFileName", originFileName);
file.put("savedName", savedName);
file.put("filePath", "/img/single");
file.put("singleFileDescription", singleFileDescription);
파일 정보를 Map 형태로 저장
(originFileName, savedName, filePath,singleFileDescription)
6. 리다이렉트 시 메시지 전달
rttr.addFlashAttribute("message", originFileName + " 파일 업로드 성공!");
rttr.addFlashAttribute("img", "/img/single/" + savedName);
rttr.addFlashAttribute("singleFileDescription", singleFileDescription);
리다이렉트 페이지의 경우, RedirectAttributes 를 사용해야 매개변수 전달이 가능하다.
성공 메시지와 이미지 경로, 설명을 FlashAttribute로 전달.
리다이렉트된 페이지에서 메시지를 받아 ui에 표시한다.
7. 결과 페이지로 이동
return "redirect:/result";
업로드가 끝난 후 /result 페이지로 이동 요청.
4. 다중 파일 업로드 (multi-file)
@PostMapping("multi-file")
public String multiFileUpload(@RequestParam List<MultipartFile> multiFiles,
                              @RequestParam String multiFileDescription,
                              RedirectAttributes rttr)
@RequestParam List multiFiles : 다중 파일을 MultipartFile 타입의 리스트로 받음
파일 처리 과정(반복문 사용)
1. 각 파일을 순회하면서 처리
for (int i = 0; i < multiFiles.size(); i++)리스트에 저장된 파일들 순회하며 처리
2. 파일 이름 추출 및 변경
String originFileName = multiFiles.get(i).getOriginalFilename();
String ext = originFileName.substring(originFileName.lastIndexOf("."));
String savedName = UUID.randomUUID().toString().replace("-", "") + ext;
3. 파일저장
multiFiles.get(i).transferTo(new File(filePath + "/img/multi/" + savedName));4.DB 저장용 데이터 가공
Map<String, String> file = new HashMap<>();
file.put("originFileName", originFileName);
file.put("savedName", savedName);
file.put("filePath", "/img/multi");
file.put("multiFileDescription", multiFileDescription);
files.add(file);
5. 업로드 성공시 FlashAttribute 설정
rttr.addFlashAttribute("message", "다중 파일 업로드 성공!");
rttr.addFlashAttribute("imgs", imgSrcs);
rttr.addFlashAttribute("multiFileDescription", multiFileDescription);
6. 파일 업로드 중 예외 처리
catch (IOException e) {
  for (int i = 0; i < files.size(); i++) {
      Map<String, String> file = files.get(i);
      new File(filePath + "/img/multi/" + file.get("savedName")).delete();
  }
  rttr.addFlashAttribute("message", "파일 업로드 실패");
}
파일 저장 도중 오류 발생 시 이미 저장된 파일 삭제
실패 메시지를 rttr.addFlashAttribute()로 설정
5. result
기본적으로 result.html (또는 result.jsp) 템플릿이 실행된다.
  @GetMapping("result")
public void result() {}
이 코드에서 내가 가졌던 의문!
( 이미 페이지로 이동했는데 왜 마지막에 이 코드 또 적을까?)

내가 착각했던 부분!!
return "redirect:/result"; 이란
해당 경로로 요청만 했을 뿐, 그 페이지로 아직 이동안했음!!
1) controller vs handler
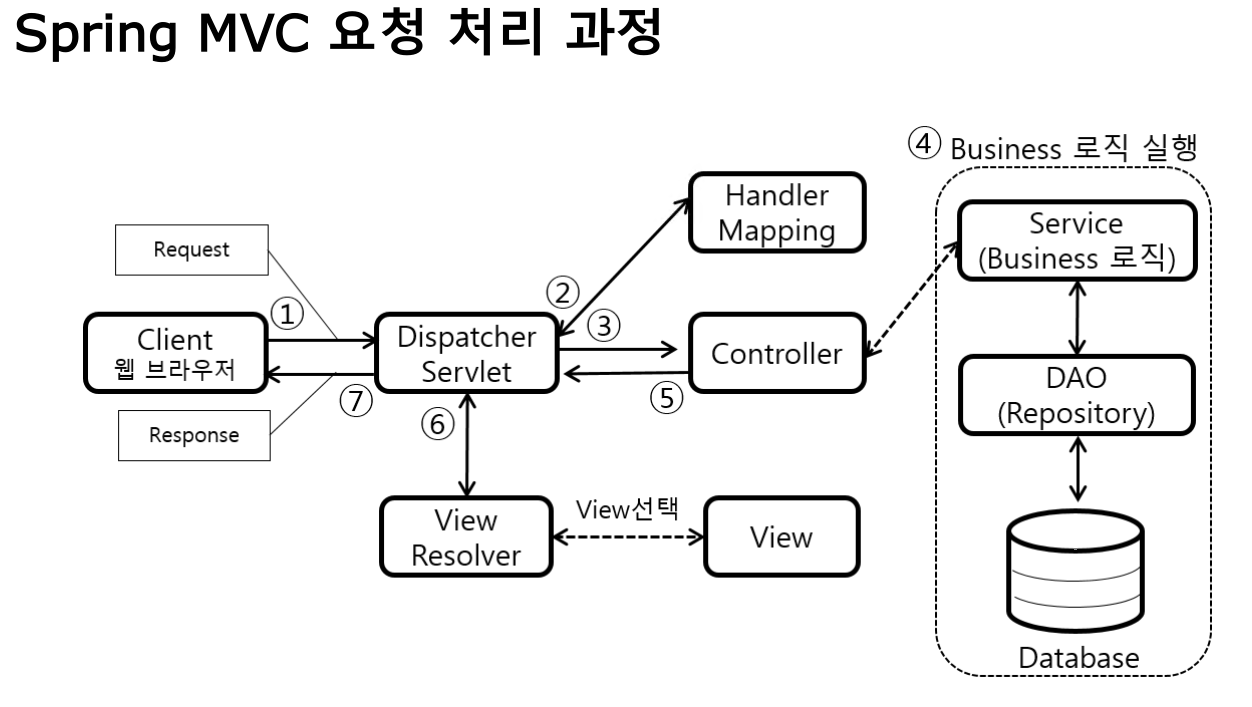
위 사진 때문에 컨트롤러와 핸들러를 완전 다른 개념으로 착각했지만,
컨트롤러 자체는 클라이언트 요청을 처리하는 클래스이고,
핸들러는 요청을 처리하는 그 컨트롤러 내부의 메서드일 뿐이다!
컨트롤러와 핸들러 메서드는 우리가 모두 작성해야하는 부분이고, 핸들러 맵핑은 spring 내에서 자동으로 수행된다.
2)redirect vs forward
redirect는 클라이언트에게 새로운 url을 다시 요청하도록 지시해서 새 요청이 생긴다! 하지만, forward는 새 요청이 없고 서버 내부에서 처리한다.
결론!! 오개념 바로 잡기.
따라서, redirect는 새로운 요청을 처리할 핸들러가 필요하다.
현재의 메소드들은 이미 다른 url요청 (single-file / multi-file)에 대해 처리하고 있기 때문에 새로운 요청을 처리할 핸들러 메소드가 필요한 것이다.
(이것도 로그인/로그아웃 페이지에서 get과 post가 모두 쓰이는 이유와 동일한 맥락으로 해석할 수 있따!)
Spring MVC의 요청 처리 흐름 정리
1️⃣ 클라이언트가 요청을 보냄 (/single-file)
2️⃣ DispatcherServlet 이 요청을 받음
3️⃣ Handler Mapping 이 요청 URL을 보고, 실행할 핸들러를 찾음
4️⃣ 컨트롤러의 핸들러 메서드(예: singleFile()) 실행
5️⃣ 핸들러가 결과를 반환 (return "result";)
6️⃣ 뷰 리졸버(View Resolver)가 해당 뷰(result.html)를 찾아서 렌더링
7️⃣ 클라이언트에게 최종 HTML을 응답
6. yml파일
1) 파일 업로드 설정(spring.servlet.multipart)
spring:
  servlet:
    multipart:
      max-file-size: 10MB     # 파일 한 개당 최대 크기
      max-request-size: 10MB  # 요청 전체의 최대 크기
2) 정적 리소스 경로 설정 (spring.web.resources.static-locations)
spring:
  web:
    resources:
      static-locations: file:///C:/uploadFiles/
오개념 바로잡기 1 ) 기본적으로 Spring Boot는 정적 파일을 어디서 찾을까?
Spring Boot에서는 기본적으로 정적 파일(이미지, CSS, JS 등)을 특정 폴더에서 제공합니다. 아래 경로들에 파일을 두면, 자동으로 정적 리소스로 인식돼 브라우저에서 접근할 수 있어요.
- Spring Boot의 기본 정적 리소스 경로는 classpath:/static/, classpath:/public/, classpath:/resources/ 등입니다.
오개념 바로잡기 2 ) 그런데 왜 static-locations를 설정해야 할까?
Spring Boot는 내부의 static/ 폴더에서만 정적 파일을 제공해요.
외부 폴더(C:/uploadFiles/)에 있는 파일도 웹에서 접근하려면 설정 필요!
-
static-locations 속성을 사용하면 별도의 외부 폴더(예: C:/uploadFiles/ )를 정적 리소스 폴더로 추가할 수 있음
즉, Spring Boot 프로젝트 내부가 아니라, 로컬 PC의 C:/uploadFiles/ 폴더에서 직접 파일을 제공하는 거예요!
file:///C:/uploadFiles/ 경로를 설정하면, 브라우저에서
http://localhost:8080/sample.png요청 시 C:/uploadFiles/sample.png 파일이 브라우저에 표시됨
3) 3. 파일 저장 경로 설정 (filepath: C:\uploadFiles)
filepath: C:\\uploadFiles 사용 예시
@Value("${filepath}")
private String filePath;