
글을 작성하게된 계기
처음에는 테스트 코드를 작성한다는 것에 대한 두려움이 매우 컸다. 프론트의 테스트에는 단위, 통합, E2E 3종류가 있는데 왜 이렇게 종류가 나뉘었는지도 모르겠고 각각의 테스트 종류마다 사용하는 라이브러리가 다양하기 때문이었다.
프론트를 공부하면서 테스트는 어려운 것이라는 생각이 자리잡고 있었기 때문에 공부를 하려고 마음먹고 글 조금읽다가도 다른 공부로 넘어간 경우가 많았다. 그러다 결국 테스트를 처음 공부하는 프론트엔드 개발자의 개념 다지기 글을 작성하기로 마음을 먹으면서 테스트에 대해 제대로 공부하게 되었다. 결정적으로 Jest + react-testing-library 환경에서 TODO 프로젝트 TDD로 설계하기 글을 작성하면서 생각보다 테스트 코드를 작성하는것이 어렵지 않을 것 같다는 생각을 했다. 그래.. TODO가 아닌 조금 더 복잡한 환경에 있는 프로젝트를 테스트하기 전까지는..

오늘은 눈물 없이 보지 못할 "테린이의 RTK 프로젝트 테스트 환경 만들어보기" 이다. 이 글은 전역 상태 관리를 RTK를 사용하고 있지만, 다른 상태관리 라이브러리(Recoil, React Query 등)를 사용하는 개발자도 이 글이 분명 도움이 될 것이다.
테스트 대상

일단 진행하던 프로젝트에 간단한 input창을 테스트 하려고 했다. 구글에 무언가를 검색할때 사용하는 검색바같은것 말이다.
// useSearchInput
export const useSearchInput = () => {
  const [inputValue, setInputValue] = useState('');

  const handleInputValue = useCallback(
    (e: ChangeEvent<HTMLInputElement>) => {
      const { value } = e.target;
      setInputValue(value);
    },
    [inputValue]
  );

  return {
    inputValue,
    setInputValue,
    handleInputValue,
  };
};

// SearchForm.tsx
<Input
  type="text"
  value={inputValue}
  onChange={handleInputValue}
  placeholder="텍스트를 입력하세요."
  />
구글의 검색창을 만들기 위해서는 일단 텍스트를 입력할 input태그가 필요하다. SearchForm 컴포넌트에서 검색창 UI를 생성한다. 그리고 이 input 태그를 다룰 useSearchInput이라는 커스텀 훅을 생성했다. 이제 input에 텍스트를 입력하면 실시간으로 입력되는 UI가 확인되고, inputValue에 해당 텍스트가 담길 것이다.
검색 버튼을 누르면, form 태그의 onSubmit에서 inputValue으로 데이터를 요청하면 검색창 완성이다. 구글에 치킨을 입력하면 치킨 사진이 나오는 것처럼 말이다.
아니.. 이개 외않되??
//SearchForm.test.tsx
import { fireEvent, render, screen } from '@testing-library/react';

import { SearchForm } from '@/components';

describe('<SearchForm />', () => {
  const setup = () => {
    const handleInputValue = jest.fn();
    const utils = render(
      <SearchForm handleInputValue={handleInputValue} />
    );
    const input = screen.getByPlaceholderText('텍스트를 입력하세요.');
    const submit = screen.getByText('검색');
    return {
      ...utils,
      input,
      handleInputValue,
      submit,
    };
  };

  it('input handle test', () => {
    const { input } = setup();
    fireEvent.change(input, {
      target: {
        value: 'a man',
      },
    });
    expect(input).toHaveAttribute('value', 'a man');
  });
});
TODO 프로젝트에서 했던것 처럼 간단하게 input 태그를 핸들링하는 부분부터 테스틑 하려고 했다.

하지만 TODO 프로젝트와 나의 프로젝트에는 많은 차이점이 있었다. 가벼운 마음으로 시도했던 과거의 나를 보면 마음이 아프다.
첫 번째 에러와 6시간 데이트

사실 위에서 설명하지는 않았지만, SearchForm에는 Redux에서 사용하는 dispatch를 사용하고 있었다. onSubmit이 되는 순간 입력했던 텍스트를 이용하여 데이터를 요청하는데, 해당 데이터중에 전역으로 관리할 부분이 있었기 때문이다.
하지만 간단한 input 테스트를 하고 있어 dispatch를 선언해주지 않아도 전혀 문제가 없는데 왜 여기서 테스트 실패를 하는 걸까?
could not find react-redux context value; please ensure the component is wrapped in a
<Provider>
에러 메세지를 확인해보니 무슨 말인지는 알겠다.
//_app.tsx
const App = ({ Component, pageProps }: AppProps) => (
  <QueryClientProvider client={queryClient}>
    <Component {...pageProps} />
  </QueryClientProvider>
);

export default wrapper.withRedux(App);
Redux를 사용하기 위해서는 _app.tsx에서 wrapper.withRedux(App)와 같이 감싸줘야 한다. 이것은 다른 상태관리도 비슷하다. recoil도 RecoilRoot로 감싸고, react-query도 QueryClientProvider로 감싼다.
우리는 테스트 할때 render를 사용하여 컴포넌트를 렌더링 하게 된다. 이것도 실제 프로젝트에 셋팅되어 있는것 처럼 Provider들을 감싸주라는 에러 메세지인 것이다. 이제 상황 파악은 확실하게 했지만, 막막했던 부분은 그래서 그걸 어떻게 하는데? 라는 생각이었다.
테스트에도 Provider 설정하자!

테스트에도 Provider를 셋팅하여 에러를 해결해주기 위해서 우리는 2개의 파일을 생성할 것이다. 여기서 부터는 Redux ToolKit(RTK)의 내용이 들어간다. RTK가 아닌 Redux를 이용한 testing library가 보고 싶은 경우 해당 블로그를 참고하자.
reducer와 store
//store/modules/search.ts
const initialState = { searchInput: ''};

const searchSlice = createSlice({
  name: 'searchData',
  initialState,
  reducers: {
    setSearchData: (state, action: PayloadAction<SearchActionPayload>) => {
      state.searchInput = action.payload.searchInput;
    },
  },
});

export const { setSearchData } = searchSlice.actions;
export default searchSlice.reducer;
RTK에서 전역 상태 관리를 사용하기 위해서는 createSlice를 이용하여 reducer를 생성하게 된다. 나는 searchSlice라는 최근 검색어를 저장하는 reducer를 만들었다.
그리고 이 외에도 여러개의 reducer를 생성한다면, store에서 이 reducer들을 combineReducers로 묶어줄 수 있다. 이것을 이용하여 configureStore로 스토어를 생성한다. 이 부분을 테스트 store에서도 구현해야 한다.
테스트 store
//tests/store.ts
import type { PreloadedState } from '@reduxjs/toolkit';
import { combineReducers, configureStore } from '@reduxjs/toolkit';

import otherSlice from '@/store/modules/other';
import searchSlice from '@/store/modules/search';

const rootReducer = combineReducers({
  other: otherSlice,
  search: searchSlice,
});

export const setupStore = (preloadedState?: PreloadedState<RootState>) =>
  configureStore({
    reducer: rootReducer,
    preloadedState,
  });

export type RootState = ReturnType<typeof rootReducer>;
export type AppStore = ReturnType<typeof setupStore>;
export type AppDispatch = AppStore['dispatch'];
테스트의 store에서도 여러개의 reducer들을 combineReducers로 묶고, configureStore로 스토어를 생성하고 있다. 초기값이 있다면 설정할 수 있도록 preloadedState도 넣어주었다. RootState, AppStore, AppDispatch는 testUtils.ts에서 사용할 타입들이다.
store를 이용하여 Provider로 감싸기
//tests/testUtils.ts
import type { PreloadedState } from '@reduxjs/toolkit';
import type { RenderOptions } from '@testing-library/react';
import { render as rtlRender } from '@testing-library/react';
import { PropsWithChildren } from 'react';
import { QueryClient, QueryClientProvider } from 'react-query';
import { Provider } from 'react-redux';

import { AppStore, RootState, setupStore } from './store';

interface ExtendedRenderOptions extends Omit<RenderOptions, 'queries'> {
  preloadedState?: PreloadedState<RootState>;
  store?: AppStore;
}

const render = (
  ui: React.ReactElement,
  {
    preloadedState = {},
    store = setupStore(preloadedState),
    ...renderOptions
  }: ExtendedRenderOptions = {}
) => {
  function Wrapper({ children }: PropsWithChildren<{}>): JSX.Element {
    return (
      <Provider store={store}>
        {children}
      </Provider>
    );
  }

  return { store, ...rtlRender(ui, { wrapper: Wrapper, ...renderOptions }) };
};

export * from '@testing-library/react';
export { render };
Provider로 감싸주었다. 여러가지 글을 참고하면서 에러를 해결했지만 CodeSandBox와 Redux 공식 문서에서 정말 많은 도움을 받았다. CodeSandBox는 확인해보면 뭔가 더 어렵다.. 아직 나의 수준으로는 전부 이해하기는 힘들어서 공식 문서의 방법을 사용했다. (저거 보다가 시간이 더 걸렸다.)
No QueryClient set

Provider는 아직 한발 남았다.
No QueryClient set, use QueryClientProvider to set one
처음에 언급한 _app.tsx를 보면, React Query도 사용하고 있으므로 이것 또한 Provider 작업을 해주자.
//tests/testUtils.ts

function Wrapper({ children }: PropsWithChildren<{}>): JSX.Element {
  return (
    <Provider store={store}>
      <QueryClientProvider client={queryClient}>{children}</QueryClientProvider>
    </Provider>
  );
}
이제 쉽게 에러를 해결할 수 있다. testUtils.ts의 Wrapper에 QueryClientProvider만 추가하자.
test 파일에서의 적용
import { fireEvent, render, screen } from './testUtils';원래 render와 같은 메소드는 testing-library에서 가져왔었다. 이제는 testUtils에서 가져오면 된다. 이 파일에서 render에 대한 모두 설정해줬기 때문이다. 이렇게 Provider에 대한 문제는 해결할 수 있었다.
이번에는 useSelector 에러

암담 했다. 많은 서치와 다양한 코드를 적용해보며 Provider문제를 해결했는데, dispatch의 바로 다음줄에서 또 에러가 발생한 것이다. 마치 군대에서 다양한 일과로 3일은 지난 느낌인데, 자고 일어나니 하루 지난 기분이다.

useSelector를 사용한 부분에서 에러가 발생한 것이다. 프로젝트에서는 정상적으로 잘 돌아가는데, 테스트에서만 실패하므로 당연히 useSelector를 mocking 해야하는줄 알았다. "나는 그냥 input handle만 테스트하려고 하는건데, 왜 useSelector를 mocking 해줘야 할까?" 라는 생각을 하면서도 시도했다. 하지만 역시 실패했다.
useSelector의 구조 분해 할당
TypeError: Cannot destructure property 'searchUrl' of '(0 , _reactRedux).useSelector(...)' as it is undefined.
// SearchForm.tsx
// X
const {searchData} = useSelector(({ searchData }: SearchUrlData) => searchData)

// O
const search = useSelector(({ searchData }: SearchUrlData) => searchData);
에러 메세지에 집중해보았다. 프로젝트에서 useSelector에 구조 분해 할당을 사용한 부분을 리팩토링 했다.
구조 분해 할당 문제점
프로젝트에서는 잘 돌아가다가 왜 테스트에서 막히는 걸까? 다른 부분에서 구조 분해 할당을 사용하면 당연히 에러가 발생하지 않는다. 하지만 useSelector에서 구조 분해 할당을 하면 에러가 발생하므로, 여기에 문제가 있다고 보는것이 맞다.
//예시
const { a , b } = useSelector((state) => state)

const a = useSelector((state) => state.a);
const b = useSelector((state) => state.b );
실제로 위의 코드와 아래의 코드는 차이점이 있다. 구조 분해 할당으로 값을 가져오면 state 전체 변화에 따라 리렌더링이 발생한다. state에서 a와 b를 제외한 다른 값이 변경되도 state는 변경되므로 리렌더링이 발생한다는 것이다. 이 문제점 때문에 테스트에서 막아준 것이 아닐까? 덕분에 새로운 사실을 알게 되었다^^ (정말 고맙다~~~)
useSelector 여러줄 사용하기 싫은데?
useSelector의 최적화를 고려해보면, 구조 분해 할당으로 state를 받아오면 안된다는 것을 알았다. 하지만 여러 줄의 코드를 입력해서 각각 받아오기도 싫다. 이 경우에 shallowEqual를 사용해주면 된다.
const { searchUrl } = useSelector(({ searchData }: SearchUrlData) => searchData, shallowEqual);이렇게 구조 분해 할당을 useSelector에서 사용해도 최적화에 문제가 되지 않는다. 하지만... 다시 처음에 useSelector에서 발생했던 에러가 나타났다.
테스트에서 구조 분해 할당 문제 해결
  const { searchUrl } = useSelector(
    ({ searchData }: SearchUrlData) => searchData || {},
    shallowEqual
  );
provide a default value in the selector or after the selector. freecodecamp
결국 방법을 찾았다. 우리는 보통 데이터가 없을 경우 옵셔널 체이닝(?.)을 사용한다. 이와 비슷하게 useSelector에서도 데이터를 받아올 때, 데이터가 없을 경우를 생각하여 초기값을 부여해야 하는 것이다. 사실 간단하게 생각할 수 있는 문제지만 테스트에만 집중하다보니 계속 어렵게 돌아간 것 같다.
드디어 모든 에러 해결
// SearchForm.test.tsx
describe('<SearchForm />', () => {
  const setup = () => {
    const handleInputValue = jest.fn();
    const utils = render(
      <SearchForm handleInputValue={handleInputValue} />
    );
    const input = screen.getByPlaceholderText('텍스트를 입력하세요.');
    const submit = screen.getByText('검색');
    return {
      ...utils,
      input,
      handleInputValue,
      submit,
    };
  };

  it('input handle test', () => {
    const { input } = setup();
    fireEvent.change(input, {
      target: {
        value: 'a man',
      },
    });
    expect(input).toHaveAttribute('value', 'a man');
  });
});
드디어 테스트가 성공했다. 겨우 input 하나 handle하는 테스트 코드를 작성했을 뿐인데.. 판도라 상자를 만진 기분이다. (아직도 엄청난 것들이 기다리고만 있을 것 같다.)
이번에는 경고
// SearchForm.test.tsx
  it('button click test', async () => {
    const { input, button, store } = setup();
    fireEvent.change(input, {
      target: {
        value: 'cookie',
      },
    });
    fireEvent.click(button);
    expect(store.getState().search.searchInput).toEqual('cookie');
});input을 다루는 테스트는 통과했다. 이제 한 걸음 더 나아가 onSubmit버튼을 눌렀을 때, 실제로 searchSlice reducer의 전역 상태 변수인 searchInput에 값이 들어가는지 확인하고 싶었다. (실제 검색창에 텍스트를 입력하고 검색 버튼을 누르면, inputValue가 전역 상태 관리가 될 수 있도록 searchInput에 dispatch가 되도록 설계했다.)
위의 테스트는 input에 cookie를 입력한 후 버튼을 누르면 store의 searchInput에 정상적으로 저장되는지 확인하는 테스트이다.
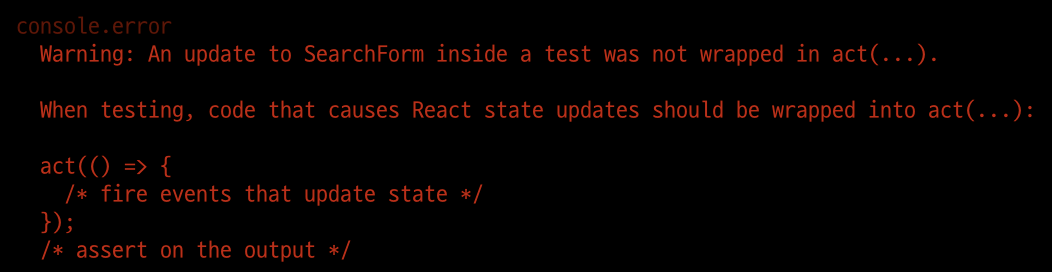
테스트가 통과했다. 하지만 문제가 있는지 경고를 해주고 있었다. 개발자라면 빨간색 경고 글씨는 그냥 넘어갈 수 없다 :(
비동기를 이용하여 해결하기
act를 사용하라는 것은 알겠는데, fireEvent를 act안에 넣어도 해결이 되지 않았다. 먼저 act란 무엇인지 부터 알아보자.
act
test('act test', () => {
  act(() => {
    // DOM에 반영하고 싶은 코드
  });
  // act안의 코드가 DOM에 반영되었다고 가정하고 테스트할 코드
});
act는 인자로 받은 함수를 실행시켜서 가상 DOM에 적용시킨다. React가 브라우저에서 실행될 때와 비슷한 환경에서 테스트할 수 있게 도와주는 메소드인 것이다. 미디움글 참고
보통 userEvent, render 등의 메소드들은 이미 act로 감싸져 있다고 한다.
waitFor로 해결?
먼저 not wrapped in act warning 에러는 컴포넌트에서 setTimeout과 같은 함수를 사용하는 경우 발생할 수 있다. 이 경우는 Fake Timer를 사용하여 해결할 수 있다.
이 에러가 발생하는 또 다른 원인은 비동기로 API를 호출하거나, 렌더링이나 업데이트를 하기 전에 테스트가 종료되면 이와 같은 현상이 발생한다. 이 경우 보통 waitFor 메소드를 사용하여 쉽게 해결할 수 있다.
await waitFor(() => expect(...))하지만 나의 경우 이 방법으로는 해결되지 않았다. 그래서 fireEvent도 한번 waitFor로 감싸보았다.
await waitFor(() => fireEvent.click(button));이제 테스트를 수행할 경우 빨간색 경고가 나타나지 않는다.

하지만 설정해준 eslint에서 걸렸다. 이 방법은 피하는게 좋은 코드인가 보다.
act, async/await, promise로 해결
  it('button click test', async () => {
    const promise = Promise.resolve();
    const { input, button, store } = setup();
    fireEvent.change(input, {
      target: {
        value: 'cookie',
      },
    });
    fireEvent.click(button);
	expect(store.getState().search.searchInput).toEqual('cookie');
    await promise
  });
결국 현재 이 에러가 발생하는 이유는 비동기적으로 상태가 업데이트 되기 전에 테스트가 종료되기 때문이다. 테스트를 전부 수행하여 테스트가 종료되기 전에 promise를 기다리도록 해주었다. 하지만 React는 이 사실을 모르기 때문에 여전히 경고는 발생하고 있다.
it('button click test', async () => {
const promise = Promise.resolve();
const { input, button, store } = setup();
fireEvent.change(input, {
target: {
value: 'cookie',
},
});
fireEvent.click(button);
expect(store.getState().search.searchInput).toEqual('cookie');
await act(() => promise)
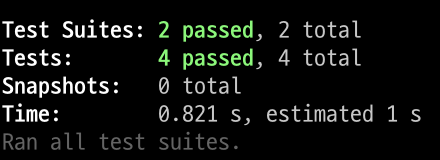
});act를 사용하여 React가 이 사실을 알게 해주었다. React는 promise가 실행되는 동안 발생하는 모든 상태 업데이트들을 일괄처리하게 된다. 드디어 해결한 것이다. egghead.io 참고
waitForElementToBeRemoved
await waitForElementToBeRemoved(()=> screen.getByTest)DOM에서 요소가 제거되는 것을 기다리고 싶다면 waitForElementToBeRemoved를 사용할 수도 있다.
마무리

역시 코딩은 실전이다. 아직도 나는 테스트 코드에 대해 빙산의 일각정도만 알고 있다. Custom Hooks과 다양한 비동기 함수를 테스트 하는 방법, 좋은 테스트란 무엇인가? 와 같은 주제로 더 공부해볼 예정이다.

you saved my life