TODO TDD
테스트를 처음 공부하는 프론트엔드 개발자의 개념 다지기에서 테스트를 멀리한 자신에 대해서 반성을 했었다. 그리고 개념을 다지기 위해 여러 글과 공식문서를 보며 구조를 이해하기 시작했다. 여기서 멈추는것이 아니라 실제로 간단한 프로젝트를 설계해보고 추후에 복잡한 프로젝트에서 사용해보는 것이 좋을 것 같다는 생각을 했다.
그러던 중 벨로퍼트님 TODO 만들기글을 발견했다. 이 글을 참고하여 프로젝트를 설계했지만, 본인은 TypeScript환경에서 작업했다. 또한 UI, 기능, 테스트 로직을 내방식대로 설계해보면서 공부를 해보았다. 이 방법이 확실히 많은 공부가 되었다.
테스트는 Jest와 react-testing-library(RTL)을 사용한다. 초기 셋팅이 궁금하다면 링크를 통해 확인해보자.
디렉터리 구조
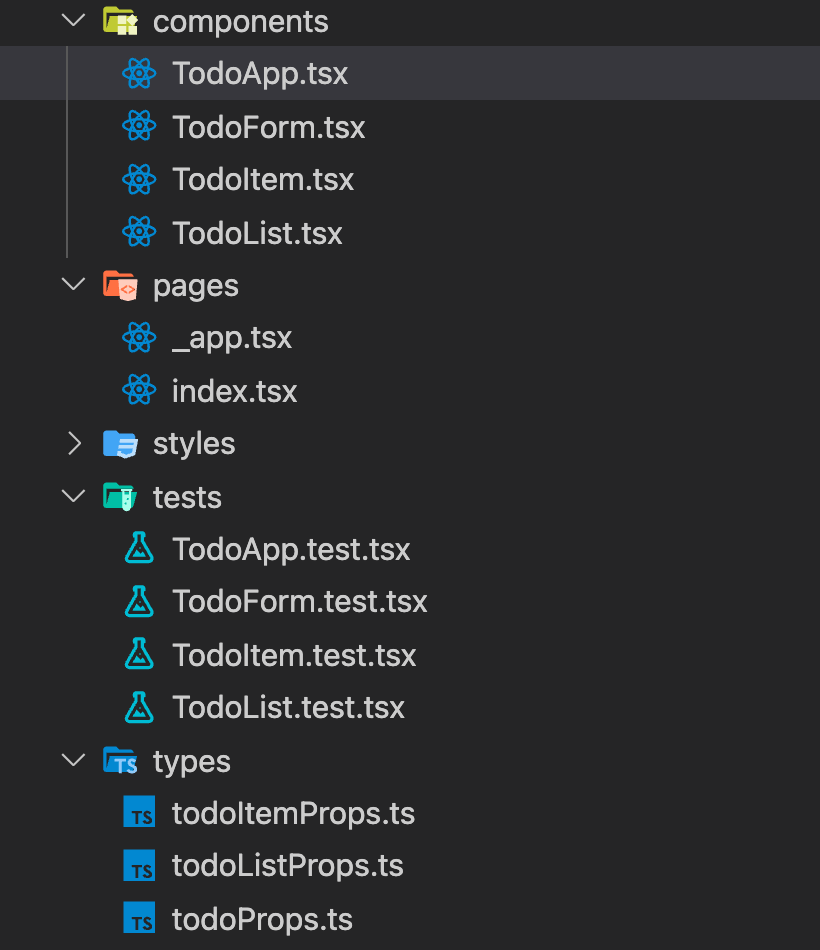
프로젝트 최종 단계에서 우리가 생성할 파일들과 디렉터리이다. TodoItem은 할 일 목록 1개이고, 이것을 포함하는것이 TodoList이며 할 일을 추가할 수 있는 입력 부분은 TodoFrom이다. 가장 상위 컴포넌트인 TodoApp에서는 여러가지 함수를 내려주고, TodoForm과 TodoList를 사용하는 구조이다.
TDD를 TodoForm을 설계하며 간단하게 알아보기
컴포넌트 테스트
컴포넌트 생성
//src/components/TodoForm.tsx

export const TodoForm = () => <div>TodoForm</div>;
클라이언트가 input에 텍스트를 입력하고, button을 클릭하면 할 일의 목록이 추가되는 TodoForm 컴포넌트를 설계하려고 한다.
우리는 테스트를 먼저 작성하고, 컴포넌트를 설계해야 하므로 가장 기본이되는 컴포넌트 형식만 먼저 생성해주자.
테스트 코드 작성
//src/tests/TodoForm.test.tsx

import { render, screen } from '@testing-library/react';

import { TodoForm } from '@/components/TodoForm';

describe('<TodoForm />', () => {
  it('has input and a button', () => {
    render(<TodoForm />);
    const input = screen.getByPlaceholderText('할 일을 입력하세요');
    const button = screen.getByText('등록하기');
    expect(input).toBeInTheDocument();
    expect(button).toBeInTheDocument();
  });
});
생성한 TodoForm를 TodoForm.test 파일에서 불러와준다. 이제 테스트를 위한 코드를 작성하면 된다.
placeholder는 할 일을 입력하세요를 넣을것 이라고 생각하고 테스트 코드를 작성한다. 우리는 input 태그를 찾은것이 아니라 해당 컴포넌트에서 placeholder를 가져온 것이라는 점을 주의하자. button의 텍스트는 등록하기로 하려고 한다.
이렇게 input과 button변수에 넣은 것을 expect를 이용하여 테스트를 진행한다. 진짜로 이게 존재하고 있는지 toBeInTheDocument로 테스트하고 있다.
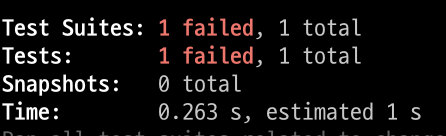
yarn test를 터미널에 입력해보자. 아직 실제 TodoForm 컴포넌트에 input과 button을 생성하지 않았으므로 테스트는 실패한다.
컴포넌트 설계
//src/components/TodoForm.tsx

export const TodoForm = () => (
  <form>
    <input placeholder="할 일을 입력하세요" />
    <button type="submit">등록하기</button>
  </form>
);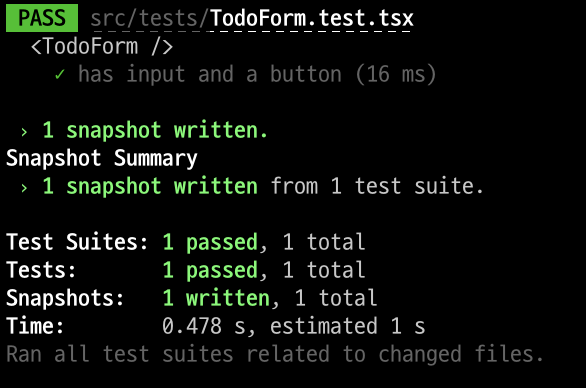
이제 input과 button을 생성했으므로, 테스트를 돌려보면 성공할 것이다. 전체적으로 이런 사이클이 돌아가게 되고, 이것이 TDD(테스트 주도 개발)이다.
input test
이번에는 input이 정상적으로 동작하는지 테스트해보자. input이 동작한다는것은 무슨 의미일까? 유저가 입력창에 텍스트를 타이핑하면, 입력한 값들이 UI에 나타나야 한다.
테스트 코드 작성
//src/tests/TodoForm.test.tsx

  it('changes input', () => {
    render(<TodoForm />);
    const input = screen.getByPlaceholderText('할 일을 입력하세요');
    fireEvent.change(input, {
      target: {
        value: 'TDD-TODO',
      },
    });

    expect(input).toHaveAttribute('value', 'TDD-TODO');
  });
아직 TodoForm컴포넌트에 대해 테스트를 하고 있으므로,describe('<TodoForm />' {...})에 it을 추가해주자.
fireEvent 객체는 선택된 영역을 대상으로 특정 이벤트를 발생시킬 수 있다. 여기서는 change 이벤트를 발생시키고 있다. 즉, TDD-TODO를 input창에 입력했을 경우 정말로 그렇게 되는지 테스트하는 것이다.
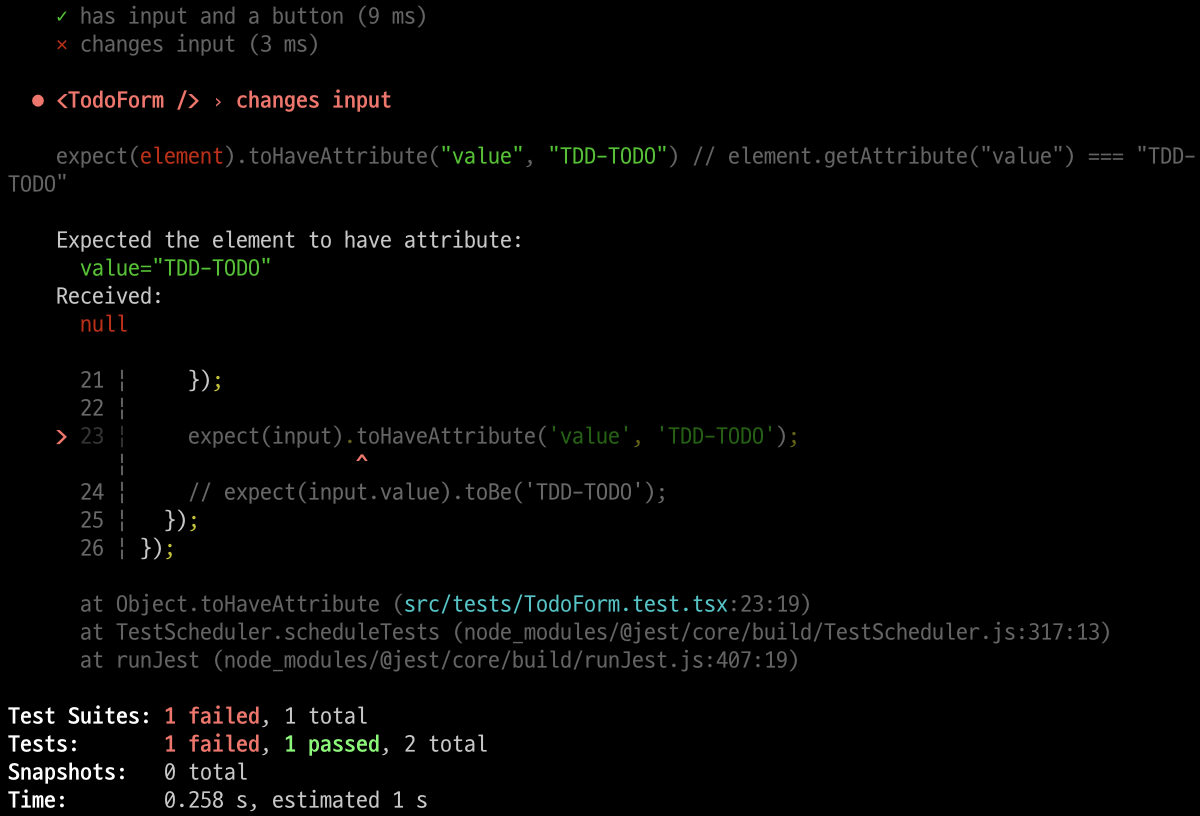
우리는 input 태그만 추가했고 onchange로 입력값을 바꿔주지 않았으므로 지금 테스트는 당연히 실패한다.
이제 TodoForm컴포넌트에서 input 핸들링하는 부분을 설계하면 된다.
하지만 그 전에 잘못된 방법을 하나 알아보자. expect(input.value).toBe('TDD-TODO');를 넣게 되면, 'HTMLElement' 형식에 'value' 속성이 없습니다. 라는 메세지가 나타나지만 테스트는 성공한다. 그런데 이 방법은 잘못된 방법이다. 그 이유는 input이 TodoForm컴포넌트에 설계한 코드대로 잘 동작하는지 보는것이 아니라 "input의 value라는 곳에 TDD-TODO를 넣었고, input.value에 TDD-TODO가 들어있게 된다" 를 테스트하기 때문이다. 즉, 컴포넌트에 어떤 로직이 있던 간에 상관 없는 테스트라는 것이다. 그러므로 이 방법은 사용하지 말자.
컴포넌트 설계
//src/components/TodoForm.tsx

import React, { ChangeEvent, useState } from 'react';

export const TodoForm = () => {
  const [value, setValue] = useState('');

  const handleInput = (e: ChangeEvent<HTMLInputElement>) => {
    setValue(e.target.value);
  };

  return (
    <form>
      <input placeholder="할 일을 입력하세요" onChange={handleInput} value={value} />
      <button type="submit">등록하기</button>
    </form>
  );
};input에 입력하면 그 값이 실제 UI에서 보일 수 있도록 설계하면 테스트는 통과할 것이다. 이를 위해 onChange와 useState를 사용하여 input 을 다루어 주자.
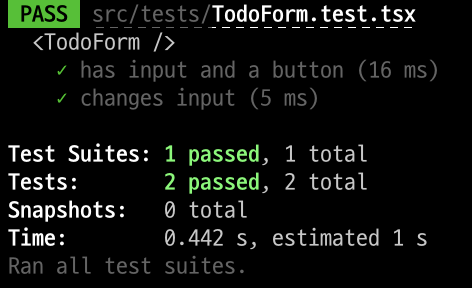
이제 테스트가 성공하는 것을 볼 수 있다.
submit test
테스트 코드를 작성하기 전에 먼저 생각을 해보자. 등록하기를 클릭하기 위해서 또는 등록하기를 클릭하면 웹에서 어떤 동작들이 일어나야 할까? 먼저 input에 할 일을 입력하고, 등록하기 버튼을 누르면 할 일이 등록되면서 input은 비워져야 할 것이다. 할 일이 등록되는 부분은 TodoForm컴포넌트의 상위 컴포넌트에서 수행하기 위해 onInsert라는 함수를 props로 받으려고 한다.
테스트 코드 작성
//src/tests/TodoForm.test.tsx

  it('calls onInsert and clears input', () => {
    const onInsert = jest.fn();
    render(<TodoForm onInsert={onInsert} />);
    const input = screen.getByPlaceholderText('할 일을 입력하세요');
    const button = screen.getByText('등록하기');
    fireEvent.change(input, {
      target: {
        value: 'TDD-TODO',
      },
    });
    fireEvent.click(button);
    expect(onInsert).toBeCalledWith('TDD-TODO');
    expect(input).toHaveAttribute('value', '');
  });
이 동작 순서대로 테스트 코드를 작성했다. 이제 슬슬 테스트 코드를 작성하는 방법에 대한 감이 생기기 시작한다. onInsert에 빨간 밑줄이 생기는 이유는 우리의 TodoForm컴포넌트에서 onInsert를 props로 받고있지 않아서 그렇다. onInsert는 상위컴포넌트에서 할 일을 등록할 수 있게 해주는 함수이고, 아직 어떻게 설계할지는 생각하지 않았지만 어쨋든 value값이 필요할 것이기 때문에 넘겨주고있다. 테스트에서는 value값이 정말로 onInsert 함수에 넘어가는지 테스트한다.
컴포넌트 설계
//src/components/TodoForm.tsx

import React, { ChangeEvent, FormEvent, useState } from 'react';

interface TodoFormProps {
  onInsert: (value: string) => void;
}

export const TodoForm = ({ onInsert }: TodoFormProps) => {
  const [value, setValue] = useState('');

  const handleInput = (e: ChangeEvent<HTMLInputElement>) => {
    setValue(e.target.value);
  };

  const onSubmitTodo = (e: FormEvent<HTMLFormElement>) => {
    onInsert(value);
    e.preventDefault();
    setValue('');
  };

  return (
    <form onSubmit={onSubmitTodo}>
      <input placeholder="할 일을 입력하세요" onChange={handleInput} value={value} />
      <button type="submit">등록하기</button>
    </form>
  );
};
테스트에서 생각한대로 onInsert함수를 props로 받아오고, form에서 submit할 경우의 onSubmitTodo함수를 생성해주었다. 이제 테스트가 정상적으로 통과한다. 그리고 테스트 코드에서 onInsert에도 빨간 밑줄이 사라졌다.
하지만 그 위의 테스트들에서 TodoForm컴포넌트에 아무것도 넘겨주고 있지 않아서 빨간줄이 생긴다. 그리고 테스트 코드를 확인해보니 반복되는 부분이 많은 것 같다. 리팩토링을 해주자.
테스트 코드 리팩토링
//src/tests/TodoForm.test.tsx

describe('<TodoForm />', () => {
  const setup = () => {
    const onInsert = jest.fn();
    const utils = render(<TodoForm onInsert={onInsert} />);
    const input = screen.getByPlaceholderText('할 일을 입력하세요');
    const button = screen.getByText('등록하기');
    return {
      ...utils,
      input,
      button,
      onInsert,
    };
  };

  it('has input and a button', () => {
    const { input, button } = setup();
    expect(input).toBeInTheDocument();
    expect(button).toBeInTheDocument();
  });

  it('changes input', () => {
    const { input } = setup();
    fireEvent.change(input, {
      target: {
        value: 'TDD-TODO',
      },
    });
    expect(input).toHaveAttribute('value', 'TDD-TODO');
  });

  it('calls onInsert and clears input', () => {
    const { input, button, onInsert } = setup();
    fireEvent.change(input, {
      target: {
        value: 'TDD-TODO',
      },
    });
    fireEvent.click(button);
    expect(onInsert).toBeCalledWith('TDD-TODO');
    expect(input).toHaveAttribute('value', '');
  });
});
TodoForm 컴포넌트의 여러가지 기능을 테스트하기 위해서 input과 button을 계속 찾고 있다. 위에서 한 번만 찾는것이 효율적일 것 같다. 그리고 이제 이 컴포넌트는 props로 onInsert라는 함수를 받기 때문에 이 부분도 고려해주어 setup을 작성했다. 훨씬 코드가 이해하기 쉽고 간결해보인다.
TodoItem
컴포넌트 테스트
컴포넌트 생성
//src/components/TodoItem.tsx

const TodoItem = () => <li>TodoItem</li>;

export default TodoItem;
위에서 우리는 할 일을 입력하여 생성하는 TodoForm을 TDD로 설계해보았다. 이제 생성한 할 일을 보여주는 TodoItem 컴포넌트를 설계해보자. 기본 형태 먼저 생성한다.
//src/types/todoProps.ts

export interface TodoProps {
  todo: {
    id: number;
    text: string;
    done: boolean;
  };
}
할 일에 대한 컴포넌트에는 무엇이 있어야 할까? 일단 목록을 수행했을 경우 체크할 수 있는 체크박스가 있어야 하고, 할 일이 텍스트로 나타나 있어야 한다. 이것은 input과 label을 사용할 예정이다. 그리고 생성된 할 일을 삭제할 수 있는 삭제 button을 아이템 마다 생성한다. 이에 대한 테스트 코드를 컴포넌트 설계 전에 완성해보자.
그리고 TodoItem 컴포넌트는 할 일에 대한 props를 받아 UI를 그려주어야 하기 때문에 이에 대한 타입도 선언해 주었다.
테스트 코드 작성
//src/tests/TodoItem.test.tsx

describe('<TodoItem />', () => {
  const sampleTodo = {
    id: 1,
    text: 'TODO-TDD',
    done: false,
  };

  const setup = (props = {} as TodoProps) => {
    const initialProps = { todo: sampleTodo };
    const utils = render(<TodoItem {...initialProps} {...props}/>);
    const todo = props.todo || initialProps.todo;
    const input = screen.getByLabelText(todo.text, { selector: 'input' });
    const label = screen.getByText(todo.text);
    const button = screen.getByText('삭제');
    return {
      ...utils,
      input,
      label,
      button,
    };
  };

  it('has input, label, button', () => {
    const { input, label, button } = setup();
    expect(input).toBeTruthy();
    expect(label).toBeTruthy();
    expect(button).toBeTruthy();
  });
});
컴포넌트가 정상적으로 생성되었는지 먼저 테스트해보기 위해서 sampleTodo를 생성했다. 만약에 props로 들어오는 값이 생기게 되면, 그 값을 todo를 사용할 수 있도록 setup 에서 설정해준다.
이 todo 객체를 이용하여 input, label, button 을 찾고, it에서 이 요소들이 실제로 존재하는지 테스트한다.
컴포넌트 설계
//src/components/TodoItem.tsx

import { TodoProps } from '@/types/todoProps';

export const TodoItem = ({ todo }: TodoProps) => {
  const { text } = todo;

  return (
    <li>
      <input type="checkbox" id={text} />
      <label htmlFor={text}>{text}</label>
      <button type="button">삭제</button>
    </li>
  );
};
테스트에 통과할 수 있도록 컴포넌트를 설계해주었다.

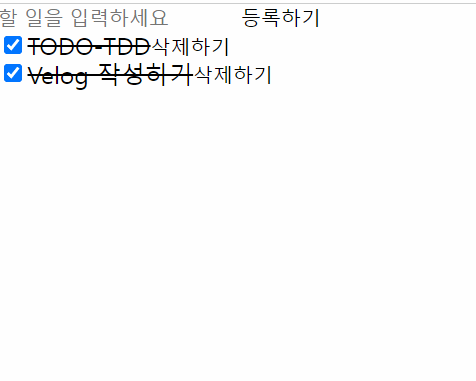
실제로 TodoItem을 확인해보면 이런 모양이다.
체크 박스 테스트
테스트 코드 작성
//src/tests/TodoItem.test.tsx

  it('does not show check and line-through when done is false', () => {
    const { input, label } = setup({ todo: { ...sampleTodo, done: false } });
    expect(input).not.toBeChecked();
    expect(label).not.toHaveStyle('text-decoration: line-through;');
  });

  it('shows check and line-through when done is true', () => {
    const { input, label } = setup({ todo: { ...sampleTodo, done: true } });
    expect(input).toBeChecked();
    expect(label).toHaveStyle('text-decoration: line-through;');
});done이 true면 checkbox가 체크가 되고, text 부분은 가운데 줄을 표시하여 일을 수행했다는 UI를 보여주려고 한다. 이것을 위한 테스트 코드를 작성했다.
//src/components/TodoItem.tsx

import { TodoProps } from '@/types/todoProps';

interface LabelProps {
  checked: boolean;
}

export const TodoItem = ({ todo }: TodoProps) => {
  const { text, done } = todo;

  return (
    <li>
      <input type="checkbox" id={text} checked={done} readOnly />
      <Label htmlFor={text} checked={done}>
        {text}
      </Label>
      <button type="button">삭제</button>
    </li>
  );
};

const Label = styled.label<LabelProps>`
  ${({ checked }) => checked && 'text-decoration: line-through;'}
`;
테스트에서 생각한대로 UI를 설계했다. input은 onChange로 체크 박스를 관리할 것이 아니라면 readOnly 속성을 부여해주자.
삭제 버튼 테스트
테스트 코드 작성
//src/tests/TodoItem.test.tsx

  const setup = (props = {} as TodoProps) => {
    const onRemove = jest.fn();
    const initialProps = { todo: sampleTodo };
    const utils = render(<TodoItem {...initialProps} {...props} onRemove={onRemove} />);
    const todo = props.todo || initialProps.todo;
    const input = screen.getByLabelText(todo.text, { selector: 'input' });
    const label = screen.getByText(todo.text);
    const button = screen.getByText('삭제하기');
    return {
      ...utils,
      input,
      label,
      button,
      onRemove,
    };
  };

  it('calls onRemove', () => {
    const { button, onRemove } = setup();
    fireEvent.click(button);
    expect(onRemove).toBeCalledWith(sampleTodo.id);
  });
삭제하기 버튼을 누를 경우 현재 버튼의 id값이 상위 컴포넌트에서 내려주는 onRemove함수에 전달이 되는지 테스트 해볼 예정이다. 먼저 setup에서 jest.fn으로 onRemove 함수를 생성하고 리턴해준다. 그리고 it에서 버튼을 클릭해서 onRemove 함수가 실행되어 id값을 정상적으로 넘겨주는지 테스트한다.
컴포넌트 설계
//src/types/TodoItemProps.ts

import { TodoProps } from './todoProps';

export interface TodoItemProps extends TodoProps {
  onRemove: (id: number) => void;
}
이제 컴포넌트에서는 onRemove 함수도 props로 받아야 하므로 타입을 인터페이스를 하나 정의해준다.
//src/components/TodoItem.tsx

export const TodoItem = ({ todo, onRemove }: TodoItemProps) => {
  const { id, text, done } = todo;
  const remove = useCallback(() => onRemove(id), [id, onRemove]);

  return (
    <li>
      <input type="checkbox" id={text} checked={done} readOnly />
      <Label htmlFor={text} checked={done}>
        {text}
      </Label>
      <button type="button" onClick={remove}>
        삭제하기
      </button>
    </li>
  );
};
삭제 버튼을 누를경우 테스트 한대로 동작하도록 설계해주었다.
TodoList
아이템 출력 테스트
컴포넌트 생성
//src/components/TodoList.tsx

export const TodoList = () => <ul>TodoList</ul>;
이제 TodoItem 들을 뿌려줄 상위 컴포넌트 TodoList를 설계해보자.
테스트 코드 작성
//src/tests/TodoList.test.tsx

import { TodoList } from '@/components/TodoList';

describe('<TodoList />', () => {
  const sampleTodos = [
    {
      id: 1,
      text: 'TODO-TDD',
      done: true,
    },
    {
      id: 2,
      text: 'Velog 작성하기',
      done: true,
    },
  ];

  const setup = () => {
    const onRemove = jest.fn();
    const utils = render(<TodoList todos={sampleTodos} onRemove={onRemove} />);

    return { ...utils, onRemove };
  };

  it('renders todos properly', () => {
    setup();
    screen.getByText(sampleTodos[0].text);
    screen.getByText(sampleTodos[1].text);
  });
});
상위 컴포넌트에서 받은 데이터를 이용하여 TodoList 컴포넌트에서 map을 돌리면서 TodoItem 컴포넌트를 출력하려고 한다. 정상적으로 TodoItem 컴포넌트가 출력이 되었다면 sampleTodos에 대한 text들이 있어야 한다.
    const item1 = screen.getByText(sampleTodos[0].text);
    expect(item1).toBeTruthy();
물론 이런식으로 테스트를 해도 되지만, getByText만 해도 만약 해당 text가 없다면 테스트는 실패할 것이기 때문에 생략해주어도 될 것 같다.
컴포넌트 설계
//src/types/todoProps.ts

export interface TodoProps {
  todo: Todo;
}

export interface Todo {
  id: number;
  text: string;
  done: boolean;
}
Todo 인터페이스를 사용하기 위해 타입을 조금 리팩토링 해주었다.
//src/types/todoListProps.ts

export interface TodoListProps {
  todos: Todo[];
  onRemove: (id: number) => void;
}
그리고 TodoListProps를 생성했다.
//src/components/TodoList.tsx

export const TodoList = ({ todos, onRemove }: TodoListProps) => (
  <ul data-testid="TodoList">
    {todos.map(todo => (
      <TodoItem todo={todo} key={todo.id} onRemove={onRemove} />
    ))}
  </ul>
);
상위 컴포넌트에서 todos를 받아와 map을 돌며 TodoItem을 출력한다. 나중에 어디서든지 이 컴포넌트를 어디서든지 테스트할 수 있도록 data-testid를 붙여주었다. querySelector과 같은 DOM을 이용하는 방법은 권장되지 않는다고 한다.
onRemove 테스트
//src/tests/TodoList.test.tsx

  it('calls onRemove', () => {
    const { onRemove } = setup();
    fireEvent.click(screen.getAllByText('삭제하기')[0]);
    expect(onRemove).toBeCalledWith(sampleTodos[0].id);
  });
onRemove 함수가 잘 수행되는지 TodoList 컴포넌트에서도 테스트해보자. 삭제하기 버튼 중에서 첫번째 버튼을 찾아서 클릭할 경우 onRemove에 첫번째 데이터의 id값이 정상적으로 넘어가는지 확인하고 있다.
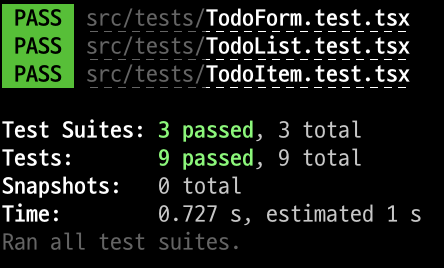
컴포넌트 설계는 위에서 이미 했으므로 테스트 돌려보면 바로 통과한다. 벌써 3개의 컴포넌트에서 9개의 테스트르 만들었고 모두 통과했다. 마저 TODO-TDD 프로젝트를 설계해보자.
TodoApp
컴포넌트 테스트
//src/tests/TodoApp.test.tsx

describe('<TodoApp />', () => {
  it('renders TodoForm and TodoList', () => {
    render(<TodoApp />);
    screen.getByText('등록하기');
    screen.getByTestId('TodoList');
  });
});
여태까지 만들었던 TodoForm, TodoList를 사용하는 최상위 컴포넌트를 생성할 것이다. (TodoItem은 TodoList에서 사용했었다.) 이 컴포넌트들이 정말 존재하는지 테스트를 하는 코드를 작성하자. TodoForm가 있다면 등록하기 버튼이 있을 것이고, TodoList 컴포넌트가 정말 불러와 졌다면 TodoList라는 ID 값을 컴포넌트가 있을 것이다.
//src/components/TodoApp.tsx

export const TodoApp = () => {
  const onInsert = () => {
    console.log('onInsert');
  };
  const onRemove = (id: number) => {
    console.log(id, 'onRemove');
  };
  return (
    <div>
      <TodoForm data-testid="helloworld" onInsert={onInsert} />
      <TodoList todos={[]} onRemove={onRemove} />
    </div>
  );
};TodoForm은 onInsert 함수가 필요했고, TodoList는 onRemove를 props로 받았기 때문에 간단하게 생성해주었다. 이제 테스트는 정상적으로 통과될 것이다.
실제 Element 생성 후 테스트
//src/tests/TodoApp.test.tsx

  it('renders two defaults todos', () => {
    render(<TodoApp />);
    screen.getByText('TODO-TDD');
    screen.getByText('Velog 작성하기');
  });
이제 실제로 TODO 프로젝트에 TODO-TDD와 Velog 작성하기라는 할 일에 대한 Element가 있는지 확인하는 테스트 코드를 작성하자. TodoList에서는 목 데이터를 생성하여 테스트 했지만, 이제 정말로 요소를 추가할 차례이다.
//src/components/TodoApp.tsx

export const TodoApp = () => {
  const [todos, setTodos] = useState<Todo[]>([]);

  useEffect(() => {
    const data = [
      {
        id: 1,
        text: 'TODO-TDD',
        done: true,
      },
      {
        id: 2,
        text: 'Velog 작성하기',
        done: true,
      },
    ];
    setTodos(data);
  }, []);

  const onInsert = () => {
    console.log('onInsert');
  };
  const onRemove = (id: number) => {
    console.log(id, 'onRemove');
  };
  return (
    <div>
      <TodoForm data-testid="helloworld" onInsert={onInsert} />
      <TodoList todos={todos} onRemove={onRemove} />
    </div>
  );
};
테스트를 통과할 수 있도록 state를 생성하여 TodoList 컴포넌트에 넘겨주고 있다.
onInsert 함수 테스트
//src/tests/TodoApp.test.tsx

  it('creates new todo', () => {
    render(<TodoApp />);
    const input = screen.getByPlaceholderText('할 일을 입력하세요');
    const button = screen.getByText('등록하기');
    fireEvent.change(input, {
      target: {
        value: '라면 끓이기',
      },
    });
    fireEvent.click(button);
    screen.getByText('라면 끓이기');
  });
할 일을 추가하기 위해 input에 라면 끓이기라는 텍스트를 입력하여 등록하기 버튼을 누를 경우 실제로 해당 TodoItem이 출력되는지 테스트 해보자. 지금은 실패한다. 그 이유는 바로 위에서 우리는 data를 임의로 설정하여 사용했고, 등록하기 버튼을 눌러도 onInsert 함수에서 어떠한 행동도 하고 있지 않기 때문이다.
//src/components/TodoApp.tsx

export const TodoApp = () => {
  const [todos, setTodos] = useState<Todo[]>([]);

  useEffect(() => {
    const data = [
      {
        id: 1,
        text: 'TODO-TDD',
        done: true,
      },
      {
        id: 2,
        text: 'Velog 작성하기',
        done: true,
      },
    ];
    setTodos(data);
  }, []);

  const onInsert = useCallback(
    (value: string) => {
      const newId = todos[todos.length - 1] ? todos[todos.length - 1].id + 1 : 1;

      const newData = {
        id: newId,
        text: value,
        done: false,
      };
      setTodos(todos => [...todos, newData]);
    },
    [todos]
  );

  const onRemove = useCallback((id: number) => {
    console.log(id, 'onRemove');
  }, []);

  return (
    <div>
      <TodoForm data-testid="helloworld" onInsert={onInsert} />
      <TodoList todos={todos} onRemove={onRemove} />
    </div>
  );
};
onInsert 함수에서 props로 받은 value를 이용하여 새로운 todos를 추가할 수 있도록 구현해주었다. id값은 배열에서 마지막 요소의 id값을 이용하는데, 할 일을 모두 삭제해서 배열에 요소가 없는 경우라면 id는 1을 사용하도록 했다.
CheckBox 테스트
체크박스를 누를 경우 done 값이 토글 형식으로 변경되도록 하려고 한다. 그렇게 하기 위해서는 TodoItem에서 input(checkbox)를 컨트롤 할 수 있는 함수가 하나 필요하다. TodoApp 컴포넌트를 설계하다가 TodoItem으로 넘어가야해서 헷갈릴 수 있겠지만.. 실제로 프로젝트를 설계하면 이런일이 많으므로 이해하자..!
handleCheckBox 생성 테스트
//src/tests/TodoItem.test.tsx

  const setup = (props = {} as TodoProps) => {
    const onRemove = jest.fn();
    const handleCheckBox = jest.fn();
    const initialProps = { todo: sampleTodo };
    const utils = render(
      <TodoItem {...initialProps} {...props} onRemove={onRemove} handleCheckBox={handleCheckBox} />
    );
    const todo = props.todo || initialProps.todo;
    const input = screen.getByLabelText(todo.text, { selector: 'input' });
    const label = screen.getByText(todo.text);
    const button = screen.getByText('삭제하기');
    return {
      ...utils,
      input,
      label,
      button,
      onRemove,
      handleCheckBox,
    };
  };

  it('calls handleCheckBox', () => {
    const { input, handleCheckBox } = setup();
    fireEvent.click(input);
    expect(handleCheckBox).toBeCalledWith(sampleTodo.id, !sampleTodo.done);
});checkbox를 클릭하면 handleCheckBox 함수로 id와 done가 정상적으로 전달되는지 테스트하는 코드를 작성하자.
//src/components/TodoItem.tsx

export const TodoItem = ({ todo, onRemove, handleCheckBox }: TodoItemProps) => {
  const { id, text, done } = todo;
  const remove = useCallback(() => onRemove(id), [id, onRemove]);

  return (
    <li>
      <input type="checkbox" id={text} checked={done} onChange={() => handleCheckBox(id, !done)} />
      <Label htmlFor={text} checked={done}>
        {text}
      </Label>
      <button type="button" onClick={remove}>
        삭제하기
      </button>
    </li>
  );
};
checkbox 를 클릭할 경우 id와 done이 handleCheckBox 함수에 전달될 수 있도록 인자로 넣었다.
//src/components/TodoApp.tsx

  const handleCheckBox = useCallback((id: number, done: boolean) => {
    console.log(id, done);
  }, []);
그 후에 TodoApp 컴포넌트에서 handleCheckBox를 생성하여 자식 컴포넌트들에게 넘겨주자. 이에 맞게 type 선언해준 것도 변경해주면 된다.(여기서는 코드로 설명하지 않겠다.)
handleCheckBox 동작 테스트
//src/tests/TodoApp.test.tsx

  it('checkbox todo', () => {
    render(<TodoApp />);
    const input = screen.getByLabelText('TODO-TDD', { selector: 'input' });
    const label = screen.getByText('TODO-TDD');
    expect(label).toHaveStyle('text-decoration: line-through;');
    fireEvent.click(input);
    expect(label).not.toHaveStyle('text-decoration: line-through;');
    fireEvent.click(input);
    expect(label).toHaveStyle('text-decoration: line-through;');
  });
체크박스를 누를경우 done의 boolean값이 변경되야 하고, UI에서는 할 일을 수행했다는 의미의 가운데 줄이 이에 맞게 보여져야 한다. 먼저 TODO-TDD라는 text를 가진 input과 이와 대응되는 label을 찾고, 테스트를 수행해주면 된다.
//src/components/TodoApp.tsx

  const handleCheckBox = useCallback(
    (id: number, done: boolean) => {
      const filtered = todos.map(data => {
        if (data.id === id) {
          return { ...data, done };
        }
        return data;
      });
      setTodos(filtered);
    },
    [todos]
  );

  return (
    <div>
      <TodoForm data-testid="helloworld" onInsert={onInsert} />
      <TodoList todos={todos} onRemove={onRemove} handleCheckBox={handleCheckBox} />
    </div>
  );
체크를 하던 체크를 해제하던 이벤트가 발생한 element의 id값을 props로 받는다. 그리고 해당 id를 가진 데이터의 done의 값을 반전시켜주면 된다.
onRemove 테스트
//src/tests/TodoApp.test.tsx

  it('removes todo', () => {
    render(<TodoApp />);
    const todoText = screen.getByText('TODO-TDD');
    const removeButton = screen.getAllByText('삭제하기');
    fireEvent.click(removeButton[0]);
    expect(todoText).not.toBeInTheDocument(); // 페이지에서 사라졌음을 의미함
});삭제하기버튼을 누를 경우 할 일이 제거되야 한다. 먼저 TODO-TDD라는 텍스트를 가진 요소를 찾는다. 그리고 삭제하기 라는 텍스트를 가진 모든 버튼을 가져오고, 0번째 삭제하기 버튼을 클릭한다. 이렇게 하면 TODO-TDD의 삭제버튼이 눌리게 될 것이다.
//src/components/TodoApp.tsx

  const onRemove = useCallback(
    (id: number) => {
      const filtered = todos.filter(data => data.id !== id);
      setTodos(filtered);
    },
    [todos]
  );
onRemove 함수가 호출 되면, props로 받은 id가 데이터 배열에서 사라지면 되므로 filter를 이용해주었다.
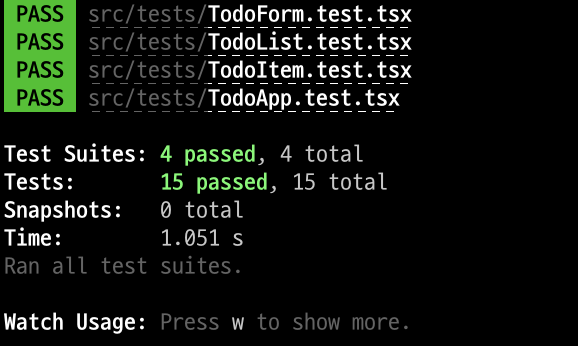
여태까지 작성한 테스트는 모두 통과되는 것을 볼 수 있다.
브라우저에서 확인해보기
//pages/index.tsx

import { TodoApp } from '@/components/TodoApp';

const Home: NextPage = () => <TodoApp />;

export default Home;
테스트 주도 개발(TDD)로 TODO 프로젝트를 설계해보았다. 이제 정말로 잘 동작하는지 index.tsx에 TodoApp컴포넌트를 가져오자.
테스트를 작성하면서 우리가 원했던 동작대로 움직이는것을 볼 수 있다. 실제로 프로젝트를 설계할 때는 컴포넌트를 브라우저에 띄워보며 에러를 찾기도 했다. "TDD라면서 이러면 무슨 의미지?" 라고 생각할 수도 있다. 하지만 이 과정이 의미없는 행동은 아니다. 개발자가 모든 예외를 생각하며 테스트 코드를 작성할 수 없으므로 실제 에러를 발견해서 그것을 테스트 코드로 추가해놓으면 다음에는 같은 실수를 하지 않을 수 있다. 동작은 같은데 로직은 효율적으로 바꾸는 리팩토링 작업에서도 에러가 발생하는 상황을 깜빡하지 않을 수 있는 효과가 있다느 것이다.
마무리
개념부터 프로젝트에 적용까지 사실 쉽지는 않았다. 이해가 가지않는 개념들도 있었고, 어떤식으로 설계하는 테스트코드가 효율적이고 직관적인지 판단하는게 힘들었다. 하지만 간단한 프로젝트라도 설계해보니 조금씩 감은 잡히는것 같다. 실제 프로젝트에서는 모든 부분에 테스트 코드를 작성한다기보다는 중요한 로직에 테스트 코드를 작성할 것 같다. 그리고 다음에는 cypress도 사용해보려고 한다.


좋은 글 잘 봤습니다!