비효율적인 컴포넌트
Wine API 프로젝트 - 2에서 설계했을 때 부족한 부분이 있었다.
import type { NextPage } from "next";

import { Wine } from "../../types/wine";
import { useWineData } from "../../hooks/useWineData";
import { Error, Loading, WineCard } from "../../conponents";

const WhitesPage: NextPage = () => {
  const name = "whites";
  const { data, error } = useWineData(name);
  if (error) return <Error />;
  if (!data) return <Loading />;
  return (
    <div>
      <h1>Wine</h1>
      <main>
        {data.map((wineData: Wine) => {
          return (
            <WineCard
              key={`${name}-wine-list-${wineData.id}`}
              wineData={wineData}
            />
          );
        })}
      </main>
    </div>
  );
};
export default WhitesPage;
와인의 종류 중 화이트와인 페이지 부분이다. 이와 같은 종류 상세 페이지에서 현재 동일한 코드가 많이있다.
import type { NextPage } from "next";

import { Wine } from "../../types/wine";
import { useWineData } from "../../hooks/useWineData";
import { Error, Loading, WineCard } from "../../conponents";

const RosePage: NextPage = () => {
  const name = "rose";
  const { data, error } = useWineData(name);
  if (error) return <Error />;
  if (!data) return <Loading />;
  return (
    <div>
      <h1>Wine</h1>
      <main>
        {data.map((wineData: Wine) => {
          return (
            <WineCard
              key={`${name}-wine-list-${wineData.id}`}
              wineData={wineData}
            />
          );
        })}
      </main>
    </div>
  );
};

export default RosePage;
레드 와인 페이지와 비교해보자. 이제 확실하게 보인다.
공통 되는 부분을 컴포넌트로 만들어 줘야 한다.
추상화
//components/WineContainer.tsx
import { Error, Loading, WineCard } from ".";
import { useWineData } from "../hooks/useWineData";
import { Wine } from "../types/Wine";

interface WineContainerProps {
  name: string;
}

export const WineContainer = ({ name }: WineContainerProps) => {
  const { data, error } = useWineData(name);

  if (error) return <Error />;
  if (!data) return <Loading />;

  return (
    <main>
      <h1>{name} wine</h1>
      {data.map((wineData: Wine) => {
        return (
          <WineCard
            key={`${name}-wine-list-${wineData.id}`}
            wineData={wineData}
          />
        );
      })}
    </main>
  );
};
에러가 발생하면 에러를 나타내는부분, 로딩부분, 공통으로 겹치는 헤더, 그리고 map으로 값을 가져와 화면에 보여주는 부분을 컴포넌트로 분리했다.
//pages/wines/whites.tsx
import type { NextPage } from "next";
import { WineContainer } from "../../conponents";

const WhitesPage: NextPage = () => {
  const name = "whites";

  return (
    <div>
      <WineContainer name={name} />
    </div>
  );
};

export default WhitesPage;
이제 위와 같이 간단하게 사용할 수 있다.
이렇게 컴포넌트를 분리하게 되면 WineContainer 하나만 CSS 작업을 해줘도 이것을 사용하는곳은 디자인이 적용된다. 그리고 수정할 경우에는 이 파일만 수정해주면 된다는 장점이 있다.
WineCard UI
//constants/index.ts
export const WINE_API_ENDPOINT = "https://api.sampleapis.com/wines/";
export const Beer_API_ENDPOINT = "https://api.sampleapis.com/beers/";

export const MEDIA_QUERY_END_POINT = {
  MOBILE: "640px",
  TABLET: "1280px",
  DESKTOP: "1920px",
  LARGE: "2560px",
};
각 API의 엔드 포인트의 주소를 constants의 index.ts에 넣어 주었었다. 이제 공통으로 사용될 변수 MEDIA_QUERY_END_POINT 을 선언해주자. 모바일, 테블릿, PC, LAGGE 인 경우의 픽셀들을 미리 정의해주었다.
import { Wine } from "../types/Wine";
import styled from "styled-components";
interface WineProps {
wineData: Wine;
}
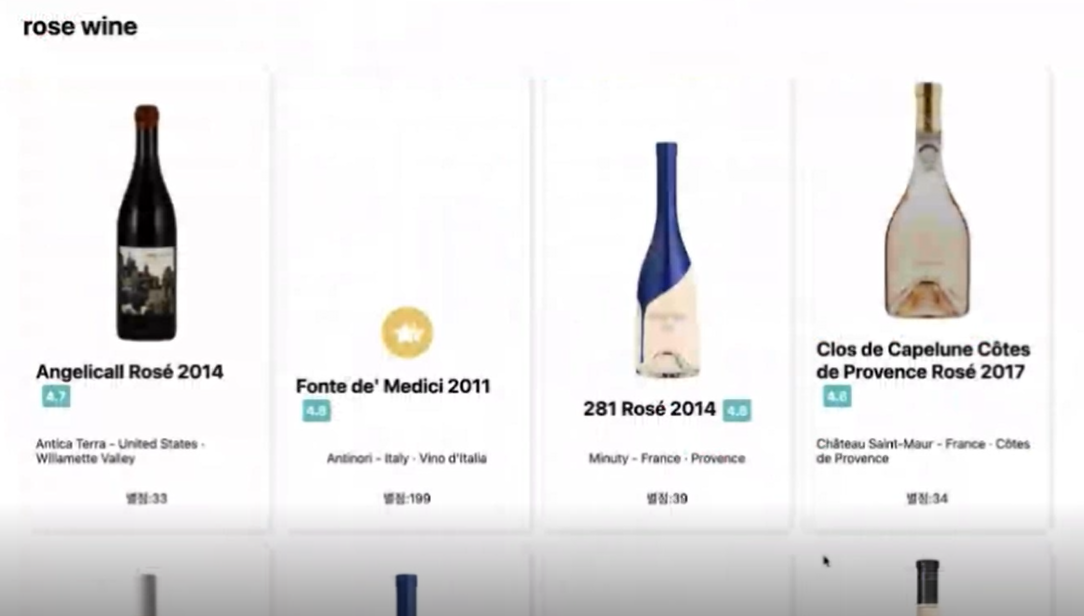
export const WineCard = ({ wineData }: WineProps) => {
const { wine, winery, image, location, rating } = wineData;
return (
<Container>
<img src={image} alt="와인" />
<h2>
{wine}
<Average>{rating.average}</Average>
</h2>
<p>
{winery} - {location}
</p>
<p>별점 : {rating.reviews.replace("ratings", "")}</p>
</Container>
);
};
const Container = styled.div`
display: flex;
flex-direction: column;
align-items: center;
justify-content: flex-end;
padding: 1em;
box-shadow: 1px 1px 5px rgba(0, 0, 0, 0.3);
border-radius: 1em;
`;
const Average = styled.span`
display: inline-block;
padding: 0.3em;
font-size: 16px;
margin-left: 0.5em;
color: white;
background-color: #2ac1bc;
border-radius: 3px;
`;WineContainer에서 <WineCard /> 와 같은 형식으로 WineCard컴포넌트를 사용하고 있었다. wineData={wineData} 로 props를 넘겨주고 있는데 wineData에는 image, rating 등 정보가 들어있다. 이 정보들을 이용해서 화면에 나타내주고 있다.
styled-components를 사용하고 있다.
Layout
import "../styles/globals.css";
import type { AppProps } from "next/app";

import { Layout } from "../conponents/layout";

function MyApp({ Component, pageProps }: AppProps) {
  return (
    <Layout>
      <Component {...pageProps} />
    </Layout>
  );
}

export default MyApp;
이번에는 레이아웃을 생성해볼 것이다. 맥주와 와인 종류마다 링크를 생성해서 클릭하면 해당 주소로 이동하게 해줄 레이아웃이다.
레이아웃은 _app.tsx에서 사용될 것이다. Next.js의 _app.tsx 페이지는 최상위 컴포넌트이다. 이 부분을 Layout 컴포넌트로 감싸주었다. (아직 Layout 컴포넌트는 만들지 않았다.)
본격적으로 components 디렉터리에 layout 디렉터리를 생성해주었다.
//index.ts
export * from "./Layout";
export * from "./Navigation";
index.ts는 layout 컴포넌트들을 파일을 export 해주는 파일이다.
//Layout
import React from "react";
import { Navigation } from "./Navigation";
import styled from "styled-components";

export const Layout: React.FC = ({ children }) => {
  return (
    <div>
      <Navigation />
      <Container>{children}</Container>
    </div>
  );
};

const Container = styled.main`
  max-width: 1280px;
  margin: auto;
`;
Layout 컴포넌트이다. Navigation 컴포넌트를 사용하고 있고, children으로 받아온 것을 출력해주고 있다.
React.FC를 사용하면 props에 기본적으로 children이 들어가있다. 타입스크립트에서 함수 컴포넌트라 명시해주는 것이고 Children Props를 사용하기 위해서 선언해 준 것이다.
그리고 컴포넌트의 defaultProps, propTypes, contextTypes 를 설정 할 때 자동완성이 된다. 참고 링크
//Navigation
import React from "react";
import Link from "next/link";
export const Navigation = () => {
return (
<header>
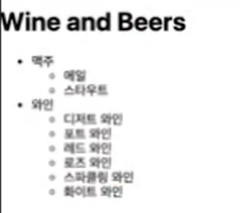
<h1>Wine and Beers</h1>
<nav>
<ul>
<li>
<Link href="/beers/">
<a>맥주</a>
</Link>
<ul>
<li>
<Link href="/beers/ale">
<a>에일</a>
</Link>
</li>
<li>
<Link href="/beers/stouts">
<a>스타우트</a>
</Link>
</li>
</ul>
</li>
<li>
<Link href="/wines/">
<a>와인</a>
</Link>
</li>
</ul>
</nav>
</header>
);
};링크를 하나씩 생성하려다 보니 반복적인 작업이 이루어지고 있다. 이러한 일은 매우 지겨운 일이다. 그리고 술의 종류나 더 상세한 종류들이 추가된다면 코드를 수정하기 번거로울 것이다.
//constants/index.ts
export const ROUTES = {
  BEERS: {
    MAIN: {
      ID: 0,
      PATH: "/beers",
      LABEL: "맥주",
      SUBS: [
        {
          ID: 0,
          PATH: "/ale",
          LABEL: "에일",
          ORDER: 0,
        },
      ],
    },
  },
};
constans에 데이터로 빼주자. 라우터에 대한 데이터로 입력하고 있다. 위와 같이 객체 형식으로 데이터 구조를 작성해줄 수 있지만 이 프로젝트에서는 JSON 형식으로 설계했다.
export const ROUTES = [
  {
    ID: 0,
    PATH: "/beers",
    LABEL: "맥주",
    SUBS: [
      {
        ID: 0,
        PATH: "/ale",
        LABEL: "에일",
        ORDER: 0,
      },
      {
        ID: 1,
        PATH: "/stouts",
        LABEL: "스타우트",
        ORDER: 1,
      },
    ],
  },
  {
    ID: 1,
    PATH: "/wines",
    LABEL: "와인",
    SUBS: [
      {
        ID: 0,
        PATH: "/dessert",
        LABEL: "디저트 와인",
        ORDER: 0,
      },
      {
        ID: 1,
        PATH: "/port",
        LABEL: "포트 와인",
        ORDER: 1,
      },
      {
        ID: 2,
        PATH: "/reds",
        LABEL: "레드 와인",
        ORDER: 2,
      },
      {
        ID: 3,
        PATH: "/rose",
        LABEL: "로즈 와인",
        ORDER: 3,
      },
      {
        ID: 4,
        PATH: "/sparkling",
        LABEL: "스파클링 와인",
        ORDER: 4,
      },
      {
        ID: 5,
        PATH: "/whites",
        LABEL: "화이트 와인",
        ORDER: 5,
      },
    ],
  },
];
Beers와 Wines에 연결될 데이터들을 모두 입력해주었다.
import Link from "next/link";
import { ROUTES } from "../../constants";

interface ROUTE {
  ID: number;
  PATH: string;
  LABEL: string;
  SUBS?: Array<ROUTE>;
}

export const Navigation = () => {
  return (
    <header>
      <h1>Wine and Beers</h1>
      <nav>
        <ul>
          {ROUTES.map((routeObject: ROUTE) => {
            return (
              <li>
                <Link href={routeObject.PATH}>
                  <a>{routeObject.LABEL}</a>
                </Link>
                <ul>
                  {routeObject.SUBS &&
                    routeObject.SUBS.map((subRouteObject: ROUTE) => {
                      return (
                        <li>
                          <Link
                            href={`${routeObject.PATH}${subRouteObject.PATH}`}
                          >
                            <a>{subRouteObject.LABEL}</a>
                          </Link>
                        </li>
                      );
                    })}
                </ul>
              </li>
            );
          })}
        </ul>
      </nav>
    </header>
  );
};
JSON 형식으로 생성해준 라우터 데이터들을 map을 돌리면서 사용해주고 있다. 이제 술의 종류나 상세 종류의 데이터를 추가하면 위의 코드에서는 변경할 것 없이 constants의 ROUTES 만 건들면 된다.
_app.tsx에 추가해주었으므로 모든 페이지에 위의 헤더가 적용될 것이다.
이제 데이터들을 이용하여 위와 같이 Styled-components로 디자인 해주면 된다.
