오늘은 논리회로의 기본적인 예시인 counter 에 대해 알아보도록 하겠다. counter 는 clk, rst, counter 세가지 유닛으로 구성되어 있으며, clk 에 상관 없이 rst 신호가 ON 되었을 때 전체 counter 를 초기화 하는 asynchronous counter, 오직 clk 에 의해 동작하는 synchronous counter 로 구분될 수 있다. 그럼 지금부터 sync 와 async counter 의 동작을 위한 코드를 분석하고 결과 파형을 확인해보도록 하겠다.
- synchronous counter
1. module 생성
synchronous counter 는 매우 간단하다. rst 일 때는 count 를 0 으로 할당, 그 외의 경우는 clk 에 의해 1 씩 counting 한다.
module sync_counter(clk, rst, count);

    input clk, rst;
    output reg [3:0] count;

    always @(posedge clk)
    begin
        if (rst)
            count <= 4'b0000;
        else
            count <= count + 1;
    end
endmodule
2. testbench 생성
다음으로는 시간 정보를 할당해주는 testbench 를 생성해준다.
`include "sync_counter.v"
`timescale 1ns/1ps

module sync_counter_tb;
    reg clk, rst;
    wire [3:0] count;

    sync_counter sync(.clk(clk), .rst(rst), .count(count));

    initial

        begin
            rst = 1;
            clk = 0;

            #125;
            rst = 0;

            #4500;
            $finish;
        end

    always @(posedge clk)
        begin
            $display("The value is %d", count);
        end

    always #10 clk = ~clk;

    initial begin
        $dumpfile("sync_counter_tb.vcd");
        $dumpvars(0, sync_counter_tb);
    end

endmodule
3. 결과 파형 확인
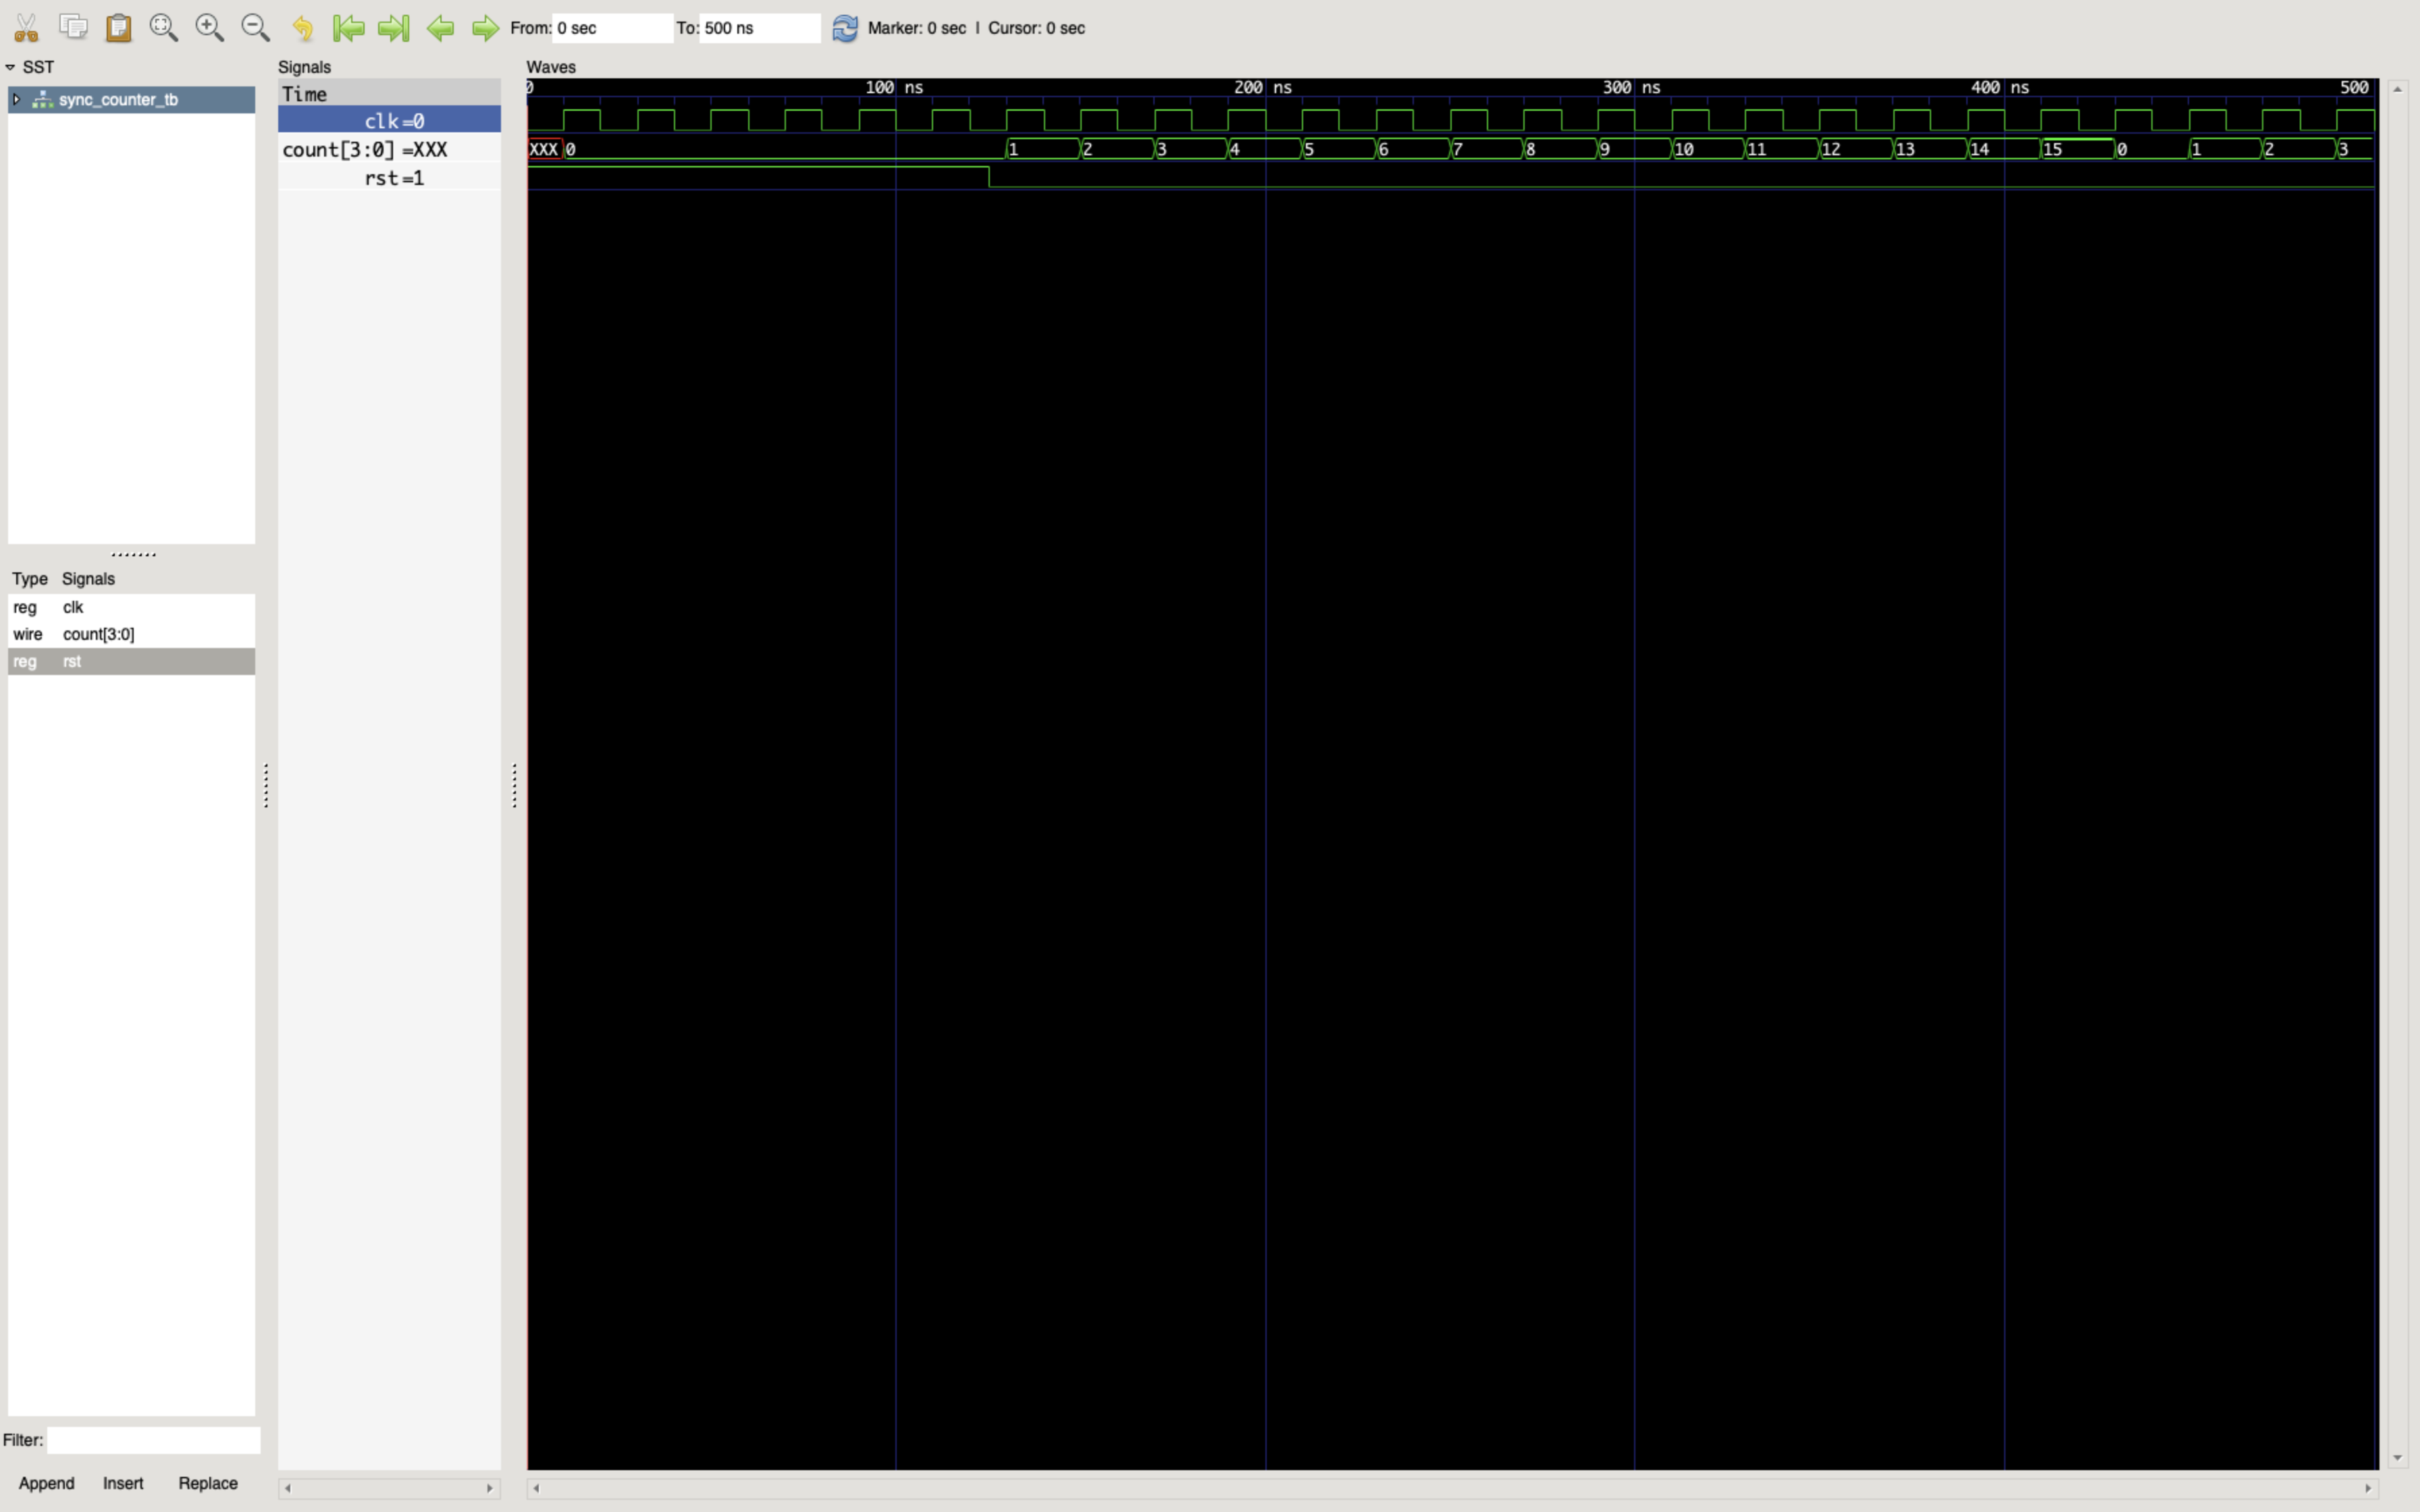
파형을 확인해보면, rst = 1 일 때는 count = 0 으로, rst = 0 일 때는 positive edge clk 마다 count 가 1 씩 증가하는 것을 확인할 수 있다. 이때, '1111' 이후의 값은 '10000' 이 되는데, 해당 counter 는 4bit 만 표현하는 binary counter 이기 때문에 해당 값이 '0000' 으로 초기화되는 구조로 동작한다.
이러한 동작을 고려하여 carry ripple counter 도 추가적으로 설계해봐야겠다!
- asynchronous counter
1. module 생성
module async_d_ff(q, qbar, clk, rst, d);
    input d;
    input clk, rst;
    output reg q;
    output qbar;

    assign qbar = ~q;

    always @(posedge clk, posedge rst)
        begin
            if (rst)
                q <= 0;
            else
                q <= d;
        end

endmodule

module async_counter(count, countbar, clk, rst);
    input clk, rst;
    output [3:0] count, countbar;

    // 1st type
    async_d_ff m1(count[0], countbar[0],      clk, rst, countbar[0]);
 	async_d_ff m2(count[1], countbar[1], count[0], rst, countbar[1]);
  	async_d_ff m3(count[2], countbar[2], count[1], rst, countbar[2]);
  	async_d_ff m4(count[3], countbar[3], count[2], rst, countbar[3]);

    // 2nd type
    async_d_ff m1(countbar[0], count[0],        ~clk, rst, count[0]);
    async_d_ff m2(countbar[1], count[1], countbar[0], rst, count[1]);
    async_d_ff m3(countbar[2], count[2], countbar[1], rst, count[2]);
    async_d_ff m4(countbar[3], count[3], countbar[2], rst, count[3]);


endmodule
코드를 보면 알 수 있다시피, async 는 sync 와 다른 패턴으로 코드를 짜주어야 한다. 간단히 코드 설명을 해보자면, 우선 진정한 async counter 를 위해 d-flipflop 을 설계해주는 것부터 시작한다. 그리고 생성된 d-flipflop 을 4개의 counter bits 에 각각 할당시켜서 counting 기능을 부여한다.
이때, 아래 그림의 signal flow 와 같이 next MSB 의 input 이 이전 단의 ouput 에 연결되어 있는 형태를 그대로 코드로 구현해주면 counter 를 위한 모듈이 완성된다.
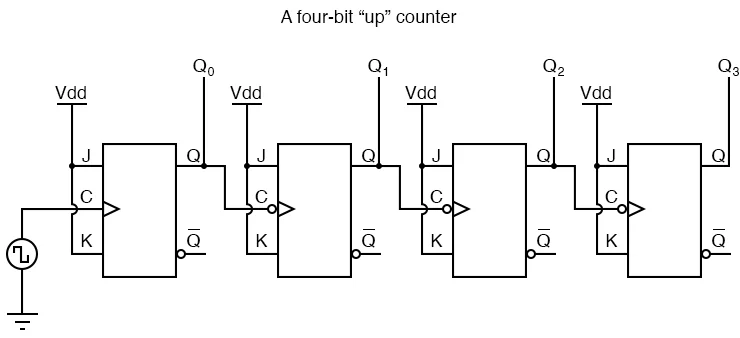
이미지 출처 : https://www.allaboutcircuits.com/textbook/digital/chpt-11/asynchronous-counters/
2. 결과 파형 확인
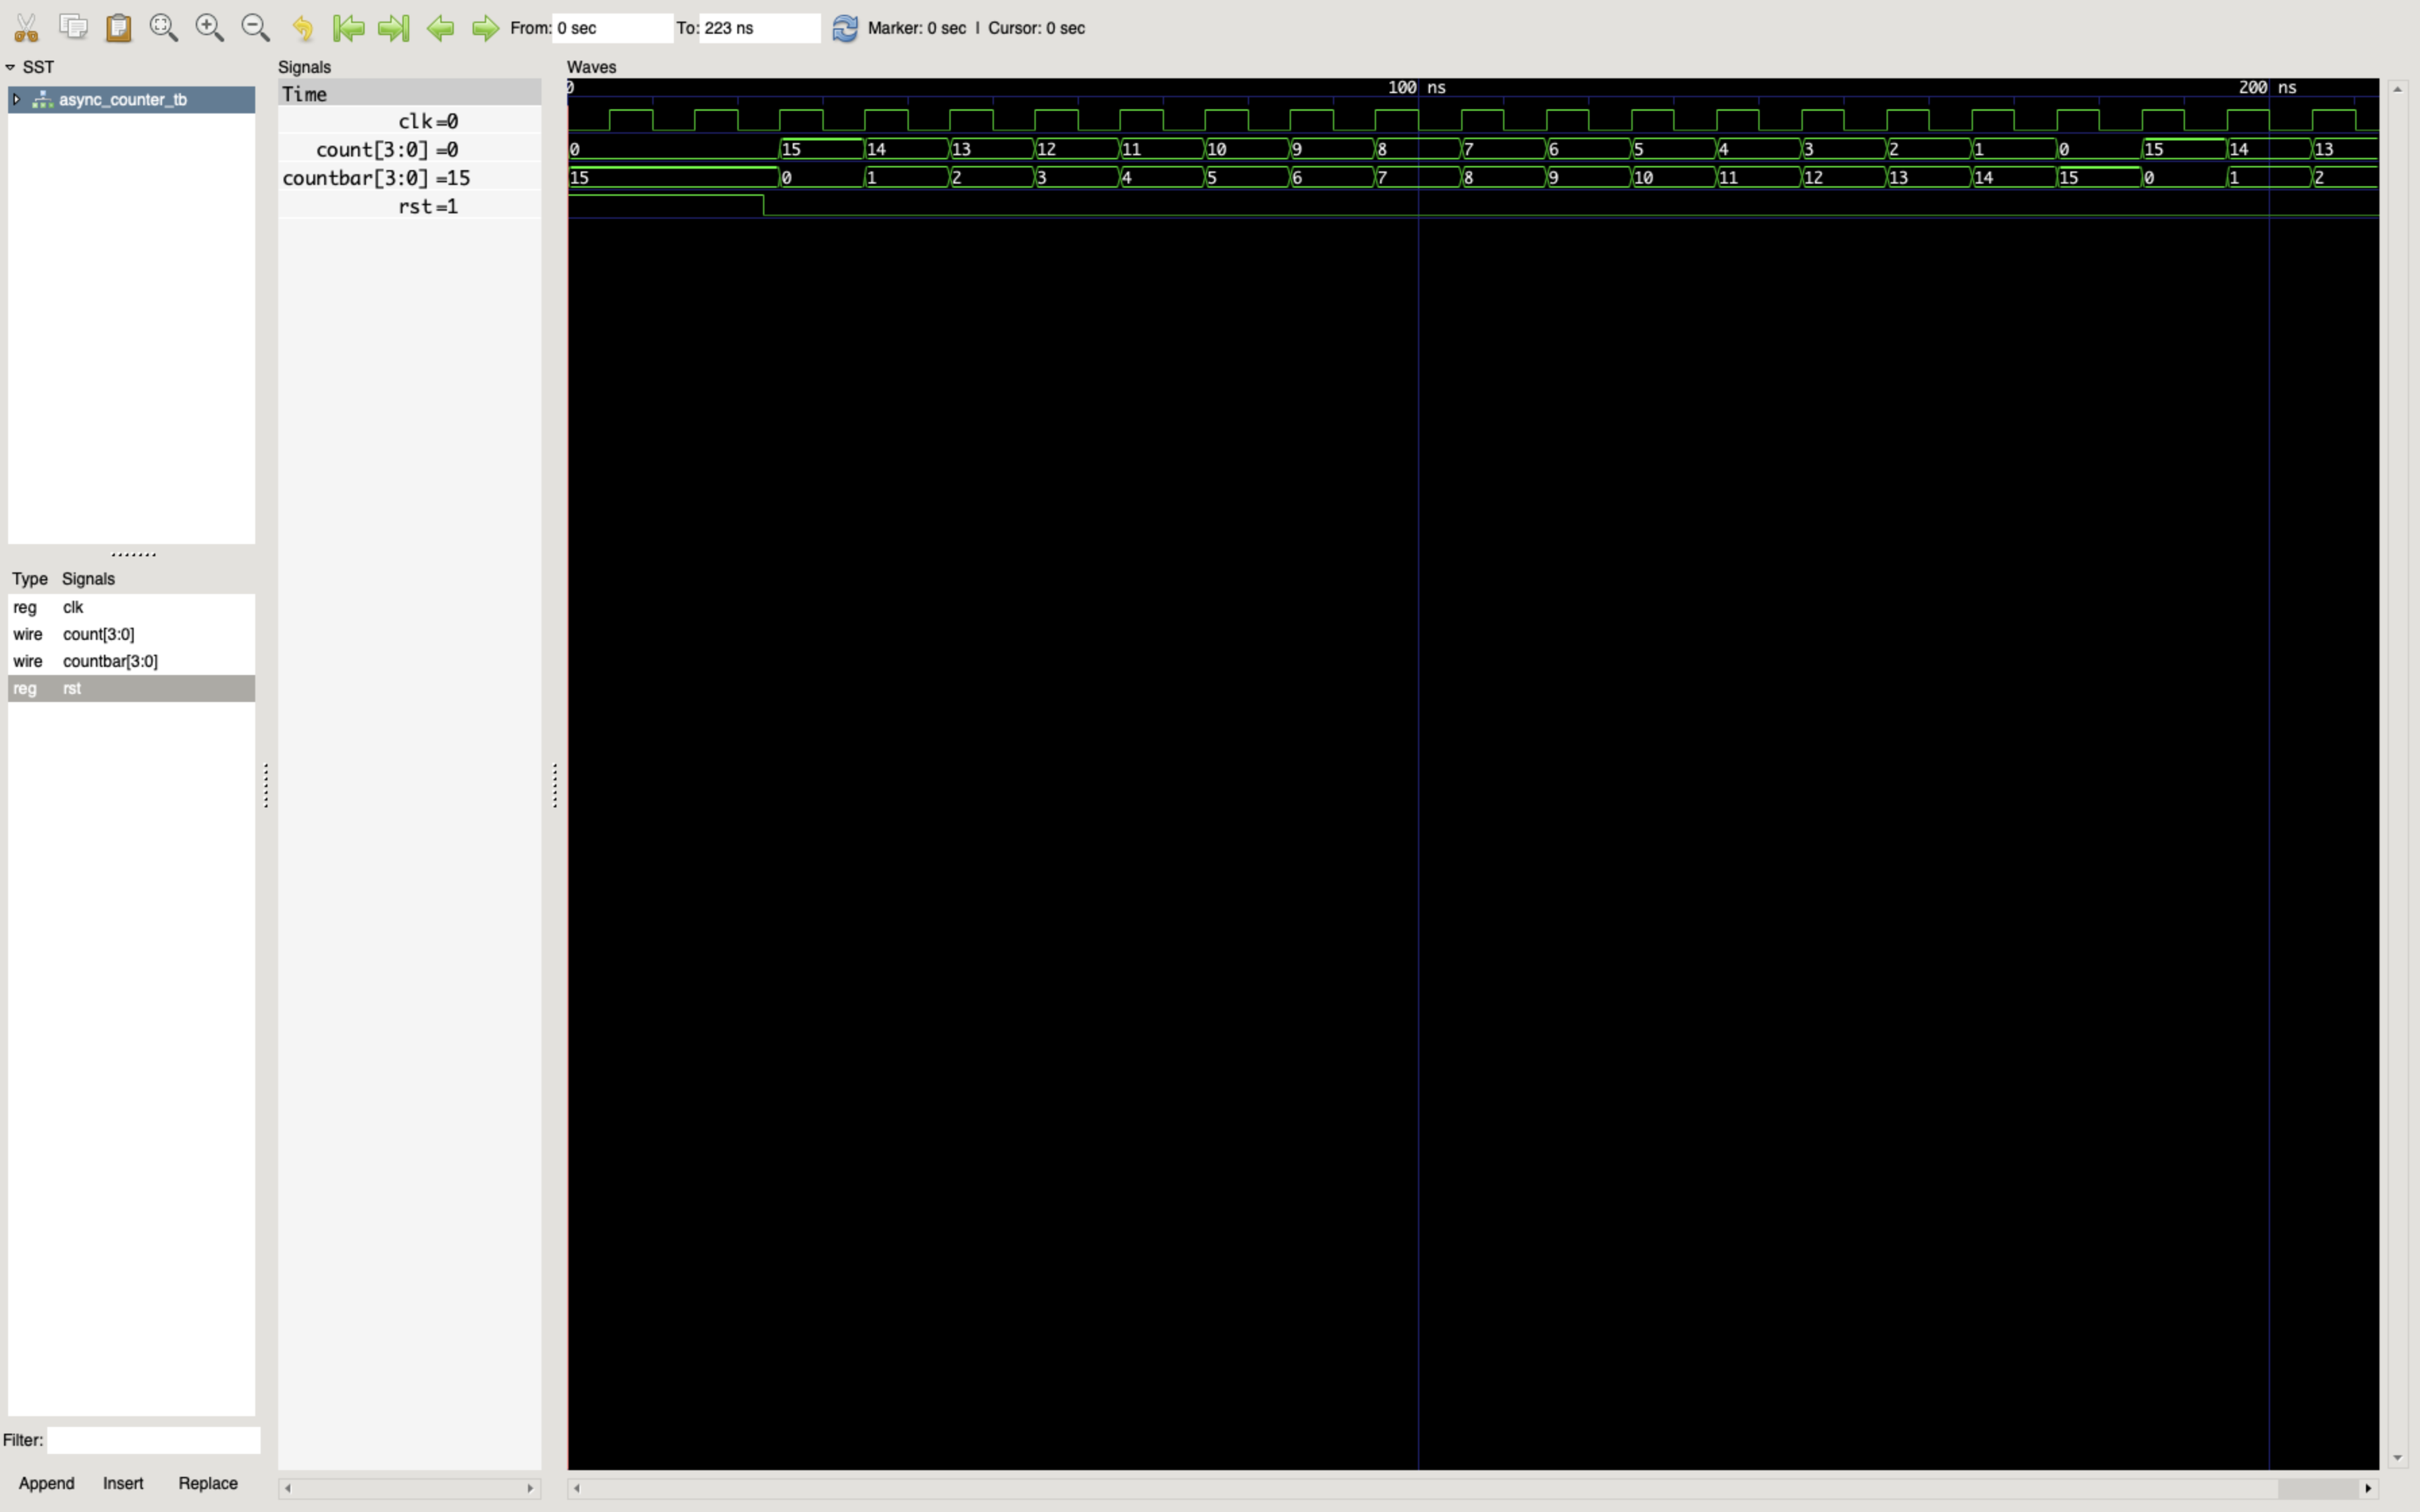
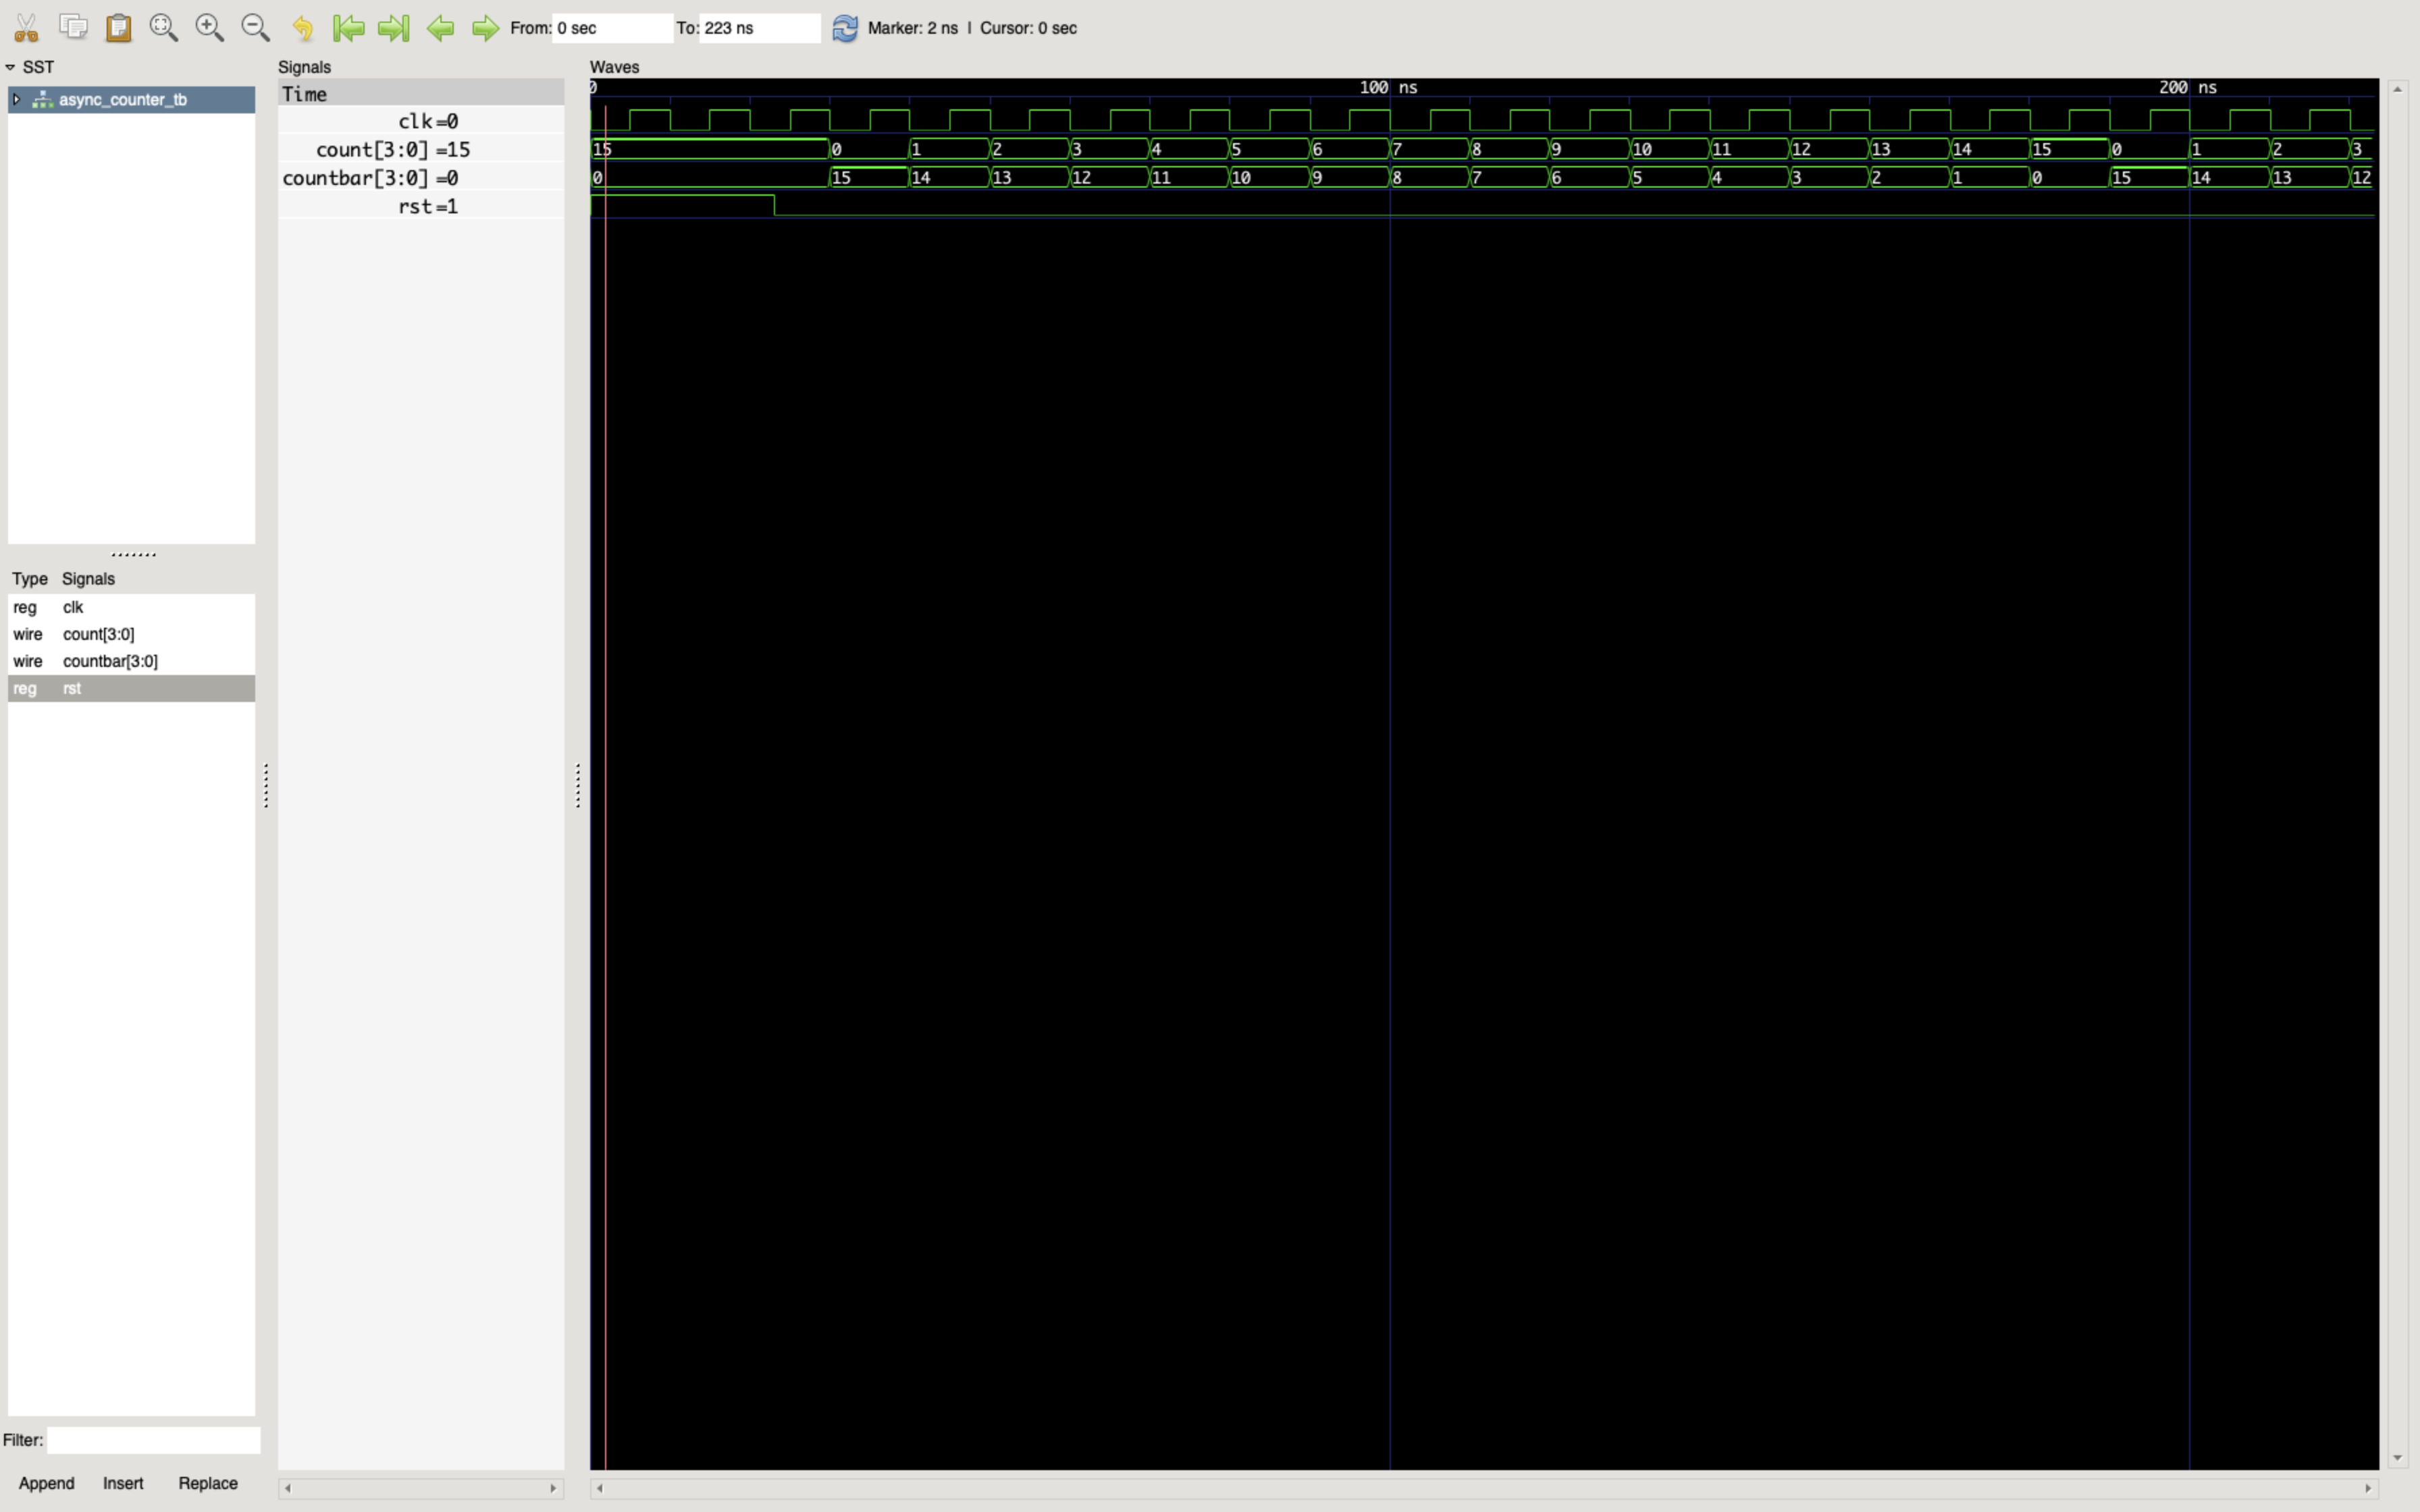
우선 기존 코드인 1st type 파형 결과를 확인해보면 negative edge clk 에서 15부터 down counting 을 수행하는 것을 알 수 있다. 그 이유는 d-flipflop 의 'd' 변수에 count 가 아닌, countbar 가 할당 되어 있기 때문이다. 따라서 down counting 대신 up counting 기능을 수행하도록 하는 2nd type 코드로 수정해주면 비로소 up counter 가 만들어지게 되는 것을 확인할 수 있다.
-
1st type
-
2nd type
3. testbench 생성
`include "async_counter.v"
`timescale 1ns/1ps

module async_counter_tb;
    reg clk, rst;
    wire [3:0] count, countbar;
    async_counter async(.count(count), .countbar(countbar), .clk(clk), .rst(rst));

    initial begin
        clk = 0;
        rst = 1;

        #23;
        rst = 0;

        #200;
        $finish;
    end

    always #5 clk = ~clk;

    always @(posedge clk)
        begin
            $display("The value is %d", count);
        end

    initial begin
        $dumpfile("async_counter_tb.vcd");
        $dumpvars(0, async_counter_tb);
    end

endmodule
마치며
나는 복잡한 모듈을 마주치면 지레 겁을 먹어, 연진아... counter 는 조금 더 깊게 분석해볼 필요가 있다. 특히 async counter 다시 복습하기!
To be continued...🫠