
//
//  ViewController.swift
//  Calculator_UI&codeBase
//
//  Created by t2023-m0023 on 6/20/24.
//

import UIKit
import SnapKit

class ViewController: UIViewController {

    let label = UILabel()
    let button = UIButton()
    let stackview = UIStackView()
    let clcStackVeiw = UIStackView()

    override func viewDidLoad() {
        super.viewDidLoad()
        configureUI()
    }

    private func configureUI() {
        // 배경 컬러지정
        view.backgroundColor = .black

        //라벨 설정

        label.text = "12345"
        label.textColor = .white
        label.textAlignment = .right
        label.font = UIFont.boldSystemFont(ofSize: 60)

        // 라벨을 뷰에 추가하고 제약 조건을 설정
        view.addSubview(label)
        label.snp.makeConstraints {
            $0.leading.equalToSuperview().inset(30)
            $0.trailing.equalToSuperview().inset(30)
            $0.top.equalToSuperview().inset(200)
            $0.height.equalTo(100)
        }
        makeHorizontalStackView()
    }

    private func makeHorizontalStackView() {

            // 스택 뷰의 속성을 설정
            stackview.axis = .horizontal
            stackview.backgroundColor = .black
            stackview.spacing = 10
            stackview.distribution = .fillEqually

        //버튼생성 및 스택뷰에 추가
        for _ in 1...4 {
            let button = UIButton()
            button.backgroundColor = UIColor(red: 58/255, green: 58/255, blue: 58/255, alpha: 1.0)
            button.setTitle(" ", for: .normal)
            button.titleLabel?.font = UIFont.boldSystemFont(ofSize: 30)
            button.frame.size.height = 80
            button.frame.size.width = 80
            button.layer.cornerRadius = 40

            stackview.addArrangedSubview(button)

            view.addSubview(stackview)
            stackview.snp.makeConstraints{
                $0.top.equalTo(label.snp.bottom).offset(80)
                $0.centerX.equalToSuperview()
                $0.height.equalTo(80)
                $0.width.equalTo(350)

        }
      }
    }
}
Lv. 4
🧑🏻💻UIStackView을 사용해서 세로 스택 뷰 생성. 왼쪽과 같이 구성해보세요.
verticalStackView속성
axis = .verticalbackgroundColor = .blackspacing = 10distribution = .fillEquallyhorizontalStackView AutoLayout
- width = 350
- top = label 의 bottom 으로 부터 60 떨어지도록.
- centerX = superView 와 같도록.
//
//  ViewController.swift
//  Calculator_UI&codeBase
//
//  Created by t2023-m0023 on 6/20/24.
//

import UIKit
import SnapKit

class ViewController: UIViewController {

    let label = UILabel()
    let stackview1 = UIStackView()
    let stackview2 = UIStackView()
    let stackview3 = UIStackView()
    let stackview4 = UIStackView()
    let clcStackVeiw = UIStackView()

    override func viewDidLoad() {
        super.viewDidLoad()
        configureUI()
    }

    private func configureUI() {
        // 배경 컬러지정
        view.backgroundColor = .black

        //라벨 설정

        label.text = "12345"
        label.textColor = .white
        label.textAlignment = .right
        label.font = UIFont.boldSystemFont(ofSize: 60)

        // 라벨을 뷰에 추가하고 제약 조건을 설정
        view.addSubview(label)
        label.snp.makeConstraints {
            $0.leading.equalToSuperview().inset(30)
            $0.trailing.equalToSuperview().inset(30)
            $0.top.equalToSuperview().inset(200)
            $0.height.equalTo(100)
        }
        makeHorizontalStackView()
    }

    private func makeHorizontalStackView() {
        // 스택뷰를 4개를 만들어 줘야함
        // 각각의 스택뷰에 버튼타이틀 설정 할 수있는 함수 필요

        let stackViews = [stackview1, stackview2, stackview3, stackview4]
        let buttonTitle = ["789+", "456-", "123*", "AC, 0, =, /"]
        // for  반복문 사용 스택 뷰의 속성을 설정
        for (index, stackview) in stackViews.enumerated() {
            stackview.axis = .horizontal
            stackview.backgroundColor = .black
            stackview.spacing = 10
            stackview.distribution = .fillEqually

            //버튼생성 및 스택뷰에 추가
            for title in buttonTitle[index] {
                let button = UIButton()
                button.backgroundColor = UIColor(red: 58/255, green: 58/255, blue: 58/255, alpha: 1.0)
                button.setTitle(String(title), for: .normal)
                button.titleLabel?.font = UIFont.boldSystemFont(ofSize: 30)
                button.frame.size.height = 80
                button.frame.size.width = 80
                button.layer.cornerRadius = 40

                stackview.addArrangedSubview(button)

            }
        }

        view.addSubview(stackview)
        stackViews.snp.makeConstraints{
            $0.width.equalTo(350)
            $0.top.equalTo(label.snp.bottom).offset(60)
            $0.centerX.equalToSuperview()
        }

        func makeVerticalstackView() {
            clcStackVeiw.axis = .vertical
            clcStackVeiw.backgroundColor = .black
            clcStackVeiw.spacing = 10
            clcStackVeiw.distribution = .fillEqually

            //가로 스텍뷰를 세로 스택뷰에 추가해주기
            clcStackVeiw.addArrangedSubview(stackview1)
            clcStackVeiw.addArrangedSubview(stackview2)
            clcStackVeiw.addArrangedSubview(stackview3)
            clcStackVeiw.addArrangedSubview(stackview4)
        }
    }
}
💡오류 및 해결💡
- 4개의 HorizontalStackView를 만들어 VerticalstackView에 추가하여 4*4 배열의 계산기를 만들어 주려고 했으나 실패
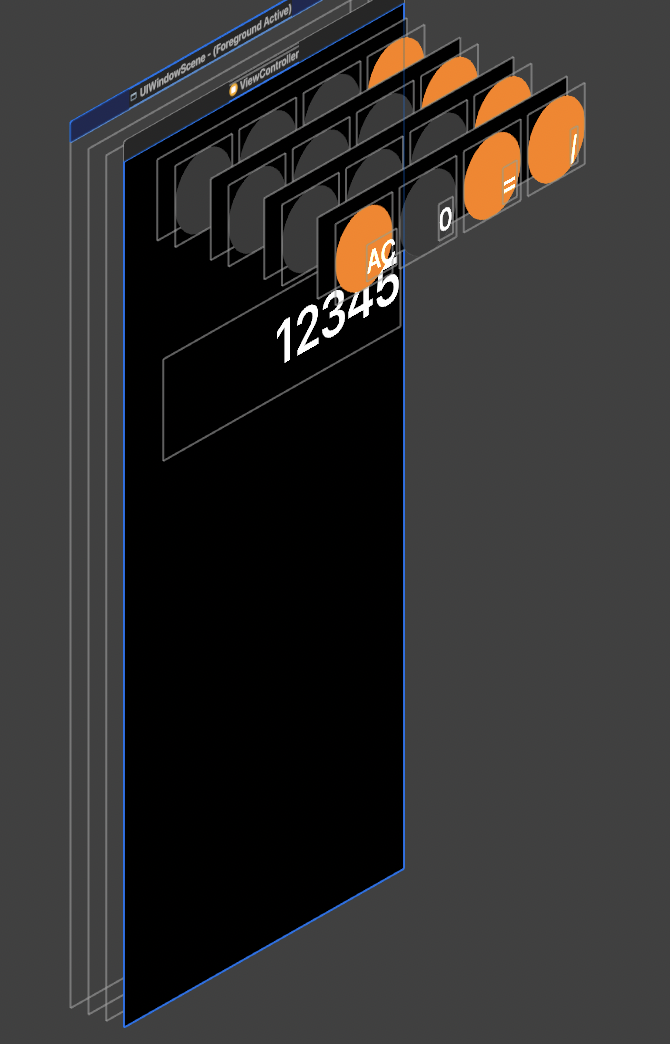
-
Debug View Hierarchy확인 결과 VerticalstackView에 생성이 되지 않아서 같은자리에 HorizontalStackView 4개가 겹쳐져 생성됨
- 코드 확인 결과 VerticalstackView를 만들어주는 함수 func makeVerticalstackView()를 생성했으나 호출해 주지 않아서..... 세로스택뷰가 불러와지지 않았던것...ㅠㅠㅠ
//
//  ViewController.swift
//  Calculator_UI&codeBase
//
//  Created by t2023-m0023 on 6/20/24.
//

import UIKit
import SnapKit

class ViewController: UIViewController {

    let label = UILabel()
    let stackview1 = UIStackView()
    let stackview2 = UIStackView()
    let stackview3 = UIStackView()
    let stackview4 = UIStackView()
    let clcStackVeiw = UIStackView()

    override func viewDidLoad() {
        super.viewDidLoad()
        configureUI()
    }

    private func configureUI() {
        // 배경 컬러지정
        view.backgroundColor = .black

        //라벨 설정
        label.text = "12345"
        label.textColor = .white
        label.textAlignment = .right
        label.font = UIFont.boldSystemFont(ofSize: 60)

        // 라벨을 뷰에 추가하고 제약 조건을 설정
        view.addSubview(label)
        label.snp.makeConstraints {
            $0.leading.equalToSuperview().inset(30)
            $0.trailing.equalToSuperview().inset(30)
            $0.top.equalToSuperview().inset(200)
            $0.height.equalTo(100)
        }
        makeHorizontalStackView()
    }

    private func makeHorizontalStackView() {
        // 스택뷰를 4개를 만들어 줘야함
        // 각각의 스택뷰에 버튼타이틀 설정 할 수있는 함수 필요

        let stackViews = [stackview1, stackview2, stackview3, stackview4]
        let buttonTitle = [["7", "8", "9", "+"], ["4", "5", "6", "-"], ["1", "2", "3", "*"], ["AC", "0", "=", "/"]]
        // for  반복문 사용 스택 뷰의 속성을 설정
        for (index, stackview) in stackViews.enumerated() {
            stackview.axis = .horizontal
            stackview.backgroundColor = .black
            stackview.spacing = 10
            stackview.distribution = .fillEqually

            //버튼생성 및 스택뷰에 추가
            for title in buttonTitle[index] {
                let button = UIButton()
                button.backgroundColor = UIColor(red: 58/255, green: 58/255, blue: 58/255, alpha: 1.0)
                button.setTitle(String(title), for: .normal)
                button.titleLabel?.font = UIFont.boldSystemFont(ofSize: 30)
                button.frame.size.height = 80
                button.frame.size.width = 80
                button.layer.cornerRadius = 40

                stackview.addArrangedSubview(button)

            }

            view.addSubview(stackview)
            stackview.snp.makeConstraints{
                $0.width.equalTo(350)
                $0.height.equalTo(80)
                $0.centerX.equalToSuperview()
            }
        }

        func makeVerticalstackView() {
            clcStackVeiw.axis = .vertical
            clcStackVeiw.backgroundColor = .black
            clcStackVeiw.spacing = 10
            clcStackVeiw.distribution = .fillEqually


            view.addSubview(clcStackVeiw)
            clcStackVeiw.snp.makeConstraints {
                $0.width.equalTo(350)
                $0.top.equalTo(label.snp.bottom).offset(60)
                $0.centerX.equalToSuperview()
            }

            //가로 스텍뷰를 세로 스택뷰에 추가해주기
            clcStackVeiw.addArrangedSubview(stackview1)
            clcStackVeiw.addArrangedSubview(stackview2)
            clcStackVeiw.addArrangedSubview(stackview3)
            clcStackVeiw.addArrangedSubview(stackview4)
        }
    }
}
Lv.4
🧑🏻💻 연산 버튼 (+, -, *, /, AC, =) 들은 색상을 orange 로 설정.
- 개발 효율성을 위한 팁.
버튼을 만드는 func makeButton 이라는 메서드가 있었고 인자로 titleValue: String, action: Selector, backgroundColor: UIColor 를 받을 수 있으면 편했겠죠.Lv.5
🧑🏻💻 모든 버튼들을 원형으로 만들기.
- 힌트
- HorizontalStackView 의 높이 = 80
- VerticalStackView 의 가로 = 350.
- VerticalStackView 의 Spacing = 10
- 그렇기 때문에 VerticalStackView 에 들어가는 모든 버튼은 가로 길이가 (350 - 10 * 3) / 4 = 80 이 됨.
- 즉 모든 버튼은 정사각형이 됨.
- 버튼을 원형으로 만들기 위해서는 정사각형 버튼을 만들고, cornerRadius 를 한 변 길이의 절반으로 설정하면 됩니다.
- 여기까지 했으면 필수 구현들을 마쳤습니다.
- 기본적인 UI 구성이었습니다.
- 이 다음 스텝들은 본격적인 로직의 영역입니다.
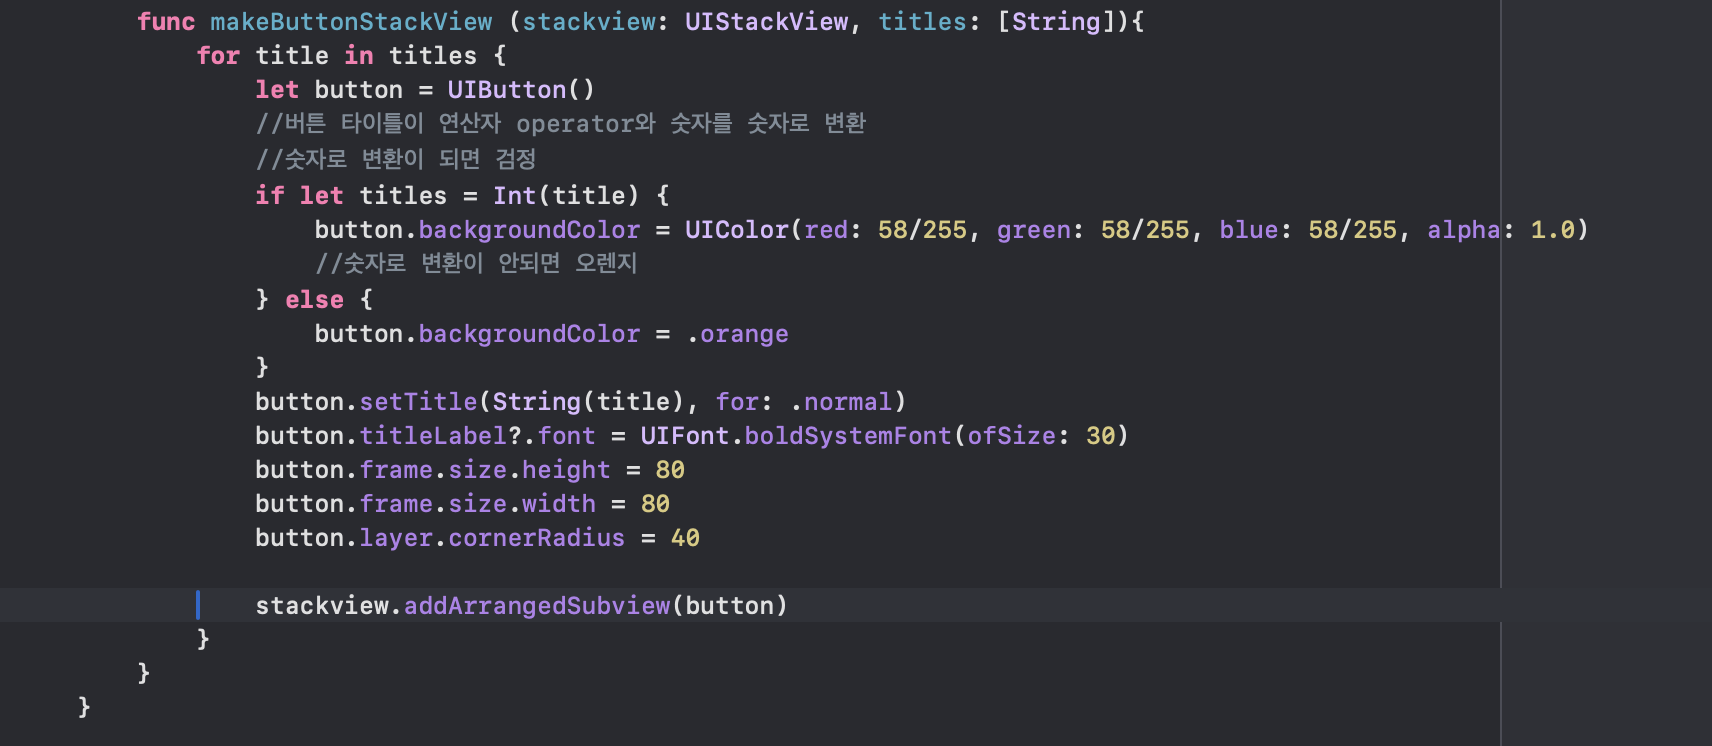
- 이중for문을 각각 함수로 나누어준 후 버튼만드는 함수를 수정하여 색상을 따로 설정할 수 있도록 코드 변경
func makeButtonStackView (stackview: UIStackView, titles: [String]){
            for title in titles {
                let button = UIButton()
                //버튼 타이틀이 연산자 operator와 숫자를 숫자로 변환
                //숫자로 변환이 되면 검정
                if let titles = Int(title) {
                    button.backgroundColor = UIColor(red: 58/255, green: 58/255, blue: 58/255, alpha: 1.0)
                    //숫자로 변환이 안되면 오렌지
                } else {
                    button.backgroundColor = .orange
}- 형변환을 이용해서 titles의 요소가 숫자로 변환될시 회색계열의 배경색, 요소가 숫자로 변환이 안 될시 오렌지 색으로 사용됨!

개발이 어려운 나를 위한... 개발노트