SuccessHandler 를 살펴보기에 앞서 JWT 를 먼저 알아야 합니다.
JWT 는 인증방식중 하나 인데 쿠키, 세션보다 장점이 많아 꼭 아셔야 합니다
다음 블로그에 글이 잘 정리되어있어 한번 확인해 보시면 좋을 것 같습니다.
그럼 이제 SuccessHandler 를 살펴보겠습니다.
📂 SuccessHandler
@RequiredArgsConstructor
@Component
public class CustomSuccessHandler implements AuthenticationSuccessHandler {


    @Override
    public void onAuthenticationSuccess(HttpServletRequest request, HttpServletResponse response, Authentication authentication) throws IOException {

        //로그인 성공시 다음을 수행
        // 소셜로그인 유저와 일반 로그인 유저 모두 여기서 처리합니다
        CustomIntegratedLogin user = (CustomIntegratedLogin) authentication.getPrincipal();
        // 소셜로그인 ex) user.getUsername() = google_1231344534523565757, user.getPassword() = $2a$10$nlkgA6oUE.7KpHSO6tDDpOBth4PICf1DeQiHQ2qbbaA8o3s1osGvG
        //일반 로그인 ex) user.getUsername() = 로그인 시도 아이디 ,user.getPassword() = $sdf34$dfgs$Rr.7KpHSO6tDDpOBth4PICf1DeQiHdgerteshtwefs435


        String accessToken = JWT.create() // JWT 생성을 시도하는데
                .withSubject(user.getUsername()) // JWT 의 이름(제목)을 정한다.
                .withExpiresAt(new Date(System.currentTimeMillis() + AT_EXP_TIME)) // JWT 의 만료시간을 지정한다. 설정하지 않으면 기본적으로 무한지속 된다.
                .withClaim("roles", user.getAuthorities().stream().map(GrantedAuthority::getAuthority).collect(Collectors.toList())) //사용자 지정 클레임. 커스텀이 가능하다
                .withIssuedAt(new Date(System.currentTimeMillis())) // 언제 생성 되었는지 기록해둔다.
                .sign(Algorithm.HMAC256(JWT_SECRET)); // 어떤 해싱 알고리즘으로 해시를 하는지, 어떤 시크릿키를 사용하는지 결정한다.

        // Access Token 을 프론트 단에 Response Header로 전달
        response.setContentType(APPLICATION_JSON_VALUE);
        response.setCharacterEncoding("utf-8");
        response.setHeader(AT_HEADER, accessToken);


        Map<String, String> responseMap = new HashMap<>();
        responseMap.put(AT_HEADER, accessToken);
        new ObjectMapper().writeValue(response.getWriter(), responseMap);
    }
}
CustomSuccessHandler 는 AuthenticationSuccessHandler 를 구현하고 있습니다
AuthenticationSuccessHandler 는 인터페이스이며 onAuthenticationSuccess 를 오버라이딩 해줘야 합니다.
갑자기 Authentication 이라는게 나오는데 시큐리티 기본흐름에서 마지막단계에서
Authentication을 저장하는데 그거랑 동일한 객체입니다.
Authentication 은 2가지 객체를 가질 수 있습니다.
OAuth2User, UserDetails 두가지를 가질 수 있는데 저희는 이 둘을 하나로 묶은
CustomIntegratedLogin 을 만들었기 때문에 캐스팅해서 하나로 받을 수 있습니다.
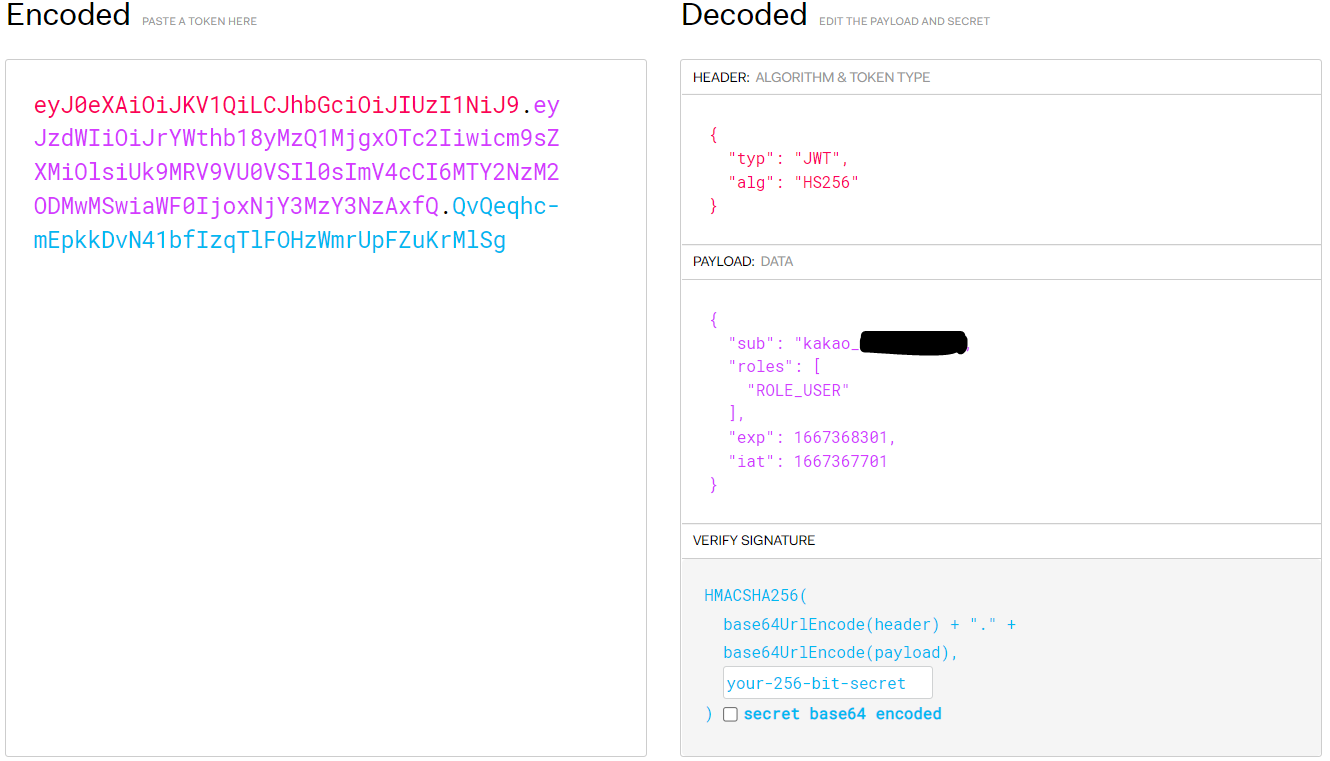
이 과정을 마치고 나면 웹 화면에서 다음과 같은 결과를 얻을 수 있습니다.
✔️ 결과화면


토큰값이 찍히는데 이것을 jwt.io 에서 확인할 수 있습니다.
이상 소셜로그인을 마쳤습니다.
개인정보라 application.yml 을 올리지 않았는데 다음과 같이 구성되어 있습니다
spring:
  datasource:
    url: jdbc:mysql://localhost:3306/auth
    username: root
    password: 1234

  jpa:
    hibernate:
      ddl-auto: create
    show-sql: true

    properties:
      hibernate:
        format_sql: true
        dialect: org.hibernate.dialect.MySQL8Dialect
  security:
    oauth2:
      client:
        provider:

          naver:
            authorization_uri: https://nid.naver.com/oauth2.0/authorize
            token_uri: https://nid.naver.com/oauth2.0/token
            user-info-uri: https://openapi.naver.com/v1/nid/me
            user_name_attribute: response

          kakao:
            authorization-uri: https://kauth.kakao.com/oauth/authorize
            token-uri: https://kauth.kakao.com/oauth/token
            user-info-uri: https://kapi.kakao.com/v2/user/me
            user-name-attribute: id

        registration:
          naver:
            client-id: 네이버 클라이언트 id
            client-secret: 네이버 클라이언트 secret
            redirect-uri: http://localhost:8080/login/oauth2/code/naver
            authorization-grant-type: authorization_code
            scope: name, email, nickname
            client-name: Naver

          kakao:
            authorization-grant-type: authorization_code
            client-id: 카카오 클라이언트 id
            client-secret: 카카오 클라이언트 secret
            redirect-uri: http://localhost:8080/login/oauth2/code/kakao
            scope:
              - profile_nickname
              - account_email
            client-authentication-method: POST
            client-name: Kakao

          google:
            client-id:  구글 클라이언트 id
            client-secret: 구글 클라이언트 secret
            scope: profile,email
다음 글에서는 기본 로그인을 어떻게 진행하는지 알아보도록 하겠습니다.
출처
OAuth 2.0 개념 정리
스프링 부트 OAuth2-client를 이용한 소셜(구글, 네이버, 카카오) 로그인 하기
스프링 시큐리티의 아키텍처(구조) 및 흐름
JWT를 사용한 로그인 및 Refresh Token을 활용한 로그인 상태 유지