앞서 소셜로그인을 진행해봤습니다.
그러면 이제 기본 로그인도 살펴봐야겠죠??
우선 SecurityConfig 를 살펴보겠습니다.
📂 SecurityConfig
@RequiredArgsConstructor
@Configuration
@EnableWebSecurity
public class SecurityConfig {

    private final AuthenticationProvider authenticationProvider;
    private final AuthenticationFailureHandler authenticationFailureHandler;
    private final AuthenticationSuccessHandler authenticationSuccessHandler;
    private final AccessDeniedHandler accessDeniedHandler;
    private final AuthenticationConfiguration authenticationConfiguration;
    private final AuthenticationManagerBuilder authenticationManagerBuilder;
    private final CustomOAuth2UserService customOAuth2UserService;


    @Bean
    public SecurityFilterChain filterChain(HttpSecurity http) throws Exception {
        // AuthenticationFilter 설정정보
        CustomAuthenticationFilter customAuthenticationFilter =
                new CustomAuthenticationFilter(authenticationManager(authenticationConfiguration,authenticationManagerBuilder));
        customAuthenticationFilter.setFilterProcessesUrl("/login");  //  /login 요청시 AuthenticationFilter 가서 처리를 합니다.
        customAuthenticationFilter.setPostOnly(true); // 항상 POST 처리
        customAuthenticationFilter.setAuthenticationFailureHandler(authenticationFailureHandler); // 성공시 핸들러 설정
        customAuthenticationFilter.setAuthenticationSuccessHandler(authenticationSuccessHandler); // 실패시 핸들러 설정


        http.csrf().disable(); // POST 가능하게 설정

        http.authorizeRequests() // 인증이 된 경우에만 접근을 허용하는데
                .anyRequest()  // 인증된 어떤 요청이든 오던지
                .permitAll()  // 허용하라.
                .and() // 또한
                .oauth2Login() // 소셜로그인을 진행하는데
                .successHandler(authenticationSuccessHandler) //성공하면 커스텀한 핸들러에서 처리한다
                .userInfoEndpoint() // 사용자 정보를 가져올 때
                .userService(customOAuth2UserService); // 커스텀한 서비스에서 정보를 처리한다

        http.addFilter(customAuthenticationFilter); // AuthenticationFilter 추가

        http.exceptionHandling().accessDeniedHandler(accessDeniedHandler); // 예외처리 핸들러 설정

        return http.build();
    }

    @Bean
    public AuthenticationManager authenticationManager(AuthenticationConfiguration authenticationConfiguration
                                                        ,AuthenticationManagerBuilder auth)
            throws Exception {
        auth.authenticationProvider(authenticationProvider); //authenticationProvider 를 설정합니다
        return authenticationConfiguration.getAuthenticationManager(); // AuthenticationManager 정보를 가져옵니다
    }
}
filterChain 메소드를 보면 AuthenticationFilter 설정정보를 세팅한 다음
http.addFilter(customAuthenticationFilter); 에서 등록을 해줍니다
설정내용을 살펴보겠습니다. /login으로 아이디,비밀번호가 post를 이용해 넘어왔을때, 로그인이 성공하면 SuccessHandler 로 이동하고 실패하면 FailureHandler 로 이동하여 처리한다는 의미입니다.
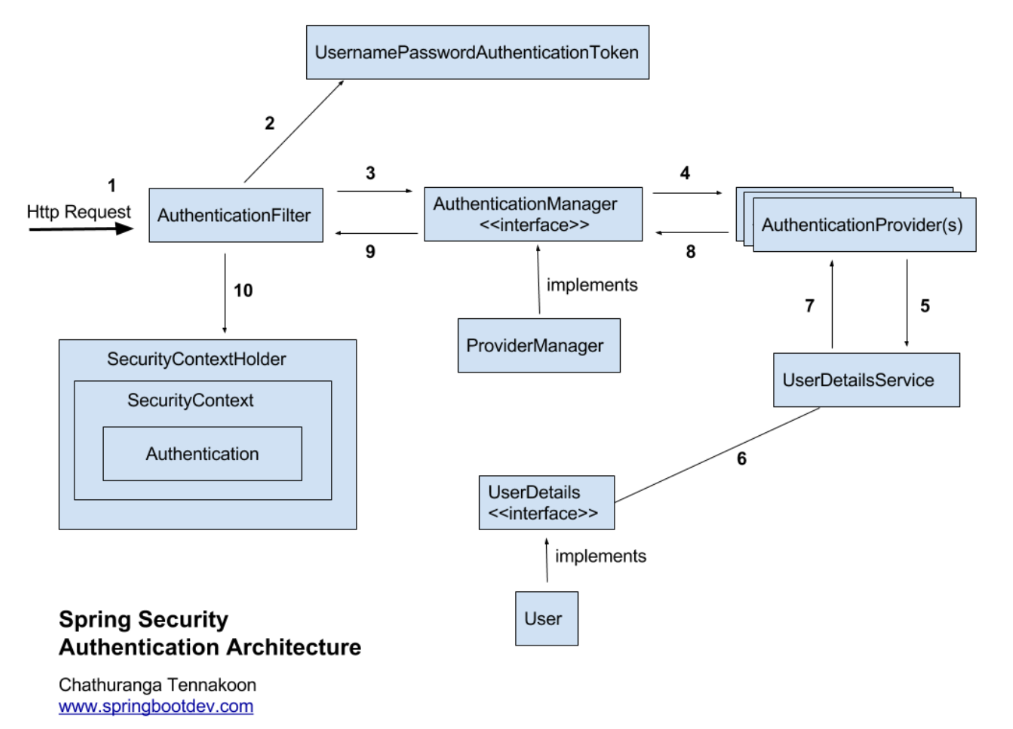
자세히 살펴보기 전에 시큐리티 기본흐름을 다시 보고 가겠습니다
그럼 하나하나 파헤쳐 보겠습니다.
📂 CustomAuthenticationFilter
@Slf4j
public class CustomAuthenticationFilter extends UsernamePasswordAuthenticationFilter {

    private final AuthenticationManager authenticationManager;

    public CustomAuthenticationFilter(AuthenticationManager authenticationManager) {
        this.authenticationManager = authenticationManager;
    }

    @SneakyThrows
    @Override
    public Authentication attemptAuthentication(HttpServletRequest request, HttpServletResponse response) throws AuthenticationException {

        // 넘어오는 데이터가 JSON 형태이면 이를 변환하는 과정이 필요합니다
        ServletInputStream inputStream = request.getInputStream();
        String messageBody = StreamUtils.copyToString(inputStream, StandardCharsets.UTF_8);

        ObjectMapper objectMapper = new ObjectMapper();
        SignUpRequestDto signUpRequestDto = objectMapper.readValue(messageBody, SignUpRequestDto.class);
        String username = signUpRequestDto.getUsername();
        String password = signUpRequestDto.getPassword();

//        넘어오는 데이터가 FORM 형식일때 파라미터로 받습니다
//        String username = request.getParameter("username");
//        String password = request.getParameter("password");

        UsernamePasswordAuthenticationToken token = new UsernamePasswordAuthenticationToken(username, password);
        return authenticationManager.authenticate(token);
    }
}
여기서 UsernamePasswordAuthenticationFilter != AuthenticationFilter 인데 왜 UsernamePasswordAuthenticationFilter 를 상속받는지 알아야 합니다
HTTP 기본 인증을 요청하면 BasicAuthenticationFilter를 통과합니다.
HTTP Digest 인증을 요청하면 DigestAuthenticationFilter를 통과합니다.
로그인 폼에 의해 요청된 인증은 UsernamePasswordAuthenticationFilter를 통과합니다.
x509 인증을 요청하면 X509AuthenticationFilter를 통과합니다.
현재 로그인 과정을 진행하기때문에 UsernamePasswordAuthenticationFilter 를 상속받습니다.
로그인 데이터가 JSON 형태로 넘어오면 이를 String 으로 바꿔 인자 값으로 넘겨줘야 합니다. 그 다음 토큰을 발급받고 authenticationManager 에게 토큰을 넘겨주면, AuthenticationProvider 를 구현한 CustomAuthProvider 가 이를 처리하게 됩니다.
📂 CustomAuthProvider
@RequiredArgsConstructor
@Component
public class CustomAuthProvider implements AuthenticationProvider {

    private final CustomUserDetailsService customUserDetailsService;
    private final PasswordEncoder passwordEncoder;

    @Override
    public Authentication authenticate(Authentication authentication) throws AuthenticationException {
        String username = authentication.getName();
        String password = (String) authentication.getCredentials();

        System.out.println("CustomAuthProvider username = " + username);
        System.out.println("CustomAuthProvider password = " + password);


        CustomIntegratedLogin userDetails = (CustomIntegratedLogin) customUserDetailsService.loadUserByUsername(username);

        System.out.println("userDetails.getPassword() = " + userDetails.getPassword());

        // PW 검사
        if (!passwordEncoder.matches(password, userDetails.getPassword())) {
            throw new BadCredentialsException("Provider - authenticate() : 비밀번호가 일치하지 않습니다.");
        }

        return new UsernamePasswordAuthenticationToken(userDetails, password, userDetails.getAuthorities());
    }

    @Override
    public boolean supports(Class<?> authentication) {
        return true;
    }
}
authenticate 에서는 userDetails 를 불러와 패스워드 검사를 하고 인증된 토큰을 생성합니다. 그 뒤, 리턴되어 SecurityContext에 저장되고 CustomSuccessHandler 가 동작하게 됩니다 CustomSuccessHandler 는 다음 글에서 살펴보겠습니다.