Thymeleaf 와 함께하는 게시판 (페이지네이션)
1. 프로젝트 개요
게시판에 들어가는 페이지네이션, 검색, 정렬, 로그인 유지 등등 기본적인 내용에 대해 다뤄보려고 합니다.
2. 페이지네이션이란?
페이지네이션 기능구현에 앞서 페이지네이션이 무엇인지 알아보겠습니다.
Pagination이란 데이터를 여러 페이지에 걸쳐 보여주는것을 의미합니다.
모든 데이터를 한 번에 다 보여주면 속도, 가독성 측면에서 시용성이 떨어지기 때문에 사용하는 기능이고 Paging이라고도 불립니다.
3. 구현
페이지네이션 구현에 필요한 파라미터들이 있습니다.
페이지번호, 정렬기준, 사이즈 등의 값이 필요합니다.
또한 스프링부트에서 페이징을 편리하게 사용하기 위해 @PageableDefault 어노테이션을 제공합니다.
@PageableDefault(~~) 의 형태로 값을 지정할 수도 있습니다.
여기서는 id를 기준으로 내림차순 사이즈는 5가 설정되어 있습니다.
Thymeleaf를 통해 ?page= 만 넘어온다면 페이징 사용이 가능합니다.
• 컨트롤러
    /**
     * @param pageable 페이징 객체
     * @param model
     * @param category 필터링 카테고리
     * @param searchingWord 검색어
     * @return 공지사항 페이지
     */
    @GetMapping("/admin/announcement")
    public String getAnnouncementPage(@PageableDefault(sort = "announcementId", direction = Sort.Direction.DESC, size = 5) Pageable pageable, Model model,
                                      @RequestParam(required = false,defaultValue = "ALL") States.AnnouncementCategory category,
                                      @RequestParam(required = false) String searchingWord){
        Page<AnnouncementResponseDto> announcementList = announcementService.getAnnouncementList(pageable,category,searchingWord);
        model.addAttribute("totalCount",announcementService.getAnnouncementCount());
        model.addAttribute("announcementList",announcementList);
        model.addAttribute("category",States.AnnouncementCategory.values());
        model.addAttribute("selectedCategory",category);
        model.addAttribute("searchingWord",searchingWord);
        return "page/announcement";
    }
• Thymeleaf
<!DOCTYPE html>
<html xmlns:th="http://www.thymeleaf.org">
<head>
<meta charset="UTF-8">
<title>게시판</title>
<link rel="stylesheet" href="/webjars/bootstrap/3.3.pageSize/css/bootstrap.min.css">
</head>
<script src="http://code.jquery.com/jquery-latest.js"></script>
<script type="text/javaScript">
function register(){
location.href = "/admin/announcement/registration";
}
</script>
<script type="text/javaScript">
function filterAnnouncement(category) {
console.log(category);
location.href = "/admin/announcement?category=" + category;
}
</script>
<script>
function deleteValue(){
var url = "/admin/announcement"; // Controller로 보내고자 하는 URL
var checkArr = new Array();
$("input[name='RowCheck']:checked").each(function(i){
checkArr.push($(this).val()); // 체크된 것만 값을 뽑아서 배열에 push
})
if (checkArr.length == 0){
alert("선택된 글이 없습니다.");
}
else{
var chk = confirm("정말 삭제하시겠습니까?");
if (chk == true){
$.ajax({
url : url,
type : 'DELETE',
traditional : true,
data : {
valueArr : checkArr // 보내고자 하는 data 변수 설정
}
});
}else {
alert("삭제를 취소하였습니다.");
}
}
}
$(function(){
var chkObj = document.getElementsByName("RowCheck");
var rowCnt = chkObj.length;
$("input[name='allCheck']").click(function(){
var chk_listArr = $("input[name='RowCheck']");
for (var i=0; i<chk_listArr.length; i++){
chk_listArr[i].checked = this.checked;
}
});
$("input[name='RowCheck']").click(function(){
if($("input[name='RowCheck']:checked").length == rowCnt){
$("input[name='allCheck']")[0].checked = true;
}
else{
$("input[name='allCheck']")[0].checked = false;
}
});
});
</script>
<body class="container">
<div class="jumbotron">
<h2>공지사항</h2>
</div>
<div>
<h3 th:text="'전체글: '+${totalCount}+'개'"></h3>
</div>
<form th:action="@{/admin/announcement}" method="get">
<input type="text" name="searchingWord">
<button type="submit">검색</button>
</form>
<select onchange="filterAnnouncement(this.value)">
<option th:value="${selectedCategory}" th:text ="${selectedCategory.displayAnnouncementCategory}" hidden selected></option>
<option th:each="category : ${category}" th:value="${category}" th:text="${category.displayAnnouncementCategory}" ></option>
</select>
<table class="table">
<tr>
<th><input id="allCheck" type="checkbox" name="allCheck"/></th>
<th>글 번호</th>
<th>글 제목</th>
<th>내용</th>
<th>수정일</th>
</tr>
<tr th:each="announcement: ${announcementList}">
<td><input type="checkbox" name="RowCheck" th:value="${announcement.announcementId}"/></td>
<td th:text="${announcement.announcementId}"></td>
<td><a th:text="${announcement.title}" th:href="@{/admin/announcement/modify/{id}(id=${announcement.announcementId})}"></a></td>
<td th:text="${announcement.content}"></td>
<td th:text="${announcement.announcementCategory.displayAnnouncementCategory}"></td>
<td th:text="${announcement.lastModifiedAt}"></td>
</tr>
</table>
<button type="button" th:onclick="|register()|">작성하기</button>
<button type="button" th:onclick="|deleteValue()|">삭제하기</button>
<div class="page-num" th:if="${!announcementList.isEmpty()}">
<nav th:with="pageSize = ${announcementList.pageable.pageSize},
start=${(announcementList.number/pageSize)*pageSize + 1},
end=(${(announcementList.totalPages == 0) ? 1 : (start + (pageSize - 1) < announcementList.totalPages ? start + (pageSize - 1) : announcementList.totalPages)})">
<ul>
<li th:if="${start > 1}">
<a th:href="@{/admin/announcement?(page=0,category=${selectedCategory},searchingWord=${searchingWord})}" th:text="'<<'"></a></li>
</li>
<li th:if="${start > 1}">
<a th:href="@{/admin/announcement?(page=${start - 2},category=${selectedCategory},searchingWord=${searchingWord})}" th:text="'<'"></a>
</li>
<li th:each="page: ${#numbers.sequence(start, end)}">
<a th:href="@{/admin/announcement?(page=${page-1},category=${selectedCategory},searchingWord=${searchingWord})}" th:text="${page}"></a></li>
</li>
<li th:if="${end < announcementList.totalPages}">
<a th:href="@{/admin/announcement?(page=${start + pageSize -1 },category=${selectedCategory},searchingWord=${searchingWord})}" th:text="'>'"></a>
</li>
<li th:if="${end < announcementList.totalPages}">
<a th:href="@{/admin/announcement?(page=${announcementList.totalPages-1},category=${selectedCategory},searchingWord=${searchingWord})}" th:text="'>>'"></a></li>
</li>
</ul>
</nav>
</div>
</body>
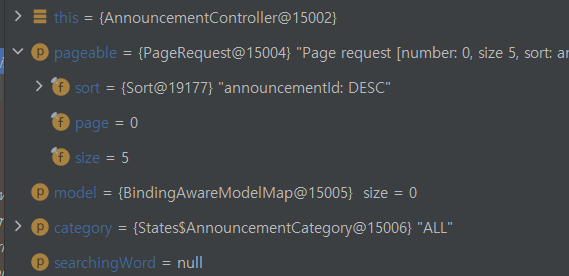
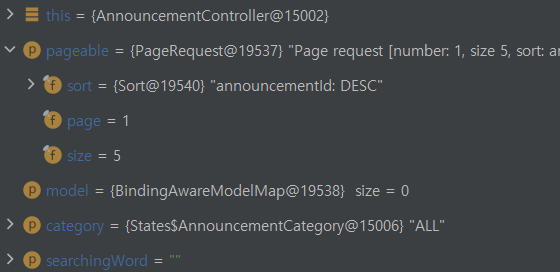
</html>페이지 번호를 나타내는 아래쪽 네비게이션을 보시면 (page=${announcementList.totalPages-1}) 처럼 page를 쿼리 파라미터로 넘기는것을 볼 수 있습니다.
이렇게 파라미터를 넘기면 페이지 번호가 다르게 들어오는것을 확인할 수 있습니다.
한가지 주의할 점은 페이지번호가 0부터 시작된다는 점 입니다.

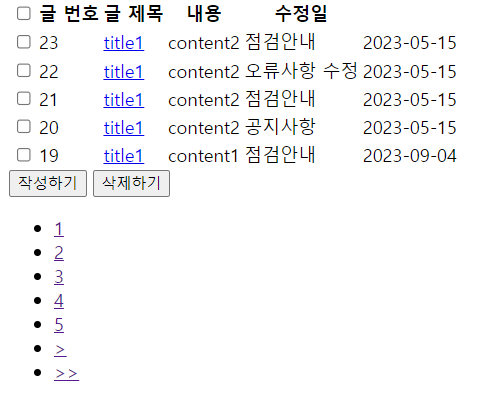
페이징의 적용은 운영체제에서 배우는 페이징이랑 비슷하다고 생각하시면 이해가 빠를것이라고 생각합니다.