Output Stream
java.io.OutputStream 클래스
- 바이트 기반의 출력스트림이다.
- 출력 단위
1) int
2) byte[]
파일출력스트림 생성 (반드시 예외 처리가 필요한 코드)
- 생성모드 : 언제나 새로 만든다.(덮어쓰기)
new FileOutputStream(file) - 추가모드 : 새로 만들거나, 기존 파일에 추가
new FileOutputStream(file, true)
public static void ex01() {

    // 디렉터리를 File 객체로 만들기
    File dir = new File("C:/storage");
    if(!dir.exists()) {
      dir.mkdirs();
    }

    // 파일을 File 객체로 만들기
    File file = new File(dir, "ex01.dat");

    // 파일출력스트림 선언
    FileOutputStream fout = null;

    try {

      // 파일출력스트림 생성 (반드시 예외 처리가 필요한 코드)
      fout = new FileOutputStream(file);

      // 출력할 데이터(파일로 보낼 데이터)
      int c = 'A';              // int
      String s = "pple";
      byte[] b = s.getBytes();  // byte[] : String을 byte[]로 변환

      // 출력(파일로 데이터 보내기)
      fout.write(c);
      fout.write(b);

      System.out.println(file.getPath() + " 파일 크기 : " + file.length() + "바이트");

    } catch (IOException e) {
      e.printStackTrace();
    } finally {
      try {
        if(fout != null) {
          fout.close();
          // 출력스트림은 반드시 닫아줘야 함 (반드시 예외 처리가 필요한 코드)
        }
      } catch (IOException e) {
        e.printStackTrace();
      }
    }

  }
java.io.BufferedOutputStream 클래스
- 내부 버퍼를 가지고 있는 출력스트림이다.
- 많은 데이터를 한 번에 출력하기 때문에 속도 향상을 위해서 사용한다. (버퍼라는 장소에 데이터를 모아 한번에)
- 보조스트림이므로 메인스트림과 함께 사용한다.
BufferedOutputStream bout = null;
bout = new BufferedOutputStream(new FileOutputStream(file));
java.io.DataOutputStream 클래스
- int, double, String 등의 변수를 그대로 출력하는 출력스트림이다.
- 보조스트림이므로 메인스트림과 함께 사용한다.
java.io.ObjectOutputStream 클래스
- 객체를 그대로 출력하는 출력스트림이다.
- 직렬화(Serializable)된 객체를 보낼 수 있다.
- 보조스트림이므로 메인스트림과 함께 사용한다.
직렬화(Serializable) 처리하기
- java.io.Serializable 인터페이스를 구현(implements)한다.
- long serialVersionUID 필드 값을 생성(generate)한다.
Input Stream
java.io.InputStream 클래스
- 바이트 기반의 입력스트림이다.
- 입력 단위
1) int
2) byte[]
public static void ex01() {

    // 디렉터리를 File 객체로 만들기
    File dir = new File("C:/storage");

    // 파일을 File 객체로 만들기
    File file = new File(dir, "ex01.dat");

    // 파일입력스트림 선언
    FileInputStream fin = null;

    try {

      // 파일입력스트림 생성 (반드시 예외 처리 필요, 파일이 없으면 예외 발생)
      fin = new FileInputStream(file);

      // 입력된 데이터 저장 변수
      int c = 0;

      // 입력된 데이터를 누적할 StringBuilder 생성
      StringBuilder sb = new StringBuilder();

      // int read() 메소드
      // 1. 1개 데이터를 읽어서 반환한다.
      // 2. 읽은 내용이 없으면 -1을 반환한다.

      // 반복문 : 읽은 내용이 -1이 아니면 계속 읽는다.
      while( (c = fin.read()) != -1 ) {
        sb.append((char)c);
      }

      // 결과 확인
      System.out.println(sb.toString());

    } catch (IOException e) {
      e.printStackTrace();
    } finally {
      try {
        if(fin != null) {
          fin.close();
        }
      } catch (IOException e) {
        e.printStackTrace();
      }
    }

  }
ex01.dat에 출력해둔 데이터 APPLE이 콘솔창에 출력됨
int read() 메소드
- 1개 데이터를 읽어서 반환한다.
- 읽은 내용이 없으면 -1을 반환한다.
int read(byte[] b) 메소드
- 파라미터로 전달된 byte[] b에 읽은 내용을 저장한다.
- 실제로 읽은 바이트 수를 반환한다.
- 읽은 내용이 없으면 -1을 반환한다.
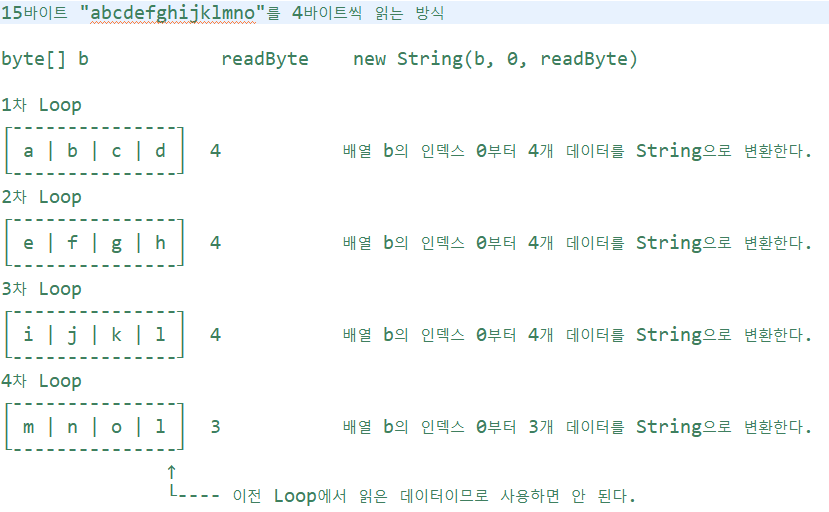
만약 readByte에 몇 바이트를 읽어야하는지를 저장해주지 않으면 마지막에 mno만 읽어야 온전한 데이터인데 1(3차 루프 데이터가 지워지지 않고 남아있는 것)까지 같이 읽어버린다.
java.io.BufferedInputStream 클래스
- 내부 버퍼를 가지고 있는 입력스트림이다.
- 많은 데이터를 한 번에 입력받기 때문에 속도 향상을 위해서 사용한다.
- 보조스트림이므로 메인스트림과 함께 사용한다.
java.io.DataInputStream 클래스
- int, double, String 등의 변수를 그대로 입력받는 입력스트림이다.
- 보조스트림이므로 메인스트림과 함께 사용한다.
  public static void ex04() {

    // DataOutputStream과 DataInputStream을 사용하면
    // 바이트 기반 입출력에서도 한글 처리가 가능하다.(writeUTF, readUTF 메소드 이용)

    // 디렉터리를 File 객체로 만들기
    File dir = new File("C:/storage");

    // 파일을 File 객체로 만들기
    File file = new File(dir, "ex04.dat");

    // 데이터입력스트림 선언
    DataInputStream din = null;

    try {

      // 데이터입력스트림 생성 (반드시 예외 처리 필요, 파일이 없으면 예외 발생)
      din = new DataInputStream(new FileInputStream(file));

      // 순서대로 입력 받기
      char ch1 = din.readChar();        // 't'
      char ch2 = din.readChar();        // 'o'
      char ch3 = din.readChar();        // 'm'
      int age = din.readInt();          // 50
      double height = din.readDouble(); // 180.5
      String school = din.readUTF();    // 가산대학교

      // 결과 확인
      System.out.println("" + ch1 + ch2 + ch3);
      System.out.println(age);
      System.out.println(height);
      System.out.println(school);

    } catch (IOException e) {
      e.printStackTrace();
    } finally {
      try {
        if(din != null) {
          din.close();
        }
      } catch (IOException e) {
        e.printStackTrace();
      }
    }

  }
java.io.ObjectInputStream 클래스
- 객체를 그대로 입력 받는 입력스트림이다.
- 직렬화(Serializable)된 객체를 입력 받을 수 있다.
- 보조스트림이므로 메인스트림과 함께 사용한다.
코드 : 프로젝트17-ex02의 스튜던트가 직렬화를 해주는 클래스, 메인래퍼는 직렬화한 객체로 ObjectOutputStream 돌리는거 (파일 생성) / 프로젝트17-ex03은 ObjectInputStream 돌리는 거 (파일 불러와서 읽기)
Writer
java.io.Writer 클래스
- 문자 기반의 출력스트림이다.
- 출력 단위
1) int
2) char[]
3) String
public static void ex01() {

    // 디렉터리를 File 객체로 만들기
    File dir = new File("C:/storage");
    if(dir.exists() == false) {
      dir.mkdirs();
    }

    // 파일을 File 객체로 만들기
    File file = new File(dir, "ex01.txt");

    // 파일출력스트림 선언
    FileWriter fw = null;

    try {

      // 파일출력스트림 생성(반드시 예외 처리가 필요한 코드)

      // 1. 생성모드 : 언제나 새로 만든다.(덮어쓰기)        new FileWriter(file)
      // 2. 추가모드 : 새로 만들거나, 기존 파일에 추가한다. new FileWriter(file, true)
      fw = new FileWriter(file);

      // 출력할 데이터(파일로 보낼 데이터)
      int c = 'H';
      char[] cbuf = {'e', 'l', 'l', 'o'};
      String str = " world";

      // 출력(파일로 데이터 보내기)
      fw.write(c);
      fw.write(cbuf);
      fw.write(str);

      // 메시지
      System.out.println(file.getPath() + " 파일 생성 완료");

    } catch (IOException e) {
      e.printStackTrace();
    } finally {
      try {
        if(fw != null) {
          fw.close();
        }
      } catch (IOException e) {
        e.printStackTrace();
      }
    }

  }
java.io.BufferedWriter 클래스
- 내부 버퍼를 가지고 있는 출력스트림이다.
- 많은 데이터를 한 번에 출력하기 때문에 속도 향상을 위해서 사용한다.
- 보조스트림이므로 메인스트림과 함께 사용한다.
public static void ex02() {


    // 디렉터리를 File 객체로 만들기
    File dir = new File("C:/storage");
    if(dir.exists() == false) {
      dir.mkdirs();
    }

    // 파일을 File 객체로 만들기
    File file = new File(dir, "ex02.txt");

    // 버퍼출력스트림 선언
    BufferedWriter bw = null;

    try {

      // 버퍼출력스트림 생성(반드시 예외 처리가 필요한 코드)
      bw = new BufferedWriter(new FileWriter(file));

      // 출력할 데이터(파일로 보낼 데이터)
      String str1 = "Hello";
      String str2 = "world";

      // 출력(파일로 데이터 보내기)
      bw.write(str1, 0, 4);  // 문자열 str1의 인덱스 0부터 4글자만 출력
      bw.newLine();          // 줄 바꿈(bw.write("\n")과 동일하다.) BufferedWriter 클래스의 전용 메소드
      bw.write(str2);

      // 메시지
      System.out.println(file.getPath() + " 파일 생성 완료");

    } catch (IOException e) {
      e.printStackTrace();
    } finally {
      try {
        if(bw != null) {
          bw.close();
        }
      } catch (IOException e) {
        e.printStackTrace();
      }
    }

  }
java.io.PrintWriter 클래스
- print() 메소드와 println() 메소드를 지원하는 출력스트림이다.
- println() 메소드를 사용하면 자동으로 줄 바꿈이 처리된다.
- 서버가 클라이언트에게 데이터를 전송할 때 사용하는 기본 Writer이다.
      // PrintWriter 선언
      PrintWriter out = null;

      // PrintWriter 생성(반드시 예외 처리가 필요한 코드)
      out = new PrintWriter(file);

      // 출력할 데이터(파일로 보낼 데이터)
      String str1 = "Hello";
      String str2 = "world";

      // 출력(파일로 데이터 보내기)
      out.println(str1);
      out.println(str2);
java.io.Reader 클래스
- 문자 기반의 입력스트림이다.
- 입력 단위
1) int
2) char[]
3) String
 public static void ex01() {

    // 디렉터리를 File 객체로 만들기
    File dir = new File("C:/storage");

    // 파일을 File 객체로 만들기
    File file = new File(dir, "ex01.txt");

    // 파일입력스트림 선언
    FileReader fr = null;

    try {

      // 파일입력스트림 생성(반드시 예외 처리 필요, 파일이 없으면 FileNotFoundException 발생)
      fr = new FileReader(file);

      // 입력된 문자 저장 변수
      int ch = 0;

      // 입력된 문자를 누적할 StringBuffer 생성
      StringBuffer sb = new StringBuffer();

      // read() 메소드
      // 1. 1개 문자를 읽어서 반환한다.
      // 2. 읽은 문자가 없으면 -1을 반환한다.

      // 반복문 : 읽은 문자가 -1이 아니면 계속 읽는다.
      while((ch = fr.read()) != -1) {
        sb.append((char)ch);
      }

      // 결과 확인
      System.out.println(sb.toString());

    } catch (IOException e) {
      e.printStackTrace();
    } finally {
      try {
        if(fr != null) {
          fr.close();
        }
      } catch (IOException e) {
        e.printStackTrace();
      }
    }

  }
java.io.BufferedReader 클래스
- 내부 버퍼를 가지고 있는 입력스트림이다.
- 많은 데이터를 한 번에 입력받기 때문에 속도 향상을 위해서 사용한다.
- 보조스트림이므로 메인스트림과 함께 사용한다.
public static void ex03() {

    // 디렉터리를 File 객체로 만들기
    File dir = new File("C:/storage");

    // 파일을 File 객체로 만들기
    File file = new File(dir, "ex03.txt");

    // 버퍼입력스트림 선언
    BufferedReader br = null;

    try {

      // 버퍼입력스트림 생성(반드시 예외 처리 필요, 파일이 없으면 FileNotFoundException 발생)
      br = new BufferedReader(new FileReader(file));

      // 입력된 문자열 저장 변수
      String line = null;

      // 입력된 문자를 누적할 StringBuffer 생성
      StringBuffer sb = new StringBuffer();

      // String readLine() 메소드
      // 1. 한 줄 전체를 반환한다.
      // 2. 읽은 문자가 없으면 null을 반환한다.

      // 반복문 : readLine()의 반환값이 null이 아니면 계속 읽는다.
      while((line = br.readLine()) != null) {
        sb.append(line + "\n");  // 읽은 라인에 줄 바꿈(\n)은 포함되어 있지 않다.
      }

      // 결과 확인
      System.out.println(sb.toString());

    } catch (IOException e) {
      e.printStackTrace();
    } finally {
      try {
        if(br != null) {
          br.close();
        }
      } catch (IOException e) {
        e.printStackTrace();
      }
    }

  }
바이트 출력스트림으로 보낸 문자
public static void ex04() {

    // 바이트 출력스트림으로 보낸 문자를 바이트 입력스트림으로 읽기(한글 실패)
    // 바이트 출력스트림으로 보낸 문자를 문자 입력스트림으로 읽기(한글 성공)

    // 1단계. 바이트 출력스트림으로 문자 보내기
    File dir = new File("C:/storage");
    if(dir.exists() == false) {
      dir.mkdirs();
    }
    File file = new File(dir, "server.dat");
    BufferedOutputStream bout = null;
    try {
      bout = new BufferedOutputStream(new FileOutputStream(file));
      String s1 = "안녕하세요";
      String s2 = "Hello";
      bout.write(s1.getBytes("UTF-8"));
      bout.write(s2.getBytes("UTF-8"));
      bout.close();
    } catch (IOException e) {
      e.printStackTrace();
    }

    // 2단계. 문자 입력스트림으로 읽기
    /*
     * java.io.InputStreamReader 클래스
     * 1. Reader 클래스를 상속 받는 클래스이다. (문자 입력스트림이다.)
     * 2. InputStream(바이트 입력스트림)을 받아서 Reader(문자 입력스트림)으로 변환한다.
     */
    BufferedReader br = null;
    try {
      br = new BufferedReader(new InputStreamReader(new FileInputStream(file)));
      String line = null;
      StringBuffer sb = new StringBuffer();
      while((line = br.readLine()) != null) {
        sb.append(line + "\n");
      }
      System.out.println(sb.toString());
      br.close();
    } catch (IOException e) {
      e.printStackTrace();
    }

  }
try_catch_resources
- 사용한 자원(대표적으로 입출력 스트림)을 자동으로 close 해주는 try문
- 형식
try (입출력 스트림 생성) {
코드
} catch(Exception e) {
e.printStackTrace();
}
public static void main(String[] args) {

    // 디렉터리를 File 객체로 생성
    File dir = new File("C:/storage");
    if(dir.exists() == false) {
      dir.mkdirs();
    }

    // 파일을 File 객체로 생성
    File file = new File(dir, "ex01.txt");

    // try 블록에서 출력스트림 생성하기
    try (BufferedWriter bw = new BufferedWriter(new FileWriter(file, true))) {  // 추가모드

      // 출력할 데이터
      String str1 = "안녕하세요";
      String str2 = "반갑습니다";

      // 출력 (추가모드이므로 기존 파일 뒤에 추가된다.)
      bw.newLine();
      bw.write(str1);
      bw.newLine();
      bw.write(str2);

      System.out.println(file.getPath() + " 파일에 데이터 추가 완료");

    } catch (IOException e) {
      e.printStackTrace();
    }

  }

}
fc.close를 위해 finally 할 필요 없어짐
(근데 사실 이론적으론 fc.close를 finally에 적어야하는게 맞지만 걍 트라이에 적어도 아무 오류 안난다고함)
