
9강 / 탭기능 만들며 배우는 for 반복문
오늘은 탭기능을 만들어보면서 for 반복문을 배워볼건데
먼저 index.html의 <body> 안에 필요없는 내용 지우자.

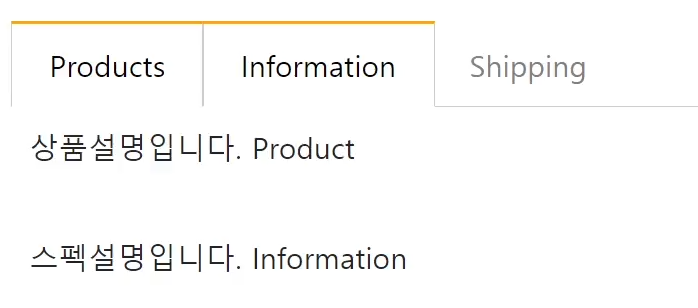
위처럼 생긴 UI를 탭이라고 한다.
어떻게 만드냐면 그냥 UI 만드는 step 그대로 따라가면 완성이다.
버튼3개, div 박스 3개 만들어두고
버튼누르면 거기 맞는 div박스를 보여주면 끝이다.
디자인은 코딩애플에서 제공해준 디자인으로 갈 것이다.
detail.html
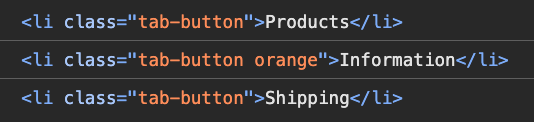
<div class="container mt-5">
  <ul class="list">
    <li class="tab-button">Products</li>
    <li class="tab-button orange">Information</li>
    <li class="tab-button">Shipping</li>
  </ul>
  <div class="tab-content">
    <p>상품설명입니다. Product</p>
  </div>
  <div class="tab-content show">
    <p>스펙설명입니다. Information</p>
  </div>
  <div class="tab-content">
    <p>배송정보입니다. Shipping</p>
  </div>
</div>
detail.css
  ul.list {
    list-style-type: none;
    margin: 0;
    padding: 0;
    border-bottom: 1px solid #ccc;
  }
  ul.list::after {
    content: '';
    display: block;
    clear: both;
  }
  .tab-button {
    display: block;
    padding: 10px 20px 10px 20px;
    float: left;
    margin-right: -1px;
    margin-bottom: -1px;
    color: grey;
    text-decoration: none;
    cursor: pointer;
  }
  .orange {
    border-top: 2px solid orange;
    border-right: 1px solid #ccc;
    border-bottom: 1px solid white;
    border-left: 1px solid #ccc;
    color: black;
    margin-top: -2px;
  }
  .tab-content {
    display: none;
    padding: 10px;
  }
  .show {
    display: block;
  }
위처럼 탭 디자인이 완성된 것을 볼 수 있다.
첫 버튼부터 기능개발해보기
버튼이 3개나 있으니까 "버튼3개를 어떻게 한 번에 개발하지?" 부터 생각을 할 수도 있지만
그러면 금방 망하기 때문에 가장 간단하고 쉬운거 하나부터 만드는게 좋은 습관이다!
우선 첫 버튼만 기능개발해보자.
탭의 0번 버튼 누르면 무슨 일이 일어나야할까?
버튼0누르면버튼0에orange클래스명 부착박스0에show클래스명 부착
이러면 끝인 것 같은데
근데 그것만 짜면...
▲ 버튼0 눌렀을 때 이렇게 보인다...
그래서 기존에 붙어있던 orange, show 라는 클래스는 제거해야한다.
버튼0누르면버튼0,1,2에 붙어있던orange클래스명 전부 제거하라고 코드 3줄 짜기버튼0에orange클래스명 부착박스0,1,2에 붙어있던show클래스명 전부 제거하라고 코드 3줄 짜기박스0에show클래스명 부착
이렇게 코드짜면 버튼0 기능 완성일 것 같다.
Q. 왜 버튼0,1,2에 붙어있던 orange 클래스명 전부 제거하라고 코드 3줄이나 짜나?
A. 무슨 버튼에 orange가 들어있을지 모르니까
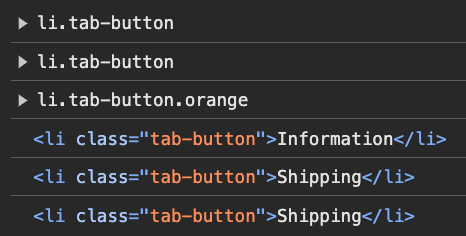
querySelectorAll() 셀렉터로 여러 요소 찾은 뒤 하나만 고르기
지금 class="tab-button" 가진 요소가 3개나 있습니다.
그래서 `document.querySelector(".tab-button") 이렇게 이벤트리스너 달면
3개 버튼에 전부 이벤트리스너를 달게된다.
그게 싫고 버튼0만 달고 싶으면
const buttons = document.querySelectorAll(".tab-button");
const productsButton = buttons[0];
이렇게 쓰면 된다.
querySelectorAll() 셀렉터로 찾은 요소 중에 x번째 요소만 선택하고 싶으면
querySelectorAll()[?] 쓰면 된다.
숙제
탭 기능 완성해오기
버튼1, 2, 3과 내용1, 2, 3 대한 변수 지정하기
const buttons = document.querySelectorAll(".tab-button");
const productsButton = buttons[0];
const informationButton = buttons[1];
const shippingButton = buttons[2];
const contents = document.querySelectorAll(".tab-content");
const productsContent = contents[0];
const informationContent = contents[1];
const shippingContent = contents[2];
버튼 1, 2, 3에 이벤트리스너 부착
productsButton.addEventListener("click", productsHandle);
informationButton.addEventListener("click", informationHandle);
shippingButton.addEventListener("click", shippingHandle);
버튼을 누르면 해당 탭으로 이동되는 각 함수 실행
function productsHandle() {
  informationButton.classList.remove("orange");
  shippingButton.classList.remove("orange");
  productsButton.classList.add("orange");
  informationContent.classList.remove("show");
  shippingContent.classList.remove("show");
  productsContent.classList.add("show");
}

function informationHandle() {
  productsButton.classList.remove("orange");
  shippingButton.classList.remove("orange");
  informationButton.classList.add("orange");
  productsContent.classList.remove("show");
  shippingContent.classList.remove("show");
  informationContent.classList.add("show");
}

function shippingHandle() {
  productsButton.classList.remove("orange");
  informationButton.classList.remove("orange");
  shippingButton.classList.add("orange");
  productsContent.classList.remove("show");
  informationContent.classList.remove("show");
  shippingContent.classList.add("show");
}
결과
10강 / 탭기능 만들며 배우는 for 반복문 2
좋은 관습 : 반복적인 셀렉터는 변수에 넣어서 쓰기
위 숙제에서 보면 비슷한 셀렉터가 매우 많이 등장한다.
셀렉터 문법은 기본적으로 작동시간이 오래걸린다!
셀렉터 하나 쓸 때 마다 html을 쭉 읽고 찾아야해서 오래걸리는 것이다.
html이 길고 복잡할 수록 더 오래걸린다.
그래서 저게 반복적으로 등장하면 그냥 변수에 넣어서 쓰면된다. (이전에 했던 방식처럼!)
querySelector 도 마찬가지이다. 한번 예시를 봐보자
const buttons = document.querySelectorAll(".tab-button");
const productsButton = buttons[0];
const informationButton = buttons[1];
const shippingButton = buttons[2];

const contents = document.querySelectorAll(".tab-content");
const productsContent = contents[0];
const informationContent = contents[1];
const shippingContent = contents[2];

informationButton.addEventListener("click", informationHandle);

function informationHandle() {
  productsButton.classList.remove("orange");
  shippingButton.classList.remove("orange");
  informationButton.classList.add("orange");
  productsContent.classList.remove("show");
  shippingContent.classList.remove("show");
  informationContent.classList.add("show");
이런 식으로 바꿔버리면 셀렉터 3번 쓰던걸 1번으로 줄일 수 있어서 성능적 이점이 있을 수 있다.
코드 복붙하고 싶으면 for 반복문
지금 탭기능함수 만든 것을 잘 보면 비슷한 코드덩어리 6줄이 3번이나 반복되고 있다.
비슷한 코드를 발견하면 굳이 손수 복사붙여넣기할 필요없이 for 반복문 쓰면 쉽게 복붙해준다.
for (횟수){
  복붙할 코드
}
이렇게 쓰면 안의 코드를 반복실행해준다.
횟수넣는 부분은 이렇게 써야한다.
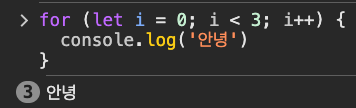
for (let i = 0; i < 3; i++) {
  console.log('안녕')
}
이러면 console.log('안녕') 이게 3번 복사 붙여넣기 된다.
왜 3번이냐면
i를 0부터 시작해서 / i에 1씩 더해가면서 복붙해라 / 근데 i < 3 까지
라는 뜻이라 3번이다.
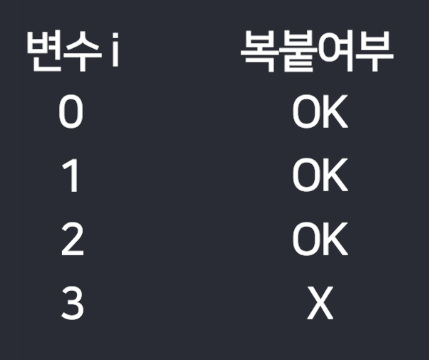
▲ 표로 그리면 이렇게 될 것같다.
for (let i = 0; i < 3; i++) {
  console.log(i)
}
진짜 i가 그렇게 변하는지 궁금하면 출력해보면 된다.
출력해보면 진짜로 0, 1, 2로 변하는 것을 볼 수 있다.
그리고 i가 3이 될 때 복사붙여넣기를 중지해준다.

한번 퀴즈를 풀어보자
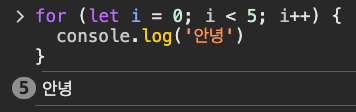
1번
for (let i = 0; i < 5; i++) {
  console.log('안녕')
}
그럼 이건 안녕이 몇번 출력될까?
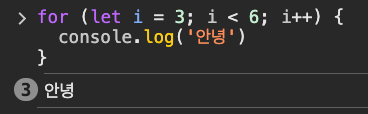
2번
for (let i = 3; i < 6; i++) {
  console.log('안녕')
}
그럼 이건 안녕이 몇번 출력될까?
for 반복문으로 탭기능 코드 줄여보기
그래서 코드가 너무 길거나 그러면 for문법을 쓰면 된다!
for 문법은 언제나 옵션일 뿐이라 쓰기싫으면 안써도 된다. (안써도 모든기능 구현가능하기때문)
하지만 배운 기념으로 아까 길게 짰던 탭기능을 for 문법 이용해서 간단하게 만들어보자.
원래 이전 코드
function productsHandle() {
  informationButton.classList.remove("orange");
  shippingButton.classList.remove("orange");
  productsButton.classList.add("orange");
  informationContent.classList.remove("show");
  shippingContent.classList.remove("show");
  productsContent.classList.add("show");
}

function informationHandle() {
  productsButton.classList.remove("orange");
  shippingButton.classList.remove("orange");
  informationButton.classList.add("orange");
  productsContent.classList.remove("show");
  shippingContent.classList.remove("show");
  informationContent.classList.add("show");
}

function shippingHandle() {
  productsButton.classList.remove("orange");
  informationButton.classList.remove("orange");
  shippingButton.classList.add("orange");
  productsContent.classList.remove("show");
  informationContent.classList.remove("show");
  shippingContent.classList.add("show");
}
위 코드들은 반복되고 있기 때문에 for 문법을 통해서 간단하게 바꾸어볼 것이다.
for 문법을 이용한 코드
for (let i = 0; i < 3; i++) {
  buttons[i].addEventListener("click", function () {
    buttons.forEach((button) => {
      button.classList.remove("orange");
    });

    contents.forEach((content) => {
      content.classList.remove("show");
    });

    buttons[i].classList.add("orange");
    contents[i].classList.add("show");
  });
}
forEach 문법을 사용한이유
현재 buttons & contents는 한개의 요소를 갖고오고 있는 것이 아니라 3개의 요소를 가져오고 있다.
 |  |
|---|
그렇기 때문에 forEach를 사용하여 1개의 요소씩 선택할 수 있도록 만들어놓았다.
잘 이해가 되지 않기 때문에 forEach에 대한 문법, 예시를 아래 사이트를 참고해 본 뒤 코드를 해석해보자
forEach 문법1
forEach 문법2
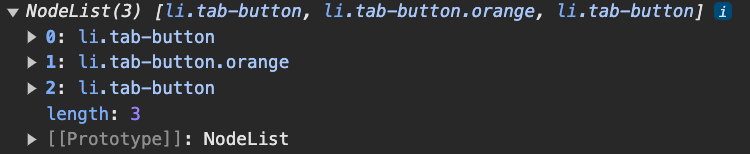
해석하기 이전에 buttons에 대해 forEach를 사용하게 되면 어떻게 되는지 콘솔을 통해 알아보자
buttons.forEach((button) => {
   console.log(button)
});
위 콘솔창 처럼 3개의 요소가 각각 선택되어 나타나고 있다.
그렇다면 아래 코드는 어떻게 될까?
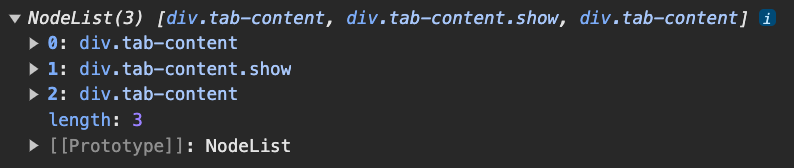
buttons.forEach((button) => {
  console.log(button)
  button.classList.remove("orange");
  console.log(button)
});
처음 위 3개는 orange클래스가 지워지지 않았지만 밑에 3개는 모두 orange클래스가 지워진 것을 볼 수 있다.
간단히 요약하자면 forEach 문법을 사용한 이유는 요소 3개 모두 orange & show 클래스를 지우기 위해 사용한 것이다.
확장성있는 코드로 바꾸기
보통 "제 코드가 좋은 코드인지 모르겠어요" 라고 생각을 할 수 있다.
- 원하는 기능이 잘 구현되었는가
- 확장성좋은가
- 나중에 관리가 쉬울 것인가
- 성능문제 없는가
이런걸 체크해보면 된다.
그래서 위에서 짠 탭기능도 확장성을 한번 잡아보자.
Q. 지금 탭이 3개면 잘 동작하지만 4개 5개가 되면 잘 동작하지 않는다.
탭이 4개나 5개로 바뀌어도 알아서 잘 동작하는 코드가 되려면 현재 코드를 어떻게 수정하면 될까?
결과
for (let i = 0; i < buttons.length; i++) {
  buttons[i].addEventListener("click", function () {
    buttons.forEach((button) => {
      button.classList.remove("orange");
    });

    contents.forEach((content) => {
      content.classList.remove("show");
    });

    buttons[i].classList.add("orange");
    contents[i].classList.add("show");
  });
}for의 횟수 부분에 3으로 정해놓는 것이 아니라 buttons.length로 buttons의 개수에 반응하도록 바꾸어주었다.
전체코드
detail.html
<!DOCTYPE html>
<html lang="en">
  <head>
    <meta charset="UTF-8" />
    <meta name="viewport" content="width=device-width, initial-scale=1.0" />
    <link
      href="https://cdn.jsdelivr.net/npm/bootstrap@5.1.3/dist/css/bootstrap.min.css"
      rel="stylesheet"
      integrity="sha384-1BmE4kWBq78iYhFldvKuhfTAU6auU8tT94WrHftjDbrCEXSU1oBoqyl2QvZ6jIW3"
      crossorigin="anonymous" />
    <link rel="stylesheet" type="text/css" href="./detail.css" />
    <title>코딩애플 Vanila JS Level2</title>
  </head>
  <body>
    <div class="container mt-5">
      <ul class="list">
        <li class="tab-button">Products</li>
        <li class="tab-button orange">Information</li>
        <li class="tab-button">Shipping</li>
      </ul>
      <div class="tab-content">
        <p>상품설명입니다. Product</p>
      </div>
      <div class="tab-content show">
        <p>스펙설명입니다. Information</p>
      </div>
      <div class="tab-content">
        <p>배송정보입니다. Shipping</p>
      </div>
    </div>
  </body>
  <script src="./detail.js"></script>
</html>
detail.css
ul.list {
  list-style-type: none;
  margin: 0;
  padding: 0;
  border-bottom: 1px solid #ccc;
}
ul.list::after {
  content: "";
  display: block;
  clear: both;
}
.tab-button {
  display: block;
  padding: 10px 20px 10px 20px;
  float: left;
  margin-right: -1px;
  margin-bottom: -1px;
  color: grey;
  text-decoration: none;
  cursor: pointer;
}
.orange {
  border-top: 2px solid orange;
  border-right: 1px solid #ccc;
  border-bottom: 1px solid white;
  border-left: 1px solid #ccc;
  color: black;
  margin-top: -2px;
}
.tab-content {
  display: none;
  padding: 10px;
}
.show {
  display: block;
}
detail.js
const buttons = document.querySelectorAll(".tab-button");
const productsButton = buttons[0];
const informationButton = buttons[1];
const shippingButton = buttons[2];

const contents = document.querySelectorAll(".tab-content");
const productsContent = contents[0];
const informationContent = contents[1];
const shippingContent = contents[2];

/* 상품설명 클릭시 오렌지색줄이 생기고 상품설명이 설명으로 나옴 */
// function productsHandle() {
//   informationButton.classList.remove("orange");
//   shippingButton.classList.remove("orange");
//   productsButton.classList.add("orange");
//   informationContent.classList.remove("show");
//   shippingContent.classList.remove("show");
//   productsContent.classList.add("show");

// buttons.forEach((button) => {
//   button.classList.remove("orange");
// });
// contents.forEach((content) => {
//   content.classList.remove("show");
// });
// productsButton.classList.add("orange");
// productsContent.classList.add("show");
// }

/* 스펙설명 클릭시 오렌지색줄이 생기고 스펙설명이 설명으로 나옴 */
// function informationHandle() {
//   productsButton.classList.remove("orange");
//   shippingButton.classList.remove("orange");
//   informationButton.classList.add("orange");
//   productsContent.classList.remove("show");
//   shippingContent.classList.remove("show");
//   informationContent.classList.add("show");

// buttons.forEach((button) => {
//   button.classList.remove("orange");
// });
// contents.forEach((content) => {
//   content.classList.remove("show");
// });
// informationButton.classList.add("orange");
// informationContent.classList.add("show");
// }

/* 배송정보 클릭시 오렌지색줄이 생기고 배송정보이 설명으로 나옴 */
// function shippingHandle() {
//   productsButton.classList.remove("orange");
//   informationButton.classList.remove("orange");
//   shippingButton.classList.add("orange");
//   productsContent.classList.remove("show");
//   informationContent.classList.remove("show");
//   shippingContent.classList.add("show");

// buttons.forEach((button) => {
//   button.classList.remove("orange");
// });
// contents.forEach((content) => {
//   content.classList.remove("show");
// });
// shippingButton.classList.add("orange");
// shippingContent.classList.add("show");
// }

/* 위 3개의 기능을 for문으로 합치기 */
for (let i = 0; i < buttons.length; i++) {
  buttons[i].addEventListener("click", function () {
    buttons.forEach((button) => {
      button.classList.remove("orange");
    });

    contents.forEach((content) => {
      content.classList.remove("show");
    });

    buttons[i].classList.add("orange");
    contents[i].classList.add("show");
  });
}

// productsButton.addEventListener("click", productsHandle);
// informationButton.addEventListener("click", informationHandle);
// shippingButton.addEventListener("click", shippingHandle);