📌태그란?
태그는 어떠한 항목을 보충 설명하는 낱말 혹은 키워드이다
HTML에서의 TAG - HTML 문서를 이루는 문법적 표식
태그 적용하여 간단한 웹 생성
<!doctype html>
<html>
<head>
<title>WEB1 - html</title>
<meta charset="utf-8">
<!--본문에 대한 설명-->
</head>

<body>
    <h1><a href="index.html">WEB</a></h1>
<ul>
    <li>1. HTML</li>
    <li>2. CSS</li>
    <li>3. JavaScript</li>
</ul>

<!--1. 2. 3. 와 같이 번호가 매겨진 숫자에 대한 자동 넘버링-->

<ol>
    <li><a href="1.html">HTML</a></li>
    <li><a href="2.html">CSS</a></li>
    <li><a href="3.html">JavaScript</a></li>
</ol>


<h2>HTML</h2>
<a href="https://www.w3.org/" target="_blank"
title="html5 specification">Hypertext Markup Language(HTML)</a> is the standard markup
language for <strong>creating <br><br>

<u>web</u> pages</strong> and web applications.

<p>Be my woman, girl, I'mma
    Be your man
    Be my woman, girl, I'll
    Be your man<br>
    Yes I be your woman
    Yes I be your baby
    Yes I be whatever that you tell me when you ready<br>
    Yes I be your girl, forever your lady
    You ain't never gotta worry, I'm down for you baby<br>
    Best believe that when you need that
    I'll provide that you will always have it<br>
    I'll be on deck keep it in check
    When you need that I'mma let you have it</p>
</body>
</html> 
📌Head
웹 본문에 대한 설명(ex. title)을 담는 태그이며 body 는 본문의 내용을 담는 태그이다. 이들은 전체적으로 html 태그에 포함되게 되며 head위 맨 윗줄 !doctype html 을 적어주는 것이 일반적이다.
title, meta, style, script, link 태그 포함 가능
meta
는 html의 메타데이터(한글 데이터를 올바르게 출력시키는 기능)등에 대한 정의를 해주는 태그이며 head 태그에 들어간다. 문서 작성자, 날짜, 키워드 등의 속성을 나타낸다. 사용 예 ( meta charset=utf-8 )
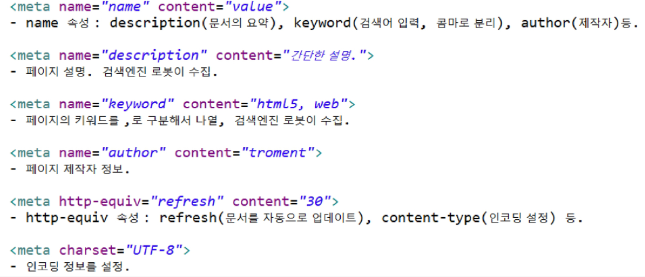
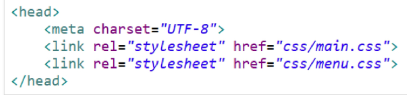
link
문서와 외부 자원을 연결하기 위해 사용한다.
rel 속성은 현재 문서와 연결된 문서 사이의 연관관계를 지정하기 위해 사용한다.
href는 연결된 문서의 위치를 지정하기 위해 사용한다.
📌body
📌링크 요소
a
문자 혹은 이미지가 링크로 연결되게끔 하는 태그이며 href="https://www.w3.org/" target="_blank" title="html5 specification"와 같은 처리를 통하여 링크 주소, 새로운 창으로 링크 연결, 툴팁 표시 등의 추가 정보를 작성할 수 있다.
a 태그 target 속성

href #id
<a href="#content1">내용1</a>한 html내에서 content1아이디를 가진 곳으로 이동하는 것도 가능하다.
map
하나의 요소를 픽셀 부분으로 나누어 구역마다 다른 링크를 줄 수도 있다.
  <img src="../img/logo.png" usemap="#logo">
  <map name="logo">
    <area shape="rect" coords="5,5,185,80"
      href="http://www.naver.com" target="_blank">
    <area shape="rect" coords="190,5,345,80"
      href="http://www.daum.net" target="_blank">
  </map>
각종 포맷팅용 태그들
<!DOCTYPE html>
<html>
<head>
<meta charset="UTF-8">
<title>Insert title here</title>
</head>
<body>
<h4>pre tag를 이용하여 javascript 함수 그대로 출력</h4>
<pre>
<code>
    function test() {
      alert("함수가 그대로 출력.");
    }
</code>
</pre>
<hr>
<blockquote>
<abbr title="Internet of Things"><mark>IoT</mark></abbr>란 인터넷을 기반으로 모든 사물을 연결하여 정보를
상호 소통하는 지능형 기술 및 서비스.<br>
(출처 : <q cite="https://terms.naver.com/alikeMeaning.nhn?query=E00273180">Naver 지식백과</q>)
</blockquote>
<hr>
<strong>의미있는 글자</strong>를 굵게 할 때는 <strong>, <b>단순 글자</b>를 굵게 할 때는 <b>를 씁니다.<br>
<em>의미있는 글자</em>를 비스듬히 할 때는 <em>, <i>단순 글자</i>를 비스듬히 할 때는 <i>를 씁니다.
</body>
</html>pre tag를 이용하여 javascript 함수 그대로 출력
function test() {
alert("함수가 그대로 출력.");
}
IoT란 인터넷을 기반으로 모든 사물을 연결하여 정보를 상호 소통하는 지능형 기술 및 서비스.
(출처 : Naver 지식백과)
의미있는 글자를 굵게 할 때는 <strong>, 단순 글자를 굵게 할 때는 <b>를 씁니다.
의미있는 글자를 비스듬히 할 때는 <em>, 단순 글자를 비스듬히 할 때는 <i>를 씁니다.
📌리스트 요소
<!DOCTYPE html>
<html>
    <head>

    </head>
    <body>
        <!--ul: unordered list-->
        <ul>
            <li>프론트엔드</li>
            <li>백엔드</li>
            <li>전과</li>
        </ul>

        <ol>
            <li>프론트엔드</li>
            <li>백엔드</li>
            <li>전과</li>
        </ol>
        <dl>
            <dt>프론트엔드 하는 사람</dt>
            <dd>나</dd>
            <dd>너</dd>
            <dd>우리</dd>


            <dt>백엔드 하는 사람</dt>
            <dd>쟤</dd>
            <dd>옆집애</dd>
            <dd>앞집애</dd>
        </dl>

    </body>
</html>
🔑ol, ul, dl
ol은 번호를 매기는 리스트, ul은 번호를 매기지 않는 리스트, dl(definition/description list)은 용어와 그에 대한 정의를 나눠서 리스트를 만들 때 사용하는 태그이다

📌이미지 삽입
1. img 태그를 통하여 이미지 파일 삽입
<img src = "istockphoto-832282452-612x612.jpg">
 -태그 안에 파일명 삽입
2. width, height
<img src = "istockphoto-832282452-612x612.jpg" width="500" height="200">
 -너비, 높이 지정 가능(둘 중 하나만 지정하면 원본 비율에 맞게 자동 조정)
3. alt (alternative text)
 <img src = "istockphoto-832282452-612x6121.jpg" width="500" height="200"
 alt="코드 이미지">
 -이미지가 잘못된 파일명 등으로 깨졌을 경우 보여지는 텍스트 적용
4. title
 <img src = "istockphoto-832282452-612x612.jpg" width="500" height="200"
 alt="코드 이미지" title="코드 이미지">
 -이미지에 커서를 올려놨을 때 툴팁 효과
📌표 생성
       <table border="2">
           <tr>
               <td>이름</td><td>성별</td><td>주소</td>
           </tr>
           <tr>
               <td>이영준</td><td>남</td><td>수원</td>
           </tr>
           <tr>
               <td>이영순</td><td>여</td><td>서울</td>
           </tr>
       </table>
1. table 로 테이블 생성
이 때 <table border = "2"> 와 같이 테두리 선 수를 지정할 수 있음2. tr (table row)로 열 구분
3. td 로(table data)각 데이터 영역 구분
| 이름 | 성별 | 주소 |
| 이영준 | 남 | 수원 |
| 이영순 | 여 | 서울 |
       <table border="2">
         <caption>표 캡션</caption>
           <thead>
               <tr>
                   <th>이름</th><th>성별</th><th>주소</th><th>회비</th>
               </tr>
           </thead>


           <tbody>
               <tr>
                   <td>이영준</td><td>남</td><td>수원</td><td>10000</td>
               </tr>
               <tr>
                   <td>이영순</td><td>여</td><td>서울</td><td>2000</td>
               </tr>
           </tbody>
           <tfoot>
               <tr>
                   <td>합계</td><td></td><td></td>  <td>12000</td>
               </tr>
           </tfoot>
       </table>
4. thead 로 테이블 상단 레이블 지정
5. tfoot 로 테이블 가장 하단 레이블 지정
6. th 로 셀 내용을 진하게 서식
| 이름 | 성별 | 주소 | 회비 |
|---|---|---|---|
| 이영준 | 남 | 수원 | 10000 |
| 이영순 | 여 | 서울 | 2000 |
| 합계 | 12000 |
7. 병합 기능: rowspan, colspan (table row)로 지정한 숫자만큼의 열과 행을 병합
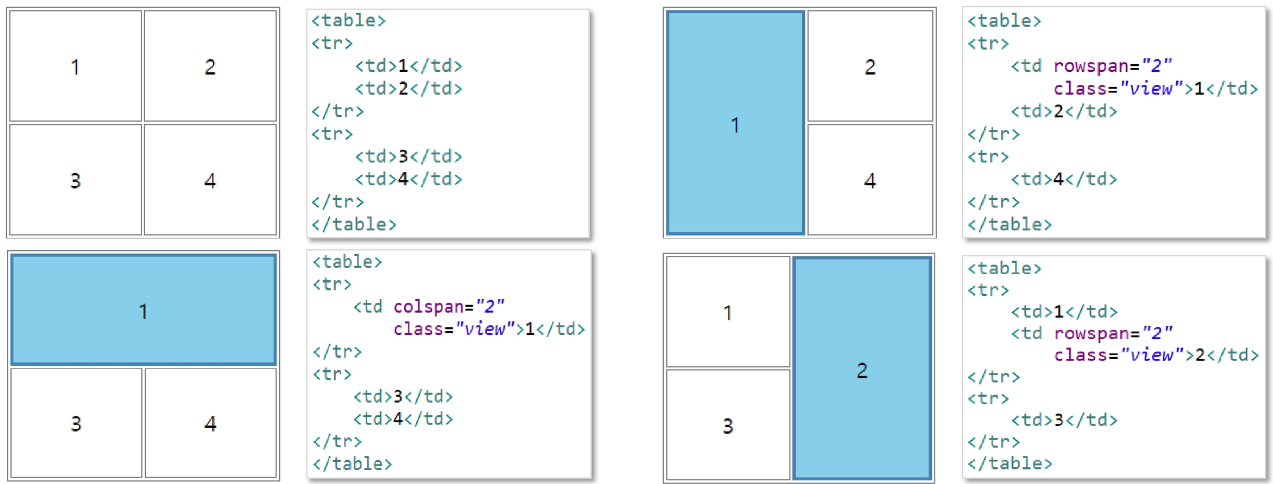
<td>이영준</td><td>남</td><td rowspan="2">수원</td><td>10000</td>
....
<th colspan="3">합계 <td>12000</td>| 이름 | 성별 | 주소 | 회비 |
|---|---|---|---|
| 이영준 | 남 | 수원 | 10000 |
| 이영순 | 여 | 2000 | |
| 합계 | 12000 |
📌프레임 요소
iframe
  <a href="java.html" target="javacontent">
    java fundamental</a>
  <a href="web.html" target="javacontent">
    servlet/jsp</a>
  <a href="mybatis.html" target="javacontent">
    mybatis</a>
  <a href="spring.html" target="javacontent">
    spring/springboot</a>
  <a href="android.html" target="javacontent">
    android</a>
  <br><br>
  <iframe src="java.html" name="javacontent"
    width="500" height="300"></iframe>
링크를 특정 프레임에 나오도록 걸 수도 있다
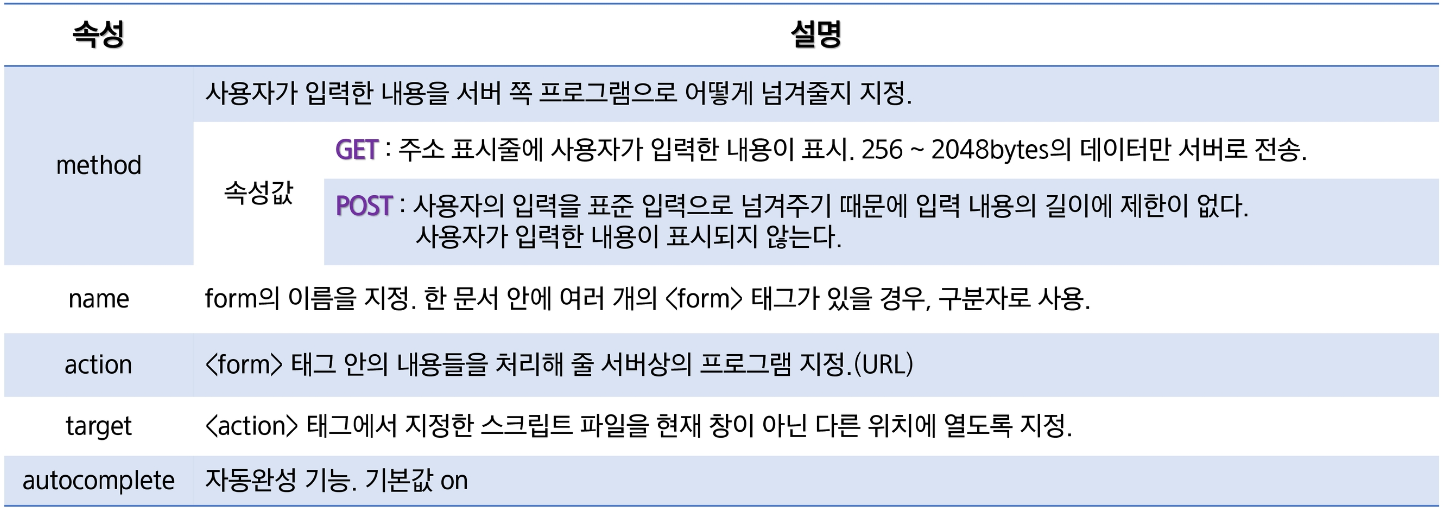
📌폼 생성
Form이란 HTML에서 사용자 의견이나 정보를 알기 위해 입력할 틀을 만드는 데 사용한다. 그리고 이러한 정보를 서버로 전송할 때 사용한다.
<html>
<body>
    <form action="http://localhost/login.php">
        <p>아이디 : <input type = "text" name="id"></p>
        <p>비밀번호 : <input type = "password"name="pwd"></p>
        <p>주소 : <input type = "text"name="address"></p>

        <input type = "submit">
    </form>
</body>
</html>
🔑기본
form action = "" 지정한 주소로 브라우저가 input 데이터를 보냄
- input type = "text" name="id" 입력박스를 생성하고 text타입으로 입력받음 서버에게 입력된 값이 무엇을 뜻하는지 name을 통하여 표시
- input type = "submit" name="id" 제출버튼을 생성하여 아이디, 비밀번호 정보 제출
아이디 :
비밀번호 :
주소 :
<html>
    <body>
        <form action="">
            <p>text:<input type="text" name="id" value="default value"></p>
            <p>password:<input type="password" name="id" value="default value"></p>
            <p>textarea:
                <textarea cols="50" rows="10">default value
                </textarea>
            </p>
        </form>
    </body>
</html>
- value="default value" 입력 칸에 기본값을 표시해줌
- textarea cols="50" rows="10" 입력칸의 가로,세로 길이를 글자 크기의 배수 단위로 지정
단, 이때 기본값은 여는 태그와 닫는 태그 사이에 위치시킨다.
text:
password:
textarea:
🔑Dropdown List
<html>
    <head>
        <meta charset="utf-8">

    </head>
    <body>
        <form action="http://localhost/color.php">
        <h1>색상</h1>
        <select name="color">
        <option value="red">red</option>
        <option value="black">black</option>
        <option value="blue">blue</option>
    </select>


    <h1>색상2 (다중선택)</h1>
    <select name="color2" multiple>
        <option value="red">red</option>
        <option value="black">black</option>
        <option value="blue">blue</option>
    </select>
    <input type="submit">
    </form>

    </body>
</html>
- select name="color" 값 중에서 선택을 받도록 지정하여 이를 color으로 받는다.
multiple 속성을 통해 여러 개의 값을 선택받을 수도 있음 (ctrl키를 누른 채로 여러가지 옵션 클릭)
-  <option value="red">red</option>
- 선택한 값이 red로 보여지는 것이면 서버로 red라는 value를 전송함
🔑radio, checkbox
<html>
    <head>
        <meta charset="utf-8">

    </head>
    <body>
        <p>
            <h1>색상(단일선택)</h1>
            뻘: <input type="radio" name="color" value="red">
            파: <input type="radio" name="color" value="blue">
            검: <input type="radio" name="color" value="black">
        </p>
        <p>
            <h1>색상(다중선택)</h1>
            95:<input type="checkbox" name="size" value="95">
            100: <input type="checkbox" name="size" value="100" checked>
            105: <input type="checkbox" name="size" value="105" checked>
            </p>
            <input type="submit"
    </body>
</html>
단일선택은 radio, 다중선택은 checkbox를 통하여 폼을 만들 수 있다.

🔑submit / button /reset
<html>
    <head>
        <meta charset="utf-8">

    </head>
    <body>
       <form action="http://localhost/form.php">
        <input type="text">
        <input type="submit" value="전송">
        <input type="button" value="버튼" onclick="alert('hello world')">
        <input type="reset">
    </body>
</html>
submit 버튼은 form action으로 지정한 주소로 정보를 전송하며 화면이 바뀐다.
button은 UI만 만들어져 있는 형태로 JavaScript 사용 시에 다양한 기능을 삽입할 수 있다.
reset은 text 박스 등에 입력한 값을 초기화 하는 기능을 한다.

🔑input type
hidden
<form action="http://localhost/color.php">
<input type="hidden" name="hide" value="egoing">
<input type="submit">
폼 속 hidden 타입은 사용자에게는 시각적으로 어떠한 영향이 없으나 서버로 egoing value를 가진 hide라는 것을 전송해준다.
🔑label
<label for = "id_txt">text</label>:
<input id="id_txt" type="text" name="id" value="default value">

<label for="color_blue">
<input id="color_blue" type="checkbox" name="color" value="red">붉은색
</label>
text라는 문자열에 레이블을 걸어주면 id_txt라는 id를 가진 input text 박스를 text가 가리키게 되며,
text를 클릭하면 textbox에 입력을 할 수 있어 사용성에 도움을 준다.
<label>
 <input type="checkbox" name="color" value="red">붉은색
</label>
와 같이 input태그 전체를 label로 감싸서 같은 효과를 줄 수 있다. 이때는 label for = "~"와 같은 처리를 할 필요가 없다.
🔑method
<form action="http://localhost/form.php">
<p>ID:<input type="text" name="id"></p>
<p>PW:<input type="password" name="pwd"></p>
<input type="submit">
</form>
위와 같은 예시에서 아이디와 패스워드를 입력하고 제출 버튼을 누른다면 서버로 정보가 url로 다음과 같이 전달된다.
"http://localhost/form.php?id=sdfsdf&pwd=1234"
비밀번호 노출이 될 위험성이 있다.
이는 method의 기본값이 get으로 되어있기 때문인데
<form action="http://localhost/form.php" method="post"> 와 같이 method를 post로 지정해주면 입력 정보가 보이지 않게 된다.
"http://localhost/form.php"
폼을 전송할 떄는 대부분 post방식으로 입력값을 전송한다.
🔑file
<form action="http://localhost/upload.php" method="post" enctype="multipart/form-data">
 <input type="file" name="profile">
 <input type="submit">
</form>
폼을 통해 서버로 파일을 전송할 수도 있다. 이 때 method는 꼭 post로, enctype는 "multipart/form-data"로 설정해주어야 한다.

🔑Html5의 추가적인 폼 속성
<html>
    <head>
        <meta charset="utf-8">

    </head>
    <body>
       <form action="http://localhost/form.php" autocomplete="on" >
        <p>ID:<input type="text" name="id" placeholder="id를 입력해주세요"
        autofocus></p>
        <p>PW:<input type="password" name="pwd"autocomplete="off" placeholder="비밀번호를 입력해주세요"></p>
        <input type="submit">
        </form>
    </body>
</html>
autocomplete = 자동완성 기능
placeholder = 입력란에 들어가있는 문구
autofocus = 커서 위치 시키는 기능
PW:
🔑유효성 검사
<html>
  <body>
      <form action="http://localhost/login.php">
          <input type = "text" name="id" placeholder="아이디를 입력해주세요" required
          pattern="[a-zA-Z].+[0-9]">
          <input type = "email" name="email" placeholder="이메일 입력">
          <input type = "submit">
      </form>
  </body>
</html>
required = 값을 반드시 입력하도록 지정
pattern="[a-zA-Z].+[0-9]" 정규표현식으로 조건을 지정
div의 margin은 상하좌우, span은 양옆만 적용
주의할 점은 span에서 태그 사이에 라인브레이킹 하는 것이 화면 상에서 공백으로 나타나므로 공백 문제가 없으려면 엔터를 주면 안된다.
또한 div의 상하 margin은 겹치면 하나만 적용된다.
예를 들어 위 div의 margin이 10이고 아래 div도 10일 때, 둘의 상하 사이는 20이 아니라 10이다.
📌정보로서의 태그
🔑font?
<font size="8" color="red" >Hello</font> world CSS가 역할을 대신하면서 font태그와 같은 가독성이 부족한 문제가 해결됨.
요즘에는 쓰이지 않음
🔑meta
    <meta charset="utf-8">
    <meta name="description" content="생활코딩에 대한 생각">
    <meta name="keywords" content="코딩,coding,생활코딩,html,css">
    <meta name="author" content="이영준">
    <meta http-equiv="refresh" content="5">
html에 대한 정보 전달을 하는 태그로서 utf-8방식의 문자세팅을 하여 한글폰트가 깨지지 않는 기능, description,keywords등의 요소가 무엇인지 알려주는 기능, 5초마다 새로고침을 해주는 기능 등을 포함할 수 있다.
📌의미론적 태그
의미론적 태그는 실제로 영향이 있지는 않으나 구획을 나누거나 어떤 의미를 가지는 부분인지를 정의하는 태그이다
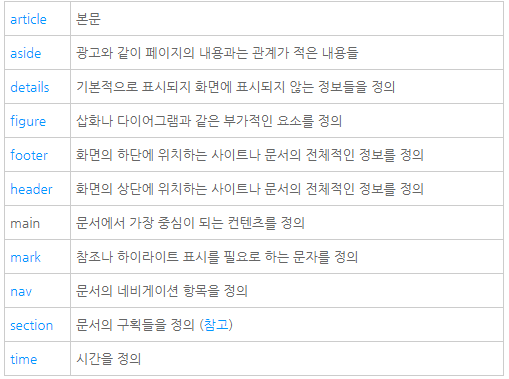
사진 출처: https://opentutorials.org/module/1892/10954
 <nav>
<ol>
    <<li><a href="1.html">HTML</a></li>
    <li><a href="2.html">CSS</a></li>
    <li><a href="3.html">JavaScript</a></li>
</ol>
</nav>

<article>
<p>Be my woman, girl, I'mma
    Be your man
    Be my woman, girl, I'll
    Be your man<br>
    Yes I be your woman
    Yes I be your baby
    Yes I be whatever that you tell me when you ready<br>
    Yes I be your girl, forever your lady
    You ain't never gotta worry, I'm down for you baby<br>
    Best believe that when you need that
    I'll provide that you will always have it<br>
    I'll be on deck keep it in check
    When you need that I'mma let you have it</p>
</article>
📌Html의 모바일 사용
<meta name="viewport" content="width=device-width, initial-scale=1.0">head부에 위와 같은 태그를 추가함으로서 페이지의 소스보기, 모바일 버튼을 누를 때 화면에 최적화된 형태로 사용자가 사용할 수 있게 해준다.
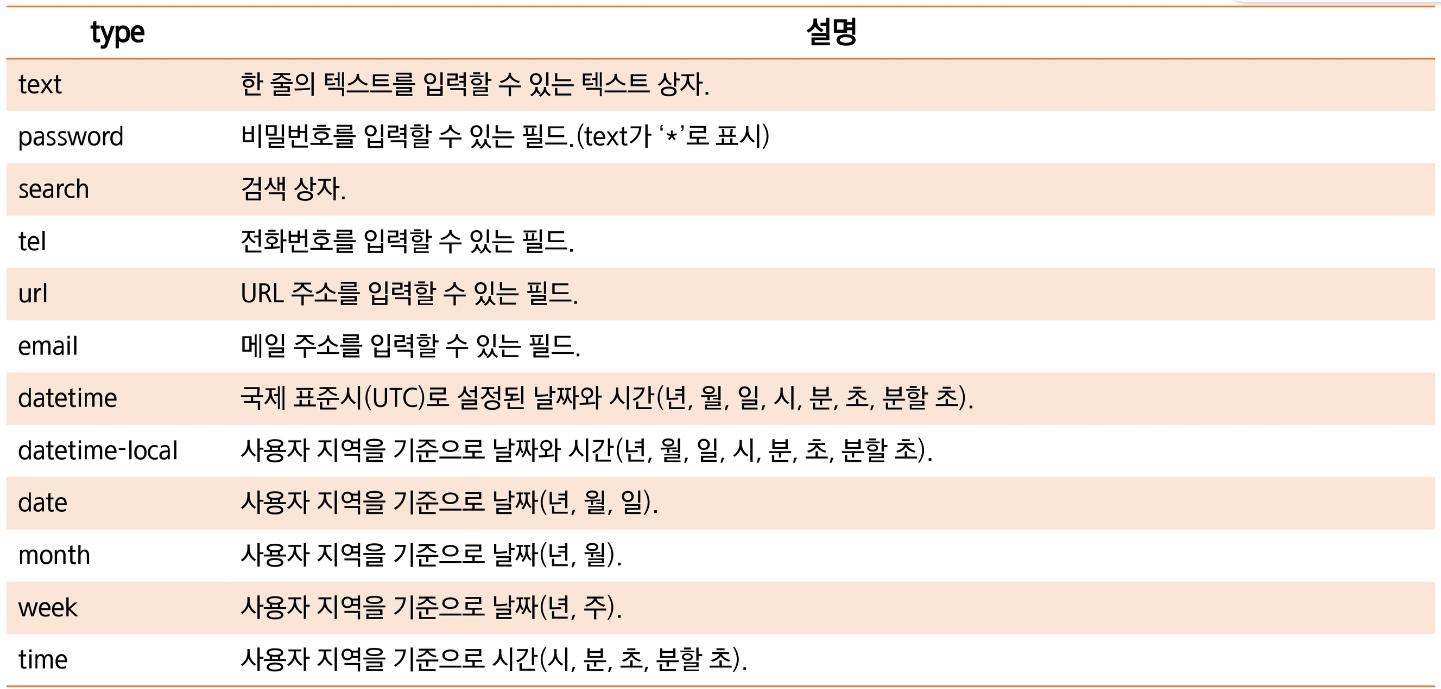
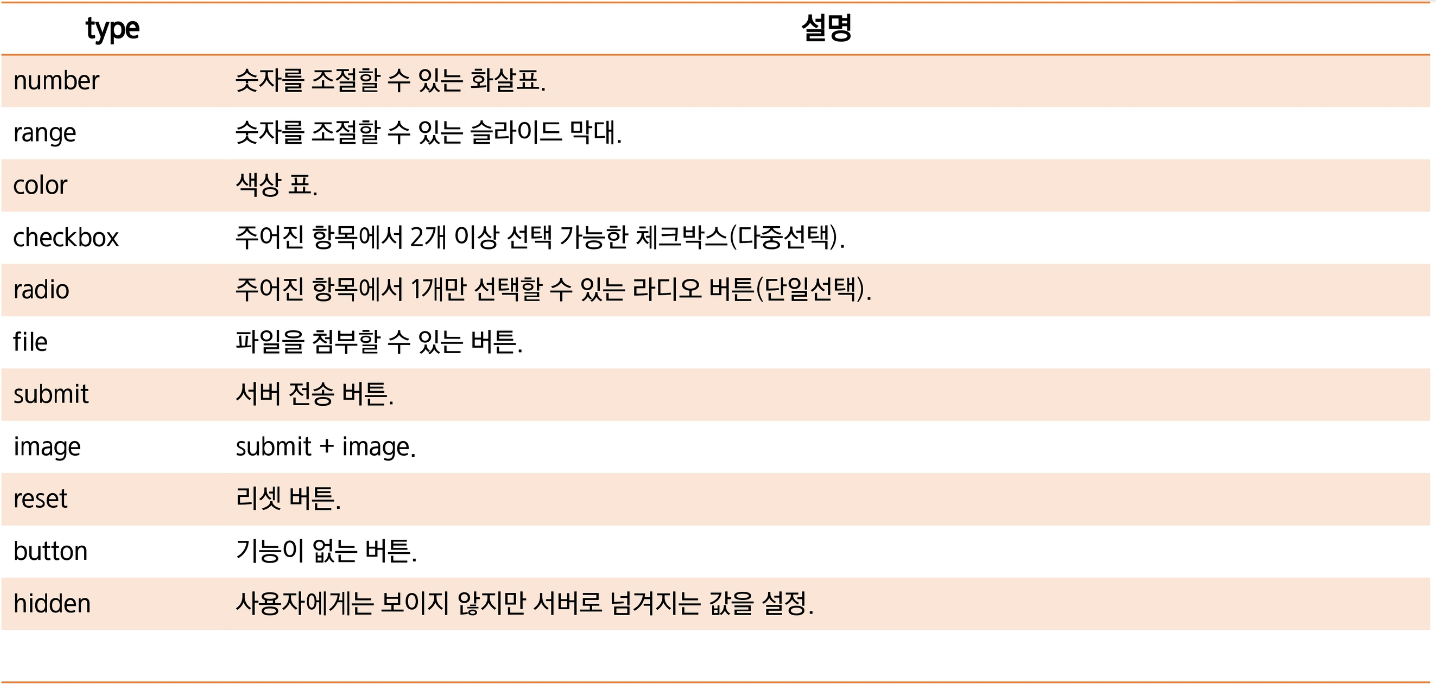
📌다양한 input 태그
 <p>number<input type="number" min="10" max="15"></p>
<p>submit<input type="submit"></p>
<p>date<input type="date" name="datev"></p>
<p>month<input type="month" name="monthv"></p>
<p>week<input type="week" name="weekv"></p>
<p>time<input type="time" name="timev"></p>
<p>email<input type="email" name="emailv"></p>
<p>search<input type="search" name="searchv"></p>
<p>tel<input type="tel" name="telv"></p>
<p>url<input type="url" name="urlv"></p>
<p>range<input type="range" name="rangev" min="0" max="10"></p>
number
submit
date
month
week
time
search
tel
url
range
태그 주요 속성
- class : 태그에 적용할 스타일의 이름 지정. 똑같은 스타일의 요소들이 반복해서 나올 때 주로 쓰인다.
- dir : 내용의 텍스트 방향을 지정 (왼쪽에서 오른쪽 ltr, 오른쪽에서 왼쪽 rtl)
- id : 주로 유일한 id를 지정해서 구분하기 위해 쓰고 자바스크립트에서 사용
- style : 곧바로 스타일을 지정해주기 위해 쓰임
- title : 태그에 추가 정보 지정, 마우스 포인터를 위치시킬 때 title 값이 표시됨
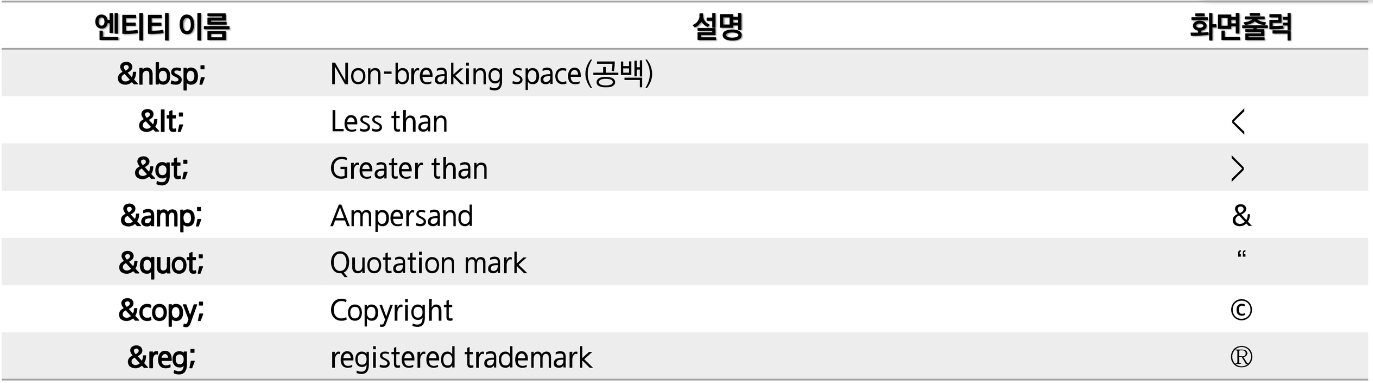
특수문자