
1. Fabric & 선언적과 절차적
Fabric

- 현재는 Fabric 영역을 사용한다. 즉, 일직선 구조가 아닌, 위와 같이 다양한 경로로 목적지에 도달할 수 있다. 또한 이를 통해 트래픽이 몰려도 다양한 경로로 처리가 가능하기에 효율과 성능이 좋다. 현재 대부분의 데이터 센터에서는 Fabric 영역를 가진다
선언적 & 절차적
- DevOps 도구는 작업을 정의하는 선언적 및 절차적이라는 두 가지 범주로 제공된다
- Terraform 은 선언적이며, Ansible 은 하이브리드 이다
선언적
- 순서가 없다
- 최종적인 결과가 중요하다 -> ~ 한 상태를 보장해라
절차적
- 순서가 있다
2. 실습 환경 구축
실습 Network 구조
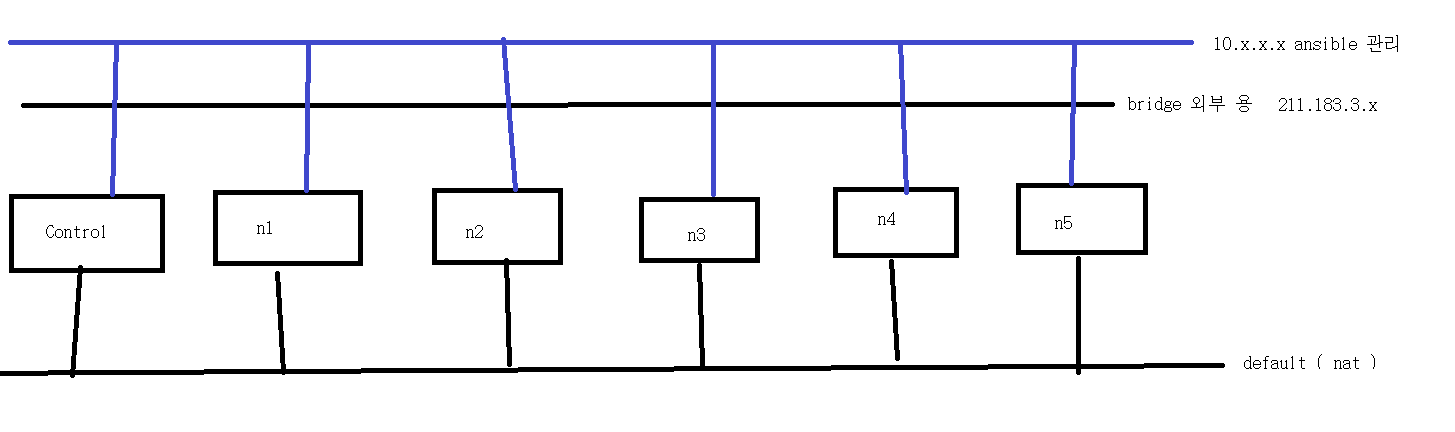
- 위와 같은 네트워크 인터페이스 구조를 가진다. 3 개의 인터페이스가 있으며, ansible 관리용 사설 네트워크와 외부 연결용 bridge 네트워크, ssh 접근용 Default 네트워크로 구성된다
[root@hypervisor ~]# brctl show
bridge name     bridge id               STP enabled     interfaces
br0             8000.000c29f3aa11       no              ens32
virbr0          8000.5254003da230       yes             virbr0-nic
- Bridge 확인
- 과거에는 STP 가 중요했다. 이 STP 프로토콜은 요즘에는 잘 사용하지 않는다
Node 프로비저닝
# -*- mode: ruby -*-
# vi: set ft=ruby :

Vagrant.configure("2") do |config|
  config.vm.define "control" do |cfg|
    cfg.vm.box = "generic/ubuntu2004"
    cfg.vm.provider :libvirt do |resource|
      resource.cpus = 4
      resource.memory = 4096
    end
    cfg.vm.host_name = "control"
    cfg.vm.network "public_network", :dev => "br0",  :type =>"bridge", ip: "211.183.3.166"
    cfg.vm.network "private_network", ip: "10.10.10.10"
    cfg.vm.network "forwarded_port", guest: 22, host: 20010, id: "ssh"
    # 앤서블 설치와 개인키 추가
    cfg.vm.provision "shell", inline: "apt-get -y install ansible"
    cfg.vm.provision "file", source: "mykey.pem", destination: "/home/vagrant/.ssh/id_rsa"
    cfg.vm.provision "shell", inline: "chmod 600 /home/vagrant/.ssh/id_rsa"
    # ssh-keyscan 을 통한 노드등록
    cfg.vm.provision "shell", inline: "ssh-keyscan 10.10.10.11 >> /home/vagrant/.ssh/known_hosts"
    cfg.vm.provision "shell", inline: "ssh-keyscan 10.10.10.12 >> /home/vagrant/.ssh/known_hosts"
    cfg.vm.provision "shell", inline: "ssh-keyscan 10.10.10.13 >> /home/vagrant/.ssh/known_hosts"
    cfg.vm.provision "shell", inline: "ssh-keyscan 10.10.10.14 >> /home/vagrant/.ssh/known_hosts"
    cfg.vm.provision "shell", inline: "ssh-keyscan 10.10.10.15 >> /home/vagrant/.ssh/known_hosts"
    cfg.vm.provision "shell", inline: "chown vagrant.vagrant /home/vagrant/.ssh/known_hosts"
  end

  config.vm.define "node1" do |cfg|
    cfg.vm.box = "centos/7"
    cfg.vm.host_name = "node1"
    cfg.vm.network "public_network", :dev => "br0",  :type =>"bridge", ip: "211.183.3.161"
    cfg.vm.network "private_network", ip: "10.10.10.11"
    cfg.vm.network "forwarded_port", guest: 22, host: 20011, id: "ssh"
    # 공개키 등록
    cfg.vm.provision "file", source: "mykey.pem.pub", destination: "/home/vagrant/.ssh/mykey.pem.pub"
    cfg.vm.provision "shell", inline: "cat /home/vagrant/.ssh/mykey.pem.pub >> /home/vagrant/.ssh/authorized_keys"
  end

  config.vm.define "node2" do |cfg|
    cfg.vm.box = "centos/7"
    cfg.vm.host_name = "node2"
    cfg.vm.network "public_network", :dev => "br0",  :type =>"bridge", ip: "211.183.3.162"
    cfg.vm.network "private_network", ip: "10.10.10.12"
    cfg.vm.network "forwarded_port", guest: 22, host: 20012, id: "ssh"
    # 공개키 등록
    cfg.vm.provision "file", source: "mykey.pem.pub", destination: "/home/vagrant/.ssh/mykey.pem.pub"
    cfg.vm.provision "shell", inline: "cat /home/vagrant/.ssh/mykey.pem.pub >> /home/vagrant/.ssh/authorized_keys"
  end

  config.vm.define "node3" do |cfg|
    cfg.vm.box = "centos/7"
    cfg.vm.host_name = "node3"
    cfg.vm.network "public_network", :dev => "br0",  :type =>"bridge", ip: "211.183.3.163"
    cfg.vm.network "private_network", ip: "10.10.10.13"
    cfg.vm.network "forwarded_port", guest: 22, host: 20013, id: "ssh"
    # 공개키 등록
    cfg.vm.provision "file", source: "mykey.pem.pub", destination: "/home/vagrant/.ssh/mykey.pem.pub"
    cfg.vm.provision "shell", inline: "cat /home/vagrant/.ssh/mykey.pem.pub >> /home/vagrant/.ssh/authorized_keys"
  end

  config.vm.define "node4" do |cfg|
    cfg.vm.box = "generic/ubuntu2004"
    cfg.vm.host_name = "ubuntu1"
    cfg.vm.network "public_network", :dev => "br0", :type => "bridge", ip: "211.183.3.164"
    cfg.vm.network "forwarded_port", guest: 22, host: 20014, id: "ssh"
    cfg.vm.network "private_network", ip: "10.10.10.14"
    # 공개키 등록
    cfg.vm.provision "file", source: "mykey.pem.pub", destination: "/home/vagrant/.ssh/mykey.pem.pub"
    cfg.vm.provision "shell", inline: "cat /home/vagrant/.ssh/mykey.pem.pub >> /home/vagrant/.ssh/authorized_keys"
  end

  config.vm.define "node5" do |cfg|
    cfg.vm.box = "generic/ubuntu2004"
    cfg.vm.host_name = "ubuntu2"
    cfg.vm.network "public_network", :dev => "br0", :type => "bridge", ip: "211.183.3.165"
    cfg.vm.network "forwarded_port", guest: 22, host: 20015, id: "ssh"
    cfg.vm.network "private_network", ip: "10.10.10.15"
    # 공개키 등록
    cfg.vm.provision "file", source: "mykey.pem.pub", destination: "/home/vagrant/.ssh/mykey.pem.pub"
    cfg.vm.provision "shell", inline: "cat /home/vagrant/.ssh/mykey.pem.pub >> /home/vagrant/.ssh/authorized_keys"
  end
end
- 위 Vagrantfile 을 통해 실습에 사용할 Node 를 프로비저닝한다
vagrant up3. Ansible 설정
Inventory 구성
vagrant ssh control
- control Node 에 들어가자
sudo vi /etc/ansible/hosts
- hosts 파일을 편집기로 열자
[centos]
centos1 ansible_host=10.10.10.11
centos2 ansible_host=10.10.10.12
centos3 ansible_host=10.10.10.13

[ubuntu]
ubuntu1 ansible_host=10.10.10.14
ubuntu2 ansible_host=10.10.10.15

[east]
centos1
centos2
ubuntu1

[west]
centos3
ubuntu2
- 위와 같이 zone 을 구성해주자. ansible_host 를 통해 Ip 를 이름에 등록하여, Ip 가 아닌 각 Ip 가 등록된 이름으로 사용한다
Facts 확인
ansible localhost -m setup
- setup 모듈을 통해 해당 Node 의 facts 를 확인할 수 있다
  "ansible_distribution": "Ubuntu",
  "ansible_distribution_file_parsed": true,
  "ansible_distribution_file_path": "/etc/os-release",
  "ansible_distribution_file_variety": "Debian",
  "ansible_distribution_major_version": "20",
  "ansible_distribution_release": "focal",
  "ansible_distribution_version": "20.04",

  "ansible_nodename": "control",
  "ansible_os_family": "Debian",
  "ansible_pkg_mgr": "apt",
- 위 정보를 확인하자. 현재 Os 가 Ubuntu 이므로 패키지 매니저는 apt 이며, os family 는 Debian 이다
4. Include tasks
installnginx.yaml - Playbook
---
- name: install nginx
  hosts: all
  become: yes

  tasks:
    - name: epel
      action: "{{ ansible_pkg_mgr }} name=epel-release state=latest"
      when: ansible_distribution == 'CentOS'

    - name: install web server
      action: "{{ ansible_pkg_mgr }} name=nginx state=present"
      when: ansible_distribution == 'CentOS'

    - name: upload index.html
      get_url: url=https://www.nginx.com dest=/usr/share/nginx/html mode=0644
      when: ansible_distribution == 'CentOS'

    - name: start nginx
      service: name=nginx state=started
      when: ansible_distribution == 'CentOS'

    - name: install nginx on ubuntu
      action: "{{ ansible_pkg_mgr }} name=nginx state=present update_cache=yes"
      when: ansible_distribution == 'Ubuntu'

    - name: upload index.html
      get_url: url=https://www.nginx.com dest=/var/www/html/
               mode=0644 validate_certs=no
      when: ansible_distribution == 'Ubuntu'
- Ansible Playbook 을 위와 같이 작성해주자
ansible-playbook installnginx.yaml
- ansible playbook 파일을 실행해주자
- {{ ansible_pkg_mgr }} 는 각 Node 의 facts 에서 패키지 매니저를 의미한다. 즉, CentOS 에서는 yum 을 의미하고, Ubuntu 에서는 apt 를 의미한다
- when 을 통해 각 Os 를 구분하여, Os 에 맞는 작업을 전달한다
허나 위 작업은 각 Node 별로 skip 이 많이 발생한다. 이 skip 을 줄여보자
Include tasks
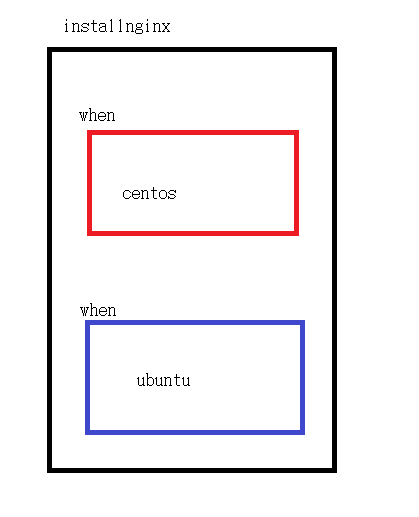
- 위와 같이 Include tasks 를 사용하여 playbook 파일을 만들어, when 을 통해 조건을 확인하는 경우를 줄여서 skip 을 줄여보겠다
vagrant@control:~$ cat centos.yaml
- name: epel
  action: "{{ ansible_pkg_mgr }} name=epel-release state=latest"

- name: install web server
  action: "{{ ansible_pkg_mgr }} name=nginx state=present"

- name: upload index.html
  get_url: url=https://www.nginx.com dest=/usr/share/nginx/html mode=0644

- name: start nginx
  service: name=nginx state=started
vagrant@control:~$ cat ubuntu.yaml
- name: install nginx on ubuntu
  action: "{{ ansible_pkg_mgr }} name=nginx state=present update_cache=yes"

- name: upload index.html
  get_url: url=https://www.nginx.com dest=/var/www/html/
           mode=0644 validate_certs=no
- 위와 같이 Os 별로 작업을 각각의 yaml 파일로 나누자
vagrant@control:~$ cat installnginx_include_task.yaml
---
- name: install nginx using include_tasks
  hosts: all
  become: yes

  tasks:
    - name: centos
      include_tasks: centos.yaml
      when: ansible_distribution == 'CentOS'

    - name: ubuntu
      include_tasks: ubuntu.yaml
      when: ansible_distribution == 'Ubuntu'
- 실행할 playbook 파일은 위와 같이 include_tasks 를 통해 실행할 작업이 명시된 yaml 파일을 지정한다
- 위에서는 조건을 5 번 확인하였지만, 이제 조건을 두 번만 확인한다
ansible-playbook installnginx_include_task.yaml
- playbook 을 실행하자
PLAY RECAP ********************************************************************************************************************************
centos1                    : ok=6    changed=1    unreachable=0    failed=0    skipped=1    rescued=0    ignored=0
centos2                    : ok=6    changed=1    unreachable=0    failed=0    skipped=1    rescued=0    ignored=0
centos3                    : ok=6    changed=1    unreachable=0    failed=0    skipped=1    rescued=0    ignored=0
ubuntu1                    : ok=4    changed=1    unreachable=0    failed=0    skipped=1    rescued=0    ignored=0
ubuntu2                    : ok=4    changed=1    unreachable=0    failed=0    skipped=1    rescued=0    ignored=0
- 각 노드 별로 skip 이 한 번씩만 발생하였다. 하지만, 아직 skip 이 발생하긴 한다
이 skip 을 없애보자
removenginx.yaml
---
- name: remove nginx
  hosts: all
  become: yes

  tasks:
    - name: remove nginx
      yum:
        name: ['epel-release', 'nginx']
        state: absent
      when: ansible_distribution == 'CentOS'

    - name: remove nginx on ubuntu
      apt:
        name: nginx
        state: absent
        autoremove: true
      when: ansible_distribution == 'Ubuntu'
- 일단 위 Playbook 을 통해 nginx 를 삭제하자
5. vars & if
vagrant@control:~$ cat installnginx_using_if.yaml
---
- name: install nginx using if
  hosts: all
  become: yes
  vars:
    dict: "{{ 'centos' if ansible_distribution == 'CentOS'
               else 'ubuntu' if ansible_distribution == 'Ubuntu'
               else 'linux'
           }}"

  tasks:
   - name: file selection
     include_tasks: "{{ dict }}.yaml"
- vars 를 통해 변수를 사용한다
- if 문을 통해 Node 의 facts 정보를 비교하여, dist 이라는 변수를 지정한다. 해당 변수는 실행할 yaml 파일 이름을 지정하는데 사용한다
- 즉, 각 Node 가 들어왔을 때, 해당 Node 가 Centos 인지 Ubuntu 인지 if 를 통해 어떤 yaml 파일을 실행시킬지, 해당 yaml 파일의 이름을 변수로 지정해준다
- 변수 dict 를 통해 include_tasks 에서 실행할 yaml 파일을 지정한다
PLAY RECAP ********************************************************************************************************************************
centos1                    : ok=6    changed=4    unreachable=0    failed=0    skipped=0    rescued=0    ignored=0
centos2                    : ok=6    changed=4    unreachable=0    failed=0    skipped=0    rescued=0    ignored=0
centos3                    : ok=6    changed=4    unreachable=0    failed=0    skipped=0    rescued=0    ignored=0
ubuntu1                    : ok=4    changed=2    unreachable=0    failed=0    skipped=0    rescued=0    ignored=0
ubuntu2                    : ok=4    changed=2    unreachable=0    failed=0    skipped=0    rescued=0    ignored=0
- 이제 skip 이 발생하지 않는다
6. Include tasks & handler
문제
- 직전 실행했던 파일의 결과를 확인하고, 정상적으로 설치가 되었다면 웹을 통해 확인하기
- 1 에 문제가 없다면 remove 하기
- if 파일에 핸들러를 적용하여 각 노드에서 nginx 가 설치된 뒤 어떤 버전인지 여부를 debug 로 출력시켜주기
코드
vagrant@control:~$ cat installnginx_using_if.yaml
---
- name: install nginx using if
  hosts: all
  become: yes
  vars:
    dict: "{{ 'centos' if ansible_distribution == 'CentOS'
               else 'ubuntu' if ansible_distribution == 'Ubuntu'
               else 'linux'
           }}"

  tasks:
     - name: file selection
       include_tasks: "{{dict}}.yaml"

  handlers:
     - name: trigger
       shell: nginx -v
       register: resulth
       notify:
         - result

     - name: result
       debug:
         var: resulth

vagrant@control:~$ cat ubuntu.yaml
- name: install nginx on ubuntu
  action: "{{ ansible_pkg_mgr }} name=nginx state=present update_cache=yes"
  notify:
    - trigger

- name: upload index.html
  get_url: url=https://www.nginx.com dest=/var/www/html/
           mode=0644 validate_certs=no

vagrant@control:~$ cat centos.yaml
- name: epel
  action: "{{ ansible_pkg_mgr }} name=epel-release state=latest"

- name: install web server
  action: "{{ ansible_pkg_mgr }} name=nginx state=present"
  notify:
    - trigger

- name: upload index.html
  get_url: url=https://www.nginx.com dest=/usr/share/nginx/html mode=0644

- name: start nginx
  service: name=nginx state=started
- 위와 같이 작성한다. 각 yaml 에서 설치 작업을 통해 changed 가 발생하면, notify 를 통해 지정한 handler 를 실행시킨다
- handler 에서는 shell 을 통해 nginx 의 버전을 출력한 결과를 resulth 에 담고, notify 를 통해 debug 를 실행하여 버전을 출력해준다
결과
RUNNING HANDLER [result] *******************************************************
ok: [ubuntu2] => {
    "resulth": {
        "changed": true,
        "cmd": "nginx -v",
        "delta": "0:00:00.011571",
        "end": "2022-10-13 08:41:32.803410",
        "failed": false,
        "rc": 0,
        "start": "2022-10-13 08:41:32.791839",
        "stderr": "nginx version: nginx/1.18.0 (Ubuntu)",
        "stderr_lines": [
            "nginx version: nginx/1.18.0 (Ubuntu)"
        ],
        "stdout": "",
        "stdout_lines": []
    }
}
ok: [ubuntu1] => {
    "resulth": {
        "changed": true,
        "cmd": "nginx -v",
        "delta": "0:00:00.010936",
        "end": "2022-10-13 08:41:32.810446",
        "failed": false,
        "rc": 0,
        "start": "2022-10-13 08:41:32.799510",
        "stderr": "nginx version: nginx/1.18.0 (Ubuntu)",
        "stderr_lines": [
            "nginx version: nginx/1.18.0 (Ubuntu)"
        ],
        "stdout": "",
        "stdout_lines": []
    }
}
ok: [centos2] => {
    "resulth": {
        "changed": true,
        "cmd": "nginx -v",
        "delta": "0:00:00.015310",
        "end": "2022-10-13 08:41:33.051507",
        "failed": false,
        "rc": 0,
        "start": "2022-10-13 08:41:33.036197",
        "stderr": "nginx version: nginx/1.20.1",
        "stderr_lines": [
            "nginx version: nginx/1.20.1"
        ],
        "stdout": "",
        "stdout_lines": []
    }
}
ok: [centos3] => {
    "resulth": {
        "changed": true,
        "cmd": "nginx -v",
        "delta": "0:00:00.019477",
        "end": "2022-10-13 08:41:33.064654",
        "failed": false,
        "rc": 0,
        "start": "2022-10-13 08:41:33.045177",
        "stderr": "nginx version: nginx/1.20.1",
        "stderr_lines": [
            "nginx version: nginx/1.20.1"
        ],
        "stdout": "",
        "stdout_lines": []
    }
}
ok: [centos1] => {
    "resulth": {
        "changed": true,
        "cmd": "nginx -v",
        "delta": "0:00:00.020916",
        "end": "2022-10-13 08:41:33.069204",
        "failed": false,
        "rc": 0,
        "start": "2022-10-13 08:41:33.048288",
        "stderr": "nginx version: nginx/1.20.1",
        "stderr_lines": [
            "nginx version: nginx/1.20.1"
        ],
        "stdout": "",
        "stdout_lines": []
    }
}
- changed 가 발생하면, handler 가 작동하여 설치된 nginx 버전을 debug 를 통해 잘 출력해준다

멋진 엔지니어가 될 때까지