📌 디자인 패턴이란?
소프트웨어 개발 방법에서 사용되는 디자인 패턴은 프로그램 개발에서 자주 나타나는 과제를 해결하기 위한 방법중 하나로, 과거의 소프트웨어 개발 과정에서 발견된 설계의 노하우를 축적하여 이름을 붙여, 이후에 재사용하기 좋은 형태로 특정의 규약을 묶어서 정리한 것이다.
디자인 패턴은 꼭 이렇게 해야 한다라기보다는 '기출 문제'와 그 성격이 비슷하다. 혹자는 '비급서'와 같다고도 한다. 선대의 고민의 흔적을 볼 수 있다.
이미 자주 활용되는 디자인 패턴
-
싱글톤
특정한 기능을 하는 오브젝트가 한 개만 존재해야 하게 하는 패턴 -
오브젝트 풀
오브젝트의 재활용을 통해 효율적으로 오브젝트를 생성하고 회수하는 패턴 -
컴포넌트 패턴
독립적인 기능을 하는 다양한 기능들을 다양한 오브젝트에 붙이고 뗄 수 있도록 구성하는 패턴 -
게임루프 (업데이트)
게임의 오브젝트에 라이프사이클을 설정하고 이를 통해 게임 오브젝트가 실행해야 할 행동들을 체계적으로 관리
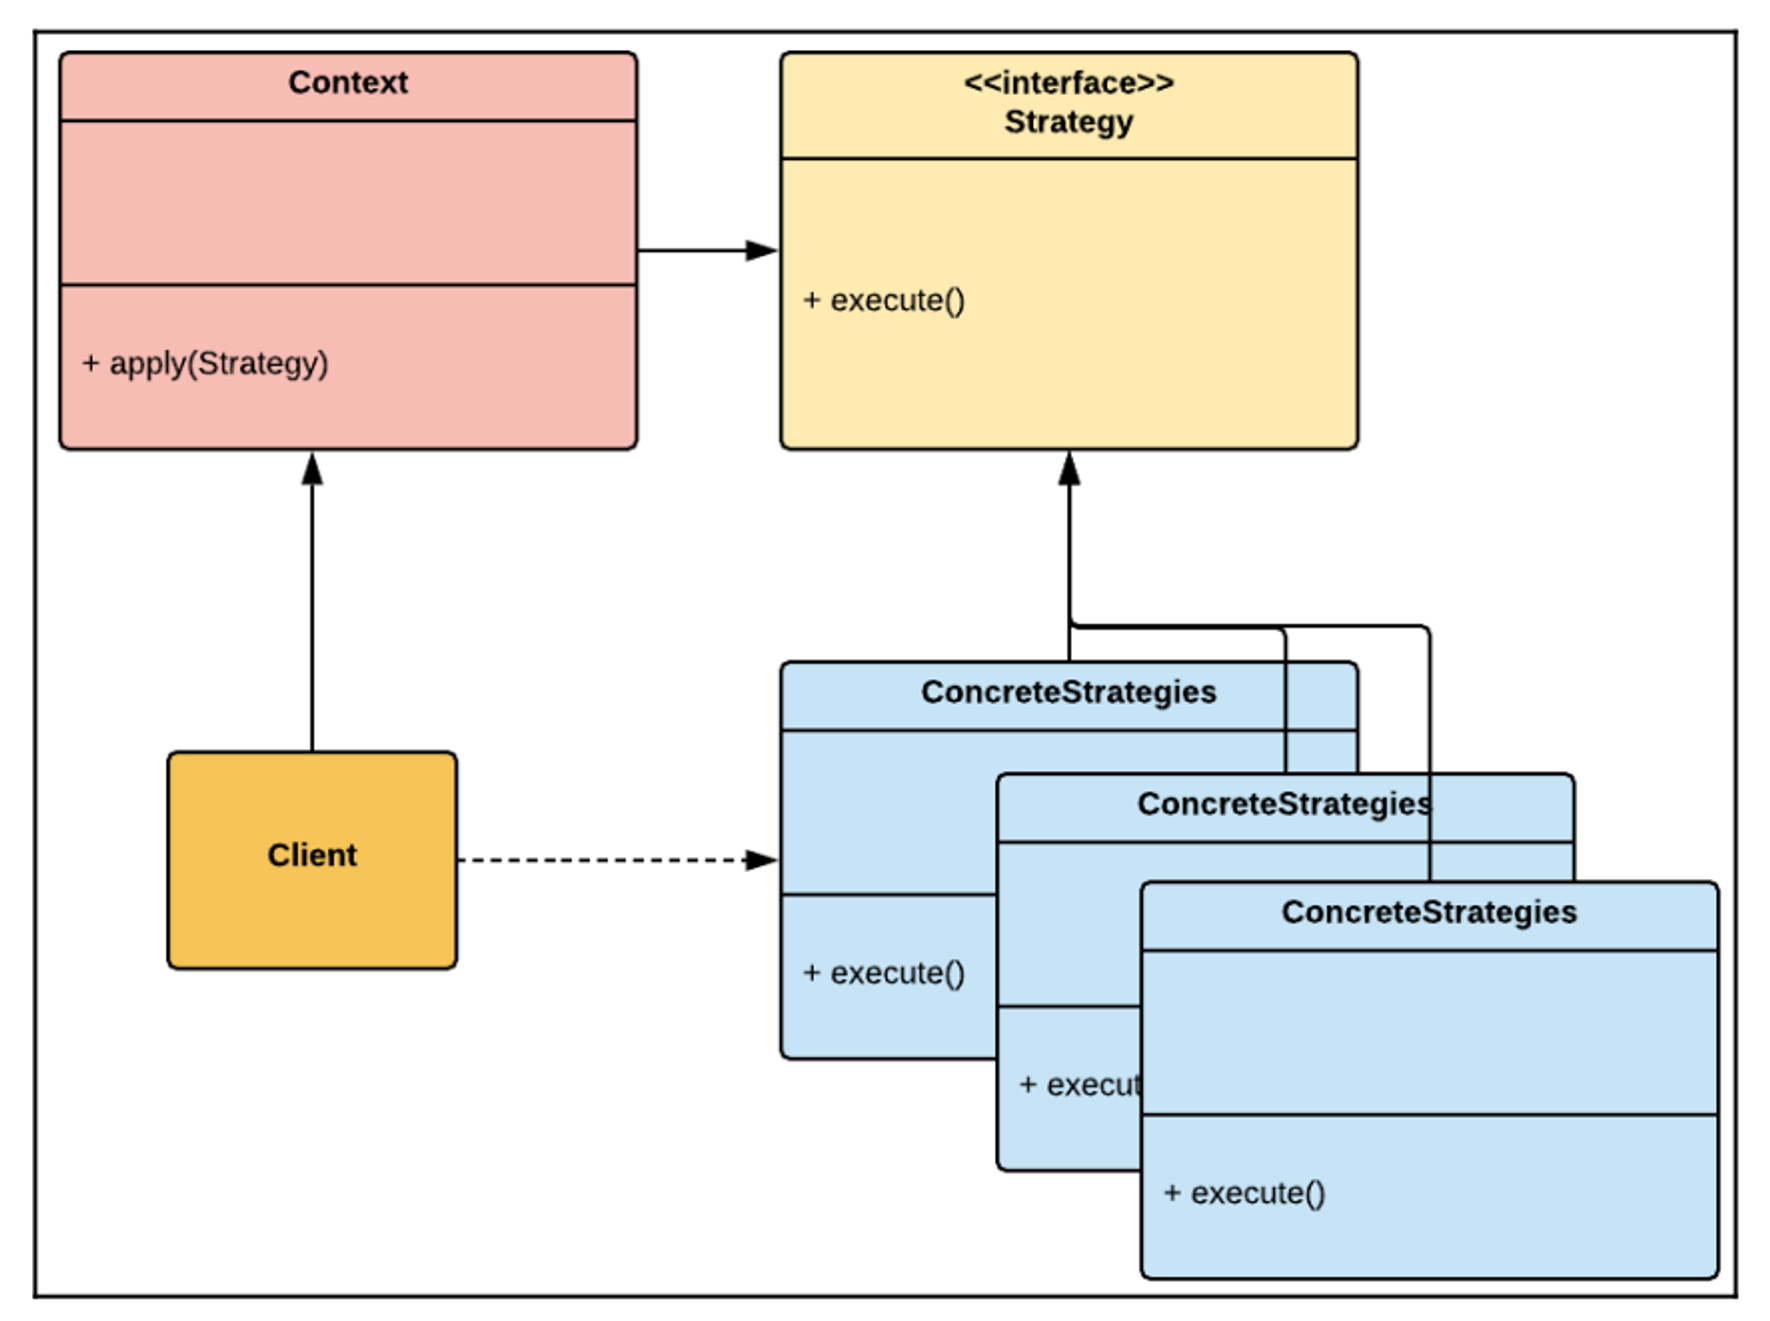
📌 전략 패턴
다양한 행동을 할 수 있는 드론이 있다고 생각해보자. 이 드론이 항상 똑같이 프로그래밍한 대로만 움직이는 게아니라, 실제 실행(런타임) 중에 랜덤으로 혹은 유저의 입력에 따라 어떤 행동이 달라질 지 구현한다고 생각해보자.
즉, 객체지향 그 자체 패턴이다. 공통적인 내용들을 추상화하고, 이를 통해 동적으로 프로그램의 실행흐름을 변경시키는 패턴이다.
- [정리]
한 클래스가 다양한 역할을 할 수 있고 이에 대한 전략을 만들어둔다. 이 중 한가지의 전략을 플레이타임에 실행할 수 있도록 로직을 구현한다.
➔ 필드를 통해 구현하는 경우
using UnityEngine;

namespace Chapter.Strategy {
    public class Drone : MonoBehaviour {

        // Ray parameters
        private RaycastHit _hit;
        private Vector3 _rayDirection;
        [SerializeField] private float _rayAngle = -45.0f;
        [SerializeField] private float _rayDistance = 15.0f;

        // Movement parameters
        public float speed = 1.0f;
        public float maxHeight = 5.0f;
        public float weavingDistance = 1.5f;
        public float fallbackDistance = 20.0f;

        void Start() {
            _rayDirection =
                transform.TransformDirection(Vector3.back)
                * _rayDistance;

            _rayDirection =
                Quaternion.Euler(_rayAngle, 0.0f, 0f)
                * _rayDirection;

						StartCoroutine(Manuever());
        }

        void Update() {
            Debug.DrawRay(transform.position,
                _rayDirection, Color.blue);

            if (Physics.Raycast(
                transform.position,
                _rayDirection, out _hit, _rayDistance)) {

                if (_hit.collider) {
                    Debug.DrawRay(
                        transform.position,
                        _rayDirection, Color.green);
                }
            }
        }

		IEnumerator Manuever(){
			    while (true) {
              time = 0;
              Vector3 start = drone.transform.position;
              Vector3 end =
                  (isReverse) ? startPosition : endPosition;

              while (time < speed) {
                  drone.transform.position =
                      Vector3.Lerp(start, end, time / speed);
                  time += Time.deltaTime;
                  yield return null;
              }
              yield return new WaitForSeconds(1);
              isReverse = !isReverse;
          }
			}
    }
}
➔ if문을 통해 구현하는 경우
using UnityEngine;

namespace Chapter.Strategy {

		public enum DroneType {
			Bopple, Weave, Fallback
		}

    public class Drone : MonoBehaviour {

        // Ray parameters
        private RaycastHit _hit;
        private Vector3 _rayDirection;
        private float _rayAngle = -45.0f;
        private float _rayDistance = 15.0f;

        // Movement parameters
        public float speed = 1.0f;
        public float maxHeight = 5.0f;
        public float weavingDistance = 1.5f;
        public float fallbackDistance = 20.0f;

				public DroneType type;

        void Start() {
						switch(type){
								case DroneType.Bopple:
									_rayAngle = ~~;
								case DroneType.Weave:
									_rayAngle = ~~;
						}
/*
            _rayDirection =
                transform.TransformDirection(Vector3.back)
                * _rayDistance;

            _rayDirection =
                Quaternion.Euler(_rayAngle, 0.0f, 0f)
                * _rayDirection;
*/
						StartCoroutine(Manuever());
        }

        void Update() {
            Debug.DrawRay(transform.position,
                _rayDirection, Color.blue);

            if (Physics.Raycast(
                transform.position,
                _rayDirection, out _hit, _rayDistance)) {

                if (_hit.collider) {
                    Debug.DrawRay(
                        transform.position,
                        _rayDirection, Color.green);
                }
            }
        }

		IEnumerator Manuever(){
			    while (true) {
              time = 0;
              Vector3 start = drone.transform.position;
              Vector3 end =
                  (isReverse) ? startPosition : endPosition;

              while (time < speed) {
                  drone.transform.position =
                      Vector3.Lerp(start, end, time / speed);
                  time += Time.deltaTime;
                  yield return null;
              }
              yield return new WaitForSeconds(1);
              isReverse = !isReverse;
          }
			}
    }
}
➔ 전략 패턴을 통해 구현하는 경우
전략 인터페이스
namespace Chapter.Strategy
{
    public interface IManeuverBehaviour
    {
        void Maneuver(Drone drone);
    }
}
전략 구현부 (Bopple만)
using UnityEngine;
using System.Collections;

namespace Chapter.Strategy {
    public class BoppingManeuver :
        MonoBehaviour, IManeuverBehaviour {

        public void Maneuver(Drone drone) {
            StartCoroutine(Bopple(drone));
        }

        IEnumerator Bopple(Drone drone)
        {
            float time;
            bool isReverse = false;
            float speed = drone.speed;
            Vector3 startPosition = drone.transform.position;
            Vector3 endPosition = startPosition;
            endPosition.y = drone.maxHeight;

            while (true) {
                time = 0;
                Vector3 start = drone.transform.position;
                Vector3 end =
                    (isReverse) ? startPosition : endPosition;

                while (time < speed) {
                    drone.transform.position =
                        Vector3.Lerp(start, end, time / speed);
                    time += Time.deltaTime;
                    yield return null;
                }
								// 변수만 바꾸는 수준에서 복잡한 조작이 가능하도록 구현 가능!

                yield return new WaitForSeconds(1);
                isReverse = !isReverse;
            }
        }
    }
}
드론 구현부
using UnityEngine;

namespace Chapter.Strategy {
    public class Drone : MonoBehaviour {

        // Ray parameters
        private RaycastHit _hit;
        private Vector3 _rayDirection;
        private float _rayAngle = -45.0f;
        private float _rayDistance = 15.0f;

        // Movement parameters
        public float speed = 1.0f;
        public float maxHeight = 5.0f;
        public float weavingDistance = 1.5f;
        public float fallbackDistance = 20.0f;

        void Start() {
            _rayDirection =
                transform.TransformDirection(Vector3.back)
                * _rayDistance;

            _rayDirection =
                Quaternion.Euler(_rayAngle, 0.0f, 0f)
                * _rayDirection;
        }

        public void ApplyStrategy(IManeuverBehaviour strategy) {
            strategy.Maneuver(this);
        }

        void Update() {
            Debug.DrawRay(transform.position,
                _rayDirection, Color.blue);

            if (Physics.Raycast(
                transform.position,
                _rayDirection, out _hit, _rayDistance)) {

                if (_hit.collider) {
                    Debug.DrawRay(
                        transform.position,
                        _rayDirection, Color.green);
                }
            }
        }
    }
}
전략 적용부
using UnityEngine;
using System.Collections.Generic;

namespace Chapter.Strategy {
    public class ClientStrategy : MonoBehaviour {

        private GameObject _drone;
        private List<IManeuverBehaviour>
            _components = new List<IManeuverBehaviour>();

        private void SpawnDrone() {
            _drone =
                GameObject.CreatePrimitive(PrimitiveType.Cube);

            _drone.AddComponent<Drone>();

            _drone.transform.position =
                Random.insideUnitSphere * 10;

            ApplyRandomStrategies();
        }

        private void ApplyRandomStrategies() {
            _components.Add(
                _drone.AddComponent<WeavingManeuver>());
            _components.Add(
                _drone.AddComponent<BoppingManeuver>());
            _components.Add(
                _drone.AddComponent<FallbackManeuver>());

            int index = Random.Range(0, _components.Count);

            _drone.GetComponent<Drone>().
                ApplyStrategy(_components[index]);
        }

        void OnGUI() {
            if (GUILayout.Button("Spawn Drone")) {
                SpawnDrone();
            }
        }
    }
}
📌 명령/메멘토 패턴
➔ 명령 패턴
명령 패턴은 한마디로 메소드를 객체처럼 만드는 것이라고 생각하면 편하다.
명령패턴을 사용하지 않고 쓴다면 아래와 같이 작성하겠지만
if(Input.GetKey(KeyCode.LeftArrow)){
	GoLeft();
}

void GoLeft(){
	Debug.Log("Left Turn!");
}
명령패턴을 활용하면 아래와 같이 바꿀 수 있다.
public abstract class Command {
	public abstract void Execute();
}

public class LeftCommand : Command {
	public override void Execute(){
		Debug.Log("Left Turn!");
	}
}

/// Another Class
LeftCommand leftCommand = new LeftCommand();

if(Input.GetKey(KeyCode.LeftArrow)){
	leftCommand.Execute();
}
위와 같은 방식이 훨씬 더 복잡해보일 수 있지만, 유지보수성을 강화해주는 데에는 좋은 방식의 코드 작업 방식이라고 생각할 수 있다. 레이싱 게임 작업 중 한명은 대시 작업, 한 명은 점프 작업을 한다고 생각해보면, 작업을 나눠서 하기 때문에 훨씬 더 확장성이 높아진다.
예시 - 리플레이 시스템
전제사항 : [결정론적(deterministic) 게임 결과]
부스터를 썻을 때 속도가 랜덤으로 0 ~ 10km/h 빨라진다 이런게 없다.
프레임 시간에 대한 보정이 있어야 한다.(fixedUpdate위주, approximate 고려)
transform.Translate(Vector3.right * Time.deltaTime);
➔ 메멘토 패턴
메멘토 패턴은 뒤로 돌아갈 수 있도록 구현하는 것을 말한다.
예를 들어, 게임을 플레이하다가 죽었을 때, 1초정도의 순간을 저장해두고, 이를 역재생할 수 있다. 아니면 유니티 같은 프로그램을 쓰다가 잘못했을 때 Ctrl+Z를 통해서 돌아가고 싶을 수 있는데 이렇게 돌아갈 수 있도록 설계하는 방법을 메멘토 패턴이라고 하며, 명령 패턴을 활용하여 쉽게 구현할 수 있다.
방법 : 명령 패턴으로 구현한다음 명령들을 리스트에 넣고 역으로 읽기
예시
using System.Collections;
using System.Collections.Generic;
using UnityEngine;

public class TimeBody : MonoBehaviour {

	bool isRewinding = false;

	public float recordTime = 5f;

	List<PointInTime> pointsInTime;

	Rigidbody rb;

	// Use this for initialization
	void Start () {
		pointsInTime = new List<PointInTime>();
		rb = GetComponent<Rigidbody>();
	}

	// Update is called once per frame
	void Update () {
		if (Input.GetKeyDown(KeyCode.Return))
			StartRewind();
		if (Input.GetKeyUp(KeyCode.Return))
			StopRewind();
	}

	void FixedUpdate ()
	{
		if (isRewinding)
			Rewind();
		else
			Record();
	}

	void Rewind ()
	{
		if (pointsInTime.Count > 0)
		{
			PointInTime pointInTime = pointsInTime[0];
      transform.position = pointInTime.position;
			transform.rotation = pointInTime.rotation;
			pointsInTime.RemoveAt(0);
		} else
		{
			StopRewind();
		}

	}

	void Record ()
	{
		if (pointsInTime.Count > Mathf.Round(recordTime / Time.fixedDeltaTime))
		{
			pointsInTime.RemoveAt(pointsInTime.Count - 1);
		}

		pointsInTime.Insert(0, new PointInTime(transform.position, transform.rotation));
	}

	public void StartRewind ()
	{
		isRewinding = true;
		rb.isKinematic = true;
	}

	public void StopRewind ()
	{
		isRewinding = false;
		rb.isKinematic = false;
	}
}
📌 옵저버 패턴
예를 들어, Input System에서 버튼을 누르면 특정한 함수가 실행되도록 구현한다든지, 어떤 값이 변경될 경우에 특정한 이벤트가 발생한다는 식이다.
옵저버 패턴은 이벤트를 특정한 오브젝트가 발생시킬 경우 이를 구독하는 구독자들의 함수를 실행시키게 하는 패턴을 말한다. 이때, 발행자와 구독자의 관계에 따라, 아래와 같이 나타낼 수 있다.

옵저버 패턴은 발행자가 1명일때, 구독자가 N명인 방식으로, HP바가 감소했을 때 HP바에 대한 UI처리, 승리/패배 처리 등을 같이 해야 할 때 이런 방식을 생각해볼 수 있다.
➔ 예시 1
public abstract class Observer
{
    // 상태 update 메서드
    public abstract void OnNotify();
}
// =================================

// 옵저버 구현클래스
public class ConcreteObserver1 : Observer
{
    // 대상타입의 클래스에서 이 메소드를 실행시킴
    public override void OnNotify()
    {
        Debug.Log("옵저버 클래스의 메서드 실행 #1");
    }
}
// =================================

public interface ISubject
{
    void AddObserver(Observer o);
    void RemoveObserver(Observer o);
    void Notify();
}

// =================================

// 대상 클래스
// : 대상 인터페이스를 구현한 클래스
public class ConcreteSubject : MonoBehaviour, ISubject
{
    List<Observer> observers = new List<Observer>();  // 옵저버를 관리하는 List

    // 관리할 옵저버를 등록
    public void AddObserver(Observer observer)
    {
        observers.Add(observer);
    }

    // 관리중인 옵저버를 삭제
    public void RemoveObserver(Observer observer)
    {
        if (observers.IndexOf(observer) > 0) observers.Remove(observer);
    }

    // 관리중인 옵저버에게 연락
    public void Notify()
    {
				foreach (Observer o in observers)
				{
					o.OnNotify();
				}
    }

    void Start()
    {
        Observer obj1 = new ConcreteObserver1();

        AddObserver(obj1);
    }
}
➔ 예시 2 - Event 활용
public class PlayerCharacter : MonoBehaviour
	{
	    public event Action<Enemy> OnAttack; // 이벤트 선언

	    public void Attack(Enemy enemy)
	    {
	        // 공격 동작 수행
	        // ...

	        // 이벤트 호출
	        OnAttack?.Invoke(enemy);
	    }
	}

	public class Enemy : MonoBehaviour
	{
	    private void Start()
	    {
	        PlayerCharacter player = FindObjectOfType<PlayerCharacter>();
	        player.OnAttack += ReactToAttack; // 옵저버 등록
	    }

	    private void ReactToAttack(Enemy enemy)
	    {
	        // 공격에 대한 반응 구현
	        // ...
	    }
	}

public class PlayerHealth : MonoBehaviour
{
    public Text healthText;

    private int health = 100;

    private void Start()
    {
        UpdateUI();
    }

    public void TakeDamage(int damage)
    {
        health -= damage;
        UpdateUI();
    }

    private void UpdateUI()
    {
        healthText.text = "Health: " + health.ToString();
    }
}

public class Explosion : MonoBehaviour
{
    public delegate void ExplosionEventHandler();
    public static event ExplosionEventHandler OnExplode; // 이벤트 선언

    private void Start()
    {
        Explode();
    }

    private void Explode()
    {
        // 폭발 동작 수행
        // ...

        // 이벤트 호출
        OnExplode?.Invoke();
    }
}

public class PlayerController : MonoBehaviour
{
    private void Start()
    {
        // 이벤트 핸들러 등록
        Explosion.OnExplode += PlayExplosionSound;
    }

    private void PlayExplosionSound()
    {
        // 폭발 사운드 재생
        // ...
    }
}
📌 게임 수학 (회전)
➔ 오일러각
Euler - x, y, z 축의 각각의 회전으로 표현하는 방식
2D - Z축으로 회전,X, Y축에서 이동
3D - X/Y/Z축으로 회전, X, Y, Z축에서 이동 (국룰 : XZ축 평면에서 이동 Y축에서 점프 : y-up)
짐벌락 - MAX를 활용한 짐벌락Gimbal-lock)설명 (youtube.com)
➔ 사원수(쿼터니언)
Quaternion - w, x, y, z 의 네 가지 수로 회전을 표현하는 방식
게임 엔진에서는 주로 쿼터니언을 활용하여 회전하지만 매우 비직관적이기 때문에 개발자들은 오일러각을 쿼터니언으로 바꾸는 방식을 활용하고, 이러한 메소드를 제공한다.
Quaternion.Identity // 회전이 없다.
Quaternion.Euler // 오일러각을 쿼터니언으로 변환하는 방식
Transform.eulerAngles // 오일러각을 회전에 직접 반영하는 방식
문제 : 우리가 생각하는 어떤 특정한 회전을 적용하는 수많은 쿼터니언이 있다.
회전 사용시 주의사항
- 잘못된 사용
void Update ()
{
    var rot = transform.rotation; // Quaternion
    rot.x += Time.deltaTime * 10; // Quaternion은 크기가 1인 벡터라고 생각가능 단위사원수
    transform.rotation = rot;
}
// rotation scripting mistake #2
// Read, modify, then write the Euler values from a Quaternion.
// Because these values are calculated from a Quaternion,
// each new rotation might return very different Euler angles, which might suffer from gimbal lock.
void Update ()
{
var angles = transform.rotation.eulerAngles;
angles.x += Time.deltaTime * 10;
transform.rotation = Quaternion.Euler(angles);
}
// Debug.Log 뭐가 나오고 있는지를 꼭 봐야됨- 스크립트에서 오일러각을 올바르게 사용하는 예시
// Rotation scripting with Euler angles correctly.
// Store the Euler angle in a class variable, and only use it to
// apply it as an Euler angle, but never rely on reading the Euler back.

float x;
void Update ()
{
    x += Time.deltaTime * 10;
    transform.rotation = Quaternion.Euler(x,0,0);
}
using UnityEngine;
// demonstration of eulerAngles not returning the same values as assigned
public class EulerAnglesProblemExample :MonoBehaviour
{
private void Start()
{
Quaternion myRotation =Quaternion.identity;
myRotation.eulerAngles = newVector3(150, 35, 45);
Debug.Log(myRotation.eulerAngles);
// output is: (30.0, 215.0, 225.0)
}
}- 값을 변환시키고 적용한다.
➔ 🔥 방향 벡터
특정한 방향을 바라보게 하거나, 특정한 방향과 축을 맞출 때 활용.
🔥 예시 - LookRotation
public class ExampleClass : MonoBehaviour
{
    public Transform target;

    void Update()
    {
        Vector3 relativePos = target.position - transform.position;

        // the second argument, upwards, defaults to Vector3.up
        Quaternion rotation = Quaternion.LookRotation(relativePos, Vector3.up);
        transform.rotation = rotation;
    }
}
🔥 예시 - FormToRotation (벡터의 정렬)
rb.velocity = transform.forward * speed.z;
Ray ray = new Ray(transform.position, transform.forward);
Physics.Raycast(transform.position, transform.forward, out RaycastHit hit, 1f);
if (hit.collider != null)
{
    Instantiate(Effect, hit.point, Quaternion.FromToRotation(Vector3.up, hit.normal));
    Destroy(gameObject);
}
선형보간(Lerp) / 구형보간(Slerp)
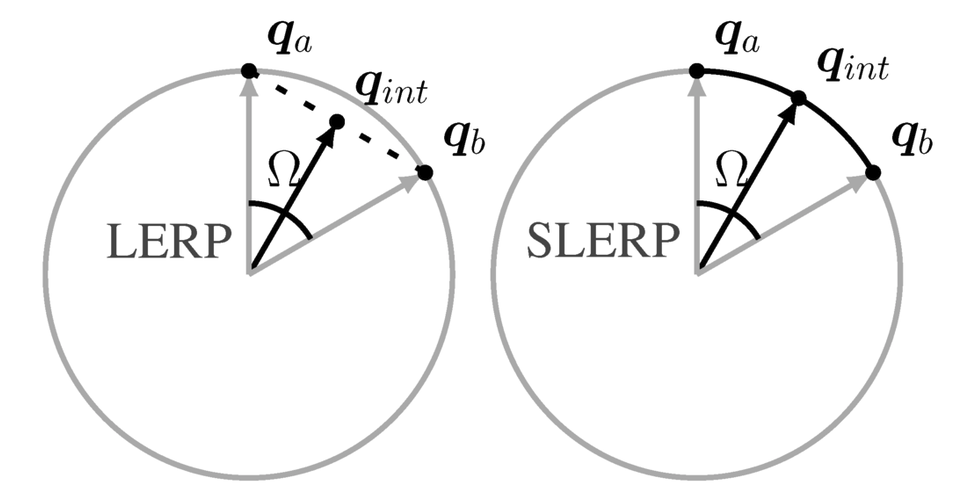
Lerp (선형보간)
Mathf.Lerp(float 초기값, float 목표값, float 비율);
0, 1, 0.07 ➔ 0.07
회복바 구현
비율을 올려서 선형으로 채우는 법 VS 연출적 목표를 위해 초기값을 건드리는 것 (절대 1이 되지 안됨 주의)
Slerp (구형보간)
Quaternion.Slerp(Quaternion From, Quaternion To, float 비율);