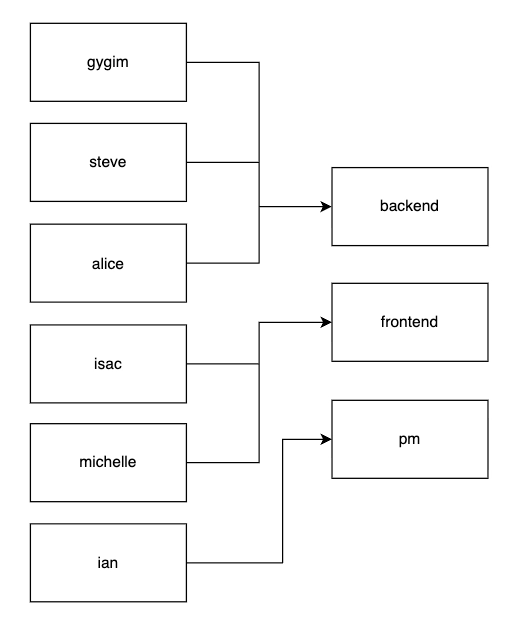
7. 조회전략과 N + 1
01. ⭐ JPA 조회 전략
a. Eager Loading - 즉시 조회
단방향(
@MnayToOne) 의 기본 조회 전략입니다. 엔티티를 가져올때 연관된 엔티티도 함께 조회합니다.
i. 즉시 조회 설정 방법
@Entity
@Table(name = "students")
public class Student {

		...

    @ManyToOne(fetch = FetchType.EAGER) // ✅ 기본 조회 전략(생략 가능)
    @JoinColumn(name = "course_id")
    private Course course;

		...
}
ii. 즉시조회 코드로 살펴보기 - V1, V2
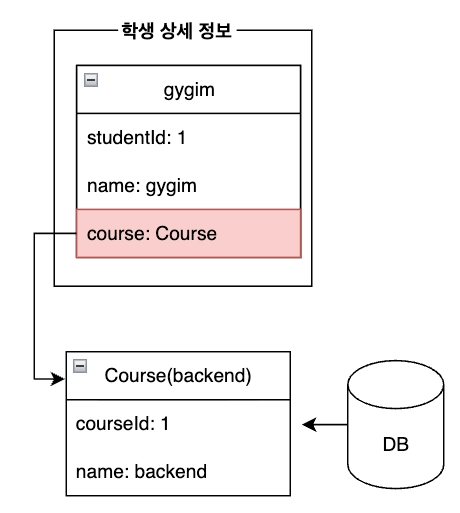
학생 정보만 조회하더라도 연관된 수업의 정보를 함께 조회하는 모습을 확인할 수 있습니다.
b. Lazy Loading - 지연 조회
연관관계에 있는 엔티티의 정보가 필요할 때만 조회합니다. 양방향(@OneToMany, @ManyToMany)의 기본 조회 전략입니다.
i. 지연 조회 설정 방법
@Entity
@Table(name = "students")
public class Student {

		...

    @ManyToOne(fetch = FetchType.LAZY) // ✅ 지연 조회 설정
    @JoinColumn(name = "course_id")
    private Course course;

    ...
}
02. 논의 포인트 - 지연 조회 전략
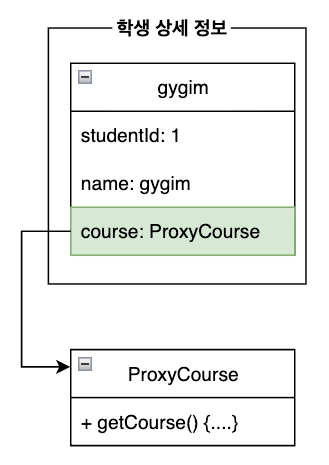
Lazy 전략을 활용해 조회를 한다면 연관된 속성 안에는 무엇이 들어가 있을까요?
03. ⭐ 프록시 객체
proxy == 대리인
a. 정체와 구조
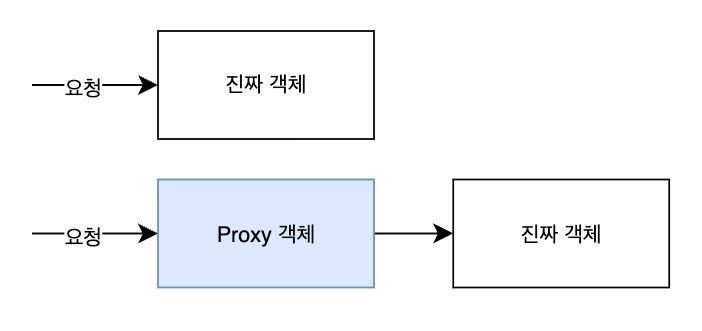
실제 객체 대신 먼저 앞에서 요청을 받아주는 객체입니다. 프록시 덕분에 지연로딩이 가능해집니다. 프록시 객체 덕분에 지연로딩이 가능해집니다.
Eager Loading 일 경우
Lazy Loading 일 경우
b. 동작 원리
JPA 는 지연로딩을 가능하게 만들기 위해 연관관계 조회시점에 진짜 객체(엔티티) 대신 프록시 객체를 주입해줍니다. 이 프록시는 식별자(id)만 가진 껍데기 객체입니다. 이후 실제 필드에 접근하는 순간 DB 쿼리가 실행되어서 진짜 데이터가 조회됩니다.
03. ⭐ 지연 로딩의 한계 → N + 1
ORM 을 활용하면서 데이터를 객체처럼 쉽게 다룰 수 있게 되었습니다! 하지만 조회전략을 잘 이해하지 못하고 활용한다면 연관된 데이터를 가져오기 위해 n 개의 추가 쿼리가 발생하는 성능 문제가 발생할 수 있습니다.
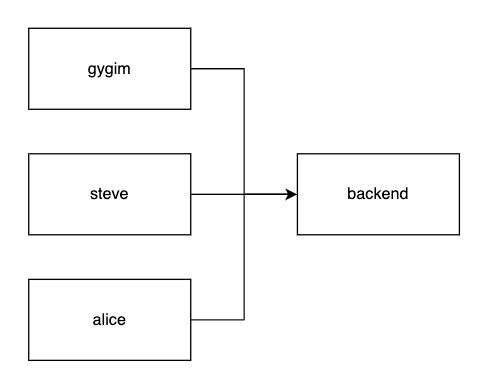
a. 퀴즈: 아래 구조에서 쿼리가 몇번 발생할까요?
4번의 쿼리 발생
b. 흔히 발생하는 n + 1 문제 유형 살펴보기
i. 반복문 내부
반복문 내부에서 연관된 엔티티 조회시
  public List<StudentDetailResponseDto> getStudentListV1() {
        // 1. 학생 목록 조회
        List<Student> foundStudentList = studentRepository.findAll();

        // 2. Dto 만들기
        // 2-1. dto 리스트 준비
        List<StudentDetailResponseDto> studentDetailResponseDtoList = new ArrayList<>();

        for (Student student : foundStudentList) {
            // 2-1. dtoDetail 요소 재료 준비
            Long foundStudentId = student.getId();
            String foundStudentName = student.getName();
            Course foundCourse = student.getCourse();
            String foundCourseName = foundCourse.getName(); // n + 1 문제

            // 2-2. dto 요소 만들기
            StudentDetailResponseDto studentDetailResponseDto = new StudentDetailResponseDto(
                    foundStudentId,
                    foundStudentName,
                    foundCourseName
            );

            // 2-3. dto 리스트에 detailDto 추가
            studentDetailResponseDtoList.add(studentDetailResponseDto);
        }
        return studentDetailResponseDtoList;
    }
ii. stream 내부
stream 내부에서 연관된 엔티티 조회시
    public List<StudentDetailResponseDto> getStudentListV2() {
        // 1. 학생 목록 조회
        List<Student> foundStudentList = studentRepository.findAll();

        // 2. Dto 만들기
        // 2-1. dto 리스트 준비
        List<StudentDetailResponseDto> studentDetailResponseDtoList = foundStudentList.stream()
                .map(student -> new StudentDetailResponseDto(
                                student.getId(),
                                student.getName(),
                                student.getCourse()
                                        .getName() // n + 1 문제
                        )
                )
                .collect(Collectors.toList());
        return studentDetailResponseDtoList;
    }
iii. dto 내부
dto 내부에서 연관된 엔티티 조회시
    public List<StudentDetailResponseDto> getStudentListV3() {
        // 1. 학생 목록 조회
        List<Student> foundStudentList = studentRepository.findAll();

        // 2. Dto 만들기
        // 2-1. dto 리스트 준비
        List<StudentDetailResponseDto> studentDetailResponseDtoList = foundStudentList.stream()
                .map(student -> new StudentDetailResponseDto(student)
                )
                .collect(Collectors.toList());
        return studentDetailResponseDtoList;
    }
class StudentDetailResponseDto {
...
private String courseName;
public StudentDetailResponseDto(Stduent student) {
this.student.getCourse().getName(); // n + 1 문제 발생
}
}04. ⭐ n + 1 문제 해결 방법
a. join fetch
    @Query("SELECT s FROM Student s LEFT JOIN FETCH s.course")
    List<Student> findAllWithStudent();
b. entityGraph
i. 기본 활용 방법
Student 엔티티에 연관된 객체들을 어떻게 조회할건지 미리 그래프로 정해놓고 repository 에서 사용하는 방법입니다.
하나만 정의해놓기(student ↔ course):
@Entity
@Table(name = "students")
@NamedEntityGraph(
        name = "Student.withCourse",
        attributeNodes = @NamedAttributeNode("course")
)
public class Student {
    ...
    private Course course;
}
여러개 정의해놓기(student ↔ course, student ↔ tutor, student:
@Entity
@Table(name = "students")
@NamedEntityGraphs({
    @NamedEntityGraph(
        name = "Student.withCourse",
        attributeNodes = @NamedAttributeNode("course")
    ),
    @NamedEntityGraph(
        name = "Student.withTutor",
        attributeNodes = @NamedAttributeNode("tutor")
    ),
    @NamedEntityGraph(
        name = "Student.withCourseAndTutor",
        attributeNodes = {
            @NamedAttributeNode("course"),
            @NamedAttributeNode("tutor")
        }
    )
})
public class Student {
    ...
    private Course course;
    private Tutor tutor;
}
public interface StudentRepository extends JpaRepository<Student, Long> {
@EntityGraph("Student.withCourse")
List<Student> findAll();
@EntityGraph("Student.withTutor")
List<Student> findAll();
@EntityGraph("Student.withCourseAndTutor")
List<Student> findAll();
@EntityGraph("Student.withCourse")
List<Student> findByName(String name);
}- queryMethod 방식, JPQL 방식 모두 활용 가능
ii. 간단한 사용 방법
    @EntityGraph(attributePaths = {"course"})
    @Query("SELECT s FROM Student s")
    List<Student> findAllWithEntityGraph();

    @EntityGraph(attributePaths = {"course"})
    List<Student> findAll();
8. JWT - 인증인가
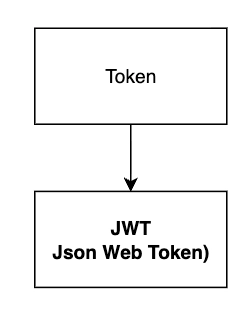
01. JWT 개념
토큰 안에 담기는 데이터를 json 형식으로 표현하는 토큰인증 방식입니다.
a. JWS 와 JWE
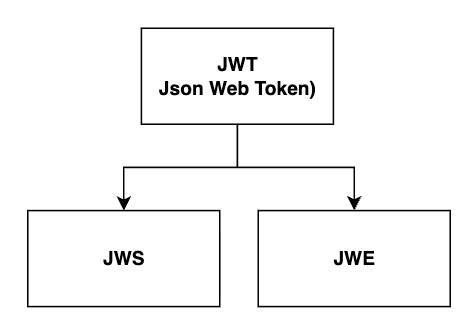
- JWS: 어떻게 데이터를 보호할까? → 서명방식으로!
- JWE: 어떻게 데이터를 보호할까? → 암호화방식으로!
c. JWT 살펴보기
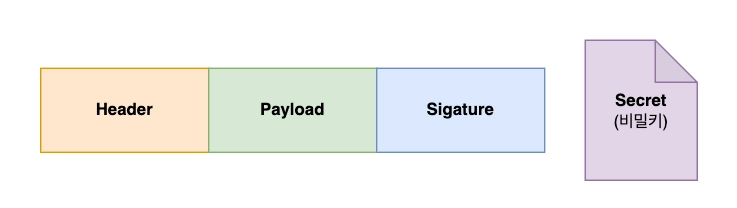
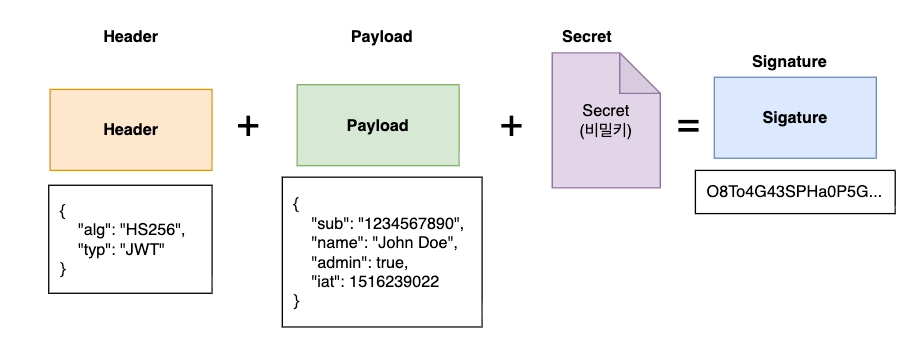
우리가 쓰는 토큰은 정확히 말하면 ”JWS로 서명된 JWT” 입니다.
i. jwt 예시

a. ⭐ Header - 어떻게 토큰을 만들었는지 설명서
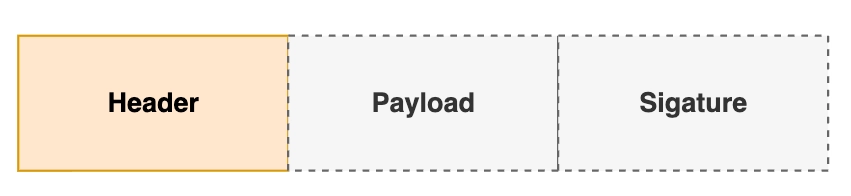
- 어떤 알고리즘(HMAC, SHA256 등)을 사용해서
signature(서명)를 만들지 명시하는 곳입니다. - Base64 로 인코딩 되어 있어서 누구나 간단하게 읽을 수 있습니다.
- 토큰 검증시 header 부분을 보고 어떤 알고리즘을 활용해서 서명을 검증할지 판단할 수 있습니다.
b. ⭐ Payload - 토큰 내용
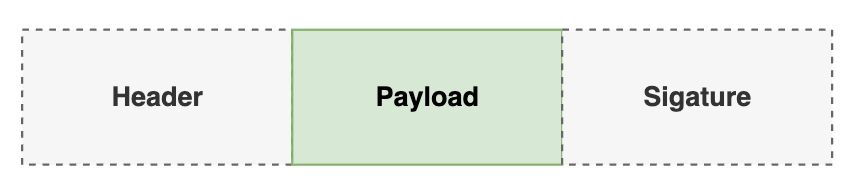
- 토큰의 내용(payload)이 담기는 곳입니다.
- Base64 로 인코딩 되어 있어서 누구나 간단하게 읽을 수 있습니다.
- key-value 형식으로 저장되어 있습니다.
- userId, role 등 다양한 정보를 담을 수 있습니다.
c. ⭐ Signature - 서명
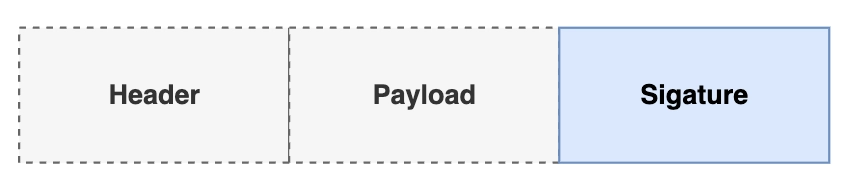
- 공식: Base64(header) + Base64(payload) + secret = signature
- 검증시 서명을 확인해서 토큰이 위변조 되었는지 확인할 수 있습니다.
d. ⭐ Secret - 비밀키
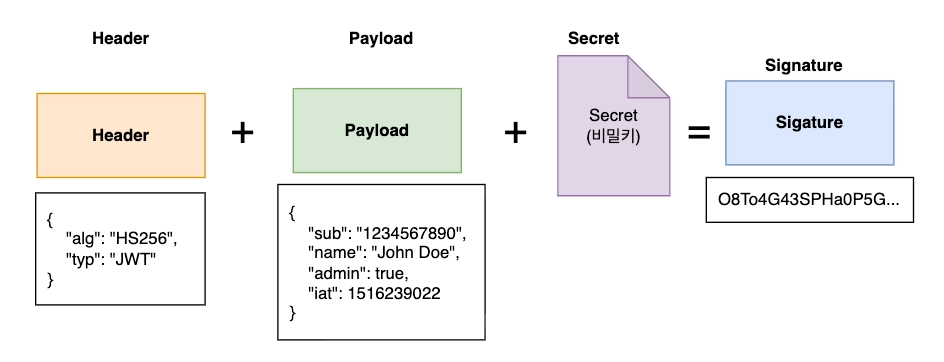
Signature(서명)를 만들때 사용합니다.- 외부로 유출될 경우 누구든지 유효한 서명을 가진 JWT 를 만들 수 있음으로 보안에 신경써야합니다.
e. 정리
- Header: 서명을 만들 때 어떤 알고리즘을 사용할지 선언하는 곳
- Payload: 토큰의 내용이 담기는 곳
- Signature:
Header + Payload + Secret조합하고 서명 알고리즘을 활용해 만들어내는 서명 - Secret: Signature 를 만들기위해 사용되는 비밀키
03. JWT 흐름
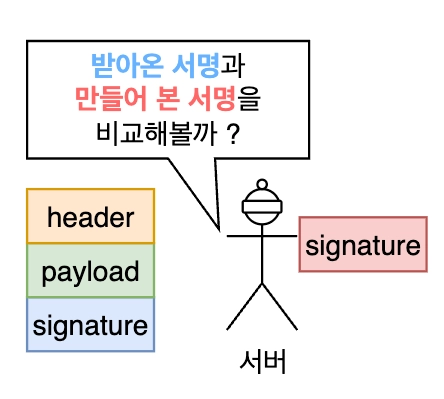
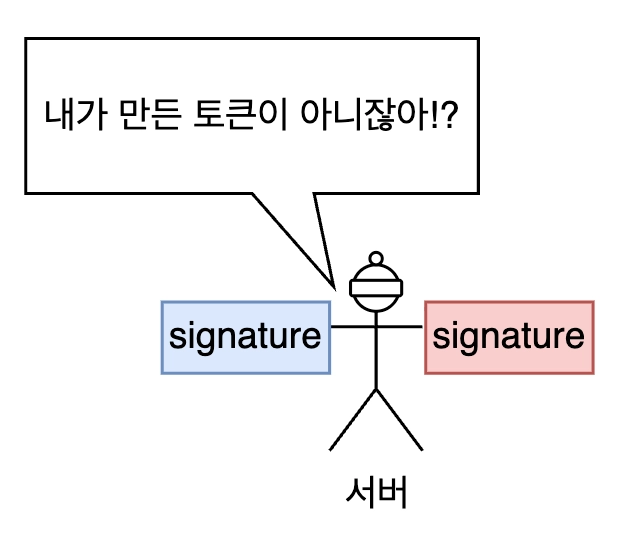
b. 검증
서버는 Header 의 alg 값을 보고 어떤 알고리즘을 사용해서 서명을 만들지 판단합니다. 그렇게 생성한 서명을 토큰에 담겨온 서명과 비교해서 일치하지 않으면 위변조된 토큰으로 판단합니다.

⭐ 06. 인증인가 jwt 실습
정리
흔히 개발자들이 말하는 JWT 는 Header, payload, Signature 세 부분으로 구성됩니다.
JWS 은 JWT 를 서명(Signature)으로 보호한 형태를 의미합니다.
JWE은 JWT 를 암호화(Encryption)로 보호한 형태를 의미합니다.
모든 JWS 는 JWT 이지만 모든 JWT 는 JWS 가 아니다 (O)
JWS 의 서명(Signature)부분을 만들때 Header, payload, secret 를 조합하여 만들어집니다.
서명(signature)을 만들때 사용되는 알고리즘은 Header부분에 선언되어 있습니다.
토큰에서 실제 내용이 담기는 곳은 payload부분입니다.
9. AOP 관점지향 프로그래밍
01. AOP
a. OOP(Object Oriented Programming)
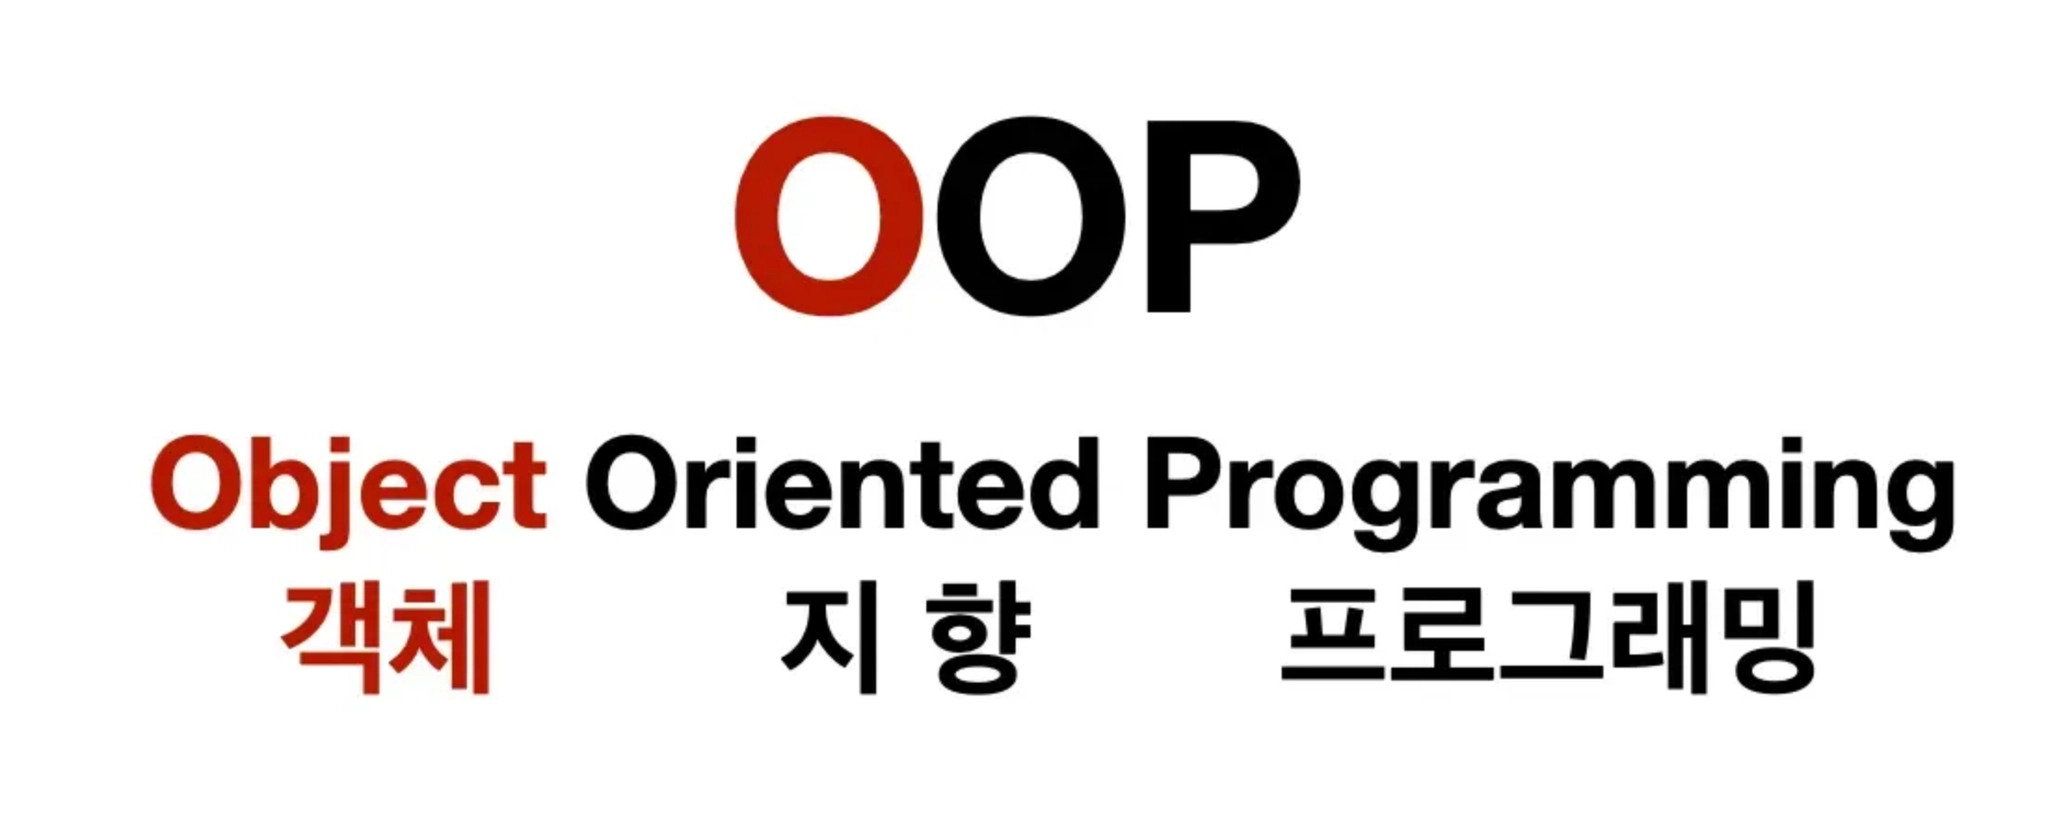
b. AOP(Aspect Oriented Programming)

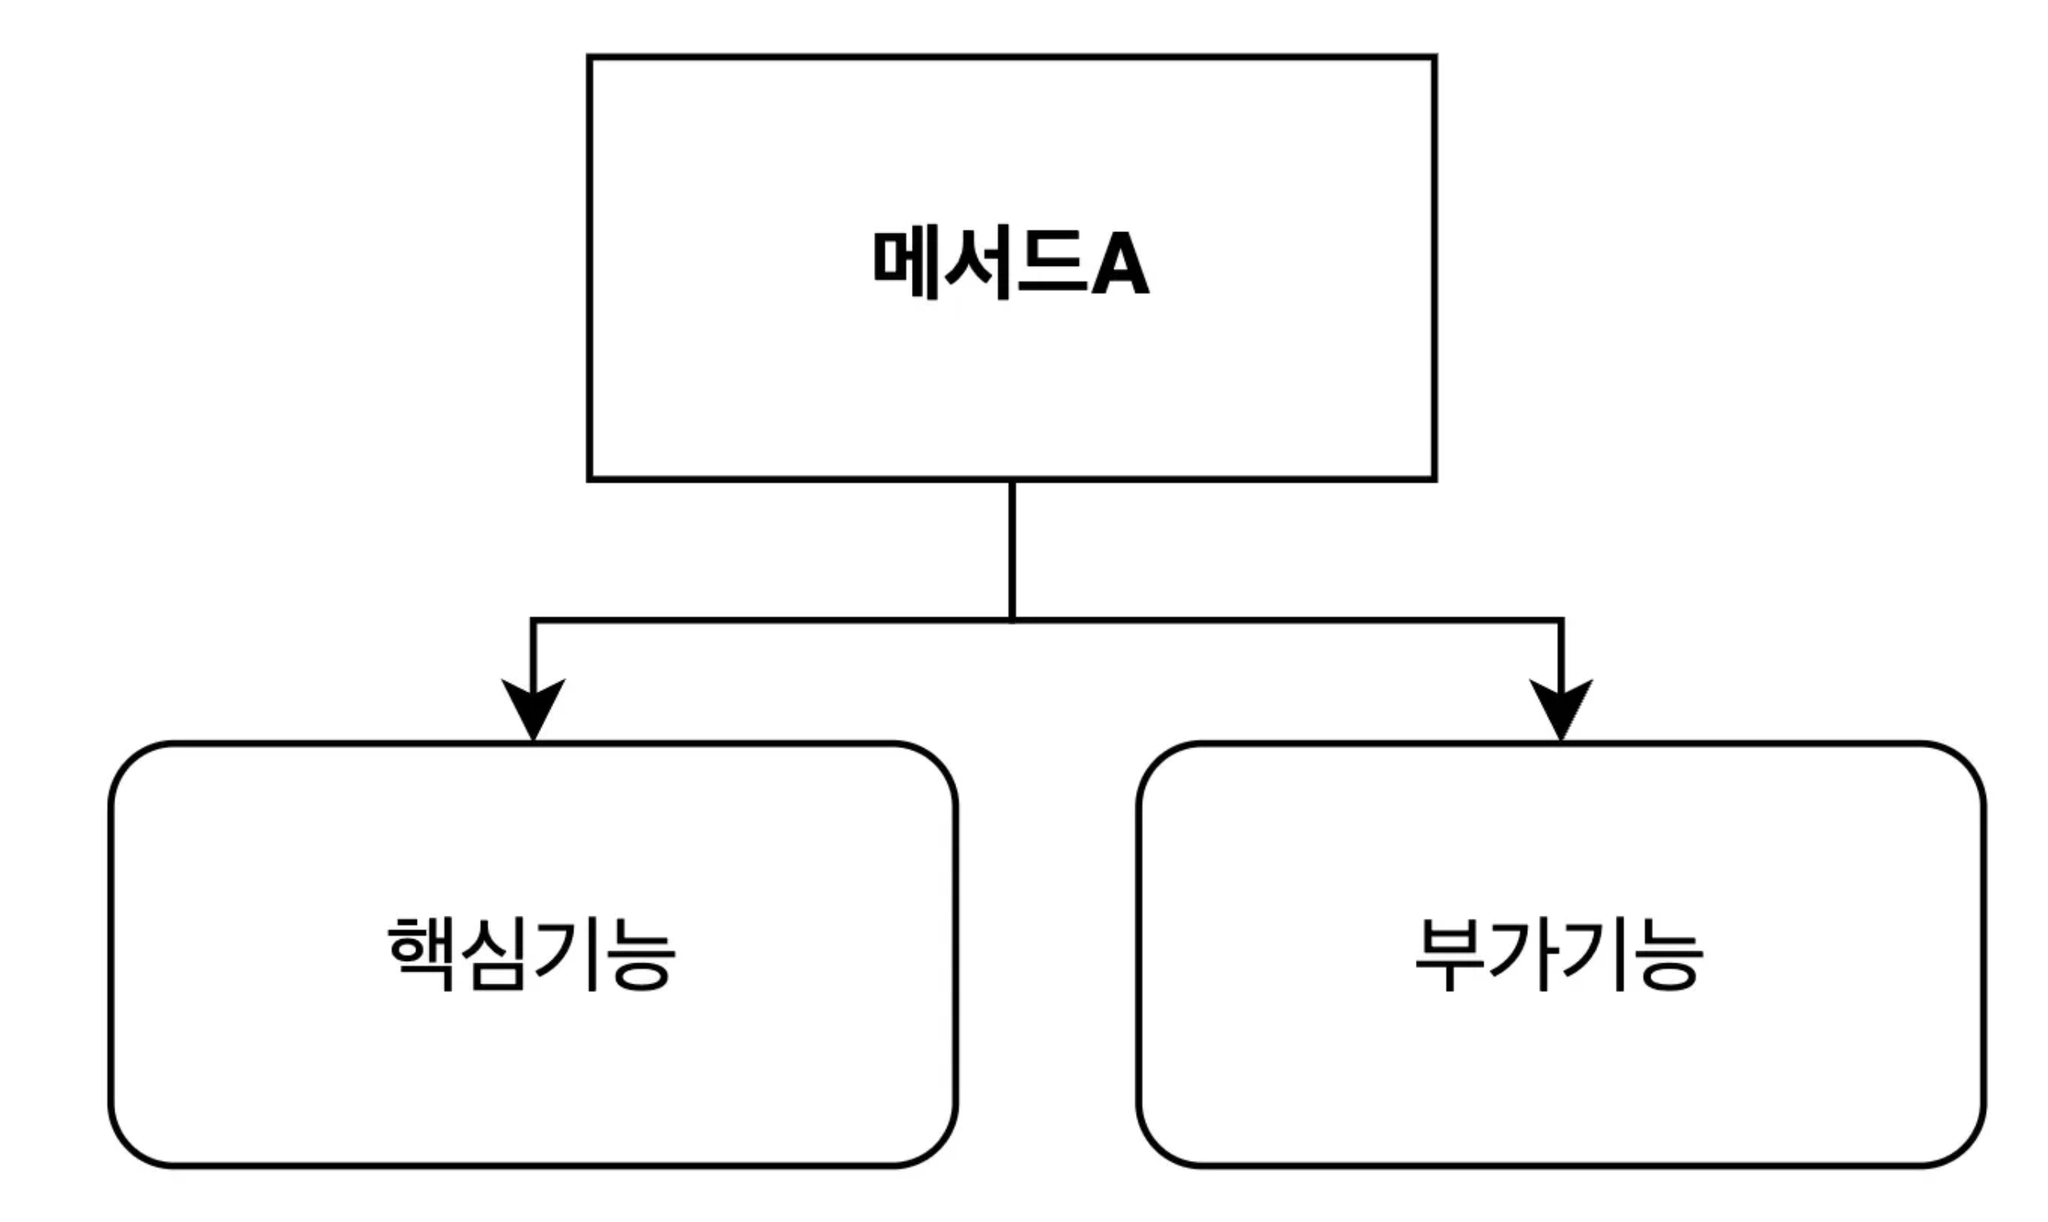
AOP 핵심 키워드 - 횡단 관심사
횡단관심사는 여러곳에서 공통적으로 발생하는 기능(부가기능)을 의미합니다.
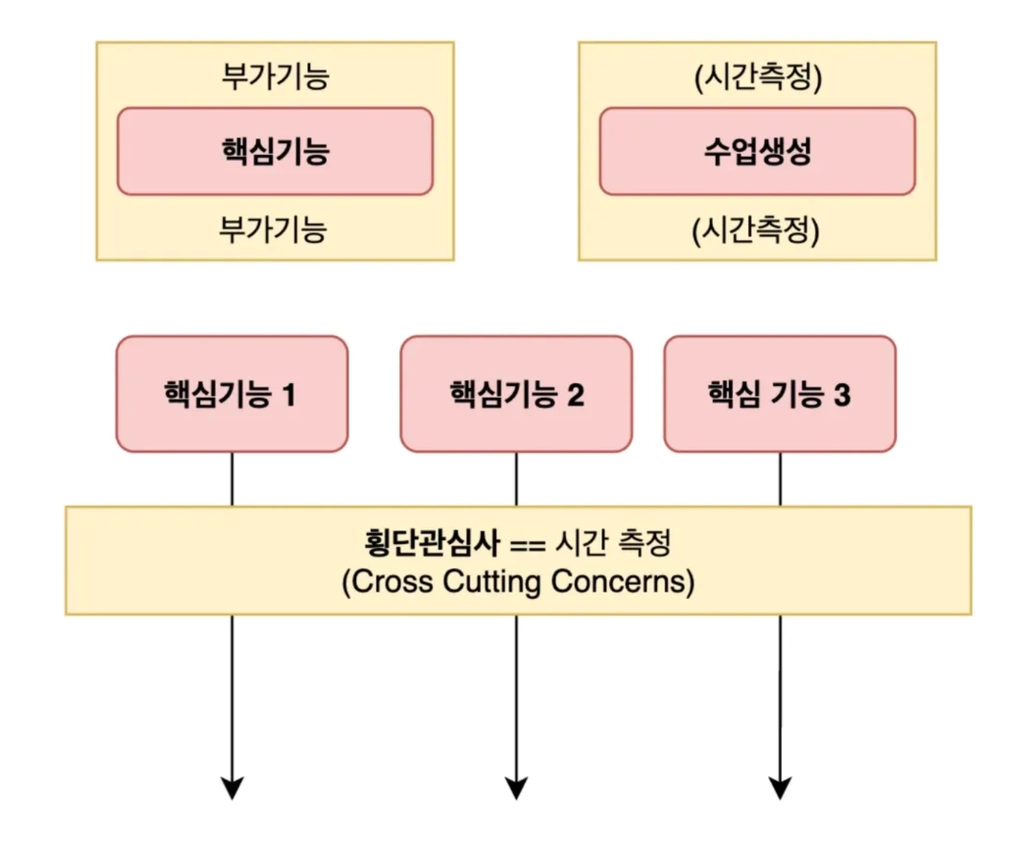
AOP - 관점지향 프로그래밍이란 ?
비즈니스 로직에서 횡단관심사(부가기능) 을 분리해서 관리하는 것 - 관점을 가지고 설계를 하는것!
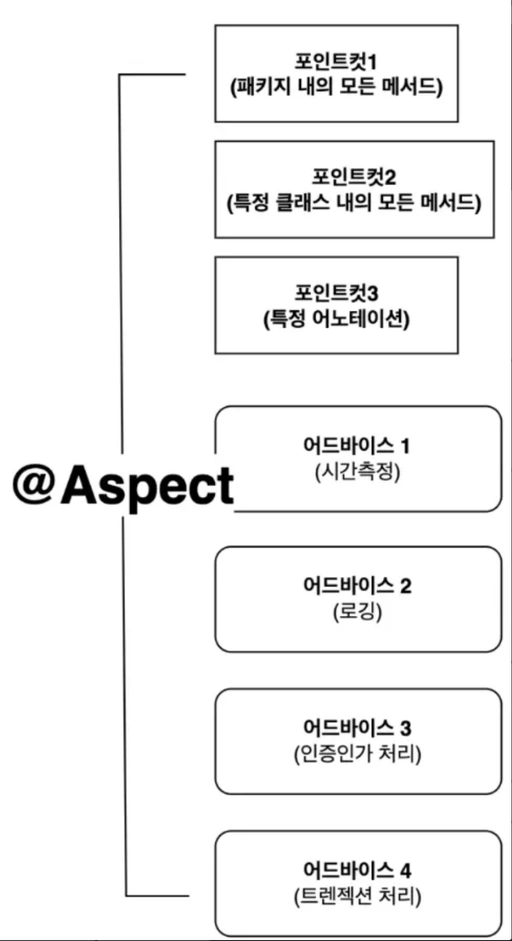
AOP 중요 키워드
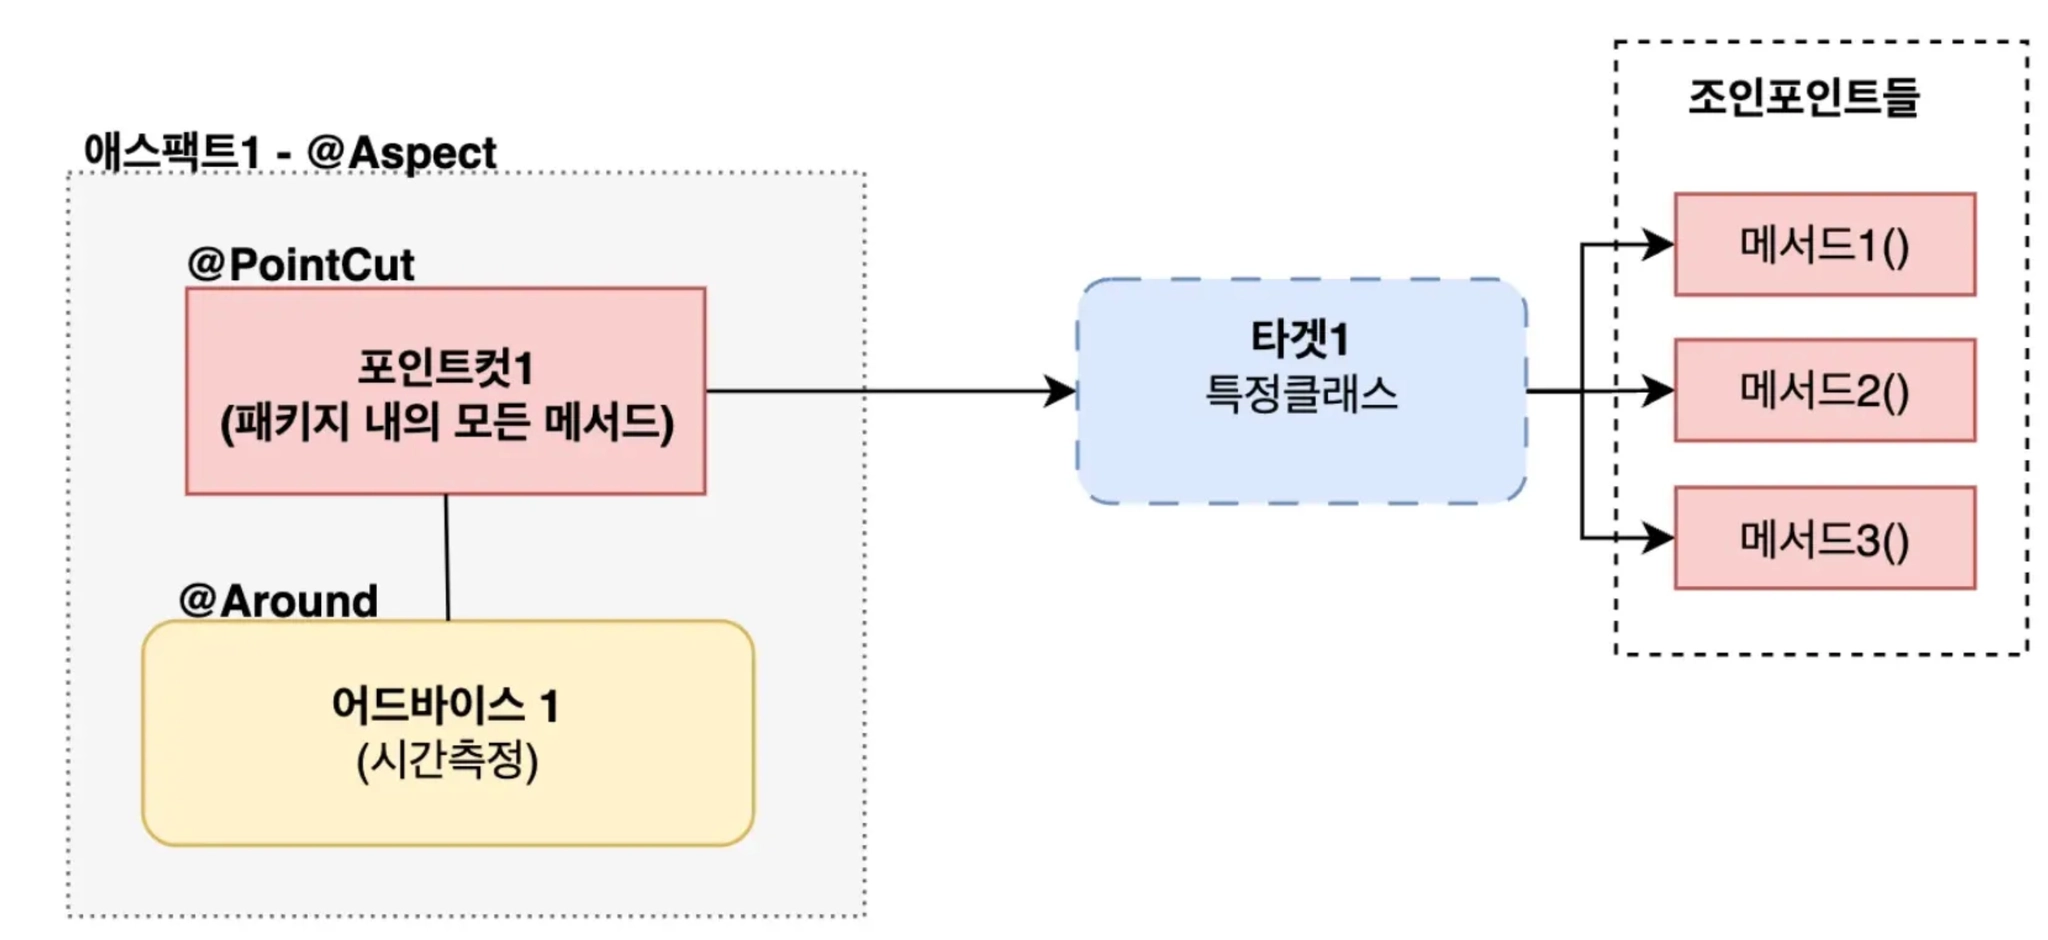
a. ⭐ 어드바이스(Advice)
부가기능
@Around, @Before, @After, @AfterThrowing
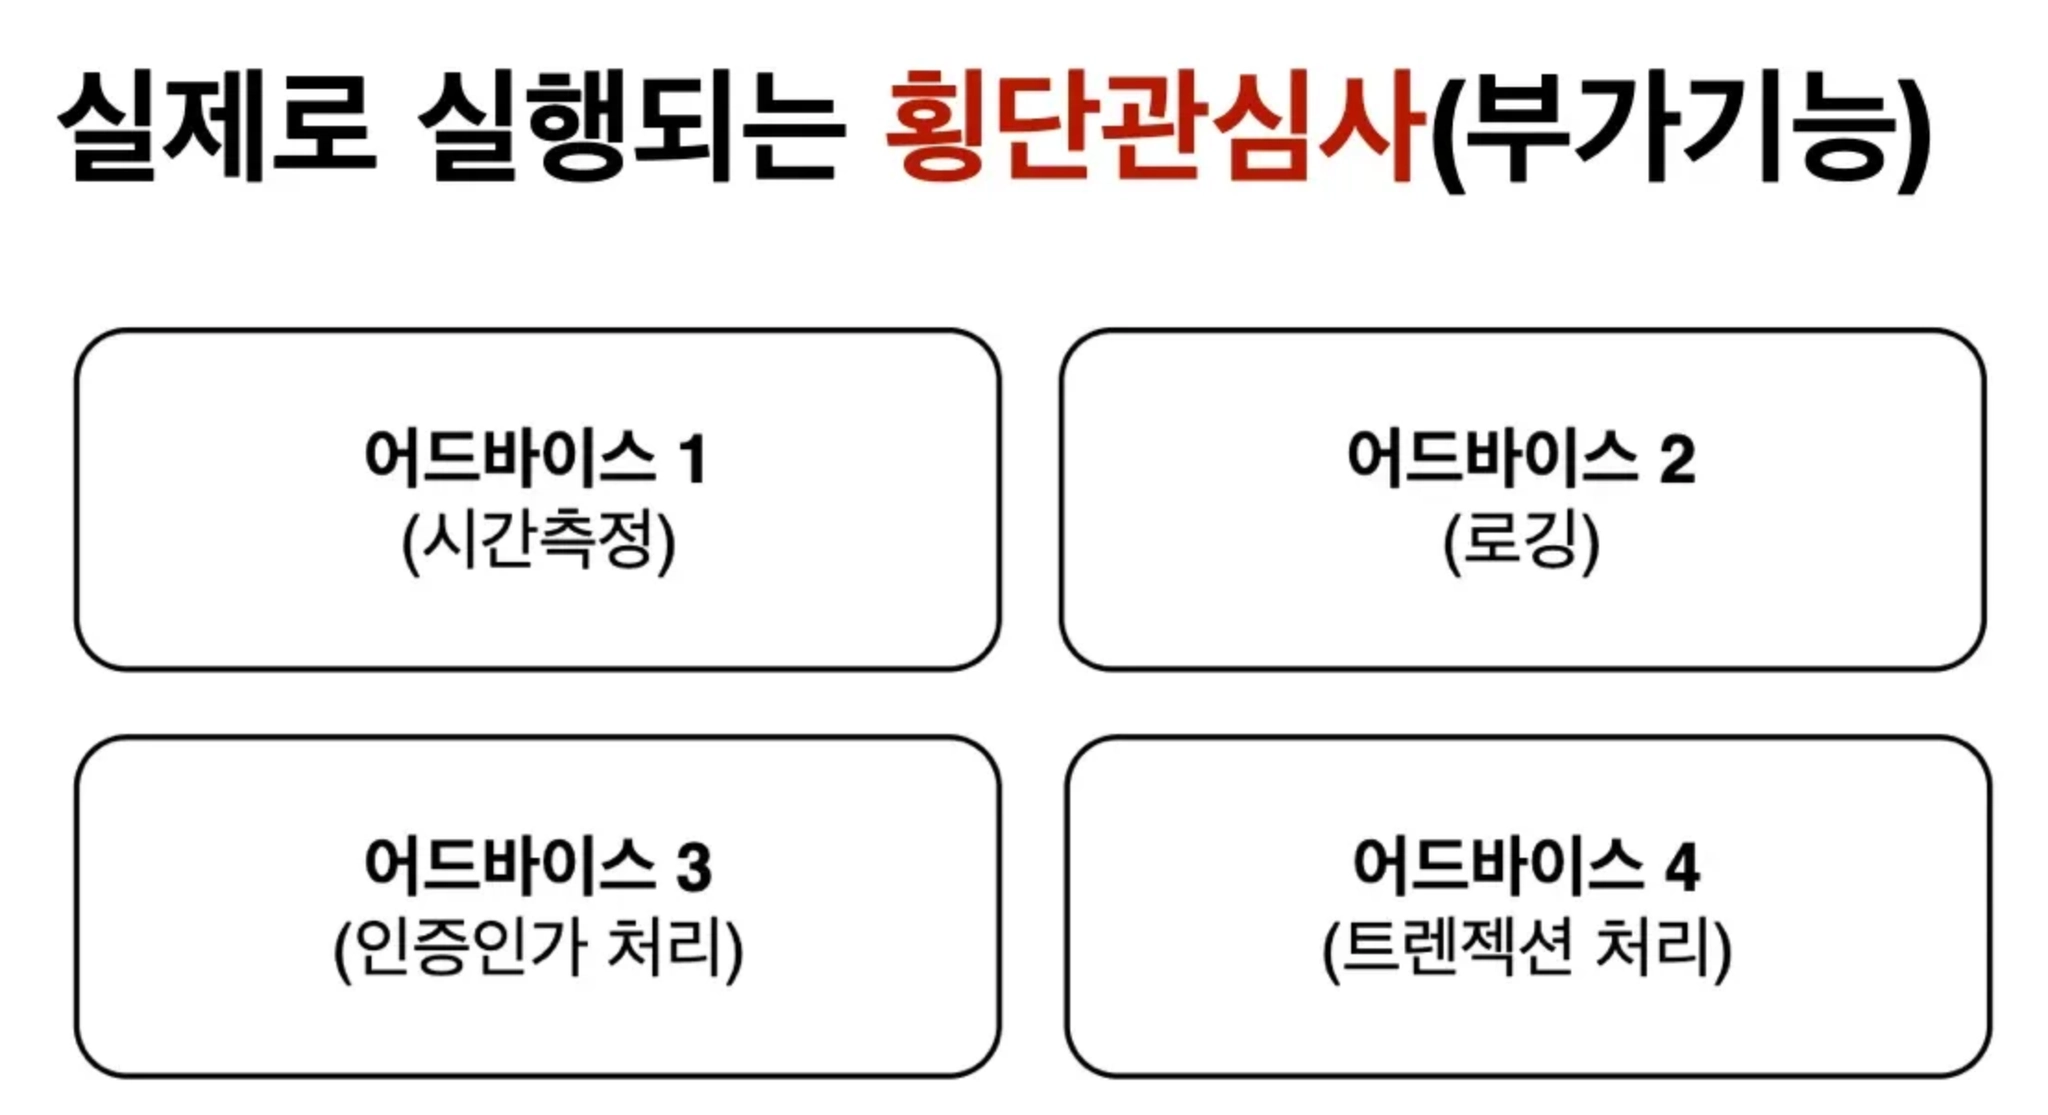
b. ⭐️포인트컷(PointCut)
어드바이스(부가기능 / 횡단관심사) 이 적용될 구체적인 범위를 표현하는 규칙

c. ⭐️대상객체(Target)
포인트컷 조건에 의해 어드바이스가 적용되는 실제 객체(클래스)
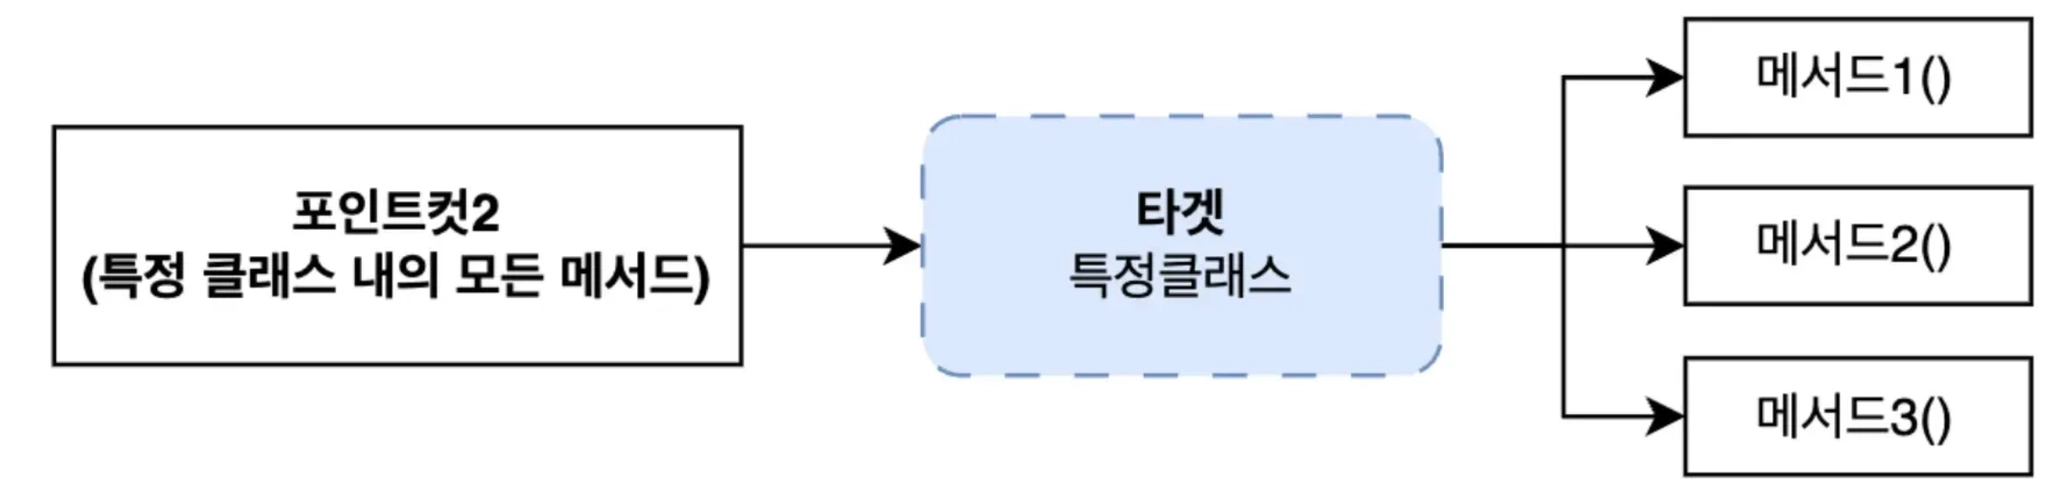
d. ⭐️조인포인트(JoinPoint)
어드바이스가 적용되는 실행지점(메서드)
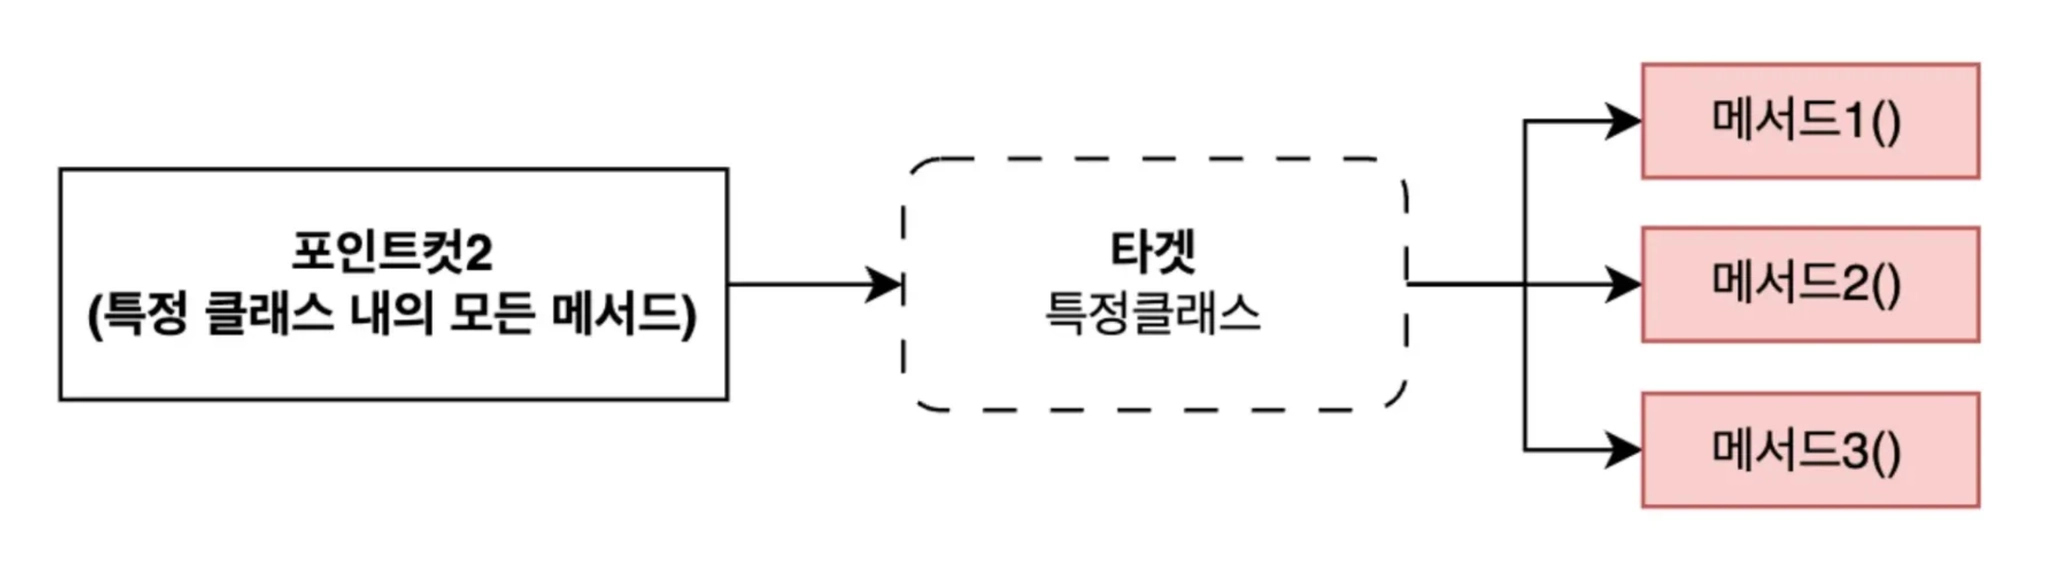
// com.example.service 패키지에 포함되어 있는 CourseService 객체의 모든 메서드
execution(* com.example.service.CourseService..*(..))
e. ⭐️에스팩트(Aspect)
AOP 를 구성하는 하나의 단위(어드바이스 + 포인트컷)
정리

10. 운영환경 배포와 클라우드

a. 다양한 빌드 도구
JVM 진영의 대표적인 빌드 도구들은 다음과 같습니다.
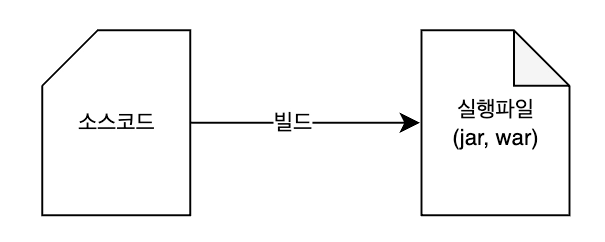
Ant- 직접 빌드 스크립트를 작성 후 실행Maven- XML(pom.xml) 파일 기반Gradle- xml 의 한계 극복 → build.gradle
b. 빌드 파일 종류와 용도
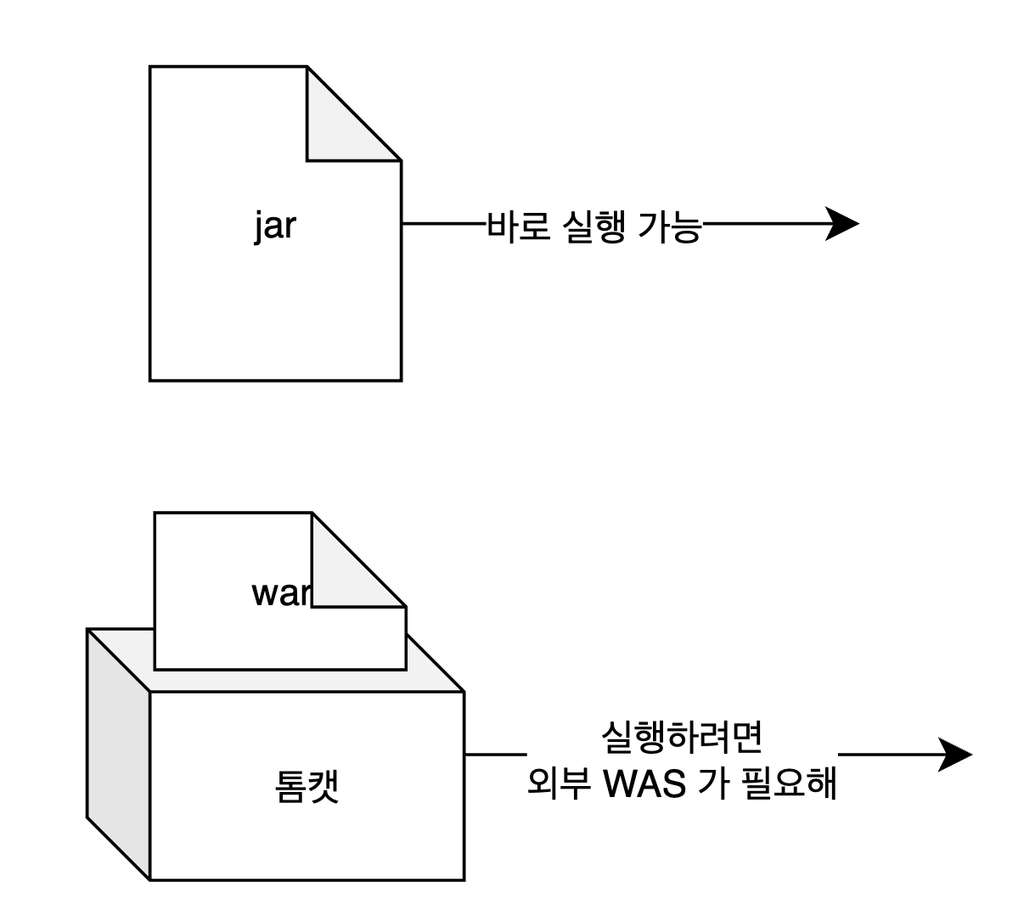
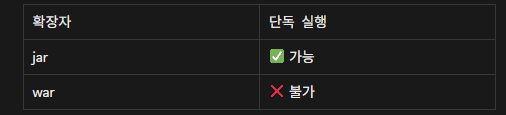
SpringBoot 에서 jar 로 빌드하면 애플리케이션과
WAS(내장 톰캣)이 함께 패키징 되기 때문에 해당 jar 파일만으로 직접 실행할 수 있습니다.
c. 빌드파일 살펴보기 build.gradle
i. 어떤 빌드 규칙을 사용할지 결정
- 이건 자바 프로젝트야 그리고 2. 스프링부트도 쓸꺼야 3.. 의존성은 자동관리 시스템을 쓸꺼야
plugins {
	id 'java'
	id 'org.springframework.boot' version '3.4.5'
	id 'io.spring.dependency-management' version '1.1.7'
}
ii. 결과물의 이름 & 버전 설정
빌드하면 결과물(jar 파일) 이 만들어지는데 그 파일에 붙일 이름표를 결정하는 부분
group = 'com.example'
version = '0.0.1-SNAPSHOT'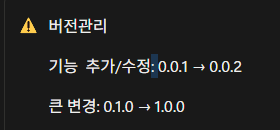
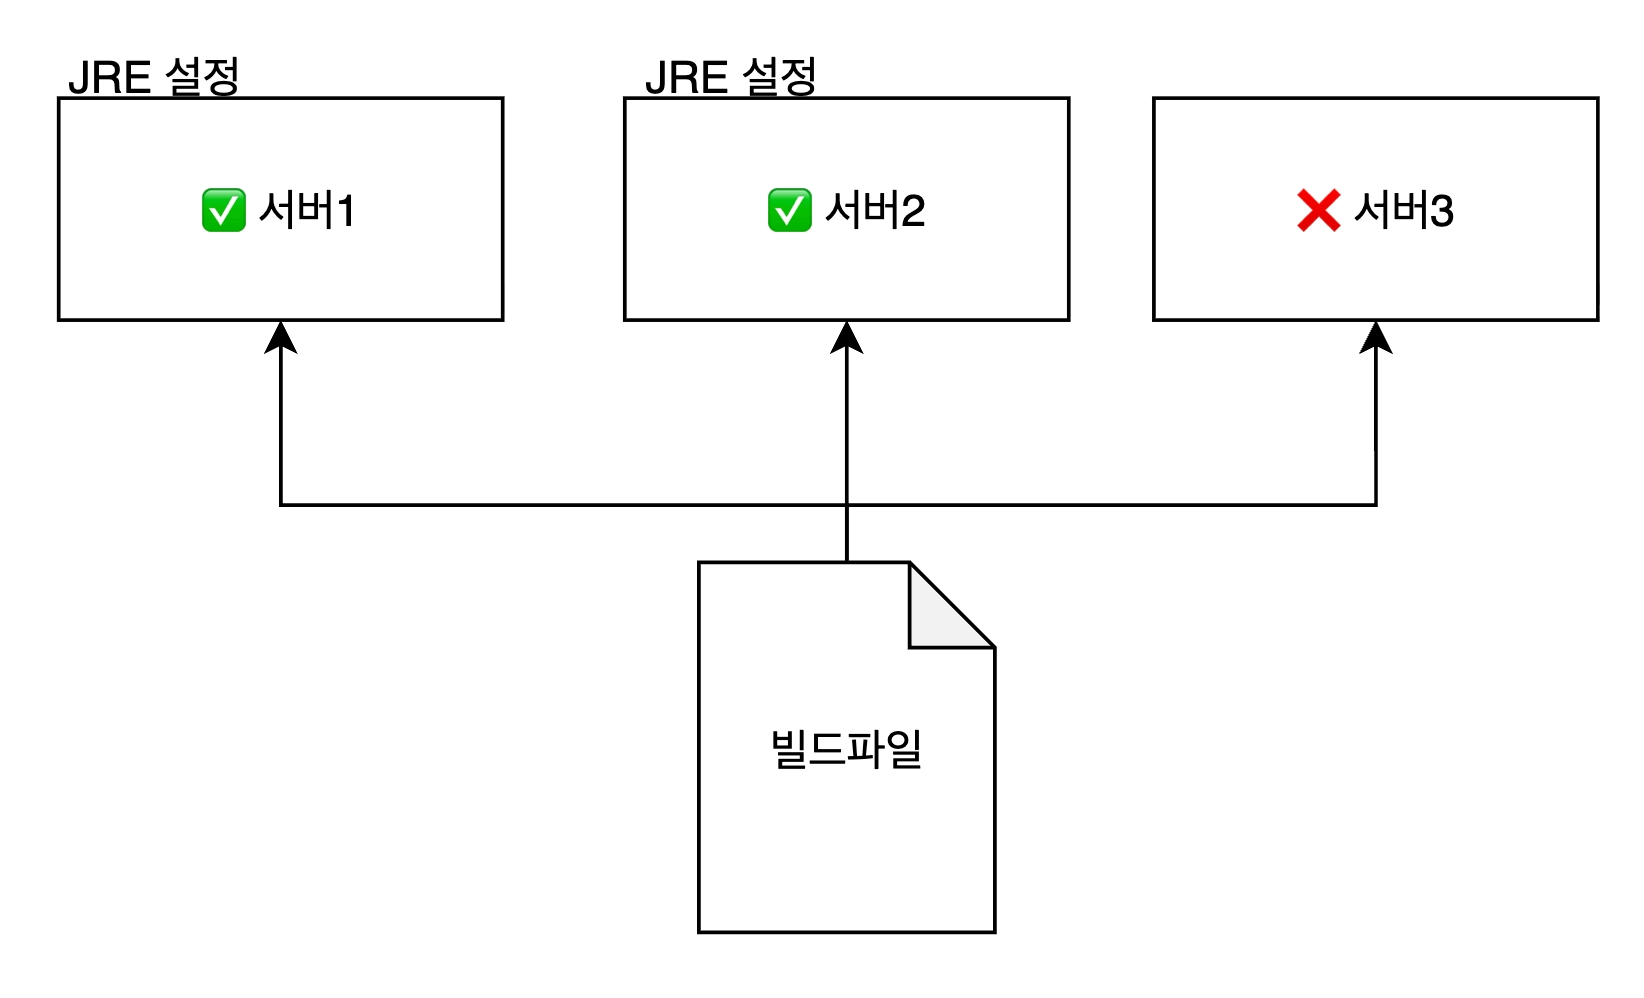
프로파일(profile)
같은 애플리케이션을 환경별로 다르게 설정하기 위한 기능
a. 다양한 환경

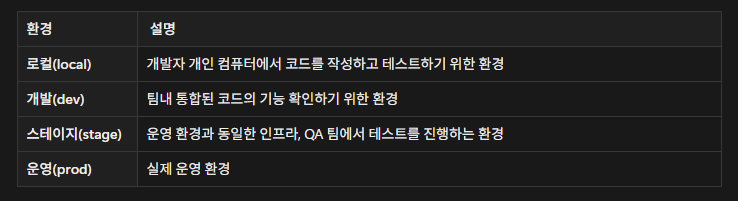
⭐ 프로파일을 활용한 운영환경 배포 방법
a. 클라우드 개념
클라우드란 구름 - 구름이 하늘에 떠 있는 것처럼 인터넷 상에 떠있는 컴퓨터 자원을 의미합니다.
b. 클라우드에 배포 - 운영환경에 배포 해보기
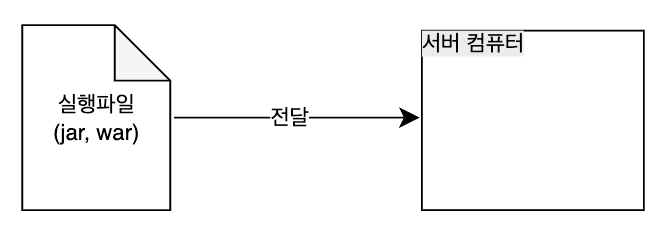
i. 프로젝트 빌드

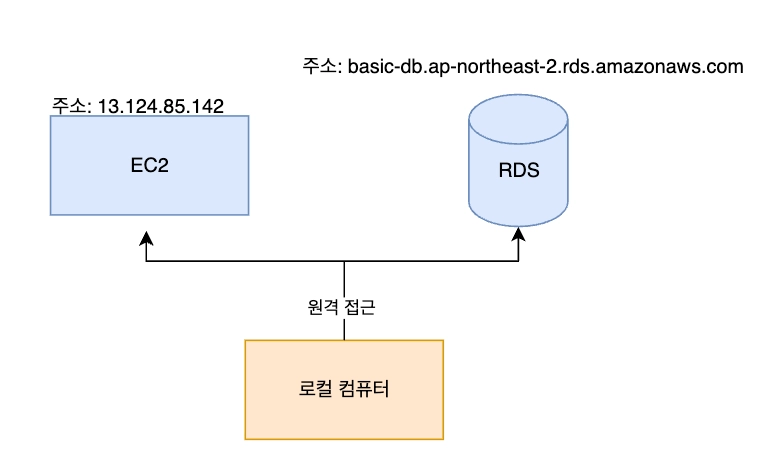
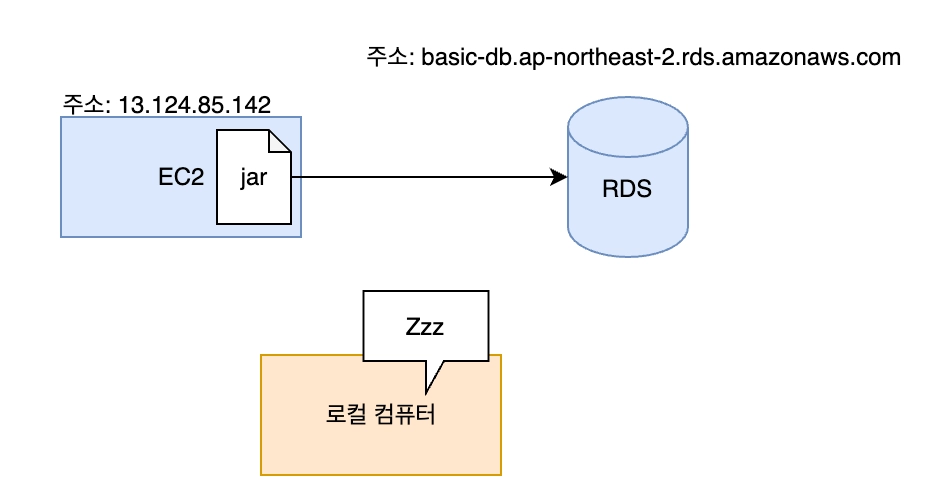
ii. 클라우드에 떠있는 Ec2 로 빌드 파일 원격 전송
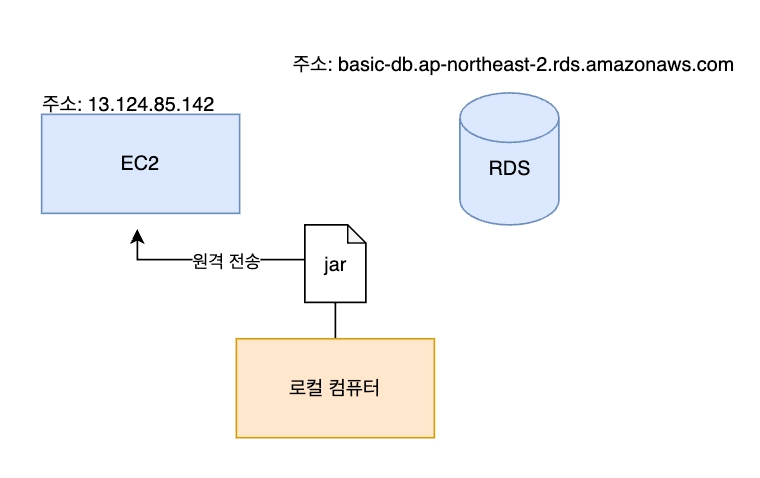
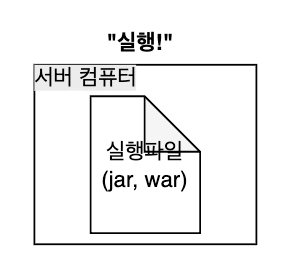
scp -i <보안키.pem> <빌드파일경로> <아이디>@<Ec2주소>:<설치경로scp -i ~/.ssh/id_rsa build/libs/basic-0.0.1-SNAPSHOT.jar gygimdev@34.64.152.58:~/app.jarc. 클라우드에서 서버 실행
⚠️ 수동배포의 번거로움
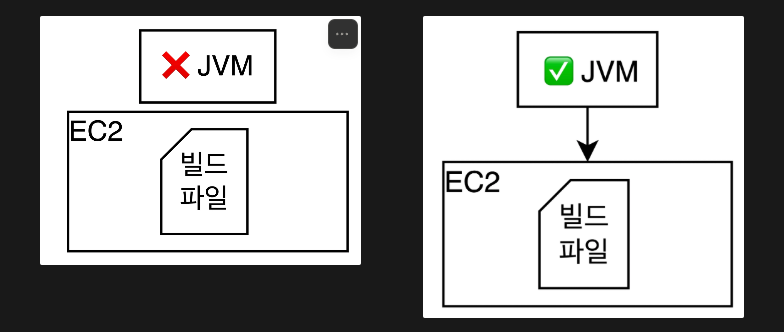
번거로운 환경설정 → JVM 설치과정
이래서 도커가 나옴
정리
Q. 다음 중 스프링 프로젝트를 운영 서버에 배포하는 절차를 올바른 순서로 나열한 것은?
- 빌드 파일을 실행한다.
- 빌드 파일을 원격 서버로 전송한다.
- 프로젝트를 빌드해 실행 가능한 파일을 만든다.
C. 3 -> 2 -> 1
Q. ./gradlew build 명령어를 시작했을때 만들어지는 결과물은 무엇일까요?
A. .class 파일만 생성된다.
B. 실행 가능한 .jar 파일이 생성된다.
C. 소스 코드(.java) 복사된다.
D. 데이터베이스 스키마가 만들어진다.
Q. Ec2 서버에 jar 파일을 성공적으로 옮겼지만 java -jar app.jar 실행시
"command not found" 에러가 발생합니다. 가장 가능성이 높은 원인은?
A. jar 파일이 손상되었다.
B. 서버에 자바 런타임(JRE, JDK) 가 설치되지 않았다.C. 포트가 열려있지 않다.
D. 데이터베이스 연결이 실패했다.
Q. 다음 중 로컬에서 만든 빌드파일을 원격 서버(EC2) 에 전송할때 사용하는 명령어는 ?
A. ssh
B. scpC. git push
D. curl
Q. 스프링 프로젝트에서 profile 을 사용하는 가장 큰 이유는 무엇일까요?
A. 빌드 속도를 빠르게 하기 위해서
B. 코드 양을 줄이기 위해서
C. 개발, 운영 등 환경별로 다른 설정을 쉽게 적용하기 위해서D. 자바 버전을 자동으로 맞추기 위해서
11. 도커(docker) - 컨테이너기술
01. 도커를 왜 배워야할까?
서버마다 환경을 설정해줘야하는 번거로움
02. 도커(docker)
리눅스 커널 기반으로 만들어진 컨테이너 기술입니다.
앱과 실행 환경을 통째로 묶어서 어디서든 똑같이 실행할 수 있게 도와주는 기술입니다.
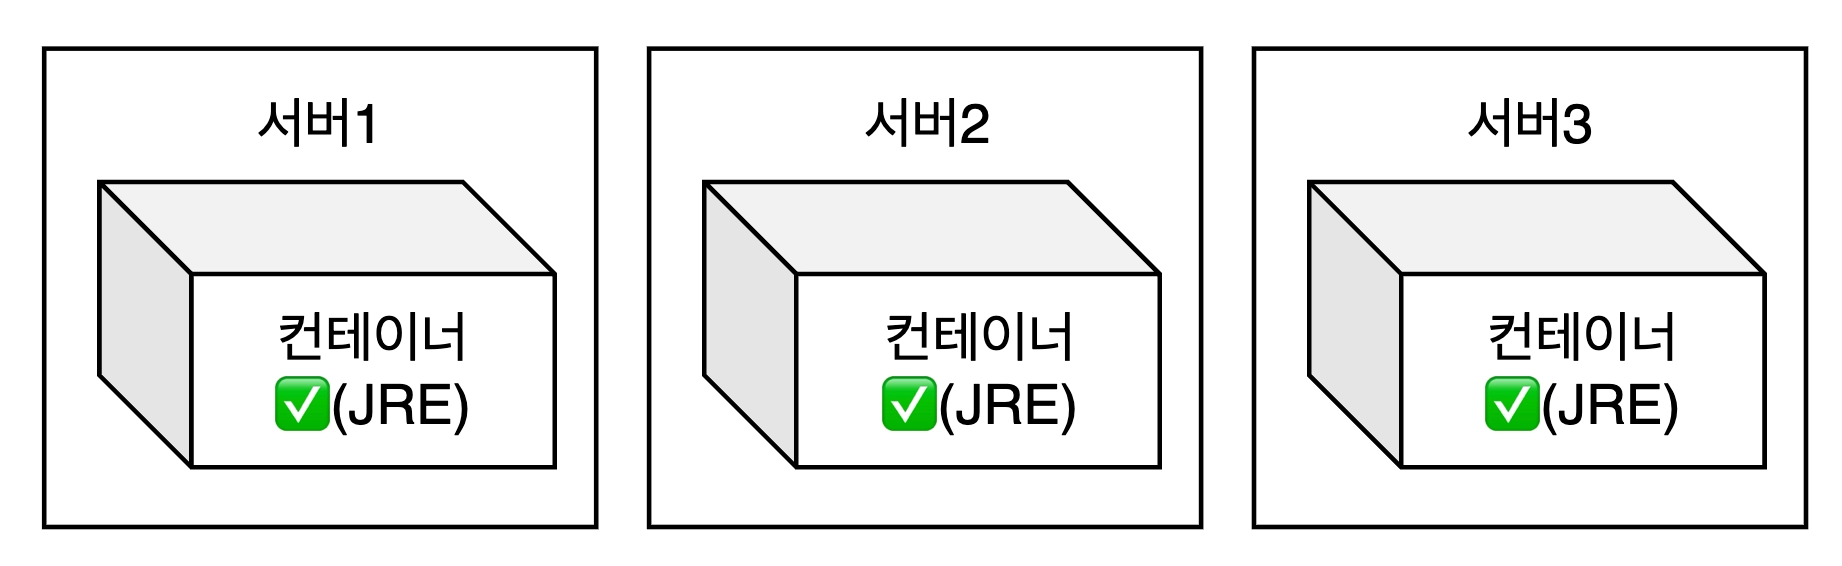
a. 컨테이너의 3가지 철학
- 재현성 - 어디서든 동일한 실행 결과 보장
- 격리 - 컨테이너마다 독립된 환경에서 실행
- 불변성 - 이미지는 수정없이 항상 새 버전으로 교체
b. 다양한 컨테이너 기술들
- docker, podman, containerD, etc
03. 가상머신(VM: virtual machine)
컴퓨터 안에 새로운 컴퓨터를 만드는 기술
- vm 이 만들어질때 컴퓨터의 자원을 미리 나눠가집니다.(RAM, CPU)
- 컴퓨터 자원: RAM 16GB, CPU 8 코어
- HOST: RAM 8GB, 4 코어
- VM 1: RAM 4GB, 2 코어(나눠줌)
- VM 2: RAM 4GB, 2 코어(나눠줌)
- 다른 곳에서 자원을 가져가지 못합니다.
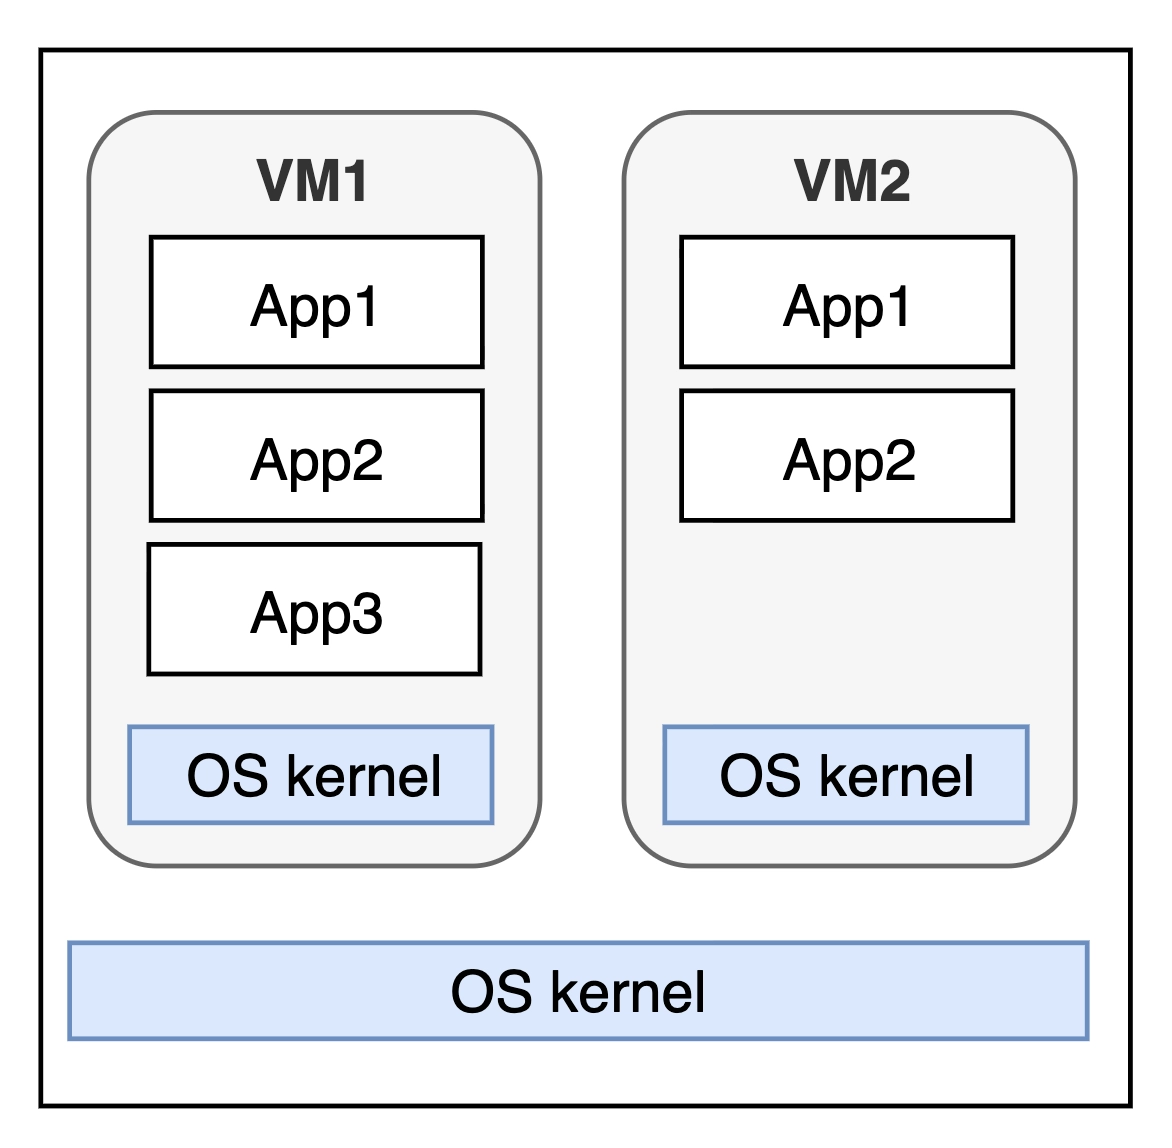
OS Kernel
운영체제의 핵심부분입니다. 하드웨어와 소프트웨어 사이에서 통역하고 관리해주는 총 관리자라고 생각하시면 충분합니다.
- window - NT Kernel (ms 독자 개발)
- Mac -XNU (unix 계열)
- Linux -Linux 커널 (도커가 그대로 도는 환경(네이티브 환경), unix 계열)
출처: 내일배움 스파르타 클럽