"Optimizing Performance: 필요할 때만 랜더한다!"
🌟 Reconciliation: 랜더 전후의 일치 여부를 판단하는 규칙 🌟
- 서로 다른 타입의 두 엘리먼트는 서로 다른 트리를 만들어낸다.
- 개발자가 key prop을 통해, 여러 랜더링 사이에서 어떤 자신 엘리먼트가 변경되지 않아야 할지 표시해 줄 수 있다.
1. 서로 다른 타입의 두 엘리먼트는 서로 다른 트리를 만들어낸다.
// App.js
class Foo extends React.Component {
  componentDidMount() {
    console.log('Foo componentDidMount');
  }
  componentWillUnmount() {
    console.log('Foo componentWillUnmount');
  }
  render() {
    return <p>Foo</p>
  }
}

class App extends React.Component {
  state = {
    count: 0,
  };

  componentDidMount() {
    setInterval(()=>{
      this.setState({count: this.state.count+1});
    }, 1000);
  }

  render(){
    if (this.state.count % 2 === 0)
      return (
        <div>
          <Foo />
        </div>
      );

    return(
      <span>
        <Foo />
      </span>
    );
  }
}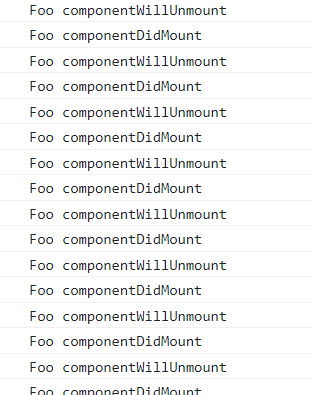
(componentDidMount는 컴포넌트가 트리에 삽입된 직후에, componentWillUnmount는 컴포넌트가 제거되기 직전에 호출되는 생명주기 메소드)
1) setInterval을 이용해 state의 값을 1초에 1씩 증가시킨 후, render 함수에서 return되는 값을 짝홀수마다 다르게 설정하면,
2) (Reconciliation 규칙에 의해) react는 div와 span을 다른 타입의 엘리먼트로 판단하여 같은 Foo를 return하더라도 다른 트리를 생성하게 된다.
3) 따라서 즉 1초마다 componentDidMount와 componentWillUnmount가 반복하여 호출 된다.
그렇다면, 타입은 같지만 속성의 값이 다른 경우에는?
render(){
    if (this.state.count % 2 === 0){
      return <div className="before" title="stuff" />;
    }

    return <div className="after" title="stuff" />;
  }
바뀐 className의 값만 변경되어 표시된다!
같은 타입의 엘리먼트가 아닌, 같은 타입의 컴포넌트인 경우에는?
render() {
    if (this.state.count % 2 === 0){
      return <Foo name="Mark" />
    }

    return <Foo name="Hanna" />
  }
render 함수를 위와 같이 변경하되, 컴포넌트의 바뀐 props 검사를 위해서는 (component가 mount되지 않으므로) 해당 컴포넌트 내에 getDerivedStateFromProps 함수를 포함시켜야 한다.
class Foo extends React.Component {
  static getDerivedStateFromProps(nextProps, prevProps) {
    console.log("Foo getDerivedStateFromProps", nextProps, prevProps);
    return {};
  }

  render() {
    console.log("Foo render");
    return <p>Foo</p>
  }
}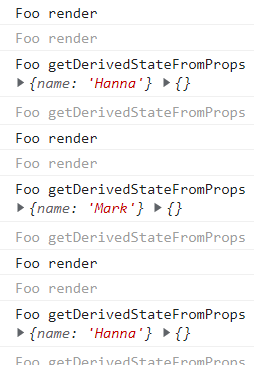
이 때는 mount가 발생하지 않고 단순 update만 발생한다는 것 주의!
👩🏻 정리하자면
1. 타입이 변경되는 경우 -> 트리가 새로 생성되므로 mount 및 unmount가 발생
2. 같은 타입의 엘리먼트의 속성 값이 다른 경우 -> 변경 된 속성만 바뀌어 표시됨
3. 같은 타입의 컴포넌트의 속성 값이 다른 경우 -> mount는 발생하지 않으므로 getDerivedStateFromProps 사용해 확인
👉🏻 따라서 경우에 따라 적절한 생명주기 메소드를 활용하는 연습이 필요할 것!
2. 개발자가 key prop을 통해, 여러 랜더링 사이에서 어떤 자신 엘리먼트가 변경되지 않아야 할지 표시해 줄 수 있다.
class Foo extends React.Component {
  componentDidMount() {
    console.log('Foo componentDidMount');
  }
  componentWillUnmount() {
    console.log('Foo componentWillUnmount');
  }

  static getDerivedStateFromProps(nextProps, prevProps) {
    console.log("Foo getDerivedStateFromProps", nextProps, prevProps);
    return {};
  }

  render() {
    console.log("Foo render", this.props.children);
    return <p>Foo</p>
  }
}

class App extends React.Component {
  state = {
    count: 0,
  };

  componentDidMount() {
    setInterval(()=>{
      this.setState({count: this.state.count+1});
    }, 1000);
  }

  render() {
    if (this.state.count % 2 === 0){
      return (
        <ul>
          <Foo>first</Foo>
          <Foo>second</Foo>
        </ul>
      );
    }

    return (
      <ul>
        <Foo>first</Foo>
        <Foo>second</Foo>
        <Foo>third</Foo>
      </ul>
    );
  }

}
위와 같이 작성할 경우, getDerivedFromProps와 render를 두 번 반복 -> componentWillUnmount -> getDerivedFromProps와 render를 세 번 반복 -> componentDidMount -> componentWillUnmount -> componentDidMount -> ... 가 반복된다.
즉, 바뀌지 않는 first와 second는 getDerivedFromProps로 출력되고, 새로 추가되는 third라는 props만 mount와 unmount를 거치는 것이다.
  render() {
    if (this.state.count % 2 === 0){
      return (
        <ul>
          <Foo>second</Foo>
          <Foo>third</Foo>
        </ul>
      );
    }

    return (
      <ul>
        <Foo>first</Foo>
        <Foo>second</Foo>
        <Foo>third</Foo>
      </ul>
    );
  }
그런데 위와 같이 render 함수를 변경하면, 인간의 입장에서 first라는 prop만 새로 추가되어 변경되는 것으로 생각하지만, 실제로는 second가 first로, third가 second로 변경된 후 third가 새로 추가되는 과정을 거치게 된다.
이 때 사용할 수 있는 것이 "key props"!
  render() {
    if (this.state.count % 2 === 0){
      return (
        <ul>
          <Foo key="2">second</Foo>
          <Foo key="3">third</Foo>
        </ul>
      );
    }

    return (
      <ul>
        <Foo key="1">first</Foo>
        <Foo key="2">second</Foo>
        <Foo key="3">third</Foo>
      </ul>
    );
  }
각 컴포넌트에 key라는 속성을 부여하고 특정한 값을 주면, 위에서 인간이 생각한 대로 second와 third를 그대로 가져가고 first만 새로 mount 및 unmount 되어 불필요한 과정을 거칠 수 있다.
이 때 key props는 식별자의 성격을 띈 고유한 값으로 부여해야 위와 같은 효과를 끌어낼 수 있다.
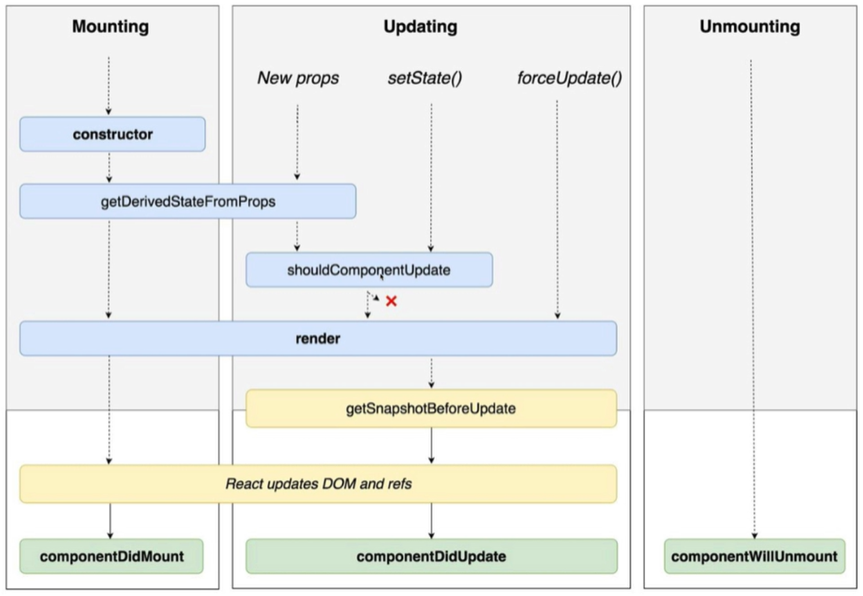
위 사진은 지난 LifeCycle 공부 포스팅에서 첨부했던 것인데, key props를 사용해 (Updating에서) shouldComponentUpdate에서 render로의 진행을 막을 수도 있다.
class Person extends React.Component {
  render() {
    console.log("Person render");
    const {name, age} = this.props;
    return <div>{name} / {age}</div>
  }
}

class App extends React.Component {
  state = {
    text: "",
    persons: [
      {id: 1, name: "Mark", age: 39},
      {id: 2, name: "Hanna", age: 28},

    ]
  };

  render() {
    const {text, persons} = this.state;

    return (
      <div>
        <input type="text" value={text} onChange={this._change} />
        <ul>
          {persons.map(person => {
          return <Person {...person} key={person.id} />})}
        </ul>
      </div>
    )
  }

  _change = e => {
    this.setState({
      ...this.state,
      text: e.target.value,
    })
  }
}
코드를 위와 같이 작성하면, input에 새로운 글자가 입력될 때마다 불필요한 render가 발생한다. 이를 막기 위한 방법에는 여러가지가 있는데,
먼저 Person 컴포넌트 내에 shouldComponentUpdate를 구현하는 것
shouldComponentUpdate(previousProps) {
    for (const key in this.props) {
      if (previousProps[key] !== this.props[key]){
        return true;
      }
    }
    return false;
}
그럼 props에 해당하는 부분이 변경되지 않았기 때문에 불필요한 render를 생략할 수 있다.
class Person extends React.PureComponent {
  render() {
    console.log("Person render");
    const {name, age} = this.props;
    return <div>{name} / {age}</div>
  }
}
이때, 위와 같이 React.Component 대신 React.PureComponent를 상속받게 되면 상단에 작성된 shouldComponentUpdate가 이미 작성된 채로 코드를 생성할 수 있다.
shouldComponentUpdate나 PureComponent를 사용할 때 주의할 점은, 요소 내에 onClick 함수를 직접 작성하게 될 경우(onClick={()=>()}) 클릭할 때마다 매번 render가 발생한다는 것이다. 따라서 함수를 따로 작성한 후 onClick={this.toPersonClick}과 같은 형태로 이벤트 핸들러를 줘야 한다.
그렇다면, class가 아닌 function을 사용할 때 PureComponent는 어떻게 사용할 수 있을까?
function Person({name, age}) {
  console.log("Person render");
  return (
    <div>
      {name} / {age}
    </div>
  );
}
이런 경우에는 shouldComponentUpdate나 PureComponent를 사용할 수 없다.
이 때 사용할 수 있는 것은 React.memo() 메소드이다.
const Person = React.memo(({name, age}) => {
  console.log("Person render");
  return (
    <div>
      {name} / {age}
    </div>
  );
});
위와 같이 React.memo에 인자로 화살표 함수를 작성한 뒤 const 변수에 할당하면 PureComponent와 같은 효과를 가져올 수 있다.
그렇다면 이벤트 핸들러로 함수를 작성할 때에는?
const toPersonClick = React.useCallback(() => {}, []);이렇게 useCallback() 메소드를 사용해 함수를 const 변수에 할당한 뒤 onClick={toPersonClick}과 같이 핸들러를 등록하면 된다. 그럼 함수가 inline으로 매번 생성되지 않고, 즉 메모리에 매번 새로 할당되지 않고 동일 참조 값을 사용하게 된다는 것이다.
👩🏻 따라서 불필요한 render를 막기 위해 props 비교에는 class에는
PureComponent를, function에는React.memo를, 이벤트 핸들러(함수) 생성에는React.useCallback을 적절히 사용해 최적화를 실천할 수 있다!
ps. 깃허브에서 커밋 내역을 통해 각 과정을 확인할 수 있습니다:)