1. 영상 데이터 속성과 픽셀 값 참조
(1) 영상 데이터의 속성
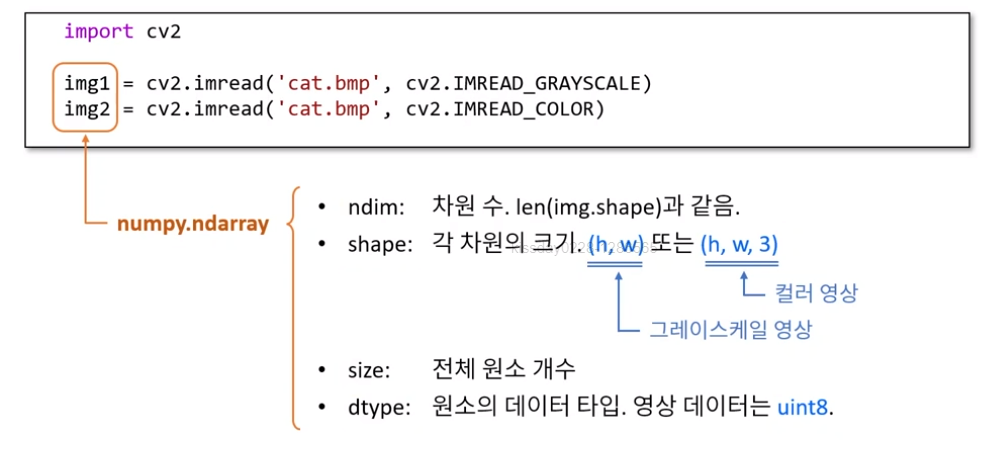
- OpenCV는 영상 데이터를 numpy.ndarray로 표현
- numpy.ndarray
- ndim : 차원 수. len과 같음(컬러 3, 흑백 1)
- shape : 각 차원의 크기. 그레이스케일 영상 (h,w) 또는 컬러 영상(h, w, 3)
- size : 전체 원소 개수(픽셀의 개수)
- dtype : 원소의 데이터 타입, 영상 데이터는 uint8
-
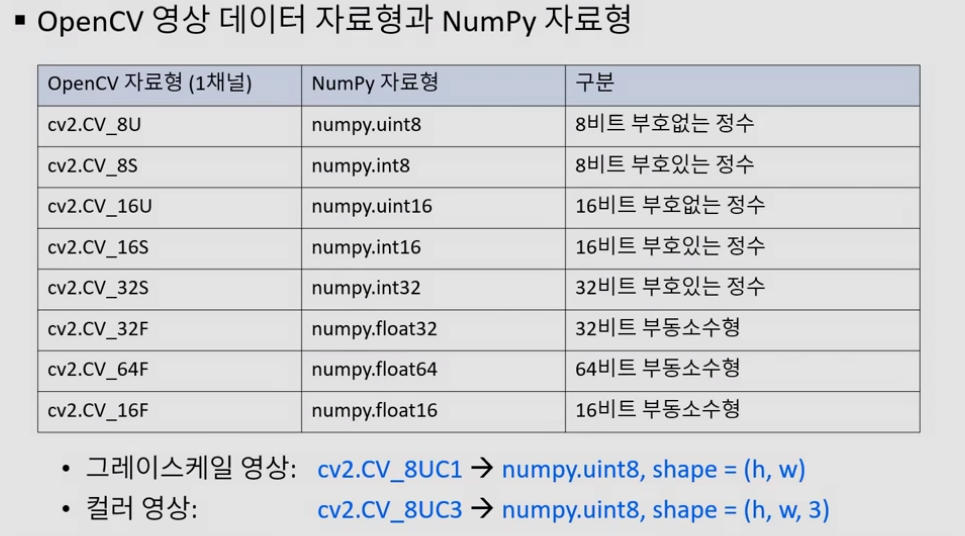
OpenCV 영상 데이터 자료형과 Numpy 자료형
-
영상의 속성 참조 예제
import cv2
import sys

img1 = cv2.imread('cat.bmp', cv2.IMREAD_GRAYSCALE)
img2 = cv2.imread('cat.bmp', cv2.IMREAD_COLOR)

if img1 is None or img2 is None:
    print('image load failed')
    sys.exit()

# 영상의 속성 참조
print('type(img1) : ',type(img1))
print('img1.shape : ', img1.shape)
print('img2.shape : ', img2.shape)
print('img2.dtype : ', img2.dtype)

# 영상의 크기 참조
h, w = img2.shape[:2]
print('img2 size : {} * {}'.format(w, h))

if len(img1.shape) == 2:
    print('img1 is a grayscale image')
elif len(img1.shape) == 3:
    print('img1 is a truecolor image')

cv2.imshow('img1', img1)
cv2.imshow('img2', img2)
cv2.waitKey()

>>> type(img1) :  <class 'numpy.ndarray'>
img1.shape :  (480, 640)
img2.shape :  (480, 640, 3)
img2.dtype :  uint8
img2 size : 640 * 480
img1 is a grayscale image
(2) 영상 데이터의 픽셀 값 참조
- 영상의 픽셀 값 참조 예제
import cv2
import sys

img1 = cv2.imread('cat.bmp', cv2.IMREAD_GRAYSCALE)
img2 = cv2.imread('cat.bmp', cv2.IMREAD_COLOR)

if img1 is None or img2 is None:
    print('image load failed')
    sys.exit()

# 영상의 속성 참조
print('type(img1) : ',type(img1))
print('img1.shape : ', img1.shape)
print('img2.shape : ', img2.shape)
print('img2.dtype : ', img2.dtype)

# 영상의 크기 참조
h, w = img2.shape[:2]
print('img2 size : {} * {}'.format(w, h))

if len(img1.shape) == 2:
    print('img1 is a grayscale image')
elif len(img1.shape) == 3:
    print('img1 is a truecolor image')

# 영상의 픽셀 값 참조
## 가급적이면 for문으로 전체 픽셀 값 참조는 하지 않는 것이 좋은 방법
## 상당히 느리게 동장하기 때문
for y in range(h):
    for x in range(w):
        img1[y, x] = 255 # 흰색 이미지
        img2[y, x] = (0,0,255) # BGR 순서로 빨간색 이미지

# 이 방법으로 전체 픽셀 값 참조
img1[:,:] = 255
img2[:,:] = (0,0,255)

cv2.imshow('img1', img1)
cv2.imshow('img2', img2)
cv2.waitKey()
cv2.destroyAllWindows()
2. 영상의 생성과 복사
(1) 영상의 생성
-
새 영상 생성하기
-
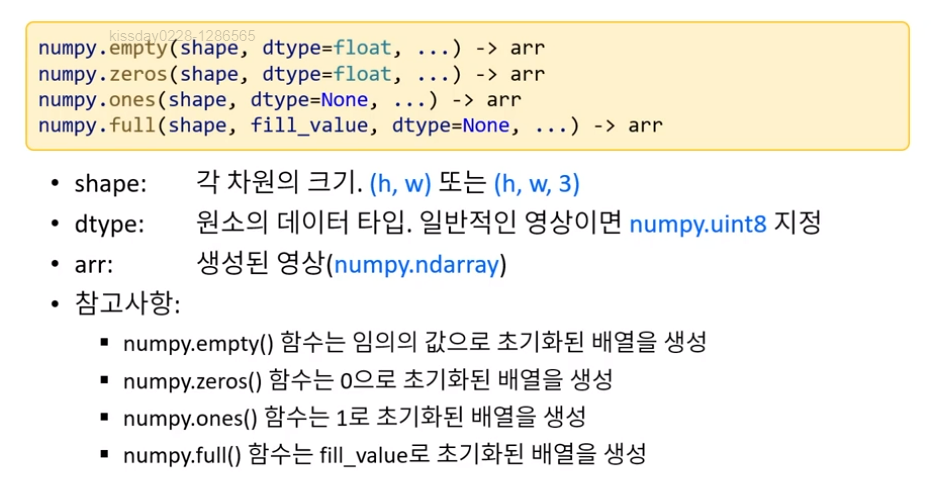
numpy.empty()로 만든 영상 데이터는 쓰레기값이 들어가 있을 수 있으므로 초기화 후 사용
-
영상의 생성 예제 코드
import numpy as np
import cv2

# 새 영상 생성하기
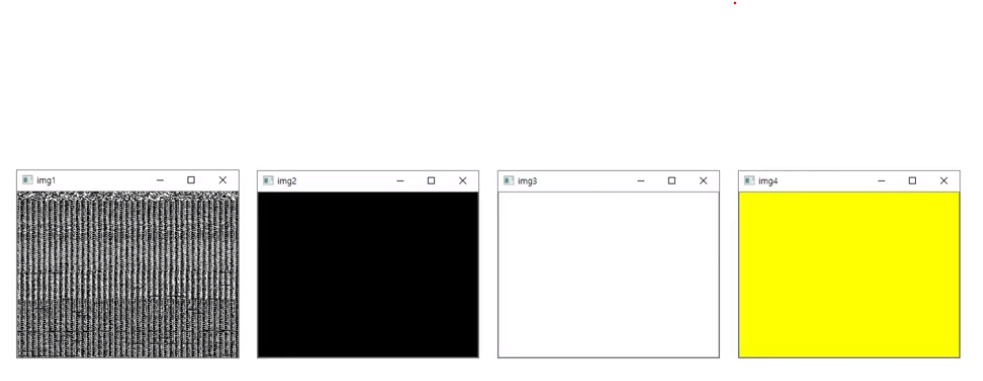
img1 = np.empty((240, 320), dtype=np.uint8) # grayscale image
img2 = np.zeros((240, 320, 3), dtype=np.uint8) # color image
img3 = np.ones((240, 320), dtype=np.uint8) * 255 # dark gray
img4 = np.full((240, 320, 3), (0, 255, 255), dtype=np.uint8) # yellow

cv2.imshow('img1', img1)
cv2.imshow('img2', img2)
cv2.imshow('img3', img3)
cv2.imshow('img4', img4)
cv2.waitKey()
cv2.destroyAllWindows()
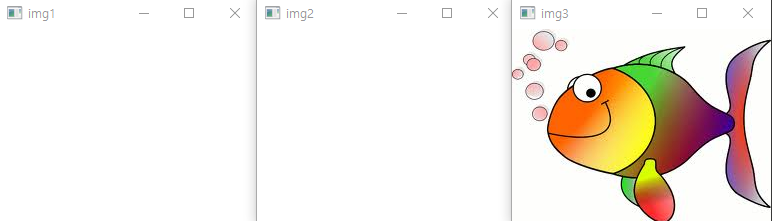
(2) 영상의 복사
- 영상의 복사 예제 코드
import numpy as np
import cv2

# 영상 복사
img1 = cv2.imread('HappyFish.jpg')

img2 = img1 # 얕은 복사
img3 = img1.copy() # 깊은 복사

img1[:,:,:] = 255

cv2.imshow('img1', img1)
cv2.imshow('img2', img2)
cv2.imshow('img3', img3)
cv2.waitKey()
cv2.destroyAllWindows()
-> 다음 글에서 이어집니다~

Hi.