💁Flutter Sqflite에 대해 Araboza
서론
Flutter에는 내장 db인 Sqflite가 있습니다.(물론 패키지를 가져와야 해요...)
지금 정신이 오락가락한 상태여서 말투가 막 바뀔수가 있어요... 양해 부탁드려요!! 👀
일단 기초적인 부분은 제가 알려드리겠지만 더 자세한 정보를 원하시는 분들은 pub.dev로 가셔서 학인해 보시길 바래요.
사용하는 패키지
sqflite: ^1.1.6
path_provider: ^1.2.0
path: ^1.6.2
sqflite는 sqlite를 Andorid, Ios에서 사용하게 해주는 패키지,
path_provider는 db파일을 저장하는 경로를 알기위해 사용하는 패키지,
path는 경로를 합치기 위해 사용합니다
Data 클래스 만들기 😎
class Diary {
  final int id;
  final String title;
  final String content;
  final String uploadDate;

  Diary({this.id, this.title, this.content, this.uploadDate});

// 이 아래 코드는 쿼리를 조금 더 효율 적으로 사용하기 위해
// 생성한 메서드 입니다.
  factory Diary.fromJson(Map<String, dynamic> json) => Diary(
        id: json['id'],
        content: json['content'],
        title: json['title'],
        uploadDate: json['uploadDate'],
      );

  Map<String, dynamic> toJson() => {
        "id": id,
        "title": title,
        "content": content,
        "uploadDate": uploadDate,
      };
}
Diary.fromJson() 과 toJson() 에 대해 설명하자면
fromJson(json) : Map구조에서 새로운 Diary클래스를 생성하기 위한 Diary.fromJson() 생성자입니다.
toJson() : Diary 객체를 map 구조로 변환하기 위한 메서드 입니다.
이 둘에 대해서 자세히 알고 싶은 분은 아래의 공식사이트를 확인해주시길 바랍니다.😉
https://flutter-ko.dev/docs/development/data-and-backend/json
DB생성하기 🎶
클래스를 하나 만들어 db인스턴스를 가져오고 쿼리들을 쉽게 관리 하도록 하겠습니다.
DBHelper() 라는 클래스를 만들어서 Db생성과 쿼리들을 관리해봅시다.
final String TableName = 'diary';

class DBHelper {
  DBHelper._();
  static final DBHelper _db = DBHelper._();
  // DBHelper를 가져올 때 마다 인스턴스를 생성하지 않도록 하기위해 factory 사용
  factory DBHelper() => _db;

  static Database _database;

  Future<Database> get database async { // database 가져오기
    if (_database != null) return _database;

    _database = await initDB();
    return _database;
  }

  initDB() async {
    Directory documentsDirectory = await getApplicationDocumentsDirectory();
    String path = join(documentsDirectory.path, 'Diary.db');

    return await openDatabase(path, version: 1, onCreate: (db, version) async {
      await db.execute( // Table 생성
          'CREATE TABLE $TableName(id INTEGER PRIMARY KEY, title TEXT, content TEXT, uploadDate TEXT)');
    }, onUpgrade: (db, oldVersion, newVersion) {});
  }
}
이제 DB를 단순히 클래스를 가져오는 것 만으로도 사용 할 수 있다.
그렇다면 쿼리들은 어떻게 짜야할까?
CRUD 생성하기☺️
일단 기본적으로 쿼리들을 생성하는 법에 대해 살펴봅시다.
createData(Diary diary) async {
    final db = await database;
    var res = await db
        .rawInsert('INSERT INTO $TableName(title, content, uploadDate) VALUES(?, ?, ?)', [diary.title, diary.content, diary.uploadDate]);
    //  var res = await db.insert(TableName, diary.toJson());
    return res;
  }
위에서 보시는 것과 같이 rawInsert로 쓰셔도 되고 혹은 아래와 같이 간편하게 insert함수를 쓰셔도 됩니다.
딱히 사용자 지정 쿼리가 필요하지 않으면 rawQuery를 쓰지말고 raw가 달리지 않은 일반 쿼리(insert, update, delete 등)을 쓰는게 편하고 좋습니다.
TMI : rawQuery 를 쓰때에는 sql문을 String으로 기입해야 하지만 미리 정의된 함수쿼리를 사용할 시 편하게 인자값 만으로 사용 가능합니다.
이제 다른 저희가 사용할 쿼리들을 보여주겠습니다.
reateData(Diary diary) async {
    final db = await database;
    var res = await db.insert(TableName, diary.toJson());
    return res;
  }

  //Read
  getDiary(int id) async {
    final db = await database;
    var res = await db.query(TableName, where: 'id = ?', whereArgs: [id]);
    return res.isNotEmpty ? Diary.fromJson(res.first) : Null;
  }

  //Read All
  Future<List<Diary>> getAllDiarys() async {
    final db = await database;
    var res = await db.query(TableName);
    List<Diary> list =
        res.isNotEmpty ? res.map((c) => Diary.fromJson(c)).toList() : [];

    return list;
  }

  updateDiary(Diary diary) async {
    final db = await database;
    var res = db.update(TableName, diary.toJson(),
        where: 'id = ?', whereArgs: [diary.id]);
    return res;
  }

  //Delete
  deleteDiary(int id) async {
    final db = await database;
    var res = db.delete(TableName, where: 'id = ?', whereArgs: [id]);
    return res;
  }

  //Delete All
  deleteAllDiarys() async {
    final db = await database;
    db.delete(TableName);
  }
이 함수들은 DBHelper() 클래스 안에 넣어주시면 됩니다😊
전체 코드를 보고 싶으시면 아래의 깃헙을 참고해 주세요><
UI 추가
일기 쓰기 다이얼로그
2편에서 만든 추가 버튼을 누를시 다이얼로그가 생성되어 일기를 추가 할 수 있게끔 하겠습니다.
물론 Platform Widgets을 사용해서 만들게용😎.
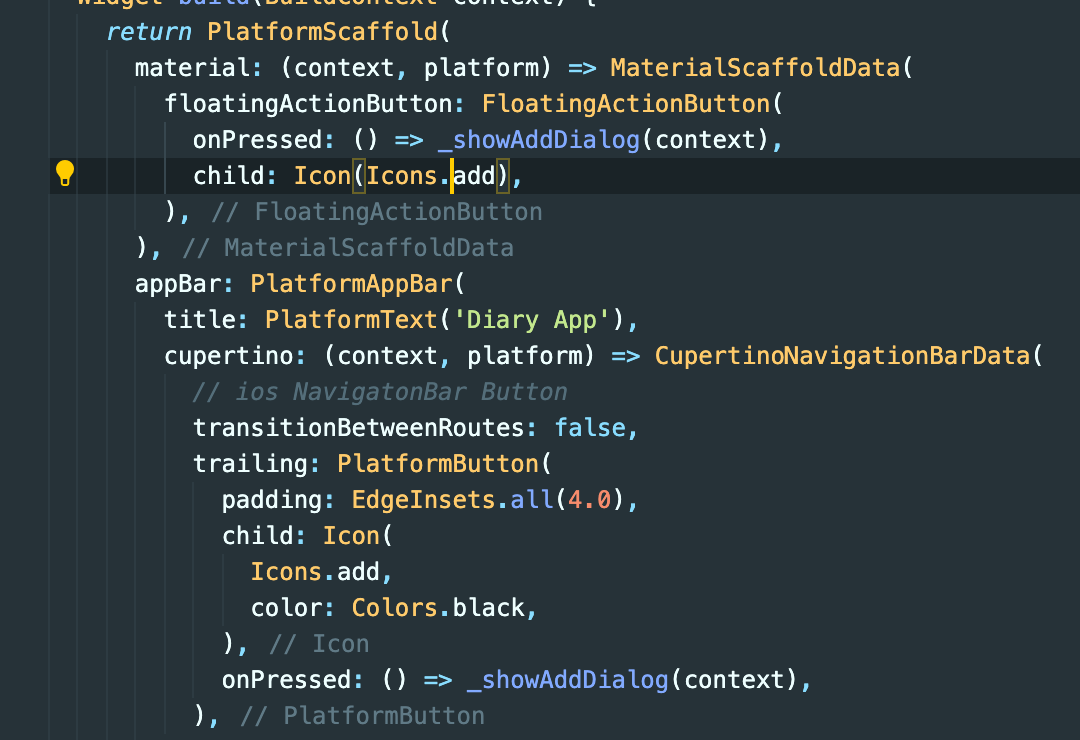
void _showAddDialog(BuildContext context) {
    var titleTextController = TextEditingController();
    var contentTextController = TextEditingController();

    var maxLines = 10;

    showPlatformDialog(
      barrierDismissible: true, // Dialog의 바깥을 터치할 시 dispose 하는 속성
      context: context,
      builder: (BuildContext context) {
        return Dialog(
          shape: RoundedRectangleBorder(
              borderRadius: BorderRadius.circular(20.0)),
          child: Container(
            height: maxLines * 40.0,
            child: Padding(
              padding: const EdgeInsets.all(8.0),
              child: SingleChildScrollView( // 화면 스크린이 작을 경우 스크롤 할 수 있게 Scrollable 위젯 상
                child: Column(
                  mainAxisAlignment: MainAxisAlignment.center,
                  crossAxisAlignment: CrossAxisAlignment.center,
                  children: [
                    Padding(
                      padding: EdgeInsets.only(bottom: 15.0),
                      child: PlatformText(
                        '일기 저장',
                        textAlign: TextAlign.center,
                        style: TextStyle(
                            fontSize: 20.0, fontWeight: FontWeight.bold),
                      ),
                    ),
                    Padding(
                      padding: EdgeInsets.only(bottom: 10),
                      child: PlatformTextField(
                        controller: titleTextController,
                        material: (context, platform) => MaterialTextFieldData( // Android Text Field hint 설정
                          decoration: InputDecoration(
                              alignLabelWithHint: true, hintText: '제목'),
                        ),
                        cupertino: (context, platform) =>
                            CupertinoTextFieldData(placeholder: '제목'), // Ios TextFiled 힌트 설정
                      ),
                    ),
                    Padding(
                      padding: EdgeInsets.only(bottom: 10),
                      child: PlatformTextField(
                        controller: contentTextController,
                        keyboardType: TextInputType.multiline,
                        maxLines: 10,
                      ),
                    ),
                    SizedBox(
                      width: 320.0,
                      child: PlatformButton(
                        color: const Color(0xFF1BC0C5),
                        child: PlatformText(
                          "Save",
                          style: TextStyle(color: Colors.white),
                        ),
                        onPressed: () {
                          if (contentTextController.text == '' ||
                              titleTextController.text == '') {
                            Toast.show('입력하지 않은 항목이 있습니다.', context);
                          } else {
                            writeDiary(titleTextController.text,
                                contentTextController.text);
                            Navigator.pop(context);
                          }
                        },
                      ),
                    ),
                  ],
                ),
              ),
            ),
          ),
        );
      },
    );
  }
그리고 2편에서 만든 Scaffold 부분의 onPressed() 부분에이 함수를 넣어주면 된다. 아래 처럼👍
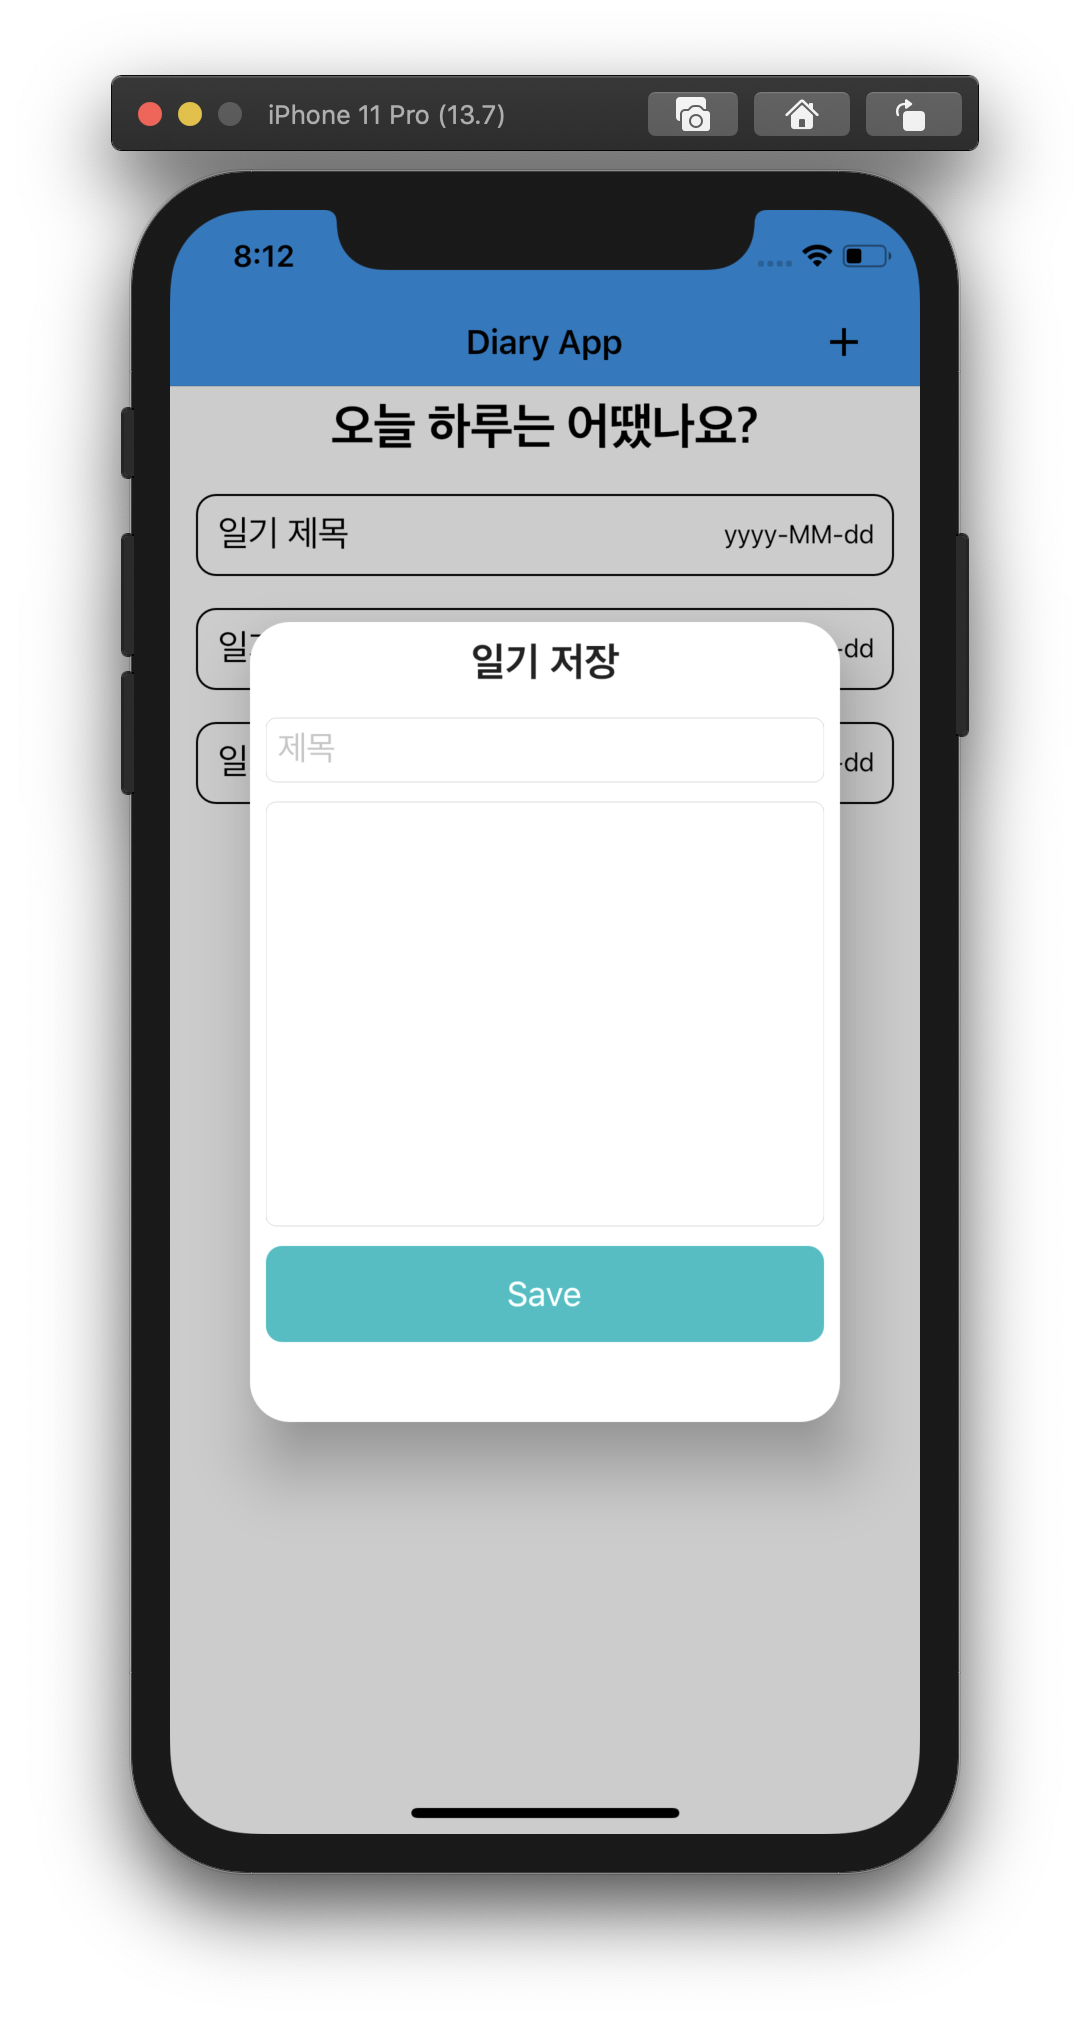
그리고 아래와 같이 화면이 만들어 질 것이다.
그리고 이제 위에서 만들지 않은 writeDiary() 함수를 완성하자!!
writeDiary() 함수 만들기😋
혹 DateTime에서 에러가 난다면 intl 패키지를 import하지 않아서 생긴 오류이니 아래의 코드를 상단에 복붙 하시면 됩니다.
import 'package:intl/intl.dart';
void writeDiary(String title, String contnent) {
    var now = DateTime.now();
    String nowDate = DateFormat('yyyy-MM-dd').format(now); // intl 패키지 import해야함

    Diary diary = Diary(title: title, content: contnent, uploadDate: nowDate);
    DBHelper().createData(diary);
    setState(() {}); // 추가된 데이터 반영
  }
그리고 추가버튼을 통해 데이터를 2,3개 추가해보고 print()를 찍어 데이터가 잘 들어가지는지 또 가져와지는지 확인해보자.
class _MainPageState extends State<MainPage> {
void initState() {
super.initState();
DBHelper().getAllDiarys().then((value) => value.forEach((element) {
print(element.content);
}));
}
// 코드 생략🥳 ListView 수정 🥳
드디어 마지막 단계입니다. 정적으로 데이터를 보여주던 ListView를 FutureBuilder를 통해 동적으로 보여주도록 하겠습니다.
Expanede -> ListView... 였던 코드에서 ListView코드 부터 싹다 지우시고 아래와 같이 코드를 작성하시면 됩니다.
Expanded(
            child: FutureBuilder(
              future: DBHelper().getAllDiarys(),
              builder: (context, snapshot) {
                if (snapshot.hasData) {
                  return ListView.builder(
                    shrinkWrap: true,
                    itemCount: snapshot.data.length,
                    itemBuilder: (context, index) {
                      var item = snapshot.data[index];
                      return Dismissible(
                        key: UniqueKey(),
                        child: _diaryListItem(item),
                        onDismissed: (direction) {
                          DBHelper().deleteDiary(index);
                          setState(() {});
                        },
                      );
                    },
                  );
                } else {
                  return PlatformText('기록하신 일기가 없습니다\n일기를 추가해주세요 :D');
                }
              },
            ),
          ),
Dismissible() 위젯은 리스트뷰 아이템을 왼쪽으로 스와이프 하게 되면 아이템을 없앨 수 있는 위젯이다.
아 그리고, 다이어리 클릭시 제목, 내용, 업로드 날짜를 모두 보여주는 다이얼로그를 추가하면 진짜 완성이다.😅😅
이부분은 단순히 코드로 보여주고 끝내겠다. 이부분은 새로운 루트 페이지를 만들던지 다이얼로그로 보여주던지는 오로지 자기 마음이기 때문이다.
void _showDiary(Diary diary) {
    showPlatformDialog(
      barrierDismissible: true,
      context: context,
      builder: (context) {
        return Dialog(
          shape: RoundedRectangleBorder(
            borderRadius: BorderRadius.circular(10.0),
          ),
          child: Container(
            height: 300.0,
            child: Column(
              children: [
                Padding(
                  padding: const EdgeInsets.all(8.0),
                  child: PlatformText(
                    diary.title,
                    style: TextStyle(fontSize: 20.0),
                  ),
                ),
                Container(
                  height: 200.0,
                  width: double.infinity,
                  margin: EdgeInsets.all(8.0),
                  padding: EdgeInsets.all(8.0),
                  decoration: BoxDecoration(
                    border: Border.all(
                      color: const Color(0xFF1BC0C5),
                    ),
                  ),
                  child: PlatformText(
                    diary.content,
                    style: TextStyle(fontSize: 12.0),
                  ),
                ),
                Padding(
                  padding: const EdgeInsets.only(right: 8.0),
                  child: Row(
                    mainAxisAlignment: MainAxisAlignment.end,
                    children: [
                      PlatformText(
                        'by ${diary.uploadDate}',
                        style: TextStyle(fontSize: 8.0),
                      ),
                    ],
                  ),
                ),
              ],
            ),
          ),
        );
      },
    );
  }
그리고 _diaryListItem을 InkWell 위젯으로 감싸고 onTap() 속성으로 위에 메서드를 던져주면 끝이다.ㅎㅎ
전체 코드는 위에 올려놓은 깃헙을 확인해주시면 감사하겠습니당😊👍
Sqlite에 대한 개인적인 생각🙈
-
sqlite를 사용할 때 가장 주의해야 하는 것은 오타라고 생각한다. 되도록이면 테이블 이름이랑 데이터 모델들의 변수명을 동일시하게 작명하여서 db를 관리할 때 예기치 못한 오류를 예방할 수 있다.
-
간단한 쿼리들은 raw쿼리 보다 일본 쿼리를 사용하도록 하자. 간편하기도 하고 사실 복잡한 기능이 아니고서야 raw quer를 잘 사용할 일이 없을 뿐더러 그런 기능은 서버를 구현하는 편이 훨신 낫기 때문이다.
추후 4편 예고🧐
4편은 Bloc패턴에 대해 알아보고 이를 이번 다이어리 애플리케이션에 적용하는 글을 써볼겁니당. 끝
참고😍
아래의 블로그를 참고하여 글을 작성하였음을 알립니다.
https://dalgonakit.tistory.com/116

유익해요! 계속 진행하셨을지 궁금해요 Flutter 다음 시리즈 기다립니다 ㅎㅎ