생성일: 2022년 1월 6일 오후 11:47
인스타 그램에서의 탭바 첫 항목인 Feed 화면을 구성하기 위해 CollectionView를 사용한다.
import UIKit

private let reuseIdentifier = "Cell"

class FeedController: UICollectionViewController {

    //MARK: - Lifecycle
    override func viewDidLoad() {
        super.viewDidLoad()
        configureUI()
    }

    //MARK: - Helpers

    func configureUI() {
        collectionView.backgroundColor = .white
        // 콜렉션 뷰에 cell 등록
        collectionView.register(UICollectionViewCell.self, forCellWithReuseIdentifier: reuseIdentifier)
    }
}

//MARK: - UICollectionViewDataSource

extension FeedController {

    // collectionView에 들어갈 아이템의 개수 정의
    override func collectionView(_ collectionView: UICollectionView, numberOfItemsInSection section: Int) -> Int {
        return 5
    }
    // collectionView의 각 cell을 정의
    override func collectionView(_ collectionView: UICollectionView, cellForItemAt indexPath: IndexPath) -> UICollectionViewCell {
        let cell = collectionView.dequeueReusableCell(withReuseIdentifier: reuseIdentifier, for: indexPath)
        cell.backgroundColor = .red
        return cell
    }
}

//MARK: - UICollectionViewDelegateFlowLayout
// 각 cell의 크기 정의
extension FeedController: UICollectionViewDelegateFlowLayout {

    func collectionView(_ collectionView: UICollectionView, layout collectionViewLayout: UICollectionViewLayout, sizeForItemAt indexPath: IndexPath) -> CGSize {
        return CGSize(width: view.frame.width, height: 200)
    }
}- FeedController가 UICollectionViewController를 상속 받게 한다.
- UICollectoinViewController 클래스는 UICollectionViewDataSource 프로토콜을 이미 사용하고 있기 때문에 따로 해당 프로토콜을 추가 하지 않고 곧바로 DataSource와 관련된 함수들을 사용할 수 있다.
- 이를 이용해 콜렉션 뷰에 들어갈 아이템(셀)의 개수와 각 셀을 정의한다.
- 각 cell의 크기를 설정하기 위해서 UICollectionViewDelegateFlowLayout 프로토콜을 불러와서 CGSize로 정의해 주었다.
여기까지 설정하고 실행시키면 오류가 발생한다.
Why?
- CollectionView 객체를 생성할 때에는 layout이 필요한데 MainTabController.swift에서 feed 객체를 생성할 때 layout을 설정해주지 않았기 때문이다.
이를 해결하기 위해
func configureViewControllers() {
        view.backgroundColor = .white

        let layout = UICollectionViewFlowLayout()

        let feed = templateNavigationController(unselectedImage: #imageLiteral(resourceName: "home_unselected"), selectedImage: #imageLiteral(resourceName: "home_selected"), rootViewController: FeedController(collectionViewLayout: layout))
...생략
}
위와 같이 layout을 생성하고 객체 선언시에 FeedController 클래스에 넘겨주었다.
- 주의해야 할 점: layout 생성할 때 UICollectionViewLayout()이 아니라 UICollectionViewFlowLayout()로 선언해야 한다.
여기까지의 실행 결과
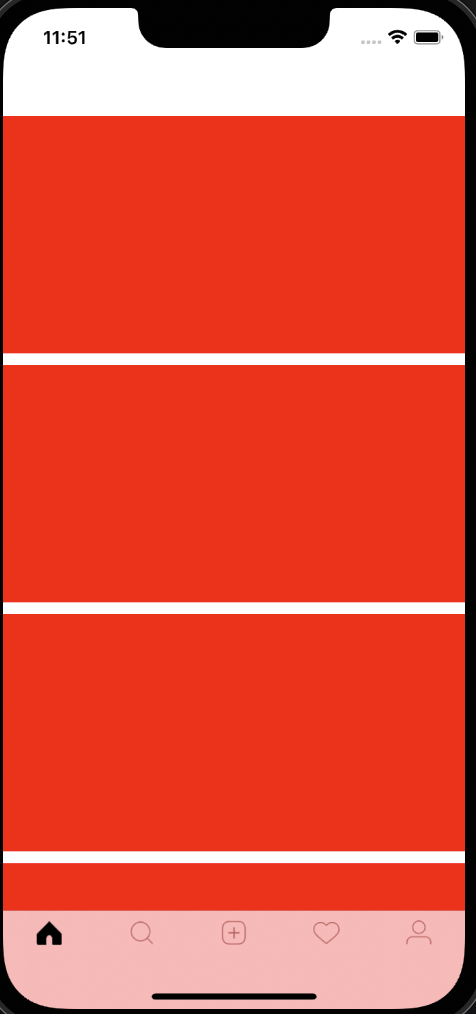
- 기초적인 콜렉션 뷰가 설정되어서 5개의 붉은색 cell을 가지게 되었다.
Feed Cell 만들기
View 폴더에 FeedCell.swift를 생성한다.
스토리보드를 사용한다면 xib파일로 cell을 그릴수도 있지만 코드로 ui를 만드는 방법에서는 swift 파일에서 ui를 코드로 만들어야 한다.
- FeedController.swift에 우선 테스트로 빨간색 cell을 추가했었기 때문에 해당 부분을 없애고 register한 부분도 FeedCell.self로 변경해 준다. cell의 크기도 알맞게 변경해야 한다.
FeedCell.swift
import UIKit

class FeedCell: UICollectionViewCell {

    //MARK: - Properties
    private let profileImageView: UIImageView = {
        let iv = UIImageView()
        iv.contentMode = .scaleAspectFill
        iv.clipsToBounds = true
        iv.isUserInteractionEnabled = true
        iv.image = #imageLiteral(resourceName: "venom-7")
        return iv
    }()

        // 여기서 lazy로 선언하는 이유는 addTarget 때문이다. lazy로 하지 않으면 addTarget은 usernameButton 객체가 생성되기 전에 작동하는데 당연히 객체가 없는데 Target을 설정하는 것은 문제를 발생시킨다. 따라서 lazy를 통해 확실히 usernameButton이 생성된 후 addTarget이 작동하도록 해야한다.
    private lazy var usernameButton: UIButton = {
        let button = UIButton(type: .system)
        button.setTitleColor(.black, for: .normal)
        button.setTitle("venom", for: .normal)
        button.titleLabel?.font = UIFont.boldSystemFont(ofSize: 13)
        button.addTarget(self, action: #selector(didTapUsername), for: .touchUpInside)
        return button
    }()

    private let postImageView: UIImageView = {
        let iv = UIImageView()
        iv.contentMode = .scaleAspectFill
        iv.clipsToBounds = true
        iv.isUserInteractionEnabled = true
        iv.image = #imageLiteral(resourceName: "venom-7")
        return iv
    }()

    private lazy var likeButton: UIButton = {
        let button = UIButton(type: .system)
        button.setImage(#imageLiteral(resourceName: "like_unselected"), for: .normal)
        button.tintColor = .black
        return button
    }()

    private lazy var commentButton: UIButton = {
        let button = UIButton(type: .system)
        button.setImage(#imageLiteral(resourceName: "comment"), for: .normal)
        button.tintColor = .black
        return button
    }()

    private lazy var shareButton: UIButton = {
        let button = UIButton(type: .system)
        button.setImage(#imageLiteral(resourceName: "send2"), for: .normal)
        button.tintColor = .black
        return button
    }()

    private let likesLabel: UILabel = {
        let label = UILabel()
        label.text = "1 like"
        label.font = UIFont.boldSystemFont(ofSize: 13)
        return label
    }()

    private let captionLabel: UILabel = {
        let label = UILabel()
        label.text = "Some test caption"
        label.font = UIFont.boldSystemFont(ofSize: 14)
        return label
    }()

    private let postTimeLabel: UILabel = {
        let label = UILabel()
        label.text = "2 days ago"
        label.font = UIFont.systemFont(ofSize: 12)
        label.textColor = .lightGray
        return label
    }()

    //MARK: - Lifecycle

    override init(frame: CGRect) {
        super.init(frame: frame)
        backgroundColor = .white

        addSubview(profileImageView)
        profileImageView.anchor(top: topAnchor, left: leftAnchor, paddingTop: 12, paddingLeft: 12)
        profileImageView.setDimensions(height: 40, width: 40)
        profileImageView.layer.cornerRadius = 40 / 2

        addSubview(usernameButton)
        usernameButton.centerY(inView: profileImageView, leftAnchor: profileImageView.rightAnchor, paddingLeft: 8)

        addSubview(postImageView)
        postImageView.anchor(top: profileImageView.bottomAnchor, left: leftAnchor, right: rightAnchor, paddingTop: 8)
        postImageView.heightAnchor.constraint(equalTo: widthAnchor, multiplier: 1).isActive = true

        configureActionButtons()

        addSubview(likesLabel)
        likesLabel.anchor(top: likeButton.bottomAnchor, left: leftAnchor, paddingTop: -4, paddingLeft: 8)

        addSubview(captionLabel)
        captionLabel.anchor(top: likesLabel.bottomAnchor, left: leftAnchor, paddingTop: 8, paddingLeft: 8)

        addSubview(postTimeLabel)
        postTimeLabel.anchor(top: captionLabel.bottomAnchor, left: leftAnchor, paddingTop: 8, paddingLeft: 8)

    }

    required init?(coder: NSCoder) {
        fatalError("init(coder:) has not been implemented")
    }

    //MARK: - Actions
    @objc func didTapUsername() {
        print("DEBUG: did tap username")
    }

    //MARK: - Helpers

    func configureActionButtons() {
        let stackView = UIStackView(arrangedSubviews: [likeButton, commentButton, shareButton])
        stackView.axis = .horizontal
        stackView.distribution = .fillEqually

        addSubview(stackView)
        stackView.anchor(top: postImageView.bottomAnchor, width: 120, height: 50)
    }
}
코드로 ui를 만드는 것은 기본적으로 다음과 같은 과정을 거친다.
-
ui객체 생성하기
private let profileImageView: UIImageView = { let iv = UIImageView() iv.contentMode = .scaleAspectFill iv.clipsToBounds = true iv.isUserInteractionEnabled = true iv.image = #imageLiteral(resourceName: "venom-7") return iv }() -
init 함수에 추가하기
override init(frame: CGRect) { super.init(frame: frame) backgroundColor = .white addSubview(profileImageView) profileImageView.anchor(top: topAnchor, left: leftAnchor, paddingTop: 12, paddingLeft: 12) profileImageView.setDimensions(height: 40, width: 40) profileImageView.layer.cornerRadius = 40 / 2 ... }- init 에서 addSubView를 통해 ui객체를 cell에 추가하고 객체의 크기와 위치를 정해준다.
- 이때 사용된 anchor와 setDimensions 함수는 이 과정을 도와주는 외부에서 가져온 함수이다.
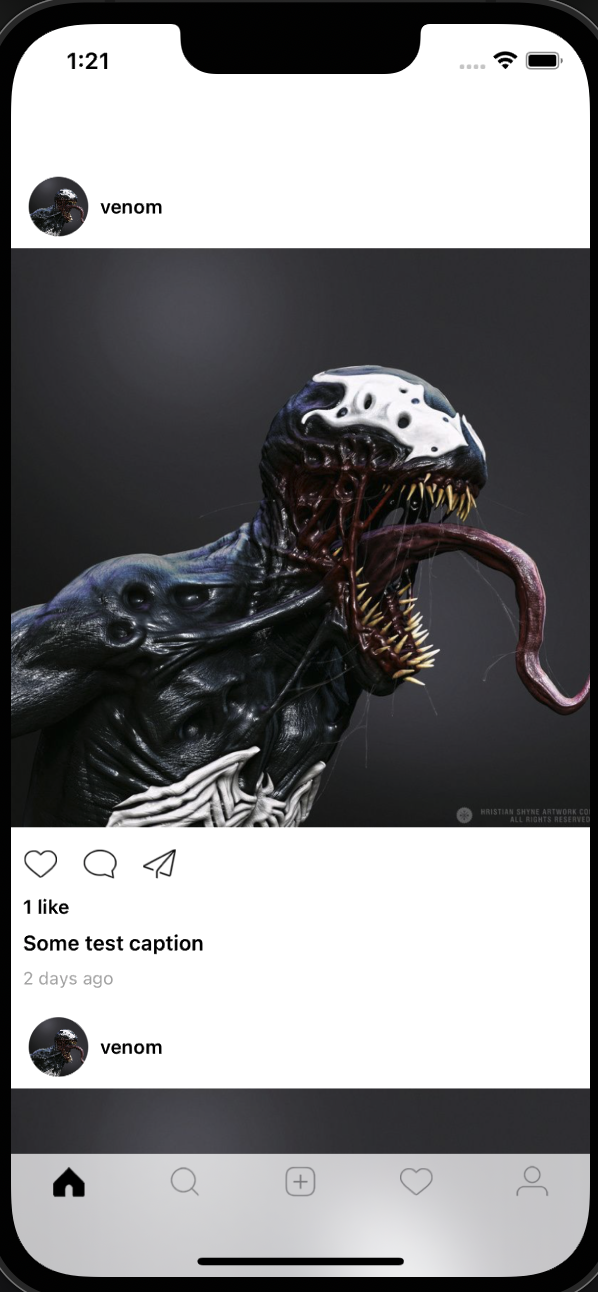
실행 결과

나중은 결코 오지 않는다.