생성일: 2021년 10월 13일 오후 10:14
오토레이아웃을 사용하여 막대 그래프 만들기
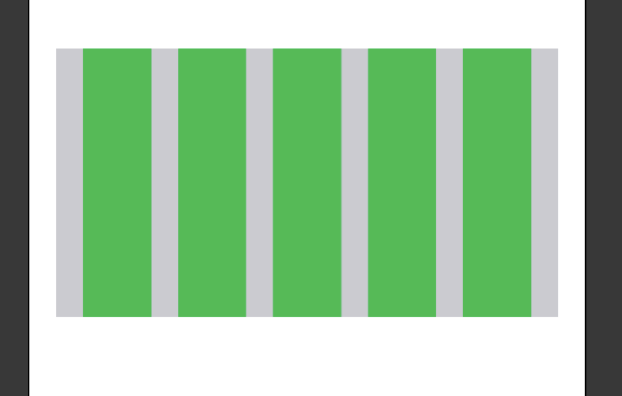
UIView로 막대모양 5개를 만들고 이들을 하나의 View에 임베드한 상태이다.
Equal Width와 좌우 20의 간격, 회색 뷰와 막대 뷰의 하단 간격 0을 주어 아래부분은 붇어 있게하고 막대의 길이는 조절 할 수 있게 한다.
막대의 길이를 조절 하는 방법에는 회색 뷰와 막대에게 Equal Height를 주고 Multiplier를 조절하는 것이다.
위의 사진은 현재 Equal Height에 Multiplier가 1인 상태이므로 회색 뷰와 막대의 길이가 같은 상태이다.
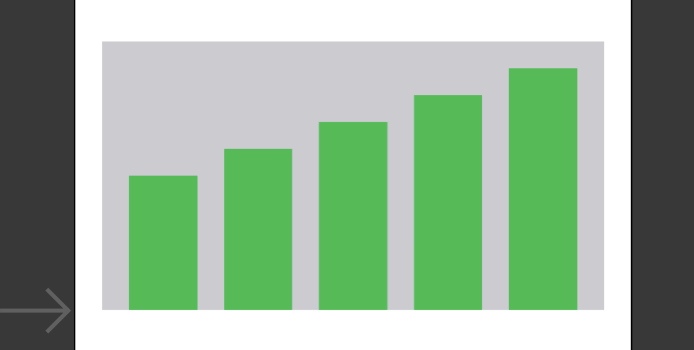
막대뷰의 Equal Height에서 Multiplier를 0.5부터 0.1씩 늘려가며 설정한 모습이다.
이러한 정해진 그래프를 이용한다면 이렇게 오토레이아웃을 이용해 그리면 된다. 하지만 그래프가 변동해야 할 때에는 코드와 연결해야 한다.
코드 연결
@IBOutlet weak var graph1Height: NSLayoutConstraint!
@IBOutlet weak var graph2Height: NSLayoutConstraint!
@IBOutlet weak var graph3Height: NSLayoutConstraint!
@IBOutlet weak var graph4Height: NSLayoutConstraint!
@IBOutlet weak var graph5Height: NSLayoutConstraint!
위에서 높이를 조절한 부분 (Eual Height에서 Multiplier를 수정했으므로 Proportional Height가 되어있다.)을 코드와 IBOutlet으로 연결한다.
이제 각각의 높이 Multiplier를 코드로 조절하면 되겠지만 그렇게 쉽게 되지 않는다.
Constant나 Priority는 graph1Height.constant = 100 이런식으로 곧바로 코드에서 조절이 가능하지만 Multiplier는 get-only property 이기 때문에 직접적으로 코드로 수정이 불가능하다.
따라서, 기존의 막대뷰 하나가 가지고 있던 NSLayoutConstraint를 초기화 시켜야 한다.
⇒ NSLayoutConstraint 클래스를 extension 시켜서 Constraint를 초기화 시키고 원하는 Multiplier를 넣고 새로 Constraint를 만드는 함수를 생성한다.
extension NSLayoutConstraint {

    func changeMultiplier(value: CGFloat) -> NSLayoutConstraint {

        //기존에 뷰가 가지고 있던 Constraint 설정 값을 비활성화
        NSLayoutConstraint.deactivate([self])

        let newConstraint = NSLayoutConstraint.init(item: self.firstItem!, attribute: self.firstAttribute, relatedBy: self.relation, toItem: self.secondItem!, attribute: self.secondAttribute, multiplier: value, constant: self.constant)

        //기존의 오브젝트가 가지고 있던 Constraints들 가져오기
        newConstraint.priority = self.priority
        newConstraint.shouldBeArchived = self.shouldBeArchived
        newConstraint.identifier = self.identifier

        //내가 만든 newConstraint를 활성화
        NSLayoutConstraint.activate([newConstraint])

        return newConstraint
    }

}
NSLayoutConstraint에 changeMuliplier 함수를 만들었다.
함수의 구조는 다음과 같다.
- 기존의 Constraint 값들을 비활성화
- 새로운 Constraint 생성 (새롭게 설정할 Multiplier value 이용)
- 기존의 Constraints (Multiplier 제외) 가져오기
- 새로운 Constraint 활성화
- 새로운 Constraint 리턴
override func viewDidLoad() {
        super.viewDidLoad()

        graph1Height = graph1Height.changeMultiplier(value: 0.9)
        graph2Height = graph2Height.changeMultiplier(value: 0.8)
        graph3Height = graph3Height.changeMultiplier(value: 0.7)
        graph4Height = graph4Height.changeMultiplier(value: 0.6)
        graph5Height = graph5Height.changeMultiplier(value: 0.5)
    }
실행 화면
직관적으로 확인하기 위해 버튼을 두개 만들어 실행 시켜 보았다.
@IBAction func style1(_ sender: UIButton) {

        UIView.animate(withDuration: 0.5) {
            self.graph1Height = self.graph1Height.changeMultiplier(value: 0.9)
            self.graph2Height = self.graph2Height.changeMultiplier(value: 0.8)
            self.graph3Height = self.graph3Height.changeMultiplier(value: 0.7)
            self.graph4Height = self.graph4Height.changeMultiplier(value: 0.6)
            self.graph5Height = self.graph5Height.changeMultiplier(value: 0.5)

            self.view.layoutIfNeeded()
        }
    }


@IBAction func style2(_ sender: UIButton) {

    graph1Height = graph1Height.changeMultiplier(value: 0.5)
    graph2Height = graph2Height.changeMultiplier(value: 0.6)
    graph3Height = graph3Height.changeMultiplier(value: 0.7)
    graph4Height = graph4Height.changeMultiplier(value: 0.8)
    graph5Height = graph5Height.changeMultiplier(value: 0.9)

    UIView.animate(withDuration: 0.5) {
        self.view.layoutIfNeeded()
    }
}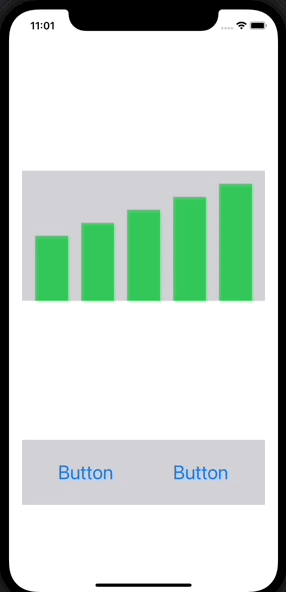
버튼 클릭시 그래프 변경