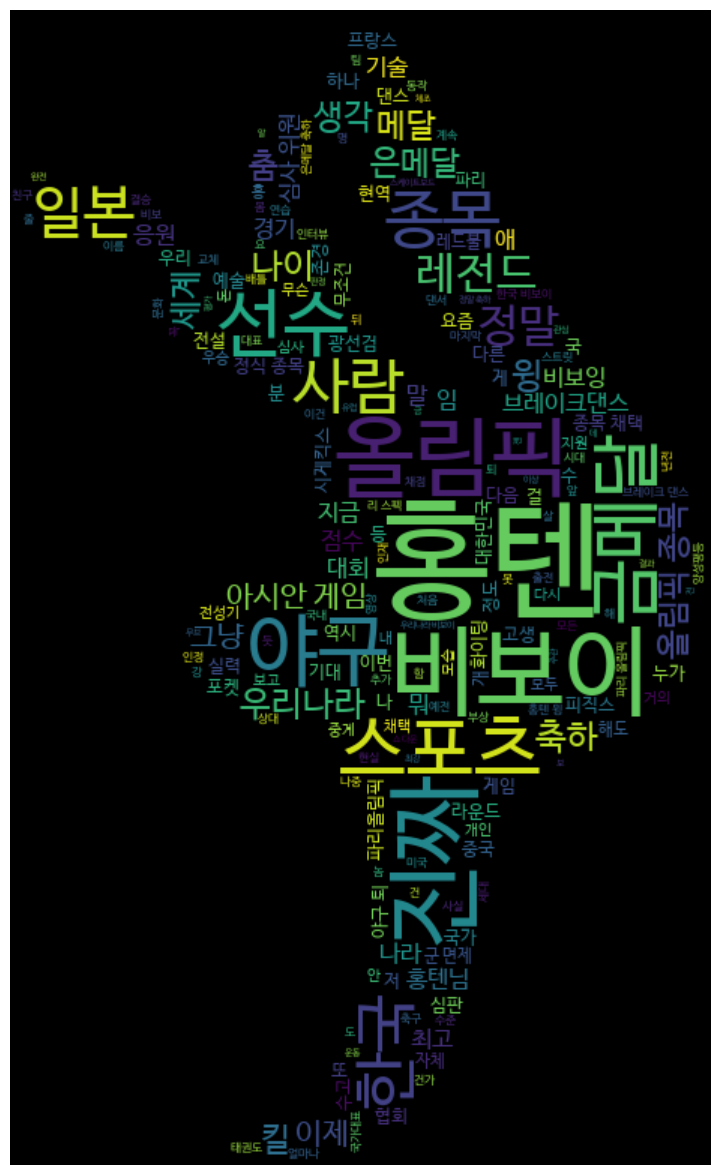
지인이 대학원 논문을 써야 하는데 유튜브 댓글을 수집해야한다고 해서 호기롭게 해준다고 해놓고 꽤나 헤맸다ㅋ
처음에 google colab으로 진행하다가 계속되는 이슈에 pycharm 설치... 어디서부터 손을 대야 할 지 몰라서 anaconda 설치 후 jupyter 로 진행했다.
!issue
유튜브 내 코드가 수시로 바껴서 댓글수집할 때 애를 좀 먹었다. 어제 됐던 코드가 안된다던지 하는 경우가 발생했다. 유튜브 댓글 크롤링 시에는 웹 상 코드도 틈틈히 봐주면서 수정해야할 것 같다.
상세 코드
##############################luna##############################

# matplotlib의 inline 백엔드를 활성화하여 Jupyter notebook 내에서 그래프를 바로 볼 수 있게 함
%matplotlib inline

# 필요한 라이브러리들을 임포트
from selenium import webdriver
import time
from bs4 import BeautifulSoup
import pandas as pd
from selenium.webdriver.support.ui import WebDriverWait
from selenium.webdriver.common.by import By
from selenium.webdriver.support import expected_conditions as EC

# 브라우저를 GUI 없이 실행하는 headless Chrome 설정
options = webdriver.ChromeOptions()
options.add_argument('--headless')
options.add_argument('--no-sandbox')
options.add_argument('--disable-dev-shm-usage')

# 위에서 설정한 옵션으로 Chrome WebDriver 인스턴스 생성
driver = webdriver.Chrome(options=options)

# 분석할 YouTube 동영상 URL들을 리스트로 정의
urls = [
    "https://youtu.be/i6K8i9BMr14?si=tbzezCAiHguzpzyb",
    # 나머지 URL들...
]

# 모든 동영상의 댓글을 저장할 빈 리스트 생성
all_comments = []

# 각 동영상 URL에 대해 반복하여 댓글 수집
for url in urls:
    # 해당 URL의 웹 페이지 로드
    driver.get(url)
    # 암묵적 대기
    driver.implicitly_wait(3)

    # 페이지 맨 아래까지 스크롤하여 댓글 섹션 로딩
    last_height = driver.execute_script("return document.documentElement.scrollHeight")
    while True:
        driver.execute_script("window.scrollTo(0, document.documentElement.scrollHeight);")
        time.sleep(2)  # 필요에 따라 대기 시간 조정
        new_height = driver.execute_script("return document.documentElement.scrollHeight")
        if new_height == last_height:
            try:
                # '더 보기' 버튼이 있으면 클릭
                dismiss_button = WebDriverWait(driver, 10).until(EC.presence_of_element_located((By.CSS_SELECTOR, '#dismiss-button > a')))
                dismiss_button.click()
            except:
                break
        last_height = new_height

    # 스크롤 후의 HTML 소스 가져오기
    html_source = driver.page_source
    # BeautifulSoup으로 HTML 파싱
    soup = BeautifulSoup(html_source, 'html.parser')

    # 댓글 섹션에서 댓글 추출
    comments_section = soup.find_all('ytd-comment-thread-renderer')
    for comment in comments_section:
        comment_text = comment.find("yt-attributed-string", id="content-text").text.strip()
        all_comments.append(comment_text)

# 브라우저 종료
driver.quit()

### 특수문자 제거하기 ###
import re
compile = re.compile("[^ ㄱ-ㅣ가-힣]+")
for i in range(len(all_comments)):
    a = compile.sub("", all_comments[i])
    all_comments[i] = a

### 문장 분석 ###
from konlpy.tag import Okt
okt = Okt()
result = [okt.nouns(i) for i in all_comments] # 댓글에서 명사만 추출
final_result = [r for i in result for r in i]

### 불용어 제거하기 ###
stop_word = ["더", "킹", "것", "때", "년", "왜", "브레이", "그", "좀", "거", "이"]
final_result = [i for i in final_result if i not in stop_word]

# 불용어 제거 결과 출력
print('불용어 제거', final_result)

## 한국어 top 30 단어 출력 ##
korean = pd.Series(final_result).value_counts().head(30)
print("top 30")
print(korean)

# 댓글 내용을 포함하는 DataFrame 생성
youtube_df = pd.DataFrame(final_result, columns=['댓글 내용'])

# 워드 클라우드 생성을 위한 텍스트 데이터 준비
text = " ".join(li for li in youtube_df['댓글 내용'].astype

# matplotlib.pyplot을 plt라는 이름으로 임포트하여 시각화 기능을 사용할 수 있게 함
import matplotlib.pyplot as plt
# wordcloud 라이브러리에서 WordCloud, STOPWORDS, ImageColorGenerator를 임포트
from wordcloud import WordCloud, STOPWORDS, ImageColorGenerator

# 워드클라우드에 사용할 한글 폰트 경로 설정
fontpath = './NanumBarunGothic.ttf'

# PIL 라이브러리에서 Image 모듈을 임포트하여 이미지 처리 기능을 사용할 수 있게 함
from PIL import Image
# numpy를 np라는 이름으로 임포트하여 배열 관련 연산을 수행할 수 있게 함
import numpy as np

# 마스크 이미지 로드 및 색상 반전 과정
# 마스크로 사용할 이미지 파일을 열어 Image 객체로 생성
mask_image = Image.open("./kang_freeze_fi.png")
# Image 객체를 numpy 배열로 변환하고, np.invert 함수를 이용해 픽셀 값의 색상을 반전시킴
mask_image = np.invert(np.array(mask_image))

# 워드클라우드 객체 생성
wordcloud = WordCloud(
    background_color = 'black',  # 배경 색상 설정
    width = 1000, height = 700,  # 워드클라우드 이미지의 너비와 높이 설정
    font_path = fontpath,  # 한글 폰트 경로 설정
    mask = mask_image  # 워드클라우드 모양을 결정할 마스크 이미지 설정
).generate(text)  # 워드클라우드를 생성할 텍스트 데이터

# matplotlib의 subplots 함수를 이용하여 그림과 축을 생성, figsize로 그림의 크기를 지정
plt.subplots(figsize = (25, 15))
plt.axis('off')  # 축을 표시하지 않음
plt.imshow(wordcloud, interpolation = 'bilinear')  # 워드클라우드 이미지를 화면에 표시, interpolation은 이미지가 부드럽게 보이도록 함
plt.show()  # 생성한 워드클라우드를 화면에 출력
결과