div태그를 하나의 단어로 축약하는 문법인 Web Component
자바스크립트 문법은 아니고 브라우저 기본 기능 중 하나임
오늘 이걸 이용해 커스텀 태그를 만들어볼거다
커스텀 HTML태그 만들기
<custom-input>이라고 입력하면 알아서 이 안에
<label></label><input>가 묶여있는걸 만들고싶다.
만들어 보자
<script>

  class 클래스 extends HTMLElement{
  	connectedCallback() {
	  this.innerHTML = `<label>니 이름이 뭐냐</label><input>`
  	}
  }

  customElements.define("custom-input", 클래스);

</script>

<body>
  <custom-input></custom-input>
</body>
이제 <custom-input>이라고 쓸 때마다 <label><input>이 사이좋게 담겨있는걸 볼 수 있다.
attribute를 추가해서 각각 다른 내용 보여주기
<custom-input>을 쓸 때마다 같은 코드만 나와서 쓸모가 없어보인다🤔
attribute를 추가해 쓸 때마다 다른 내용을 보여줘보자
<script>

  class 클래스 extends HTMLElement{
  	connectedCallback() {
  	  let name = this.getAttribute('name');
	  this.innerHTML = `<label>니 ${name}이 뭐냐</label><input>`
  	}
  }

  customElements.define("custom-input", 클래스);

</script>

<body>
  <custom-input name="이름"></custom-input>
  <custom-input name="꿈"></custom-input>
</body>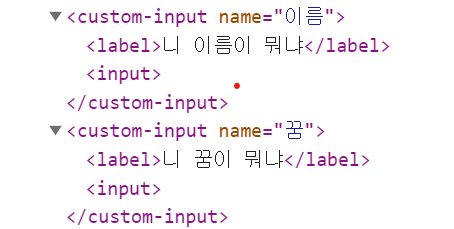
getAttribute(X)를 사용하면 현재 요소의 X라고 정의된 attribute를 가져올 수 있다.
이걸 사용했더니 각각 다른 내용을 보여줘서 조금 더 쓸모있어 졌다.
attribute가 변경될 때 특정 코드 실행도 가능하다
<script>

  class 클래스 extends HTMLElement{
  	connectedCallback() {
  	  let name = this.getAttribute('name');
	  this.innerHTML = `<label>니 ${name}이 뭐냐</label><input>`
  	}

  	static get observedAttributes() {
  	  return ['name']
  	}
  	attributeChangedCallback() {
  		// attribute 변경 시 실행할 코드
  	}
  }

  customElements.define("custom-input", 클래스);

</script>
static get observedAttributes()안에 감시할 attribute들을 array로 적으면 된다.
그럼 그게 변경되는 순간 밑에 있는 attributeChangedCallback()함수를 실행해준다.
이러면 React나 Vue에서 제공하는 자동 html 재렌더링 기능을 쌩 자바스크립트만으로 구현할 수 있다.
💡오늘의 결론
이런건 그냥 라이브러리로 만들자
출처: 코딩애플

내가보려고만든벨로그