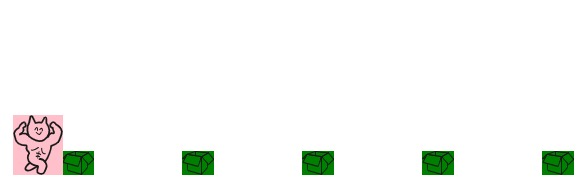
크롬공룡게임을 기반으로 '달려라!헬스냥' 이라는 미니게임을 만들고있다😸
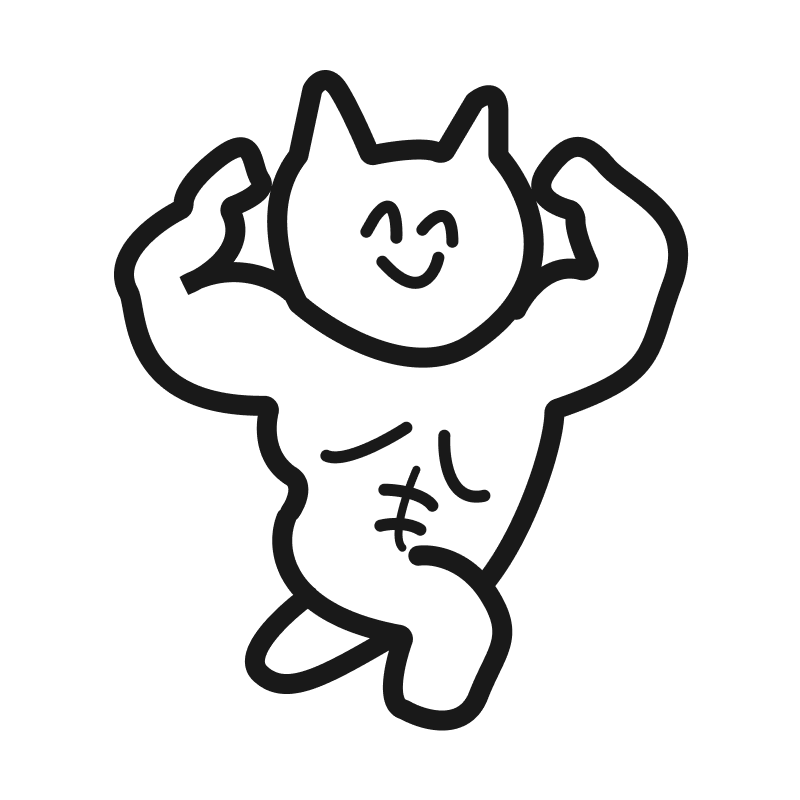
이왕 만드는거 내 취향에 맞춰 만들려고 직접 일러스트를 준비했다.
기본 구성
게임 진행 방식
헬스냥이 박스를 피하는 게임.
space바를 누르면 헬스냥이 쩜프한다.
박스와 충돌하면 헬스냥이 박스에 갇혀서 근손실이 난다😥
헬스냥
1.헬스냥이 달리는 느낌을 주기 위해 svg파일 두개를 교차해가며 보여준다.
2.space바를 누르면 헬스냥의 y값이 올라갔다가 제자리로 돌아온다.
장애물 박스
1.무작위 프레임마다 장애물이 소환된다.
2.박스의 x좌표가 0미만이 되면 제거해준다.
3.헬스냥이 박스와 충돌하면 게임이 끝난다.
지금까지 만든 목록 겸 목차
1. 기본세팅
2. 헬스냥 세팅 & space바 이벤트
3. 장애물 박스 세팅
4. 헬스냥과 장애물 충돌 확인
기본 세팅
<!-- index.html -->
<canvas id="canvas"></canvas>
게임은 canvas태그 하나만 사용해 만든다.
나중에 배경처리와 게임오버 효과를 위해 코드들이 추가 될 예정!
let canvas = document.getElementById("canvas");
let ctx = canvas.getContext("2d");
canvas.width = window.innerWidth;
캔버스는 처음에 비어있기 때문에 무언가를 표시해주기 위해서는 랜더링 컨텍스트에 접근해야 한다.
랜더링 컨텍스트와 그리기 함수를 사용하기 위해 getContext()메서드를 호출해 준다.
헬스냥 세팅 & space바 이벤트
const catSvg1 = `svg 코드~~~`;
const catSvg2 = `svg 코드~~~`;

const catImages = [new Image(), new Image()];
catImages[0].src = 'data:image/svg_xml,' + encodeURIComponent(catSvg1);
catImages[1].src = 'data:image/svg_xml,' + encodeURIComponent(catSvg2);
canvas 내에서 gif를 실행할 수 없기 때문에, svg두개를 이미지 객체로 변환해 두 이미지를 교체하며 애니메이션 효과를 주기로 했다.
encodeURIComponent()는 URI로 데이터를 전달하기 위한 메서드다.
let currentCat = 0;

let muscleCat = {
	x: 20,
  	y: 120,
  	width: 50,
  	height: 60,
  	draw() {
      	ctx.drawImage(
        	catImages[currentCat],
          	this.x,
          	this.y,
          	this.width,
          	this.height
        );
    },
  	jump() {
    	this.y -= 7;
    },
  	fall() {
    	if (this.y < 10) {
        	this.y += 8;
        }
    },
};
먼저 객체의 위치와 크기를 지정한 후 이를 draw()로 그려준 뒤, ctx.drawImage()함수를 사용해 SVG이미지를 화면에 보여준다.
여기서 catImages[currentCat]은 현재 사용중인 이미지의 인덱스를 그려준다.
jump()는 헬스냥이 점프를 하면 this.y 값을 감소시켜 헬스냥을 위로 움직여준다.
fall()은 헬스냥의 y값이 10이하면 this.y 값을 증가시켜 헬스냥이 아래로 내려가게 해준다.
let timer = 0;
let jumpTimer = 0;
let animation;

function frameRun() {
	animation = requestAnimationFrame(frameRun);
  timer++;
  ctx.clearRect(0, 0, canvas.width, canvas.height);

  if (timer %10 === 0) {
  	currentCat = (currentCat + 1) % 2;
  }

  if (jumpSwitch == true) {
  	mucleCat.jump();
    jumpTimer++;
  }
  if (jumpSwitch == false) {
  	if (muscleCat.y < 120) {
    	muscleCat.y++;
    }
  }
  if (jumpTimer > 10) {
  	jumpSwitch = false;
    jumpTimer = 0;
  }
  muscleCat.draw();
}
frameRun();

var jumpSwitch = false;

document.addEventListener('keydown', functin(e) {
	if (e.code === 'Space') {
		jumpSwitch = true;
	}
});
timer 는 프레임마다 증가되는 카운터 변수다.
이 변수는 프레임마다 얼마나 많은 시간이 흘렀는지를 추적해준다.
jumpTimer는 점프 동작을 유지하기 위한 카운터 변수다. 점프가 시작되고 얼마나 오래 유지되었는지 추적해준다.
animation은 애니메이션 프레임을 제어하는 변수다.
requestAnimationFrame함수를 통해 애니메이션을 부드럽게 실행할 수 있게 해준다. 이 녀석을 호출해 다음 프레임을 예약해 이 함수가 프레임 마다 실행할 수 있게 해준다.
space를 누르면 헬스냥이 쩜프! 할 수 있게 keydown이벤트를 추가한다.
이제 jumpSwitch변수가 true인 경우에만 짬푸를 할 수 있다.
그 후 상단에 muscleCat.jump()메서드를 소환해 헬스냥의 y위치를 상단으로 올려 점프 효과를 준다.
이 부분이 헬스냥의 짬푸담당이다.
jumpTimer변수를 증가시키면서 점프를 얼마나 오래 유지할 지 계산한다.
jumpSwitch가 false인 경우 헬스냥의 y위치를 점프 동작이 끝날 때 까지 원 위치로 내려가게 한다.
jumpTimer가 10을 초과하는 경우, 점프 동작이 끝났다고 판단하고 jumpSwitch를 다시 flase로 설정해 jumpTimer를 0으로 초기화해 다음 점프를 위한 준비를 한다.
장애물 박스 세팅
let boxImage = new Image();
boxImage.src = '/image/box.svg';
class Box {
	constructor() {
    	this.width = 32;
      	this.height = 24;
      	this.x = canvas.width - this.whidth;
      	this.y = 156;
    }
  	draw() {
    	ctx.drawImage(boxImage, this.x, this.y, this.width, this.height);
    }
}
헬스냥을 세팅해준것과 같이 장애물을 세팅해준다.
화면의 우측에서부터 나타나게 해주기 위해 x값을 계산해 넣어준다.
let timer = 0;
let jumpTimer = 0;
let manyBoxes = [];
let animation;

function frameRun() {
	animatiom = requestAnimationFrame(frameRun)
  	timer++;
  	ctx.clearRect(0, 0, canvas.width, canvas.height);

  	if (timer % 120 === 0) {
    	let box = new Box();
      	manyBoxes.push(box);
    }
  	manyBoxes.forEach((a, i, o) => {
    	if (a.x < 0) {
        	o.splice(i, 1);
        }
      	a.x--;
    });
}
frameRun();
위에 헬스냥이 쩜프를 하도록 돕는 루프 함수에 함께 들어간다.
manyBoxes배열을 만들어 박스를 120프레임마다 마구마구 만들어준다.
이 때 만들어진 박스들이 배열안에 담겨만 있으면 언젠가 소중한 컴퓨터가 화를낼 수 있으니 splice로 x좌표가 0인 박스들을 제거해주자.
헬스냥과 장애물 충돌 확인
function crash(muscleCat, box) {
	let xCalculate = box.x - (muscleCat.x + muscleCat.width);
  	let yCalculate = box.y - (muscleCat.y + muscleCat.height);

  	if (xCalculate < 00 && yCalculate < 0) {
    	ctx.clearRect(0, 0, canvas.width, canvas.height);
      	cancleAnimationFrame(animation);
    }
}
장애물과 헬스냥의 x,y좌표간의 거리를 계산해주고 이 두개를 빼서 거리를 구해준다.
x와 y축의 거리 모두가 0보다 작으면(충돌하면) 캔버스의 모든 내용을 지워서 애니메이션 프레임을 중지해준다.
function frameRun() {
	manyBoxes.forEach((a, i, o) => {
    	crash(muscleCat, a);
      	a.draw();
    });
}
나오는 모든 박스들과 헬스냥의 충돌을 체크해야하니 충돌체크는 이 사이에 넣어준다.
최종 script 코드
let canvas = document.getElementById("canvas");
let ctx = canvas.getContext("2d");
canvas.width = window.innerWidth;

// 헬스냥
const catSvg1 = `svg 코드~~~`;
const catSvg2 = `svg 코드~~~`;

// catSvg1과 catSvg2를 이미지 객체로 변환
const catImages = [new Image(), new Image()];
catImages[0].src = "data:image/svg+xml," + encodeURIComponent(catSvg1);
catImages[1].src = "data:image/svg+xml," + encodeURIComponent(catSvg2);

let currentCat = 0;

let muscleCat = {
  x: 20,
  y: 120,
  width: 50,
  height: 60,
  draw() {
    ctx.fillStyle = "pink";
    ctx.fillRect(this.x, this.y, this.width, this.height);
    ctx.drawImage(
      catImages[currentCat],
      this.x,
      this.y,
      this.width,
      this.height
    );
  },
  jump() {
    this.y -= 7;
  },
  fall() {
    if (this.y < 10) {
      this.y += 8;
    }
  },
};

// 장애물
let boxImage = new Image();
boxImage.src = "/image/box.svg";
class Box {
  constructor() {
    this.width = 32;
    this.height = 24;
    this.x = canvas.width - this.width;
    this.y = 156;
  }
  draw() {
    ctx.fillStyle = "green";
    ctx.fillRect(this.x, this.y, this.width, this.height);
    ctx.drawImage(boxImage, this.x, this.y, this.width, this.height);
  }
}

let timer = 0;
let jumpTimer = 0;
let manyBoxes = [];
let animation;

// 프레임마다 실행하기
function frameRun() {
  animation = requestAnimationFrame(frameRun);
  timer++;
  ctx.clearRect(0, 0, canvas.width, canvas.height);

  // 이미지 교체 처리
  if (timer % 10 === 0) {
    currentCat = (currentCat + 1) % 2;
  }
  // 프레임마다 장애물 소환
  if (timer % 120 === 0) {
    let box = new Box();
    manyBoxes.push(box);
  }
  // x좌표가 0미만이면 제거
  manyBoxes.forEach((a, i, o) => {
    if (a.x < 0) {
      o.splice(i, 1);
    }
    a.x--;
    // 충돌 체크
    crash(muscleCat, a);
    a.draw();
  });

  // 점프!
  if (jumpSwitch == true) {
    muscleCat.jump();
    jumpTimer++;
  }
  if (jumpSwitch == false) {
    if (muscleCat.y < 120) {
      muscleCat.y++;
    }
  }
  if (jumpTimer > 10) {
    jumpSwitch = false;
    jumpTimer = 0;
  }
  muscleCat.draw();
}
frameRun();

// 충돌확인
function crash(muscleCat, box) {
  let xCalculate = box.x - (muscleCat.x + muscleCat.width);
  let yCalculate = box.y - (muscleCat.y + muscleCat.height);
  if (xCalculate < 0 && yCalculate < 0) {
    ctx.clearRect(0, 0, canvas.width, canvas.height);
    cancelAnimationFrame(animation);
  }
}

var jumpSwitch = false;
// 헬스냥 spaceBar
document.addEventListener("keydown", function (e) {
  if (e.code === "Space") {
    jumpSwitch = true;
  }
});
💡to do
1. 헬스냥 여러번 짬프 금지
2. 장애물 소환되는 시간대 랜덤하게
3. 점수판 만들기
4. 게임오버 시 뜨는 화면 만들기
마무리로 내가 그린 귀여운 헬스냥을 놓고간다😇ㄱㅇㅇ
참고: 코딩애플
큰 도움이 되었습니다, 감사합니다.