
Scroll based Animation
- 기본 HTML 페이지에 Three.js가 배경으로 사용되는 방법
- camera가 scroll을 따라가도록 하는 방법
- ticks
- cursor 움직에 따른 parallax animation
- 특정 페이지에 도달하면 animation 발동
Setup
- 기존에 three.js canvas만 보이는 것이 아닌 html페이지가 같이 보여야 하므로, scroll 되도록 변경해준다. overflow hidden 부분을 없앤다.
/* html,
body
{
    overflow: hidden;
} */- 그러면 끝까지 scoll 시, 화면 배경 색이 다른 것을 알 수 있다.
- 이를 해결 하기 위해서 render의 alpha값을 바꾸고, html background를 변경한다.
const renderer = new THREE.WebGLRenderer({
    canvas: canvas,
    alpha: true
})
html
{
background: #1e1a20;
}Object
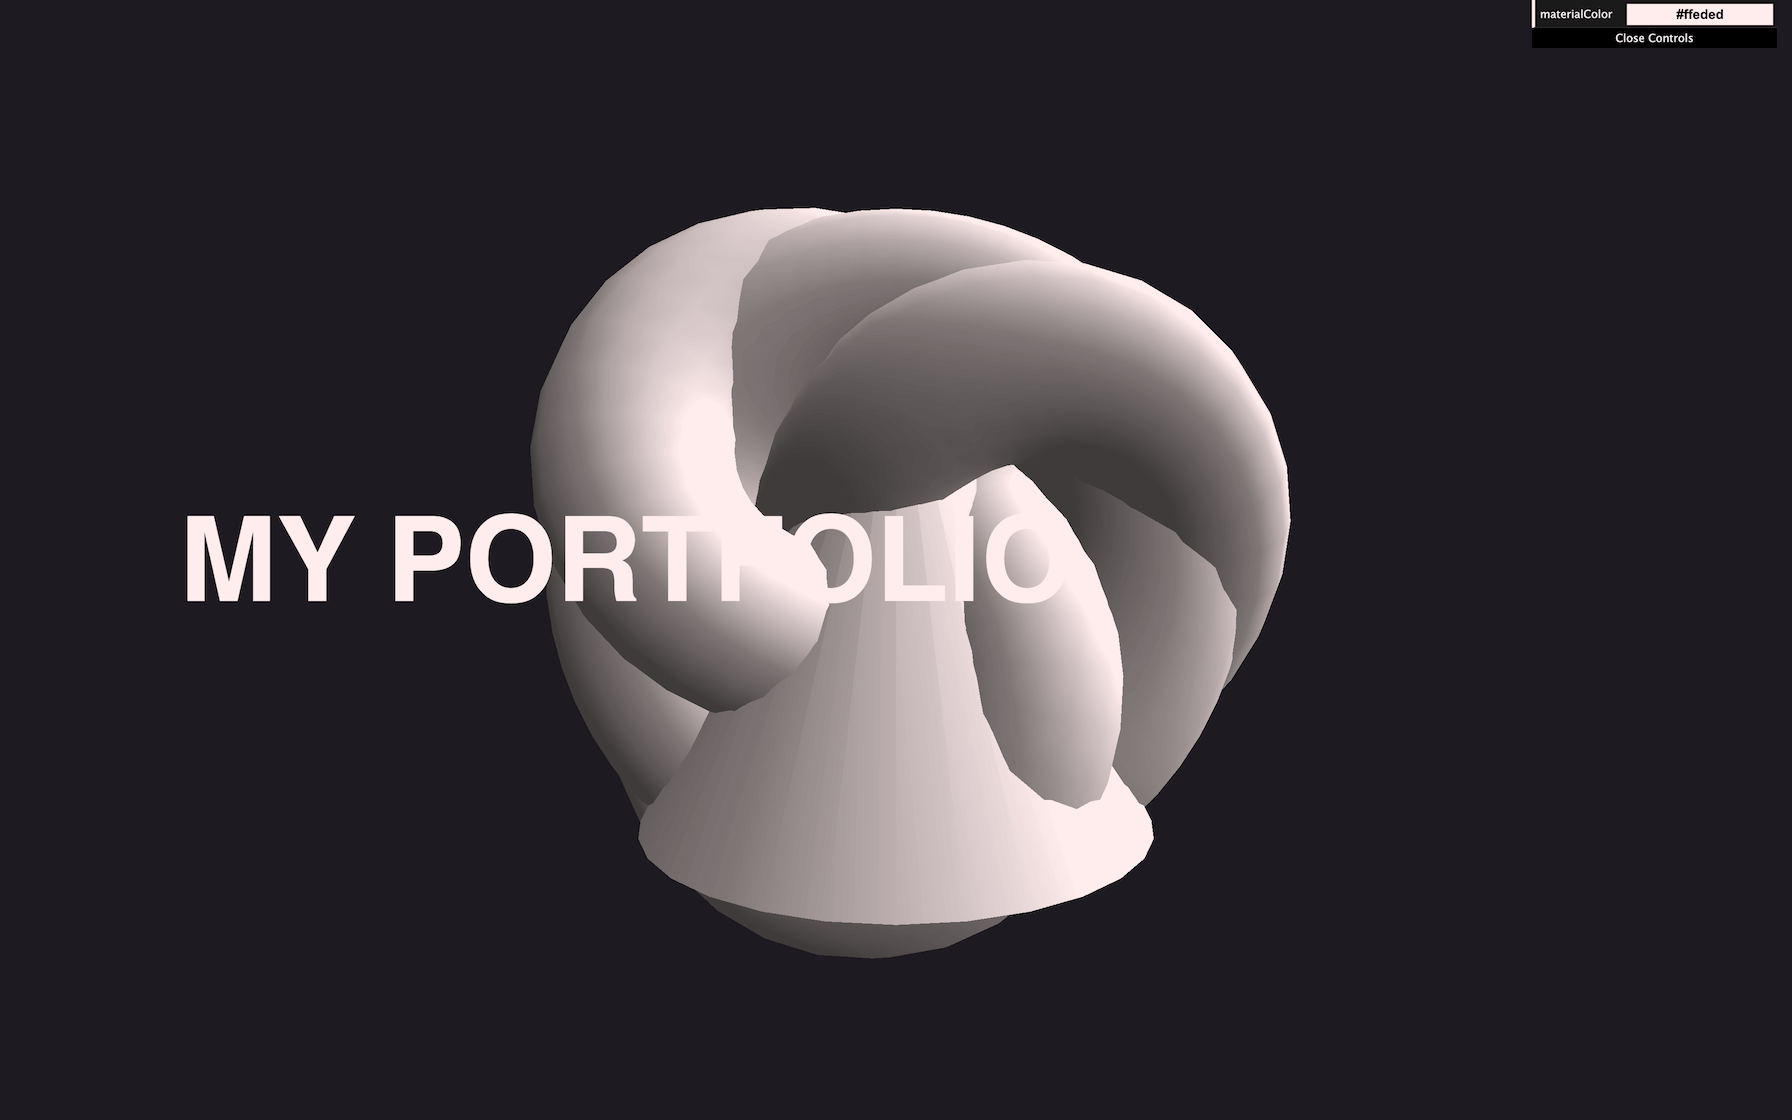
- object들을 import한다.
- toonmaterial을 입힌다.
// Material
const material = new THREE.MeshToonMaterial({ color: parameters.materialColor })

// Meshes
const mesh1 = new THREE.Mesh(
    new THREE.TorusGeometry(1, 0.4, 16, 60),
    material
)
const mesh2 = new THREE.Mesh(
    new THREE.ConeGeometry(1, 2, 32),
    material
)
const mesh3 = new THREE.Mesh(
    new THREE.TorusKnotGeometry(0.8, 0.35, 100, 16),
    material
)

scene.add(mesh1, mesh2, mesh3)
toonmaterial은 빛이 있을 때만 나타난다.
- 빛을 추가해준다.
/**
 * Lights
 */
const directionalLight = new THREE.DirectionalLight('#ffffff',3)
directionalLight.position.set(1,1,0)
scene.add(directionalLight)
- Toonmaterial이 지금은 2개로만 구분되지만 gradient texture를 추가하면 더 다채로워진다.
- textureLoader와 gradient texture를 활용해서 바꾸어준다.
- material의 gradientMap 속성을 gradientTexture로 변경한다.
// Texture
const textureLoader = new THREE.TextureLoader()
const gradientTexture= textureLoader.load('textures/gradients/3.jpg')


const material = new THREE.MeshToonMaterial({
    color: parameters.materialColor,
    gradientMap: gradientTexture
})
그러나 이렇게만 하면 우리가 원하는 3개의 gradient로만 나뉘지 않는다.
왜냐하면 Three.js에서 자동적으로 gradient texutre를 혼합해서 사용하기 때문이다.
이를 해결 하기 위해서 해당 texture의 magFilter를 NearestFilter로 변경해주어야한다.
gradientTexture.magFilter = THREE.NearestFilter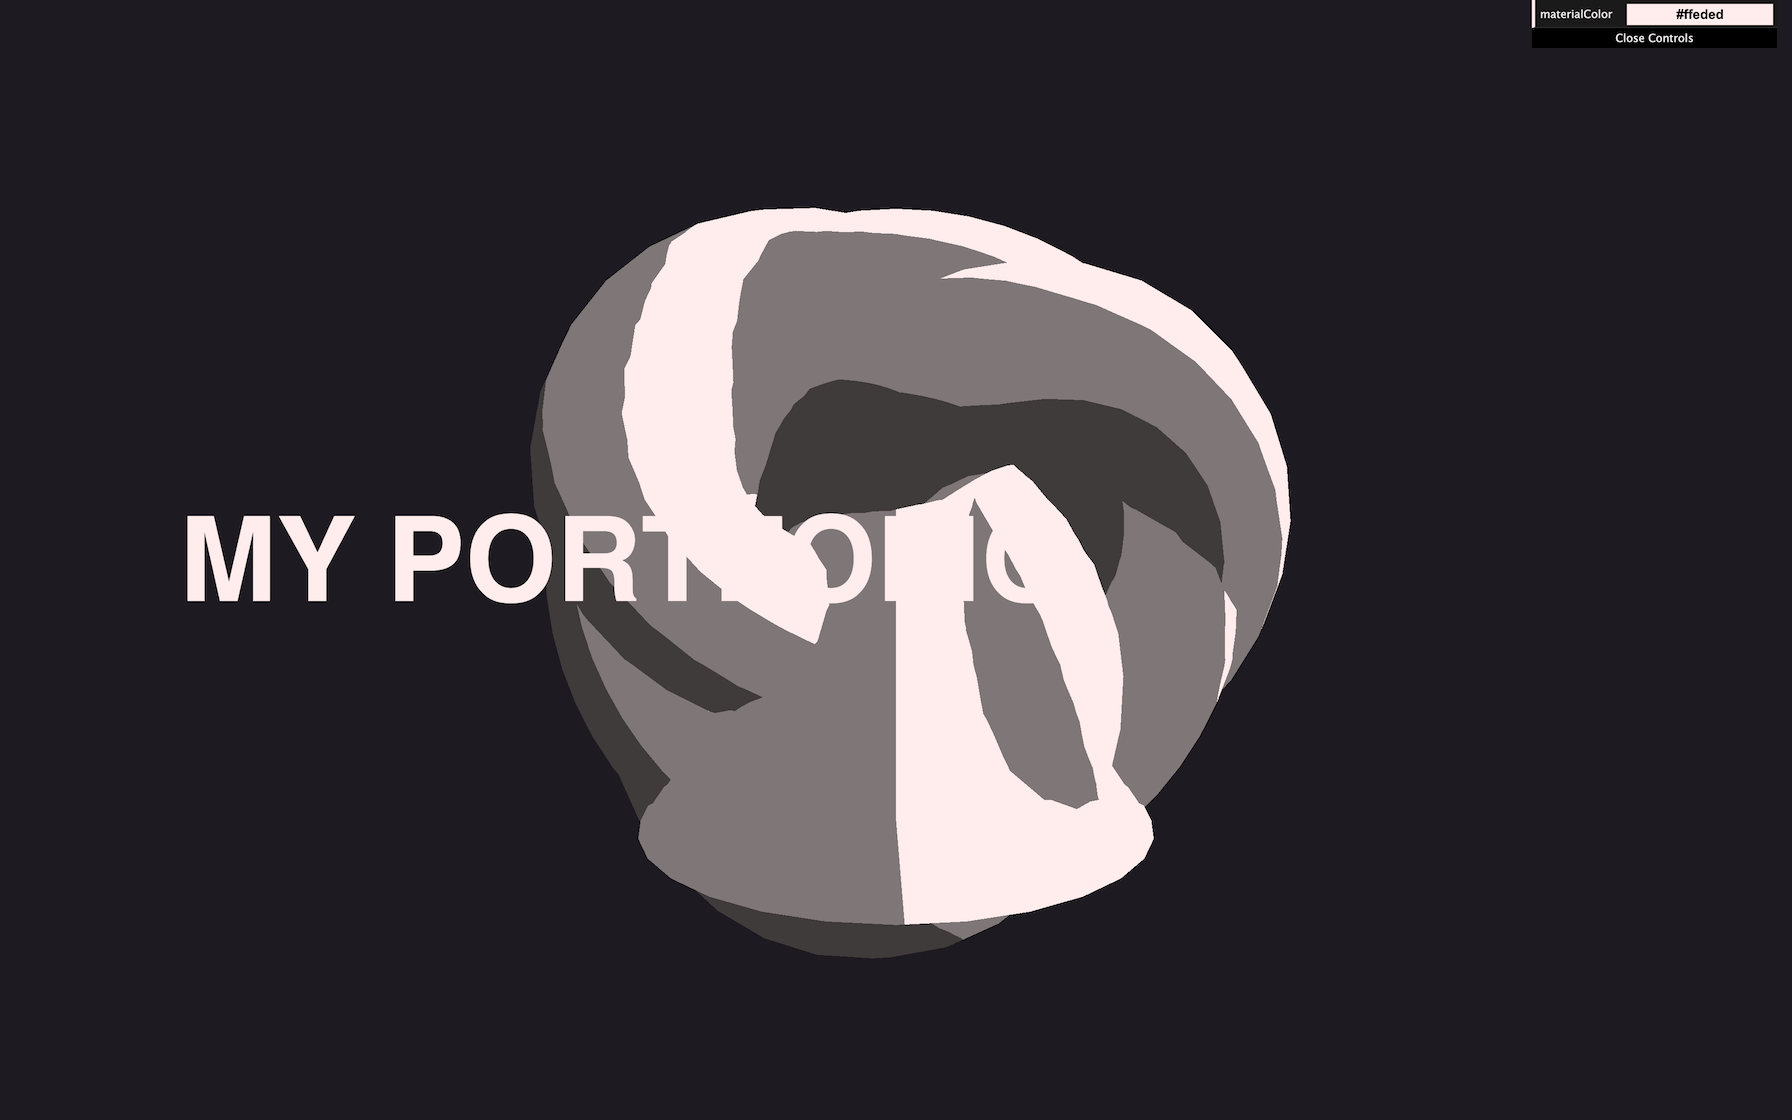
- 이제 위치를 변경해보자
mesh1.position.y = 2
mesh1.scale.set(0.5, 0.5, 0.5)

mesh2.visible = false

mesh3.position.y = - 2
mesh3.scale.set(0.5, 0.5, 0.5)
- 스크롤을 내리고, window 사이즈를 변경해도 top, bottom에 고정된다.
- 이유는 Three.js에서 fov는 수직적이기 때문이다.
- objectDistance를 사용해서 위치를 지정하고 이후에 scroll 시, camera를 조정하면 된다.
const objectsDistance = 4

mesh1.position.y = - objectsDistance * 0
mesh2.position.y = - objectsDistance * 1
mesh3.position.y = - objectsDistance * 2
Camera
- scroll 시에 camera 위치를 조정해보자
- scrollY 변수 생성 후에 addEventListener로 scroll event 확인 후 해당 변수 값을 update해주자
- 매 tick 마다 cmaera의 position을 scollY로 변경한다.
- scroll 방향과 position.y의 방향이 다르므로 마이너스로 사용한다.
/**
 * Scroll
 */
let scrollY = window.scrollY

window.addEventListener('scroll', () =>
{
    scrollY = window.scrollY

    console.log(scrollY)
})

const tick = () =>
{
    // ...

    // Animate camera
    camera.position.y = -scrollY

    // ...
}- 위의 코드로 실행해보면 너무 빠르게 넘어간다.
- 이를 해결하기 위해서 window size와 objectDistance를 활용한다.
camera.position.y = - scrollY / sizes.height * objectsDistance- 이제는 mouse에 따라서 camera를 움직여보도록 변경해보자
- cursor object를 만들고 addEventListner를 사용해서 mouse 위치 값을 저장
- 해당 변수를 window width, height로 나누누고 0.5를 빼서 관리하자
- 매 tick 마다 camera의 위치를 cursor 위치 값으로 바꾸면 적용된다.
const cursor = {}
cursor.x = 0
cursor.y = 0

window.addEventListener('mousemove', (event) =>
{
    cursor.x = event.clientX / sizes.width - 0.5
    cursor.y = event.clientY / sizes.height - 0.5
})

const tick = () =>
{
    // ...

    // Animate camera
    camera.position.y = - scrollY / sizes.height * objectsDistance

    const parallaxX = cursor.x
    const parallaxY = -cursor.y
    camera.position.x = parallaxX
    camera.position.y = parallaxY

    // ...
}
여기서 주의해야할 점은 cursor.y의 경우 아래로 내려가는게 마이너스 값이므로
camera position에 적용 할때는 - 한 값을 적용해준다.
- 위와 같이 코드를 추가하면, 기존에 있던 scroll 시, 다른 object로 camera가 이동하는 기능이 작동하지 않는다.
- camera를 group으로 묶어서 사용하면 해결된다.
- cameraGroup을 만들고, 거기에 camera를 추가해서 scene에는 cameraGroup을 추가한다.
- 그리고 cursor animation에서 camera의 위치를 변경하는 것이 아닌, cmaeraGroup을 조작하면 정상 작동된다.
/**
 * Camera
 */
// Group
const cameraGroup = new THREE.Group()
scene.add(cameraGroup)

// Base camera
const camera = new THREE.PerspectiveCamera(35, sizes.width / sizes.height, 0.1, 100)
camera.position.z = 6
cameraGroup.add(camera)

const tick = () =>
{
    // ...

    // Animate camera
    camera.position.y = - scrollY / sizes.height * objectsDistance

    const parallaxX = cursor.x
    const parallaxY = - cursor.y

    cameraGroup.position.x = parallaxX
    cameraGroup.position.y = parallaxY

    // ...
}- 위의 기능(mouse에 따라서 camera가 이동하는 기능)을 좀 더 자연스럽게 만들어보자
- 이동해야하는 위치와 현재 카메라 위치의 차이에 1/10만큼 더해주면 자연스러워진다.
cameraGroup.position.x += (parallaxX - cameraGroup.position.x) * 0.1
cameraGroup.position.y += (parallaxY - cameraGroup.position.y) * 0.1- 이렇게 하면 문제가 frame rate가 많은 모니터의 경우 더 빠르게 움직인다.
- 즉, 모든 이용자가 동일하지 않다.
- 이를 위해서 frame rate를 계산해서 해당 기능에 적용해준다.
const tick = () =>
{
    const elapsedTime = clock.getElapsedTime()
    const deltaTime = elapsedTime - previousTime
    previousTime = elapsedTime

    cameraGroup.position.x += (parallaxX - cameraGroup.position.x) * 5 * deltaTime
    cameraGroup.position.y += (parallaxY - cameraGroup.position.y) * 5 * deltaTime
    // ...
}
Particles
- 만들어진 page 위에 random으로 particle을 생성해보자
- 우선 random particle을 만들어 준다.
const particleCount = 2000

const particleMaterial = new THREE.PointsMaterial({
    color: parameters.materialColor,
    sizeAttenuation: true,
    size: 0.03
})
const particleGeometry = new THREE.BufferGeometry()

const particlePosition = new Float32Array(particleCount*3)

for(let i=0;i<particleCount;i++){
    const i3 = i*3

    particlePosition[i3] = (Math.random()-0.5) * 10
    particlePosition[i3+1] = (Math.random()-0.5) * 10
    particlePosition[i3+2] = (Math.random()-0.5) * 10
}
particleGeometry.setAttribute('position', new THREE.BufferAttribute(particlePosition,3))

const particles = new THREE.Points(particleGeometry,particleMaterial)

scene.add(particles)- 여기에 y position을 활용해서 3 section에 모두 particle이 위치하도록 변경한다.
- 각각의 object들 사이의 반의 거리를 움직이도록 할 것이다.
particlePosition[i3+1] = objectsDistance * 0.5 - Math.random()- 그리고 모든 section에까지 사용되도록 objectsDistance와 section의 개수를 곱해준다.
- random에 곱해주어야한다.
objectsDistance * 0.5 - Math.random() * objectsDistance * sectionMeshes.lengthTriggered Roatations
- section이 바뀔 때마다 해당 object에 animation을 주도록 해보자
- 우선, section이 바뀌었는지를 체크해주어야한다.
- currentSection 변수와 scroll 시에 newSection을 설정해서 체크해준다.
- currentSection과 newSection이 다르면 animation을 사용하면 된다.
let scrollY = window.scrollY
let currentSection = 0

window.addEventListener('scroll', () =>
{
    scrollY = window.scrollY
    const newSection = Math.round(scrollY / sizes.height)

    if(newSection != currentSection)
    {
        currentSection = newSection

        console.log('changed', currentSection)
    }
})- animation을 사용하기 위해서 gsap 라이브러리르 사용한다.
- npm install gsap@3.12 을 설치한다.
- gsap 함수를 사용해서 animation을 실행한다.
- 여기까지만 하면 작동되지 않는다 왜냐하면 전에 object.rotation.y 값을 바로 할당해주었기 때문이다.
- 이를 해결 하기 위해서 직접 대입이 아닌, deltaTime 값을 더해주도록 바꾼다.
import gsap from 'gsap'

window.addEventListener('scroll', () =>
{
    // ...

    if(newSection != currentSection)
    {
        // ...

        gsap.to(
            sectionMeshes[currentSection].rotation,
            {
                duration: 1.5,
                ease: 'power2.inOut',
                x: '+=6',
                y: '+=3',
                z: '+=1.5'
            }
        )
    }
})

const tick = () =>
{
    // ...

    for(const mesh of sectionMeshes)
    {
        mesh.rotation.x += deltaTime * 0.1
        mesh.rotation.y += deltaTime * 0.12
    }

    // ...
}
https://19-scroll-d0dcrj6r5-hwangsangjins-projects.vercel.app/

Web FrontEnd Developer