
여행 프로젝트를 구현하는데 있어 사용자가 달력에서 여행 시작일과 마치는 일자를 선택해서 input창에 반영시켜야 하는 기능이 있었고, 시간을 효율적으로 활용하기 위해서 react-calendar 라이브러리를 사용했다.
1. 설치
yarn add react-calendar2. css customizing
1) 기존 css 파일 활용해서 새로운 css 파일 생성
- react-calendar를 설치하고 node_modules 폴더에서 react-calendar → dist → Calendar.css를 확인할 수 있다. 해당 파일에서 css 코드를 복사해서 새로운 컴포넌트 루트에 styles.css 파일을 생성해서 복사해온 css 코드를 붙여넣어서 customizing을 진행했다.
2) 달력 전체 모양 잡기
- 나의 경우 달력 자체의 넓이와 모양, 그리고 그림자 효과를 따로 주고 싶었다.
.react-calendar {
  width: 350px;
  max-width: 100%;
  background: #ffff;
  border: 1px solid #eeeeee;
  font-family: Arial, Helvetica, sans-serif;
  line-height: 1.125em;
  border-radius: 10px;
  box-shadow: 0px 0px 20px #e0e0e0;
}
3) 현재 날짜 css 변경
- 현재 날짜가 달력에 표시될 때 background color에 변화를 주었다.
.react-calendar__tile--now {
  background: #ef5350;
  color: #fafafa;
}

.react-calendar__tile--now:enabled:hover,
.react-calendar__tile--now:enabled:focus {
  background: #ef5350;
  color: #fafafa;
}
4) 선택된 일자 css 변경
- 사용자가 여행 시작일자와 마치는 일자를 달력에 선택하면 선택된 일자들의 background color에 변경을 주었다.
.react-calendar__tile--active {
  background: #7fb77e;
  color: white;
}
.react-calendar__tile--active:enabled:hover,
.react-calendar__tile--active:enabled:focus {
  background: #7fb77e;
}
3. 기능 구현
1) 달력에 00일 → ‘일’ 생략해서 몇 일인지만 나오도록 구현
formatDay={(locale, date) => moment(date).format("DD")}로 설정하면 됨- moment 라이브러리 설치해야 됨!
yarn add moment
<Calendar
	onChange={changeDate}
	selectRange={true}
	formatDay={(locale, date) => moment(date).format("DD")}
/>
2) useState 생성
- import
import React, { useEffect, useState } from "react";
- 여행 시작 일 useState 생성
const [startDate, setStartDate] = useState(); - 여행 마치는 일 useState 생성
const [endDate, setEndDate] = useState();
3) onChange 함수 생성
- 사용자가 일자를 선택할 때 변경되는 상태를 반영하기 위해서 onChange 함수 생성
const changeDate = e => {
    // event를 받아서 yyyy/mm/dd 형식으로 일자를 포맷팅해줌
    // e[0]은 사용자가 여행 일자로 선택한 시작 일자가 들어감
    // e[1]은 사용자가 여행 마치는 일자로 선택한 일자가 들어감
    const startDateFormat = moment(e[0]).format("YYYY/MM/DD");
    const endDateFormat = moment(e[1]).format("YYYY/MM/DD");
	// 여행 시작일자와 마치는일자의 값이 변할 때마다 값을 다시 세팅해줌
    setStartDate(startDateFormat);
    setEndDate(endDateFormat);
};- 적용
<Calendar
	onChange={changeDate} // 적용된 부분
	selectRange={true}
	formatDay={(locale, date) => moment(date).format("DD")}
/>
4) selectRange={true} 설정
- 사용자가 여행 시작일과 마치는 일자에 대한 영역을 지정해야 하므로 true로 설정한다.
<Calendar
	onChange={changeDate}
	selectRange={true} // 적용된 부분
	formatDay={(locale, date) => moment(date).format("DD")}
/>
5) 여행 시작일, 여행 마치는 일자 input 태그에 반영
- value를 startDate와 endDate를 반영해준다.
- {startDate || “”} 처리는 startDate에 값이 없을 경우도 처리해주기 위해 설정한 부분이다.
- 그리고 input창은 disabled로 설정해준다.
- 사용자가 직접 input태그에 값을 입력하는 것이 아닌 달력에서 선택한 값으로 설정되어야 하기 때문에 disabled로 처리해줬다.
<input
  type="text"
  className="w-full p-2 text-sm border-b-2 border-green1 outline-none opacity-70 my-5 bg-transparent"
  placeholder="출발하는 날짜를 입력해주세요"
  value={startDate || ""}
  disabled
  />
<input
  type="text"
  className="w-full p-2 text-sm border-b-2 border-green1 outline-none opacity-70 bg-transparent"
  placeholder="돌아오는 날짜를 입력해주세요"
  value={endDate || ""}
  disabled
/>
6) 적용
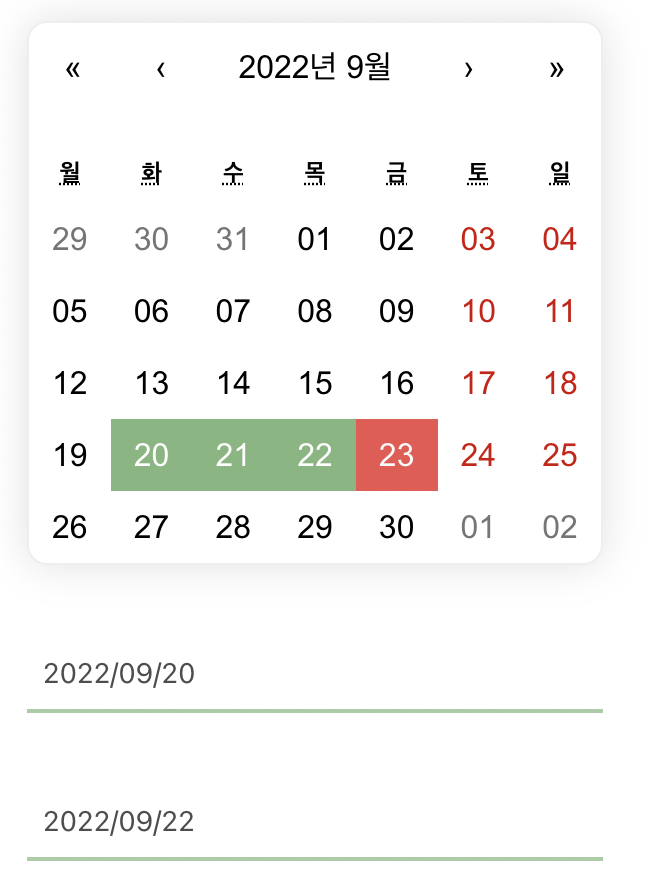
- 달력에 선택한 영역들이 input태그에 반영된 것을 확인할 수 있다!
참고 자료

개인 공부 정리
test