Yocto reference manual: https://docs.yoctoproject.org/ref-manual/index.html
Yocto
- Yocto Project 소개
- Linux 배포판에는 수천가지 Component가 들어갈 것이고.. rootfs도설정해야하고.. 거기다가, x86 기반이 아닌 Embedded SoC하나하나 BSP 해야하고.. Yocto를 사용하면 관리할 수 있다.
- 특정 BSP를 위한 레이어도 제공되고...
- 그위에 무슨 컴포넌트를 넣을 것이며...
- 이것 저것해서 이미지로 뙇! 만들 수 있다. (이걸 수작업한다고 생각하면.....)
- 그래서 그만큼 방대하다. 하루아침에 뚝딱 할 수 없으니 이미지 만들어보고 나만의 컴포넌트 레시피도 제작해보고.. 하다보면 서서히 빅 픽처가 보일 것이다...!!!!!!!!
- 우선 poky를 받아서 core-image-minimal 이미지를 만들어보고 나중에 라즈베리파이에 나만의 이미지를 올려보고 .. 해보자.
- Linux 배포판에는 수천가지 Component가 들어갈 것이고.. rootfs도설정해야하고.. 거기다가, x86 기반이 아닌 Embedded SoC하나하나 BSP 해야하고.. Yocto를 사용하면 관리할 수 있다.
- Yocto Project의 기본 구성요소
OpenEmbedded-Core(OpenEmbedded project와 공유되는core meta data,base layer묶음)Poky: Yocto Project의 reference system으로, 다양한 tool과 metadata로 이루어짐. 여기서 자신만의 레시피를 이용해 이미지 생성 가능bitbake: python과 shell script로 이루어진 task scheduler. build하고자하는source를 다운로드, 빌드,install한다.
Yocto Project 순서
- poky를 다운로드하고 환경 설정한다.
- 자신의 타겟 보드에 맞는 BSP Layer를 준비한다.
2.1. 있는 레이어 다운받아서 레시피나 레이어에 추가하는게 정신건강에 좋음 - 자신의 타겟 보드에 맞는 general layer를 만듦
- 이 이후 bitbake가 일을 진행한다. recipe 파일을 토대로, build에 필요한 모든 소스코드를 다운로드 fetch 한다.
- patch가 있다면, patch도 한다.
- configure, compile을 진행한다.
- install한다.
- build가 성공하면, Package 파일(
.rpm,.deb,ipk) 등이 생성된다. - image를 생성한다.
'build' 디렉토리
- Poky에선 어떤 레이어들을 모아서 하나의 개별 build 디렉토리 로 관리한다.
- VisualStudio Project라고 생각하면 편하다.
$ sourcebash명령으로 oe-init-build-env를 현재 쉘에 쉘 명령을 먹이면, 현재 쉘은 지정한 'build' 디렉토리를 관리하는 쉘이 된다.
$ source ./oe-init-build-env [BUILD DIRECTORY]
$ # 여기서 부터 지정한 [BUILD DIRECTORY]를 관리하는 쉘 명령이 먹힌다.
[BUILD DIRECTORY]를 공란으로 두면, build 디렉토리가 생성되고 이 디렉토리를 관리하게 된다.
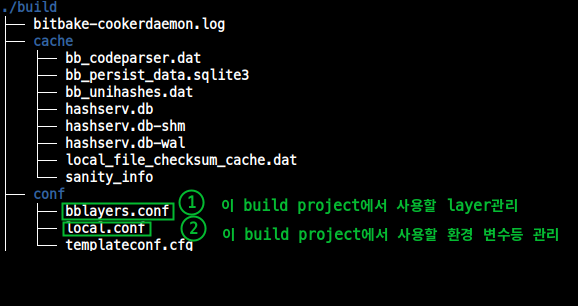
'build' Tree
build/conf/
build/conf/에서,
bblayer.conf: 사용할 레이어 관리, 레이어 우선순위 등 관리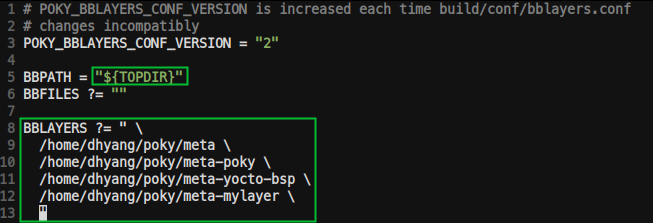
local.conf: 현재 build 디렉토리 환경 설정 설정- 각 파일의 개요도

내 BUILD의 사용 레이어 관리
build/conf/bblayers.conf에서 관리


BBLAYERS변수에 레이어 디렉토리가 나열되어 있다.- 이 목록의
conf/layer.conf파일을 찾아 그 레이어에 있는 레시피, 클래스, 설정 파일의 집합을 가리키게 하려 ->BBPATH목록에 이 레이어를 추가한다.
- 이 목록의
- 어떤 레이어가 존재하는지 알고 싶다면
$ bitbake-layers show-layers명령한다.
build/ 다른 디렉토리들
- downloads: 빌드에서 사용되는 레시피의 git repository와 upstream tarballs 다운로드 장소
- sstate-cache: share state cache
- tmp: 모든 빌드 시스템 아웃풋 유지
tmp/deploy/images/[machine]: image는 여기 존재한다.
- cache: bitbake의 parser에 의해 사용되는 캐시
Layer
- 관계 있는 레시피 모음: 그냥 레시피(package component가 될 수도 있고 image가 될 수도 있음)를 모아둔 것이라고 생각
- '레시피 콘테이너'라고도 한다.
- 일반적인 네이밍 규약:
meta-<layername> - Poky는 다음의 레이어를 가진다.
- meta, meta-poky, meta-selftest, meta-skeleton, meta-yocto-bsp
- 메타데이터 기능(BSPs, reference distribution configuration, etc.)에 따른 isolation mechanism


- 특정한 내 $BUILD/conf/bblayer.conf 에서 사용할 layer들을 지정한다.
- 나중에 공부하고 나면 머리에 들어온다.
- 레이어에 대한 자세한 설명: https://velog.io/@markyang92/Yocto-layer
layer들 소개
meta: OpenEmbedded core를 위한 meta datameta-yocto: poky를 포함한 Yocto Project를 위한 meta datameta-yocto-bsp: Yocto Project가 지원하는 reference machine에 대한 BSP를 포함하는 meta datameta-ti,meta-fsl-arm,meta-raspberrypi: SoC specific layermeta-browser: web browsers (Chrominum, Firefox)meta-filesystem: support for additional filesystems.meta-gstreamer10: support for GStreamer 1.0.meta-java,meta-oracle-java: Java supportmeta-linaro-toolchain: Linaro toolchain recipes.meta-qt5: QT5 modulesmeta-realtime: real time tools and test programs
- General layer: 일반 Application의 묶음을 위한 layer
- BSP layer: target board에 맞는 BSP Layer
meta-yocto-bsp
- BSP는 특정한 H/W 디바이스, 디바이스들 set 혹 플랫폼을 어떻게 서포트하는지 정의하는 metadata의 collection = layer
poky/meta-yocto-bsp/conf/machine/*.conf에 BSP-Layer에 의해 지원되는 HW 디바이스들이 리스트되어 있다.
specific/custom 레이어 추가
- download한 specific layer, custom layer 를 다룬다.
- 내부 레시피는 또 알아서 작성해야함
metadata
- 메타데이터는 Build Instruction을 참조한다.
- 커맨드와 데이터는 어떤 SW 버전 사용하는지 지정


- Metadata는 아래의 집합이다. (주의: meta-* 는 layer임)
- Configuration file (.conf)
- Recipes (.bb, .bbappend)
- Classes (.bbclass)
- Includes (.inc)
*.conf
.conf파일(메타데이터)는 주로 설정 역할
bblayers.conf
build/conf/bblayers.conf$ export LC_ALL=en_US.UTF-8
- poky가 build할 때 어떤 레이어를 사용할 것인지 정의
local.conf
build/conf/local.conf
- 빌드 시스템의 거의 모든 측면에서 설정
- local user settings를 포함
- Yocto project tool의 기본 설정들을 오버라이드(override)하기에 매우 유용하다.
- 특정 변수를 바꿀 수 있고, 이미지에 들어가는 패키지 추가
- 하지만
local.conf에 변화된 사항은 어떠한 소스코드 추적 불가이기 때문에 임시 변경으로 생각한다. local.conf역할은 아주 중요하므로 local.conf 변수는 링크에서 설명
Recipes
- bitbake에 의해 읽고 진행되는 명령어 집합
- 메타데이터 중 .bb 파일
- 레서피가 묘사하는 것들
- 소스 코드를 어디서 얻을 수 있나?
- apply를 위해 뭘 패치하나?
- Configuration options
- Compile options (라이브러리 디펜던시)
- Install
- License
- 레시피 예
- dhcp_4.4.1.bb
- gstreamer1.0_1.16.1.bb
따라서, 레시피는 특정한 소프트웨어 컴포넌트에 대한 정보를 묘사한다.
classes
- class file은 다수의 레시피(.bb)에서 일반적인 기능을 요약
- 레시피는 class를 상속 받는다.
- e.g. inherit classname
- extension: .bbclass
- 레이어/classes(
meta*/classes) 디렉토리 둔다.

- Example of classes
cmake.bbclass: 레서피 내 cmake를 처리한다.kernel.bbclass: 커널 building을 처리한다. 모든 커널 트리를 빌드하는 코드를 포함module.bbclass: 리눅스 커널 모듈 out-of-tree building에 대한 support를 제공한다.
OpenEmbedded Project
OpenEmbedded는 best-in-class 크로스 컴파일 환경을 제공한다.
이것으로 디벨로퍼가 embedded system용 리눅스 배포판 완성케한다.
From http://www.openembedded.org/wiki/Main_Page
- Yocto project와 O.E. Project는 openembedded-core 라는 메타 데이터의 핵심 컬렉션을 공유
- OpenEmbedded는 App, 기능, 아키텍처의 넓은 다양성의 포괄적인 집합이다.
- Yocto Project는 특정 보드/아키텍처의 Core Set에 대한 Powerful, Easy-to-use, interoperable, well-tested tools, metadata, BSP 제공에 집중
- oe-core(OpenEmbedded-Core) Yocto Project와 OpenEmbedded는 메타데이터의 공통 코어 셋을 쉐어
Image
- 타깃 머신에 올리는 이미지
package
- .rpm, .deb, .ipkg 바이너리 파일
- 하나의 컴포넌트 = 다수의 패키지
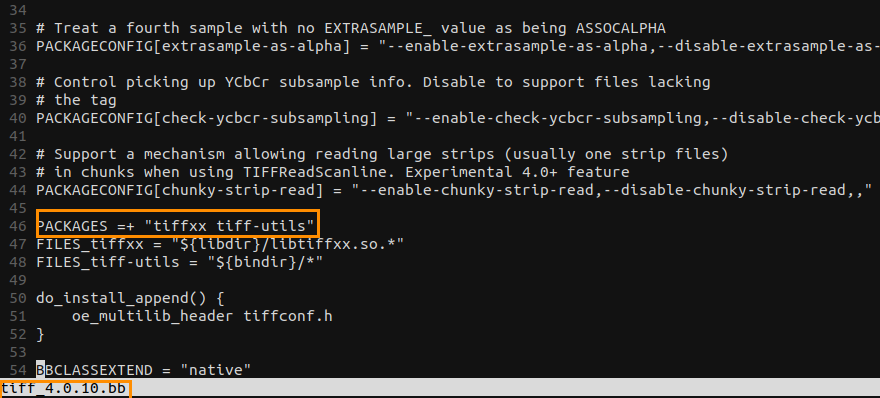
- 레시피가 생성했던 모든 패키지는 레시피 변수내 리스트된다.
vi meta/recipes-multimedia/libtiff/tiff_4.0.10.bbPACKAGES =+ "tiffxx tiff-utils"
Poky 설치
- 위에 설명 들은 yocto를 사용해보면서 자연스레 익히자.
우선, poky를 설치한다.
Prerequisites
1) 50 GBytes of free disk space
2) 지원되는 리눅스 배포판
3-1) Git 1.8.3.1 or greater
3-2) tar 1.28 or greater
3-3) Python 3.6.0 or greater
3-4) gcc 5.0 or greater
4) 8G 이상의 Host RAM
- 더욱 자세한 정보는 공식 Yocto Wiki 를 참고하자.
Packages 설치
- Ubuntu/Debian Host 기반 기준
- Essential Packages
$ sudo apt-get install gawk wget git diffstat unzip texinfo gcc build-essential chrpath socat cpio python3 python3-pip python3-pexpect xz-utils debianutils iputils-ping python3-git python3-jinja2 libegl1-mesa libsdl1.2-dev pylint3 xterm python3-subunit mesa-common-dev
- oss4-dev 패키지가 pre-installed 라면 참고
$ sudo apt list --installed | grep oss # oss4-dev [installed] 면 현재 빌드 시스템에서 oss4-dev 패키지가 설치된 상태- 공식 Wiki에서 oss4-dev 가 설치된 상태라면, QEMU build failure가 날 것이라 경고함
/usr/include/linux/soundcard.h때문이라는데 아래의 명령어를 이용해
1)build-dep, qemu 패키지 install 하고 2.oss4-dev 패키지는 uninstall 권장함
$ sudo apt-get build-dep qemu
$ sudo apt-get remove oss4-dev- Debian-8에서
apt-get을 통해 python3-git, pylint3가 더이상 사용불가
$ sudo pip3 install GitPython pylint==1.9.5
- poky를 clone 후, build tool을 설치하는 script를 돌려도 좋음
Wiki 공식 Page 참고
설치 시, trouble shooting
- locale 문제가 생기면
locale을 en_US.UTF-8로 setting!
$ sudo dpkg-reconfigure locales
$ sudo locale-gen en_US.UTF-8 && sudo update-locale LC_ALL=en_US.UTF-8 \
LANG=en_US.UTF-8
$ export LANG=en_US.UTF-8
$ export LC_ALL=en_US.UTF-8- trouble이 안생기면 그냥 넘어가도 된다.
libxcb라이브러리 패키지를 못찾는 문제
- libxcb 관련 패키지 설치
$ sudo apt-get install libxcb-randr0-dev libxcb-xtest0-dev libxcb-xinerama0-dev libxcb-shape0-dev libxcb-xkb-devPoky 설치
1. Download Poky source code
$ git clone git://git.yoctoproject.org/poky2. Checkout the latest branch/release
- 최근엔 본인은 dunfell 사용함
$ git checkout dunfell3. Prepare the build environment
- Poky 디렉토리 내부에
oe-init-build-env스크립트가 있는데, 빌드 환경을 설치하는 스크립트이다. - BUILD DIRECTORY 아규먼트를 주지 않으면 기본적으로
build로 디렉토리 명을 짓는다.
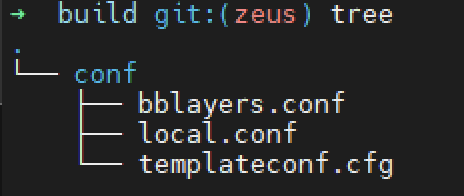
$ source poky/oe-init-build-env [BUILD DIRECTORY]- 위 명령을 실행하면, 스크립트는 [BUILD DIRECTORY]로 사용자를 이동 시키고, 두 개의 파일을
conf디렉토리에 생성한다.conf/local.confconf/bblayers.conf

4. local.conf 설정
- 타겟 머신 설정
build/conf/local.conf에서 타겟 시스템의MACHINE설정
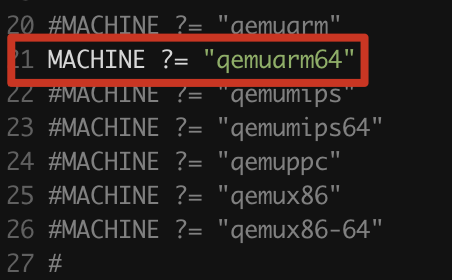
- 타겟 머신이 arm64이면,
qemuarm64설정

- 만약 위에서
MACHINE을 설정하지 않으면 기본 값으로qemux86-64가 셋 됨
5. Image 생성
$ bitbake <image_name>- Image_name (나중에 다양한 image, specific image 등 많음)
core-image-minimal: Device가 boot할 수 있게 하는 small image. very useful- Kernel, Bootloader 개발 시 유용

- Kernel, Bootloader 개발 시 유용
- build에서
bitbake core-image-minimal명령 실행
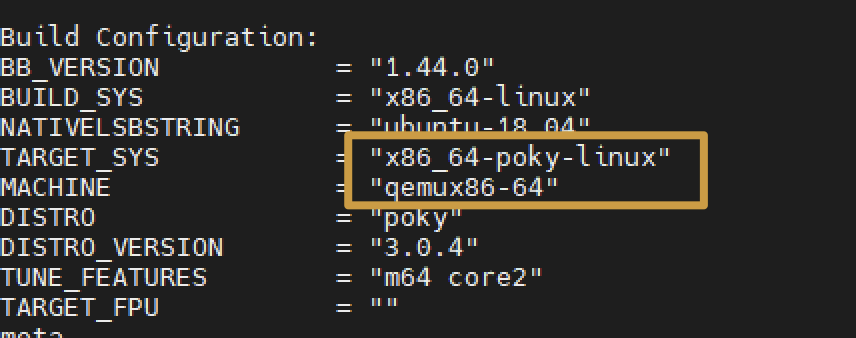 결과 타겟 시스템 정보 표시된다.
- BUILD SYSTEM:
x86_64-linux - NATIVELSBSTRING: 나중에 설명
- TARGET_SYS:
x86_64-poky-linux - MACHINE:
qemux86-64(target machine) - DISTRO:
poky
- BUILD SYSTEM:
nproc


run QEMU(runqemu)
5. Command to run the generated image in QEMU
-
Currently emulations are supported for:
- ARM
- MIPS
- MIPS64
- PowerPC
- X86
- X86_64
-
Poky는 Yocto가 생산한 이미지를 사용하는 QEMU를 실행할 수 있게 하는 스크립트
runqemu를 제공한다.- runqemu 스크립트는
poky/scripts/runqemu에 있다.
- runqemu 스크립트는

$ runqemu <machine> <zimage> <filesystem>
<machine>은 machine/architecture to use (qemuarm/qemumips/qemuppc/qemux86/qemux86-64)


Examples:
  runqemu
  runqemu qemuarm
  runqemu tmp/deploy/images/qemuarm
  runqemu tmp/deploy/images/qemux86/<qemuboot.conf>
  runqemu qemux86-64 core-image-sato ext4
  runqemu qemux86-64 wic-image-minimal wic
  runqemu path/to/bzImage-qemux86.bin path/to/nfsrootdir/ serial
  runqemu qemux86 iso/hddimg/wic.vmdk/wic.qcow2/wic.vdi/ramfs/cpio.gz...
  runqemu qemux86 qemuparams="-m 256"
  runqemu qemux86 bootparams="psplash=false"
  runqemu path/to/<image>-<machine>.wic
  runqemu path/to/<image>-<machine>.wic.vmdk
$ runqemu qemux86-64 core-image-minimal
- qemu 실행
- graphic mode:
$ runqemu qemux86-64 core-image-minimal - no-graphic mode:
$ runqemu qemux86-64 core-image-minimal nographic- ssh 환경이라면 no-graphic mode를 사용하자.
- graphic mode:
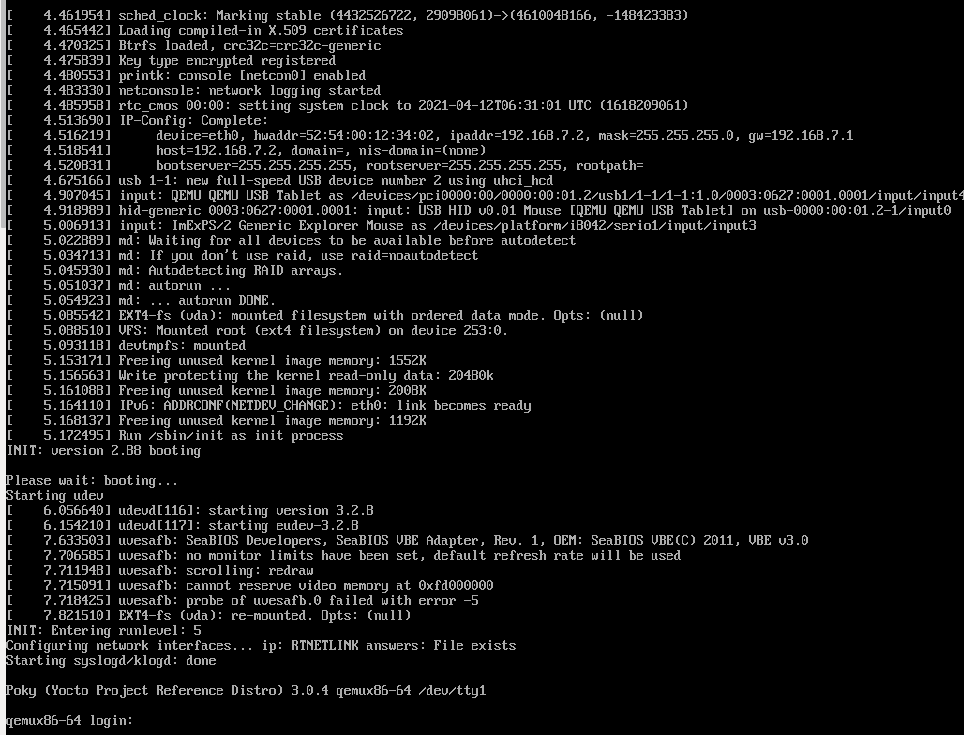
- qemux86-64 login: root 입력
-
df -hin qemu

-
cat /proc/cpuinfoin qemu
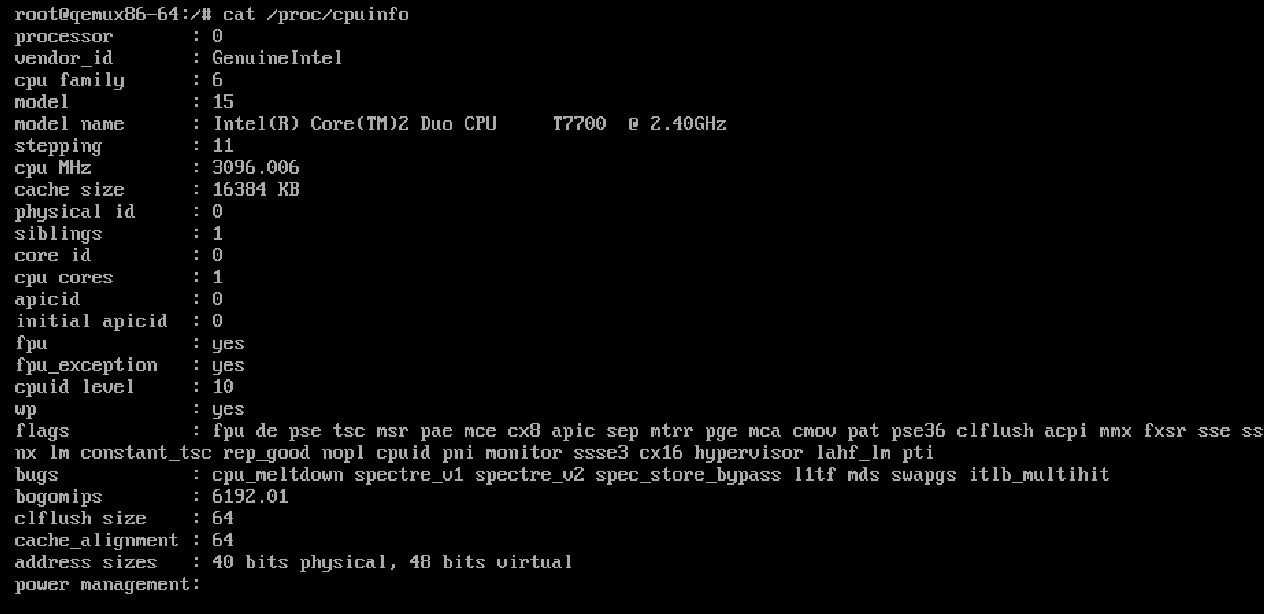
둘러보고 qemu 종료는 poweroff
docker 에서 runqemu
$ runqemu qemux86-64 <IMAGE> slirp nographictrouble-shooting
bitbake / runqemu 등이 안먹을 때
- 반드시
source oe-init-build-env <BUILD DIR>을 먼저 실행 후<BUILD DIR>에서bitbake, runqemu명령어가 먹는다.

source oe-init-build-env ./build_rpi4실행하면 어디서든 bitbake 명령이 build_rpi4 기준으로 되는 점 주의!- 당연히
source명령은 현재 shell에 영향을 주기 때문에, 깔끔하게 다른 쉘을 켜서 다른 bitbake job을 하는 것을 추천
- 당연히



이런 양질의 정보글 올려 주셔서 정말 감사합니다.
Yocto Project로 한참 해메고 있었는데 어느정도 갈피를 잡은 것 같습니다.다시 한번 감사의 말씀 드립니다. 좋은 하루 보내십시오.
문연수 올림.