
Embedded Board인 RaspberryPi 3 v1.2, RaspberryPi 4, BeagleBone Black 을 대상으로 U-Boot 부트로더를 설치하고 다룬다.
u-boot 설치
- prerequisite package
bison, flexdenx u-boot
- denx u-boot clone
$ git clone git://git.denx.de/u-boot.git
$ cd u-boot
$ git checkout <사용하고 싶은 Branch>

e.g,
$ git checkout v2021.07
Stephen Warren u-boot
- Stephen Warren's WIP branch
Stephen Warren은 RPI Support mainline U-boot - rpi_dev 브랜치: Upstream에 올라가기 전 WIP Repository.
$ git clone git://github.com/swarren/u-boot.git
$ git checkout -b rpi_dev origin/rpi_dev
기타 u-boot
u-boot내 디렉토리 설명

| Directory | Description |
|---|---|
arch | 지원되는 아키텍처별 코드를 arm, mips, powerpc등의 디렉토리에 담고 있다.각 아키텍처 안에는 해당 계열의 변종별 서브 디렉토리가 있다. arch/arm/cpu에는 armt926ejs, armv7, armv8 등의 디렉토리가 있다. |
board | 보드별 코드를 담고 있다. 같은 벤더에서 나온 여러 보드가 있으면, 서브 디렉토리로 묶을 수 있다. 따라서 비글본이 기반을 둔 arm335x evm 보드에 대한 지원은 board/ti/am335x에 있다. |
common | 명령 셸과, 명령 셸에서 부를 수 있는 명령들(각각 cmd_[명령이름].c라는 이름의 파일에 들어있다)을 포함하는 공통 핵심 기능들을 담고 있다. |
doc | U-Boot의 다양한 측면을 설명하는 README 파일들을 담고있다. U-Boot 이식을 어떻게 진행할지 궁금하다면, 여기서 출발하는 것이 좋다. |
include | 여러 공유 헤더 파일뿐만 아니라, 매우 중요한 서브디렉토리 (include/configs/(대다수의 보드 구성 설정)를 담고 있다. |
configs | Kconfig가 Kconfig 파일로부터 정보를 뽑아내고 전체 시스템 구성을 이름이 .config인 파일에 저장하는 방법보드별 기본 구성: configs/[board name]_defconfig |
configs
- u-boot의
configs디렉토리에는 1000개 이상의 구성 파일과 장치가 있다.
비글본 블랙이 사용하는 구성 파일:configs/am335x_boneblack_defconfig
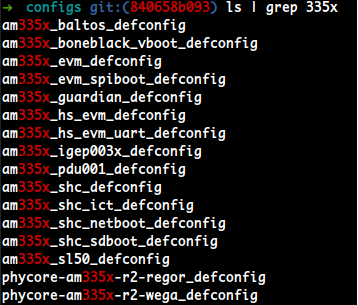
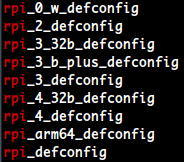
- RaspberryPi이 사용하는 구성 파일:
Cross compile setting
- 더 많은 Cross Compile Setting은 링크 참고
Pi 3B v.1.2
- arm 32bit:
arm
$ sudo apt install gcc-arm-linux-gnueabihf
$ sudo apt install gcc-arm-linux-gnueabi
$ export ARCH="arm"
$ export CROSS_COMPILE="arm-linux-gnueabi[hf]-"
$ make rpi_2_defconfig     # raspberrypi3 v.1.2
Pi 4
- arm 64bit:
aarch64
$ sudo apt install gcc-aarch64-linux-gnu
$ export ARCH="arm64"
$ export CROSS_COMPILE="aarch64-linux-gnu-"
$ make rpi_arm64_defconfig # raspberrypi4-64
비글본 블랙
- arm 32bit:
arm
$ sudo apt install gcc-arm-linux-gnueabihf
$ export ARCH="arm"
$ export CROSS_COMPILE="arm-linux-gnueabihf-"
$ make am335x_boneblack_vboot_defconfig
make로 컴파일
- cross compile
- 위의 cross compile setting이 되어 있다는 가정 하에 u-boot cross compile을 수행한다.
$ make -j4 RaspberryPi를 기준(
defconfig)으로 컴파일 한 것
 Beaglebone Black를 기준(
defconfig)으로 컴파일 한 것- 대표적으로 BBB의 SPL인
MLO가 있다.
- 대표적으로 BBB의 SPL인
u-boot 파일 종류
| u-boot 결과물 | 설명 |
|---|---|
u-boot | ELF 오브젝트 형식의 U-Boot. 디버거와 쓰기에 알맞다. |
u-boot.map | 심볼 테이블 |
u-boot.bin | RAW 바이너리형식 U-Boot. 장치에서 실행행하기 쉽다. |
u-boot.img | U-Boot Header + u-boot.bin실행 중인 U-Boot에 업로드하기에 알맞다. |
u-boot.srec | 모토로라 S-record(SRECORD 또는 SRE) 형식의 U-Boot. 시리얼 연결을 통해 전송하기에 알맞다. |
MLO | 비글본 블랙 용으로 config를 설정 후, 빌드 결과물로 나오는 비글본 블랙의 SPL |
- SD card Boot, Root 파티션 생성 관리는 링크 참고: fdisk using MBR partition manager tool
- Raspberry Pi에서 u-boot.bin을 올리는 것은 링크 참고:
- BeagleBone Black에서 u-boot image를 올리는 것은 아래 처럼 하면된다.
BBB에 u-boot 올리기
- 사전에 반드시 파티셔닝을 하고 링크
- 필요한 것은.. u-boot.bin
- 이 파일을 raspberrypi4에서 linux kernel 대신 로드할 수 있도록해야한다.
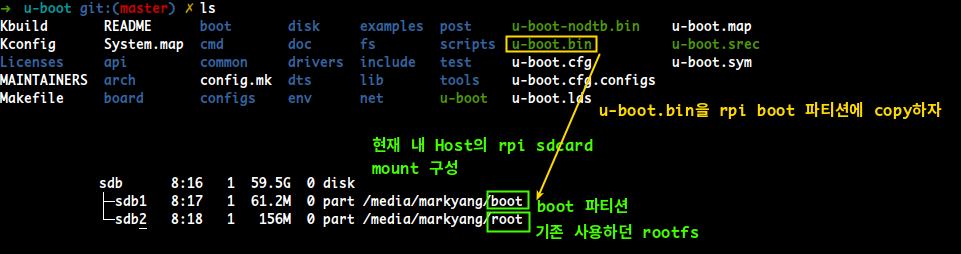
- 이 파일을 raspberrypi4에서 linux kernel 대신 로드할 수 있도록해야한다.
- u-boot.bin을 raspberrypi boot partition에 copy한다.
$ cp ./u-boot.bin /<mount_point>/boot && synckernel image로 u-boot.bin설정
- boot process 링크를 보면 알 수 있지만, 1)kernel image이 먼저 실행 되고, 그 kernel 이 후에 2)rootfs를 마운트한다.
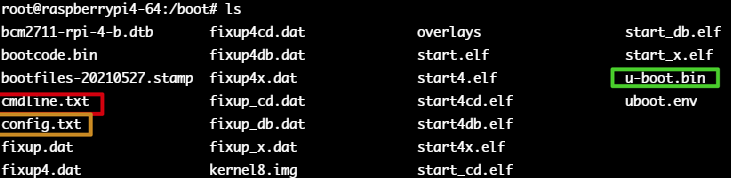
- kernel 설정은 Raspberry Pi boot partition에서 /boot/config.txt 파일에서 설정한다.
kernel=u-boot.bin으로써, kernel image을 u-boot.bin으로 사용케 한다.
- Raspberry Pi boot partition
Pi 3B v1.2.
- boot/config.txt 에서 아래와 같이 입력한다.
dtoverlay=pi3-miniuart
kernel=u-boot.bin- Host 컴퓨터에서, 연결된 sd-card(raspberrypi 파티션)을 언마운트한다.
$ sudo umount /raspberrypi/partition


# 본인의 경우, /media/markyang/boot, /media/markyang/root 로 연결되어 있다.
$ cd ~ # 마운트된 공간에서 umount하면 안됨
$ sudo umount /media/markyang/boot
$ sudo umount /media/markyang/root

$ sudo eject sdX # sd card의 디바이스파일 (본인의 경우 sdb)- 이제 raspberrypi에 sd-card를 연결하고, host 컴퓨터에 시리얼을 연결 한 뒤,
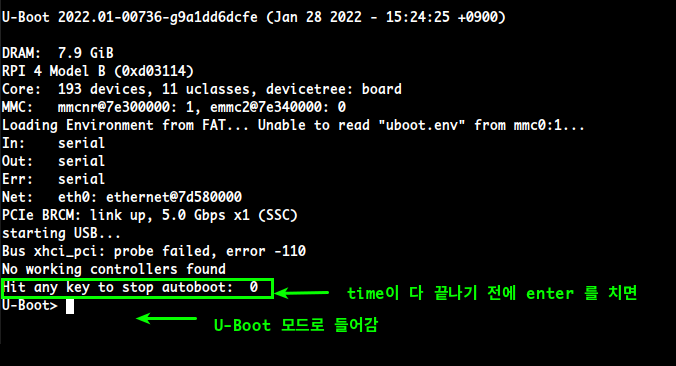
raspberrypi에 전원을 인가해본다.
- 아래는, Host 컴퓨터에서 시리얼로,
minicom화면 캡쳐이다.
u-boot 명령
u-boot 환경변수
- U-Boot 환경 변수는 간단한
name=value쌍으로 메모리에 저장된다. - Raw NAND, Raw NOR 플래시가 있으면, 이 용도로 삭제 블록(
erase block)이 예약되어 있고, 흔히 또 하나의 블록에 중복 복사본을 저장해서 훼손에 대비한다. - eMMC나 SD 카드 저장소가 있으면 환경을 예약된 일련의 섹터나, 디스크의 파티션에 있는 uboot.env 파일에 저장할 수 있다.
최초에 존재하는 변수들은 보드 구성 헤더파일에 다음과 같이 적혀있을 것이다.
#define CONFIG_EXTRA_EMV_SETTINGS <- 헤더 구성 파일
"myvar1=value1"
"myval2=value2"
[...]
- 또 다른 방법으로는 I2C나 SPI 인터페이스로 연결된 시리얼 EEPROM이나 비휘발성 램에 저장하는 것등이 있다.
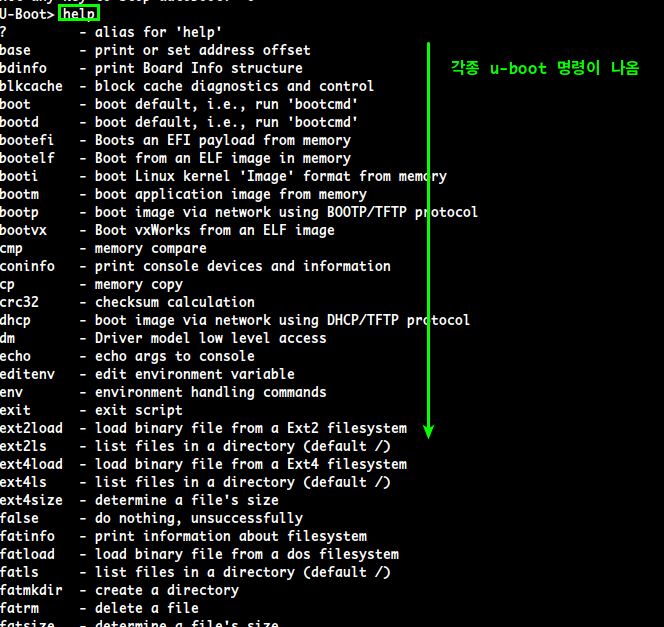
help: u-boot 명령 나열
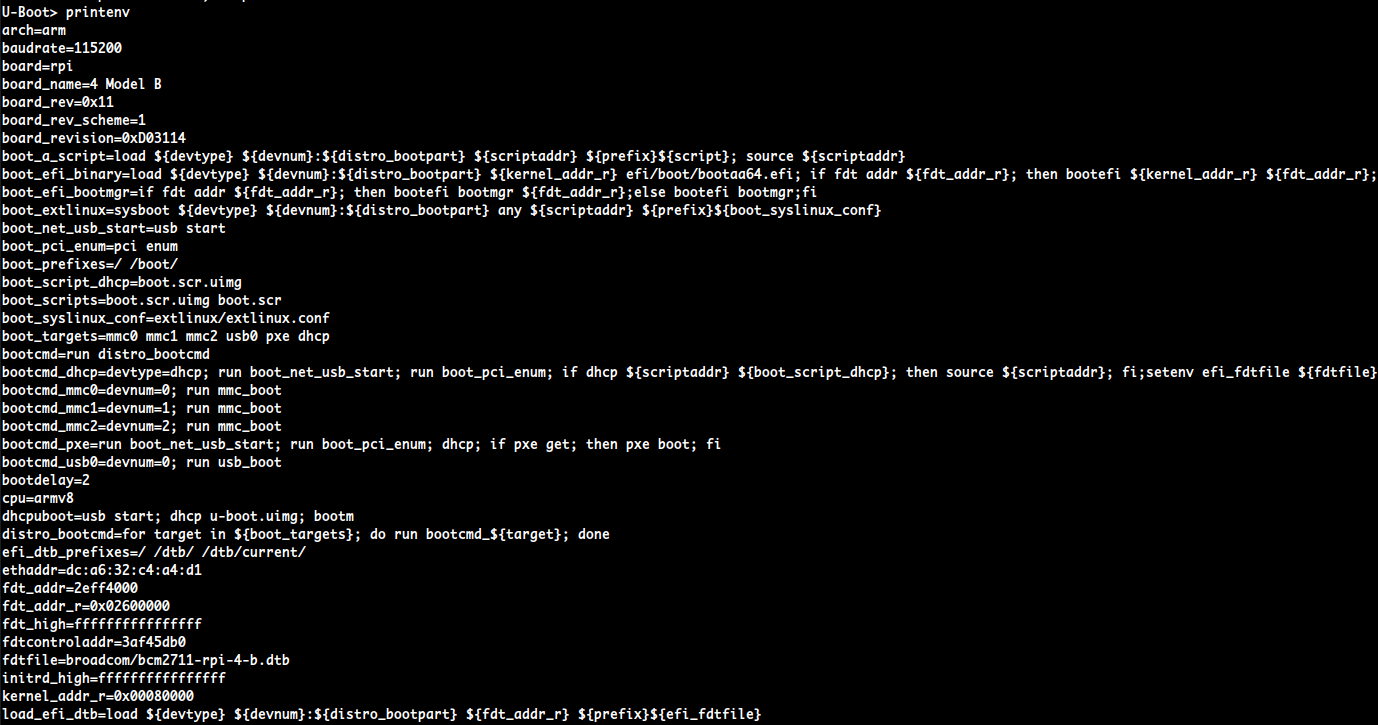
printenv : '설정된' 변수 print
- 현재 u-boot 설정들이 print된다.
U-Boot> printenv
printenv <var>: 변수,값 출력
ipaddr 변수 내 '값' 출력
printenv ipaddr
printenv <variable>
-> printenv ipaddr
ipaddr='변수의 할당된 값'
fdt_addr 변수 값 출력
printenv fdt_addr
U-Boot> printenv fdt_addr
fdt_addr=2eff4000
fdt_addr내 '값'='변수'로 인식해 출력
printenv ${fdt_addr}
U-Boot> printenv ${fdt_addr}
## Error: "2eff4000" not defined
U-Boot>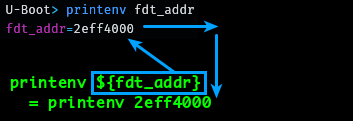
setenv <var> <값> 변수, 값 설정
setenv <variable>
-> setenv ipaddr 192.168.0.30
-> setenv serverip 192.168.0.20
saveenv : 변수 저장
U-Boot> saveenv (환경변수 저장)- 설정된 변수 저장 값들은
/boot/uboot.env파일로 저장된다.
${var} 변수 인용
${kernel_addr_r}: kernel_addr_r 변수 출력
환경 변수 인용 시, 사용 형식
> echo ${kernel_addr_r} // kernel_addr_r 변수 내용 출력
gpio : gpio 제어 명령
gpio set <PIN_NUM>: <PIN_NUM> gpio 셋
gpio (gpio 제어 명령)
> gpio set 18 // BCM_GPIO # 18에 high 신호ls: 파일 목록 보기
ls <VAR>: 변수 내용 보기
ls (파일 목록보기)
> ls mmc 0:1
nfs: nfs 클라이언트 명령
nfs (nfs 클라이언트 명령) /nfsroot/ 내 파일 전송
> nfs 0x0c100000 192.168.0.20:hello_world.bin
tftp <mem주소> <로드할 파일>
ipaddr(내 IP 주소)serverip(tftp의 서버 주소)
가 미리 설정되어 있어야한다.
U-Boot> setenv ipaddr 192.168.159.42
U-Boot> setenv serverip 192.168.159.99
U-Boot> tftp 82000000 uImage (서버의 TFTP/uImage를 내 디바이스의 82000000 주소로 로드)
link up on port 0, speed 100, full duplex
Using cpsw device
TFTP from server 192.168.159.99; our IP address is 192.168.159.42
Filename 'uImage' .
Load address: 0x82000000
...

U-Boot> tftpboot 82000000 uimage
U-Boot> nandecc hw
U-Boot> nand erase 280000 400000

NAND erase: device 0 offset 0x280000, size 0x400000
Erasing at 0x660000 -- 100% complete.
OK
U-Boot> nand write 82000000 280000 400000

NAND write: device 0 offset 0x280000, size 0x400000
4194304 bytes written: OK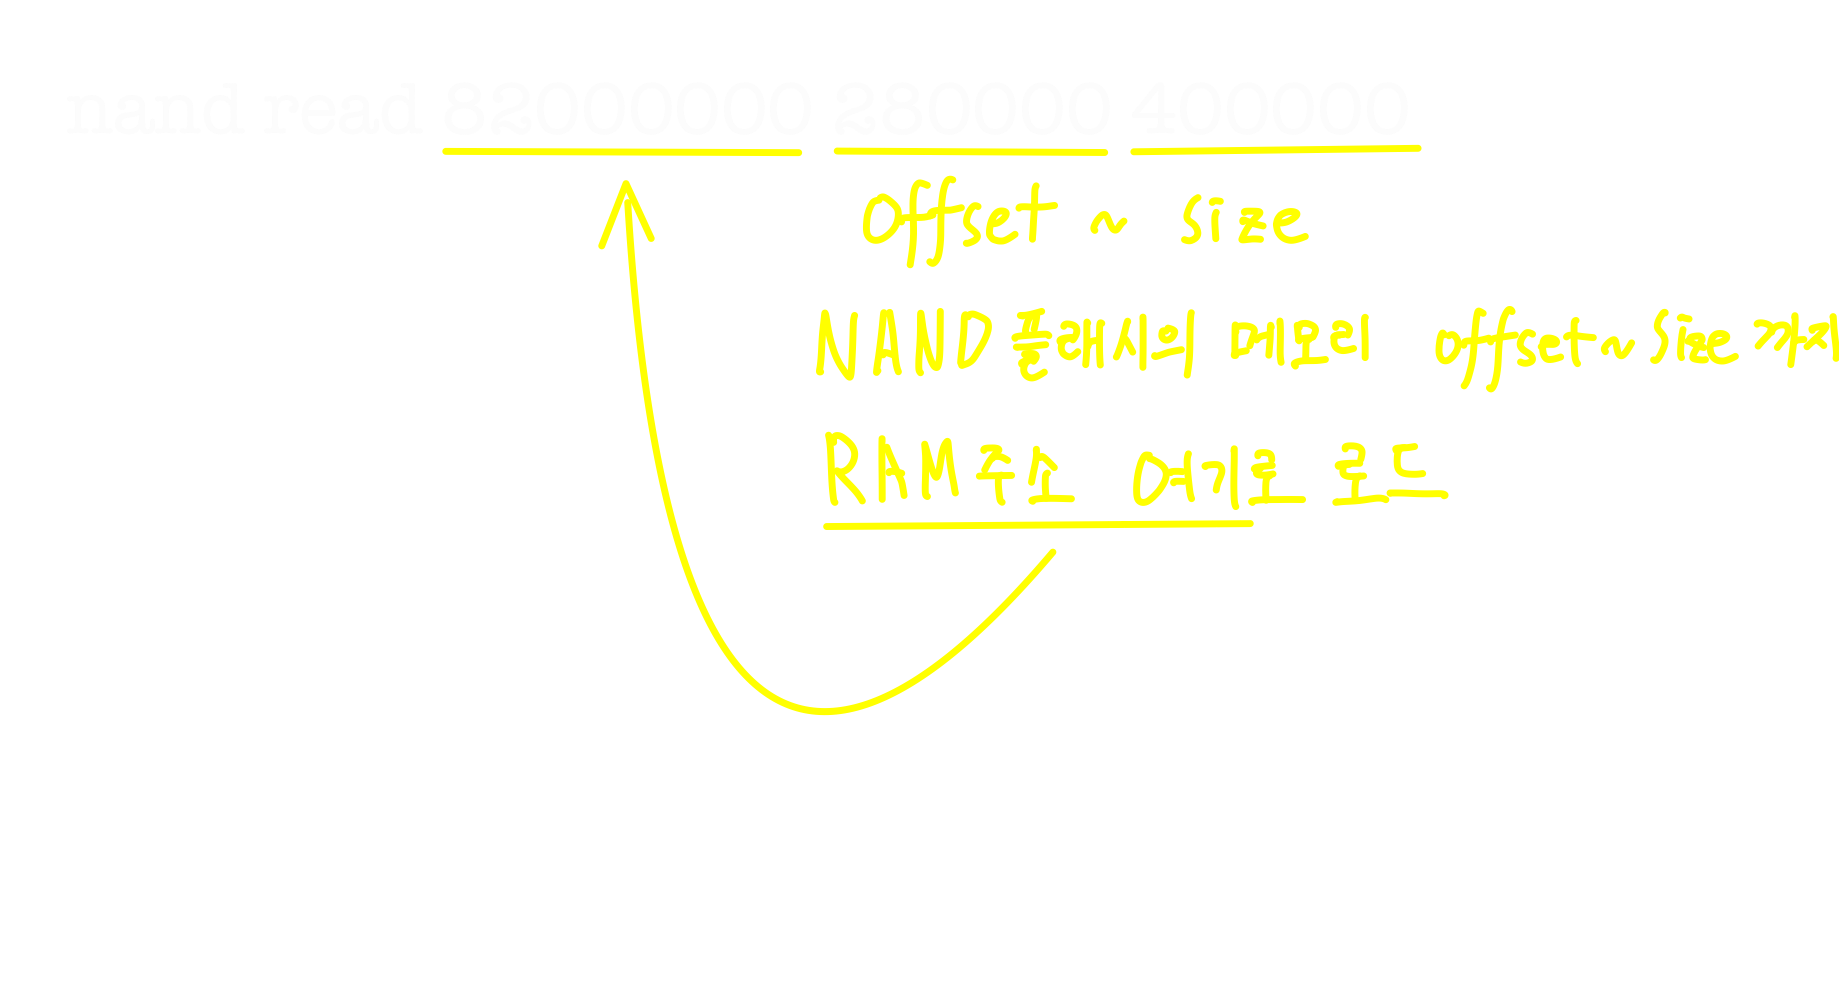
U-Boot> nand read 82000000 280000 400000- 이제
nand read명령을 통해 플래시 메모리로부터 커널을 로드할 수 있다.
U-Boot> bootm 82000000 - 83000000fatload: FAT 파일시스템에서 로드

fatload mmc 0:1 0x0c100000 hello_world.binmmcinterface의0번째 장치의1번 파티션(FAT파일 시스템)의 hello_world.bin을0x0c100000주소로 로드
fatload mmc 0:1 ${kernel}
load:
fdt: flattened device tree utility commands
fdt
fdt - flattened device tree utility commands

Usage:
fdt addr [-c]  <addr> [<length>]   - Set the [control] fdt location to <addr>
fdt move   <fdt> <newaddr> <length> - Copy the fdt to <addr> and make it active
fdt resize [<extrasize>]            - Resize fdt to size + padding to 4k addr + some optional <extrasize> if needed
fdt print  <path> [<prop>]          - Recursive print starting at <path>
fdt list   <path> [<prop>]          - Print one level starting at <path>
fdt get value <var> <path> <prop>   - Get <property> and store in <var>
fdt get name <var> <path> <index>   - Get name of node <index> and store in <var>
fdt get addr <var> <path> <prop>    - Get start address of <property> and store in <var>
fdt get size <var> <path> [<prop>]  - Get size of [<property>] or num nodes and store in <var>
fdt set    <path> <prop> [<val>]    - Set <property> [to <val>]
fdt mknode <path> <node>            - Create a new node after <path>
fdt rm     <path> [<prop>]          - Delete the node or <property>
fdt header                          - Display header info
fdt bootcpu <id>                    - Set boot cpuid
fdt memory <addr> <size>            - Add/Update memory node
fdt rsvmem print                    - Show current mem reserves
fdt rsvmem add <addr> <size>        - Add a mem reserve
fdt rsvmem delete <index>           - Delete a mem reserves
fdt chosen [<start> <end>]          - Add/update the /chosen branch in the tree
                                        <start>/<end> - initrd start/end addr
NOTE: Dereference aliases by omitting the leading '/', e.g. fdt print ethernet0.
fdt addr ${fdt_addr}
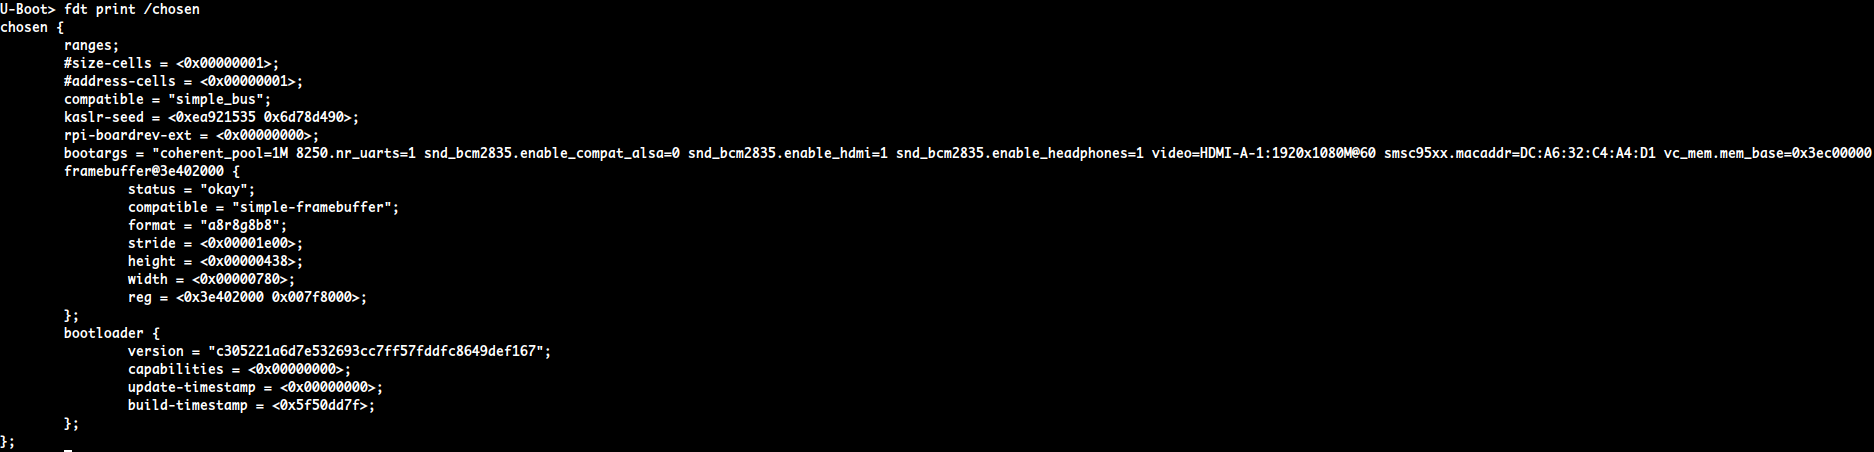
${fdt_addr}변수내 주소 값의 내용을<addr>에 설정한다.- RaspberryPi 4에서는
${fdt_addr}이2d3e4000이며 이 명령은FDT 주소(${fdt_addr})를 '메모리'에 로드시킨다.
fdt get value bootargs_fdt /chosen bootargs
/chosen이라는 경로의bootargs내용을bootargs_fdt라는 변수에 담는다.- 이미 메모리에
FDT주소(${fdt_addr})값이 로드되어 있어야 사용할 수 있다.
fdt list 'DeviceTree'
U-Boot> fdt list /amba/usb0
usb0 {
        #address-cells = <0x00000002>;
        #size-cells = <0x00000002>;
        status = "okay";
        compatible = "xlnx,zynqmp-dwc3";
        reg = <0x00000000 0xff9d0000 0x00000000 0x00000100>;
        clock-names = "bus_clk", "ref_clk";
        #stream-id-cells = <0x00000001>;
        iommus = <0x00000008 0x00000860>;
        power-domains = <0x00000031>;
        ranges;
        nvmem-cells = <0x00000020>;
        nvmem-cell-names = "soc_revision";
        clocks = <0x00000003 0x00000020 0x00000003 0x00000022>;
        pinctrl-names = "default";
        pinctrl-0 = <0x00000032>;
        dwc3@fe200000 {
        };
};
ZynqMP> fdt print /amba/usb0
usb0 {
        #address-cells = <0x00000002>;
        #size-cells = <0x00000002>;
        status = "okay";
        compatible = "xlnx,zynqmp-dwc3";
        reg = <0x00000000 0xff9d0000 0x00000000 0x00000100>;
        clock-names = "bus_clk", "ref_clk";
        #stream-id-cells = <0x00000001>;
        iommus = <0x00000008 0x00000860>;
        power-domains = <0x00000031>;
        ranges;
        nvmem-cells = <0x00000020>;
        nvmem-cell-names = "soc_revision";
        clocks = <0x00000003 0x00000020 0x00000003 0x00000022>;
        pinctrl-names = "default";
        pinctrl-0 = <0x00000032>;
        dwc3@fe200000 {
                compatible = "snps,dwc3";
                status = "okay";
                reg = <0x00000000 0xfe200000 0x00000000 0x00040000>;
                interrupt-parent = <0x00000004>;
                interrupts = <0x00000000 0x00000041 0x00000004 0x00000000 0x00000045 0x00000004>;
                snps,quirk-frame-length-adjustment = <0x00000020>;
                snps,refclk_fladj;
                dr_mode = "host";
                snps,usb3_lpm_capable;
                phy-names = "usb3-phy";
                phys = <0x00000033 0x00000004 0x00000000 0x00000002 0x018cba80>;
        };
};
iminfo <주소> : 주소에 로드된 이미지 정보
U-Boot> mmc rescan
U-Boot> fatload mmc 0:1 82000000 uimage
reading uimage
4605000 bytes read in 254 mfs (17.3 MiB/s)
U-Boot>iminfo 82000000

## Checking Image at 82000000 ...
Legacy image found
Image Name: Linux-3.18.0
Created: 2014-12-23 21:08:07 UTC
Image Type: ARM Linux Kernel Image (uncompressed)
Data Size: 4604936 Bytes = 4.4 MiB
Load Address: 80008000
Entry Point: 8008000
Verifying Checksum ... OK
U-Boot 스크립트를 이용한 부트 자동화
bootcmd인 특별 변수에 스크립트가 담겨 있으면, 전원이 켜진 뒤bootdelay초가 지나면 실행된다.
시리얼 콘솔에서 보면 0까지 카운트되는 모습을 볼 수 있다.
setenv bootcmd nand read 82000000 400000 200000\;bootm 82000000go: (메모리 주소의 응용 프로그램 실행)
go (메모리내 특정 주소에 있는 응용프로그램 실행)
> go 0x0c100000
nand read A B C
nand read: NAND 플래시의B~C까지- A: RAM 주소 여기로 로드
nandecc hwNAND, eMMC, SD카드
- NAND
1.1. CPU에서HW ecc가 지원될 경우 어떤 NAND와 매칭되는지 확인해야한다.
1.2. SLC의 경우, 1bit 정도의SW ecc를 사용해도 큰 문제 없음
1.3. MLC,TLC는 cpu에 직접 붙이는게 어려운 경우도 있고, 반드시HW ECC를 써야한다.
bootm
bootm은 두가지 용도로 사용 가능bootcmd내용을 실행bootm [커널 주소] [ramdisk_주소] [dtb_주소]실행
- 부팅
- 커널 이미지 주소는 필수
- 램디스크와 dtb 주소는 커널구성이 요구하지 않는다면 생략할 수 있다.
-로 생략할 수 있다.
Pi용 u-boot 에서 설정되어 있는 변수
bootargs
U-Boot> printenv ${bootargs}
arch=arm
baudrate=115200
board=rpi
board_name=4 Model B
board_rev=0x11
board_rev_scheme=1
board_revision=0xD03114
boot_a_script=load ${devtype} ${devnum}:${distro_bootpart} ${scriptaddr} ${prefix}${script}; source ${scriptaddr}
boot_efi_binary=load ${devtype} ${devnum}:${distro_bootpart} ${kernel_addr_r} efi/boot/bootaa64.efi; if fdt addr ${fdi
boot_efi_bootmgr=if fdt addr ${fdt_addr_r}; then bootefi bootmgr ${fdt_addr_r};else bootefi bootmgr;fi
boot_extlinux=sysboot ${devtype} ${devnum}:${distro_bootpart} any ${scriptaddr} ${prefix}${boot_syslinux_conf}
boot_net_usb_start=usb start
boot_pci_enum=pci enum
boot_prefixes=/ /boot/
boot_script_dhcp=boot.scr.uimg
boot_scripts=boot.scr.uimg boot.scr
boot_syslinux_conf=extlinux/extlinux.conf
boot_targets=mmc0 mmc1 mmc2 usb0 pxe dhcp
bootcmd=run distro_bootcmd
bootcmd_dhcp=devtype=dhcp; run boot_net_usb_start; run boot_pci_enum; if dhcp ${scriptaddr} ${boot_script_dhcp}; then;
bootcmd_mmc0=devnum=0; run mmc_boot
bootcmd_mmc1=devnum=1; run mmc_boot
bootcmd_mmc2=devnum=2; run mmc_boot
bootcmd_pxe=run boot_net_usb_start; run boot_pci_enum; dhcp; if pxe get; then pxe boot; fi
bootcmd_usb0=devnum=0; run usb_boot
bootdelay=2
bootfile=boot.scr.uimg
bootfstype=fat
cpu=armv8
dhcpuboot=usb start; dhcp u-boot.uimg; bootm
distro_bootcmd=for target in ${boot_targets}; do run bootcmd_${target}; done
efi_dtb_prefixes=/ /dtb/ /dtb/current/
ethact=ethernet@7d580000
ethaddr=dc:a6:32:c4:a4:d1
fdt_addr=2eff4000
fdt_addr_r=0x02600000
fdt_high=ffffffffffffffff
fdtcontroladdr=3af45d70
fdtfile=broadcom/bcm2711-rpi-4-b.dtb
initrd_high=ffffffffffffffff
kernel_addr_r=0x00080000
load_efi_dtb=load ${devtype} ${devnum}:${distro_bootpart} ${fdt_addr_r} ${prefix}${efi_fdtfile}
loadaddr=0x1000000
mmc_boot=if mmc dev ${devnum}; then devtype=mmc; run scan_dev_for_boot_part; fi
preboot=pci enum; usb start;
pxefile_addr_r=0x02500000
ramdisk_addr_r=0x02700000
scan_dev_for_boot=echo Scanning ${devtype} ${devnum}:${distro_bootpart}...; for prefix in ${boot_prefixes}; do run sc;
scan_dev_for_boot_part=part list ${devtype} ${devnum} -bootable devplist; env exists devplist || setenv devplist 1; ft
scan_dev_for_efi=setenv efi_fdtfile ${fdtfile}; for prefix in ${efi_dtb_prefixes}; do if test -e ${devtype} ${devnum}e
scan_dev_for_extlinux=if test -e ${devtype} ${devnum}:${distro_bootpart} ${prefix}${boot_syslinux_conf}; then echo Foi
scan_dev_for_scripts=for script in ${boot_scripts}; do if test -e ${devtype} ${devnum}:${distro_bootpart} ${prefix}${e
scriptaddr=0x02400000
serial#=100000004bcb2b43
serverip=10.177.227.40 <-- 이건 미리 설정해둔 것임!
soc=bcm283x
stderr=serial,vidconsole
stdin=serial,usbkbd
stdout=serial,vidconsole
usb_boot=usb start; if usb dev ${devnum}; then devtype=usb; run scan_dev_for_boot_part; fi
usbethaddr=dc:a6:32:c4:a4:d1
vendor=raspberrypi

Environment size: 4157/16380 bytes
mmc
mmc: SD Card와 같은 물리 메모리를 디바이스로 매핑해서 접근 할 수 있도록 하는 컨트롤러
| mmc | 위치 | - |
|---|---|---|
| mmc | 0:1 | FAT 파일 시스템의 Device와 Part |
- 예1:
U-Boot> ls 0:1
** No device specified **
Couldn't find partition 0:1 <NULL>
U-Boot> ls mmc 0:1
    47516   bcm2711-rpi-4-b.dtb
    52456   bootcode.bin
        0   bootfiles-20210527.stamp
      150   cmdline.txt
     7314   fixup.dat
     5448   fixup4.dat
     3191   fixup4cd.dat
     8452   fixup4db.dat
     8452   fixup4x.dat
     3191   fixup_cd.dat
    10298   fixup_db.dat
    10300   fixup_x.dat
 16663040   kernel8.img
            overlays/
  2953312   start.elf
  2229120   start4.elf
   793340   start4cd.elf
  3722664   start4db.elf
  2981480   start4x.elf
   793340   start_cd.elf
  4794632   start_db.elf
  3705000   start_x.elf
   583296   u-boot.bin
    16384   uboot.env
    36348   config.txt

24 file(s), 1 dir(s)
- 예2
fatload mmc 0:1 ${kernel_addr_r} kernel7.img
fatload mmc 0:1 ${fdt_addr_r} bcm2710-rpi-3-b.dtb
주소 변수
| 변수 | 설명 |
|---|---|
| ${kernel_addr_r} | 커널 주소 <- 커널 이미지 로드 할 것 |
| ${fdt_addr_r} | Device Tree Blob(.dtb) 파일 로드 할 주소 |
| ${kernel_addr_r} - ${fdt_addr_r} | 부팅하는 메모리 주소. 이 빼기 값은 메모리 상에서 커널 이미지 시작 주소를 가리킨다. |
- 예
fatload mmc 0:1 ${kernel_addr_r} kernel7.img
fatload mmc 0:1 ${fdt_addr_r} bcm2710-rpi-3-b.dtb
fdt get value bootargs_fdt /chosen bootargs
fdt addr ${fdt_addr}
여기서 bootargs_fet <- bootargs가 들어감
Beaglebone Black에 U-Boot 얹기
SD카드 파티션 나누기
- Beagle Bone Black의 파티션을 나눈다.
/dev/sdc에 인식됬다고 가정하면 아래와 같이 나눈다.
sdb      8:16   1  14.9G  0 disk         LABEL
├─sdb1   8:17   1    64M  0 part FAT32   BOOT (boot loader를 올릴 파티션)
└─sdb2   8:18   1     1G  0 part ext4    ROOT (rootfs 용)
fdisk를 이용한 파티션 나누기는 링크 참고
- 1)MLO(Beaglebone Black의 SPL), 2)u-boot.img를 BBB용 SD card의 /boot 파티션에 업로드
$ cp MLO u-boot.img /mnt/markyang/boot && sync
$ sudo umount /mnt/markyang/boot
$ sudo eject sdc
U-Boot 이미지
- U-Boot에는 파일 시스템이 없다.
대신 정보 블록에 64Byte 헤더를 붙여 내용을 추적할 수 있다.
mkimage명령으로 U-Boot용 이미지 파일을 만들 수 있다.
$ mkimage
Usage: mkimage -l image
 -l ==> list image header information
 mkimage [-x] -A arch -O os -T type -C comp -a addr -e ep -n name -d data_file[:data_file...] image
 -A ==> set architecture to 'arch'
 -O ==> set operating system to 'os'
 -T ==> set image type to 'type'
 -C ==> set compression type 'comp'
 -a ==> set load address to 'addr' (hex)
 -e ==> set entry point to 'ep' (hex)
 -n ==> set image name to 'name'
 -d ==> use image data from 'datafile'
 -x ==> set XIP (execute in place)
 mkimage [-D dtc_options] [-f fit-image.its|-F] fit-image
 -D ==> set options for device tree compiler
 -f ==> input filename for FIT source
Signing / verified boot not supported (CONFIG_FIT_SIGNATURE undefined)
mkimage -V ==> print version information and exit- ARM 프로세서용 커널 이미지를 준비하려면 다음과 같은 명령을 사용한다.
$ mkimage -A arm -O linux -T kernel -C gzip -a 0x80008000 -e 0x80008000 \
-n 'Linux' -d zImage uImage
-a(load address):0x80008000-e(entry point):0x80008000-n(image name):Linux-d(data file):zImage
yocto
meta-raspberrypi
meta-raspberrypi
  └── recipes-bsp
      ├── bootfiles
      │   └── rpi-config_git.bbappend
      ├── rpi-u-boot-scr
      │   ├── files
      │   │   ├── boot.sota.cmd
      │   │   └── uEnv.sota.txt.in
      │   └── rpi-u-boot-scr.bbappend
      └── u-boot
          ├── u-boot
          └── u-boot_%.bbappend
rpi-u-boot-scr.bbappend
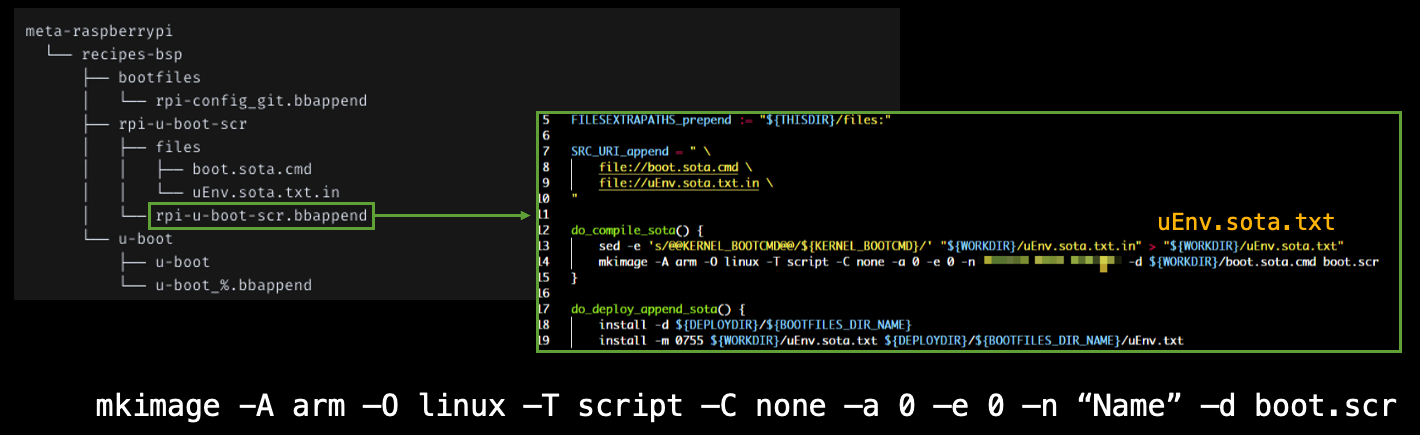
$ mkdir -A arm -O linux -T script -C none -a 0 -e 0 -n "name" -d boot.scrimage load
SD카드나 네트워크로 부터 이미지를 로드할 것이다.
SD카드는 u-boot에서mmc드라이버 를 통해 처리된다.
U-Boot를 새로운 보드에 이식
deconfig 파일 설정
- nova라는 새로운 보드에 u-boot를 이식하려면 아래와 같이한다.
- U-Boot 디렉토리에서 configs 디렉토리 내용을 추가한다.
$ cp configs/am335x_boneblack_defconfig configs/nova_defconfignova_defconfig를 편집한다.
1 CONFIG_ARM=y  --> u-boot/arch/arm/Kconfig의 내용이 포함되게 한다.
2 CONFIG_AM33XX=y  --> u-boot/arch/arm/mach-omap2/am33xx/Kconfig 가 포함되게한다.
3 # CONFIG_SPL_NAND_SUPPORT is not set
4 CONFIG_TARGET_NOVA=y  <-- '기존의 CONFIG_TARGET_AM335X_EVM=y 에서 교체'
보드별 파일
- 보드마다
board/[보드이름],board/[벤더]/[보드이름]이라는 서브디렉토리가 있고 그 안에는 다음과 같은 파일들이 있다.
| File | Description |
|---|---|
Kconfig | 보드의 구성 옵션을 담고 있다. |
MAINTAINERS | 보드가 현재 유지보수되고 있는지, 그렇다면 누가 유지보수하는지를 담고 있다. |
Makefile | 보드별 코드를 빌드하는데 사용된다. |
README | u-boot의 이식에 유용한 정보(예: 어느 하드웨어 변종이 지원되는가 등)을 담고 있다. |
| 그 밖 보드 특유 기능을 위한 소스 파일들 | - |
- 새 nova보드는 비글본 기반
- 비글본은
TI am335x EVM에 기반을 두고 있다.
$ mkdir -p u-boot/board/ti/nova
$ cp -r u-boot/board/ti/am335x u-boot/board/ti/nova- 그리고 Kconfig를 수정한다.
board/ti/nova/Kconfig 수정
u-boot/board/ti/nova/Kconfig를 편집한다.SYS_BOARD를"nova"로 설정한다. = 빌드시,u-boot/board/ti/nova에 있는 파일을 빌드한다.SYS_CONFIG_NAME를"nova"로 설정한다. = 구성 파일을u-boot/include/configs/nova.h를 사용케한다.
1  if TARGET_NOVA
2
3  config SPL_ENV_SUPPORT
4  default y
5
6  config SPL_WATCHDOG_SUPPORT
7  default y
8
9  config SPL_YMODEM_SUPPORT
10 default y
11
12 config SYS_BOARD
13 default "nova"
14
15 config SYS_VENDOR
16 default "ti"
17
18 config SYS_SOC
19 default "am33xx"
20
21 config SYS_CONFIG_NAME
22 default "nova"
...생략
링커스크립트 수정
u-boot/board/ti/nova/u-boot.lds에 있는 링커스크립트board/ti/am335x/built-in.o를 참조하도록 하드코딩 되어있다.- 이것을 아래와 같이 수정한다.
{
    *(.__image_copy_start)
    *(.vectors)
    CPUDIR/start.o (.text*)
    board/ti/nova/built-in.o (.text*) <-- 여기
    *(.text*)
}
arch/arm/Kconfig 수정
- 이제 nova용 Kconfig 파일을 일련의 Kconfig 파일들과 링크해야한다.
u-boot/arch/arm/Kconfig를 수정한다.
- 먼저
arch/arm/Kconfig를 편집해 nova용 메뉴 옵션을 추가한 뒤 Kconfig 파일을source한다.
1069 source "board/ti/nova/Kconfig"arch/arm/mach-omap2/am33xx/Kconfig 수정
u-boot/arch/arm/mach-omap2/am33xx/Kconfig를 수정TARGET_NOVA용 구성 옵션 추가
21 config TARGET_NOVA
22         bool "Support the Nova! board"
23         select DM
24         select DM_SERIAL
25         select DM_GPIO
26         select TI_I2C_BOARD_DETECT
27         help
28             The Nova target board
...
헤더파일 구성하기
- 보드마다
include/configs에 구성의 대부분을 담고 있는 헤더 파일들이 있다. - 파일의 이름은 보드의 Kconfig에 있는
SYS_CONFIG_NAME을 따른다.- 이 파일의 형식은 u-boot 소스 트리의 최상위에 있는
README파일에 자세히 설명되어 있다.
- 이 파일의 형식은 u-boot 소스 트리의 최상위에 있는
- nova 보드를 위해서는 단순히
include/configs/am335x_evm.h->include/configs/nova.h로 복사, 조금 수정- 가장 중요한 것은 실행 시에, 부트로더를 식별할 수 있도록 새로운 커맨드 프롬프트를 설정하는 것
16 #ifndef __CONFIG_NOVA_H
17 #define __CONFIG_NOVA_H
...
38 #define CONFIG_SYS_LDSCRIPT		"board/ti/nova/u-boot.lds"
...
68 #undef CONFIG_SYS_PROMPT
69 #define CONFIG_SYS_PROMPT "nova!> "
...
421 #endif /* ! __CONFIG_NOVA_H */
테스트
$ make CROSS_COMPILE=arm-cortex_a8-linux-gnueabi- distclean
$ make CROSS_COMPILE=arm-cortex_a8-linux-gnueabi- nova_defconfig
$ make CROSS_COMPILE=arm-cortex_a8-linux-gnueabi-
MLO, u-boot.img를 전에 만든 micro SD 카드의 FAT파티션에 복사하고 부트한다.
U-BOOT SPL 2017.01-dirty (Apr 20 2017 - 16:48:38)
Trying to boot from MMC1MMC partition switch failed
*** Warning - MMC partition switch failed, using default environment

reading u-boot.img
reading u-boot.img

U-Boot 2017.01-dirty (Apr 20 2017 - 16:48:38 +0100)

CPU : AM335X-GP rev 2.0
I2C: ready
DRAM: 512 MiB
MMC: OMAP SD/MMC: 0, OMAP SD/MMC: 1
*** Warning - bad CRC, using default environment
<ethaddr> not set. Validating first E-fuse MAC
Net: cpsw, usb_ether
Press SPACE to abort autoboot in 2 seconds
nova!>
- 변경 사항은
git format-patch명령을 사용하자.
$ git add .
$ git commit -m "BSP for Nova"
$ git format-patch -1
0001-BSP-for-Nova.patch
커널 커맨드라인(bootargs)
- 커널 커맨드라인은, U-Boot의 경우 부트로더가
bootargs변수를 통해 커널에게 전달하는 문자열
-
bootargs가 저장된 위치-
Device Tree
# 디바이스트리에 /chosen의 bootargs를 bootargs_fdt 변수로 가져옴 U-Boot> fdt addr ${fdt_addr} U-Boot> fdt get value bootargs_fdt /chosen bootargs -
커널 구성의 일부
CONFIG_CMDLINE에 설정되어 잇음 -
사용자 설정
U-Boot> setenv bootargs "~~~~"
-
Raspberry Pi 4의 fdt bootargs
U-Boot> fdt addr ${fdt_addr}
U-Boot> fdt get value bootargs_fdt /chosen bootargs

기존 fdt의 bootargs
coherent_pool=1M 8250.nr_uarts=1 snd_bcm2835.enable_compat_alsa=0 \
snd_bcm2835.enable_hdmi=1 snd_bcm2835.enable_headphones=1 \
video=HDMI-A-1:1920x1080M@60 smsc95xx.macaddr=DC:A6:32:C4:A4:D1 \
vc_mem.mem_base=0x3ec00000 vc_mem.mem_size=0x40000000 \
dwc_otg.lpm_enable=0 console=ttyS0,115200 cgroup_memory=1 cgroup_enable=memory swapaccount=1bootargs의 Parameters
Documentation/kernel-parameters.txt에 더 많은 설명이 있다.
| 커널 커맨드라인의 변수 | 설명 |
|---|---|
debug | 콘솔 로그 수준을 가장 높은 수준(8)로 설정해 모든 커널 메시지를 콘솔에서 볼 수 있게한다. |
init= | 마운트된 루트 파일시스템에서 실행되는 init프로그램기본 설정은 /sbin/init이다. |
lpj= | loops_per_jiffy를 주어진 상수로 설정한다.초기화 중, 커널은 지연 루프를 측정하기 위해 약 250ms 동안 반복문을 실행한다. |
panic= | 커널 패닉 시 동작.panic=음수 : 기다리지않고 리부팅panic=0 : 영원히 기다린다 (default)panic=양수 : 해당 초 만큼 기다렸다가 리부트 |
quiet | 콘솔 로그 수준을 1로 설정해 긴급 메시지를 뺀 모든 메시지를 보이지 않게한다. 대부분의 장치는 시리얼 콘솔을 사용하므로, 이들 문자열을 모두 출력하려면 시간이 걸린다. 결과적으로 이 옵션을 이용해 메시지의 수를 줄이면 부트 시간이 줄어든다. |
rdinit= | 램 디스크로부터 실행되는 init 프로그램기본 설정은 /init 이다. |
ro | 루트 디바이스를 읽기 전용으로 마운트한다. 언제나 읽고 쓸 수 있는 램디스크에는 효과가 없다. |
root= | 루트 파일시스템을 마운트할 장치root=/dev/nfs |
rootdelay= | 루트 장치를 마운트하기 전에 기다릴 초의 수 장치가 하드웨어를 검색할 때 시간이 걸리는 경우 유용하다. |
rootfstype= | 루트 장치의 파일 시스템 종류. 많은 경우 마운트 자동 탐지되지만, 몇몇의 경우는 파일 시스템 수동 설정이 필요하다.rootfstype=nfsrootfstype=jffs2 |
rootwait | 루트 디바이스가 탐지되기를 무한정 기다린다. 보통 mmc 장치에 필요하다. |
팔콘모드
- 기존의 임베디드 프로세서의 부트 과정
- CPU 부트 ROM이 SPL 로드
- SPL이 u-boot.bin 로드
- u-boot.bin이 리눅스 커널 로드
- 이 단계를줄여 간단하고 빠르게 부트하는 방법은 U-Boot Falcon mode이다.
- SPL이 u-boot.bin을 건너뛰고 커널 이미지를 직접 로드한다.
- 사용자 상호작용, 스크립트가 없다.
- 플래시, eMMC의 위치로부터 메모리로 커널을 로드하고, 미리 준비된 변수 블록을 넘기고 실행한다.
doc/README.falcon을 참고하자.
출처: 임베디드 리눅스프로그래밍 완전정복 2/e (에이콘)

pllpokko@alumni.kaist.ac.kr