1. Python에서 C lib 사용
1. C로 만든 Shared Library
- 간단한 C로 만든 shared library 제작
/*
 * samplelib.c
 */
#include <stdio.h>

int add(int a, int b){
    printf("called add\n");
    return a+b;
}

void sub(double a, double b, double* ret){
    printf("called sub\n");
    *ret=a-b;
}

int sum(int* arr, int sz){
    printf("called sum\n");
    int s=0;
    for (int i=0; i<sz; i++)
        s += i;
    return s;
}

typedef struct _Rect{
    int x;
    int y;
    int w;
    int h;
} Rect;

int getarea(Rect* r){
    printf("called getarea\n");
    return (r->w * r->h);
}- shared library로 만들기
$ gcc -fPIC -c samplelib.c
$ gcc -shared -Wl,-soname,libsamplelib.so.1 -o libsamplelib.so.1.0 samplelib.o
libsamplelib.so.1.0 생성

$ ln -s libsamplelib.so.1.0 libsamplelib.so.1
$ ln -s libsamplelib.so.1 libsamplelib.so

libsamplelib.so (softlink 생성)- Focus
int add(int a, int b): 정수형 반환void sub(double a, double b, double* ret): 포인터를 arg로 사용int sum(int* arr, int sz): 배열을 arg로 사용int getarea(Rect* r): 구조체를 arg로 사용
2. import 'ctypes'
- 위의 libsamplelib.so 를 사용하는 python Code
- import ctypes 를 로드해야함
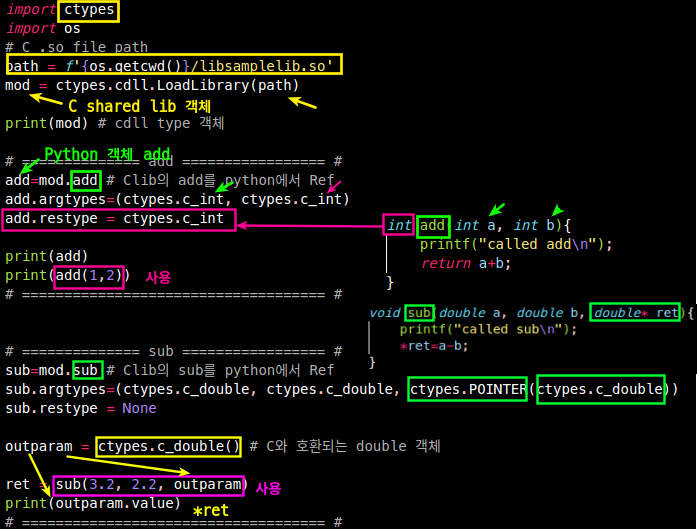
#!/usr/bin/env python3
import ctypes
import os
# C .so file path
path = f'{os.getcwd()}/libsamplelib.so'
mod = ctypes.cdll.LoadLibrary(path)
print(mod) # cdll type 객체
# ============== add ================= #
add=mod.add # Clib의 add를 python에서 Ref
add.argtypes=(ctypes.c_int, ctypes.c_int)
add.restype = ctypes.c_int
print(add)
print(add(1,2))
# ==================================== #
# ============== sub ================= #
sub=mod.sub # Clib의 sub를 python에서 Ref
sub.argtypes=(ctypes.c_double, ctypes.c_double, ctypes.POINTER(ctypes.c_double))
sub.restype = None
outparam = ctypes.c_double() # C와 호환되는 double 객체
ret = sub(3.2, 2.2, outparam)
print(outparam.value)
# ==================================== #
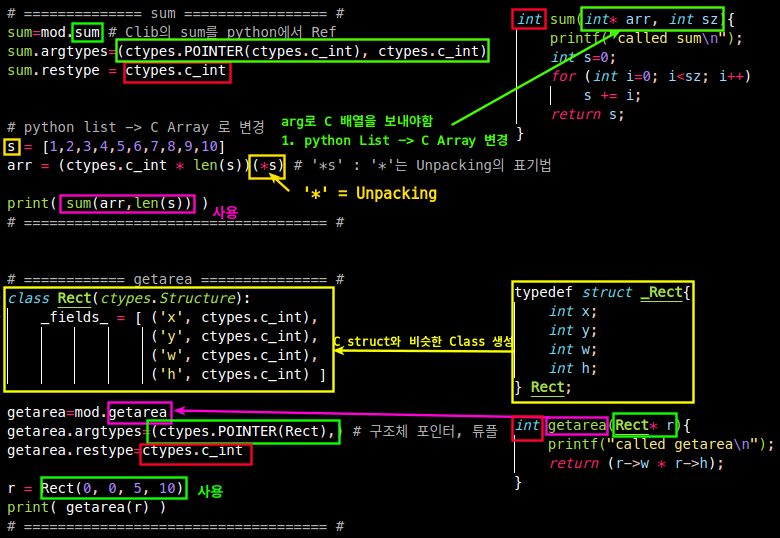
# ============== sum ================= #
sum=mod.sum # Clib의 sum를 python에서 Ref
sum.argtypes=(ctypes.POINTER(ctypes.c_int), ctypes.c_int)
sum.restype = ctypes.c_int
# python list -> C Array 로 변경
s = [1,2,3,4,5,6,7,8,9,10]
arr = (ctypes.c_int * len(s))(*s) # '*s' : '*'는 Unpacking의 표기법
print( sum(arr,len(s)) )
# ==================================== #
# ============ getarea =============== #
class Rect(ctypes.Structure):
_fields_ = [ ('x', ctypes.c_int),
('y', ctypes.c_int),
('w', ctypes.c_int),
('h', ctypes.c_int) ]
getarea=mod.getarea
getarea.argtypes=(ctypes.POINTER(Rect),) # 구조체 포인터, 튜플로 사용
getarea.restype=ctypes.c_int
r = Rect(0, 0, 5, 10)
print( getarea(r) )
# ==================================== #2. C로된 파이썬 '모듈' 만들기
0. prerequisite
Python.h
1.1python3-dev혹은python3.x-dev패키지를 설치하면/usr/include/python3[.x]/Python.h이 설치됨
1.2 위 경로가 없다면 설치하자!$ sudo apt install python3[.x]-dev
1.3#include <python3.x/Python.h>로 헤더 파일 올리고, gcc 컴파일 시-I/usr/include/python3.x걸어두면됨
1. C Module 만들기
1.1. C 함수와 PyObject 정의
1)c 함수(여기서는 add)와 2)'c 함수 add' 를 처리하는 PyObject를 다루는 함수(여기서는 py_add) 정의
-
C에서 PyObject로 Python Object 처리- PyArg_ParseTuple()로 다루기
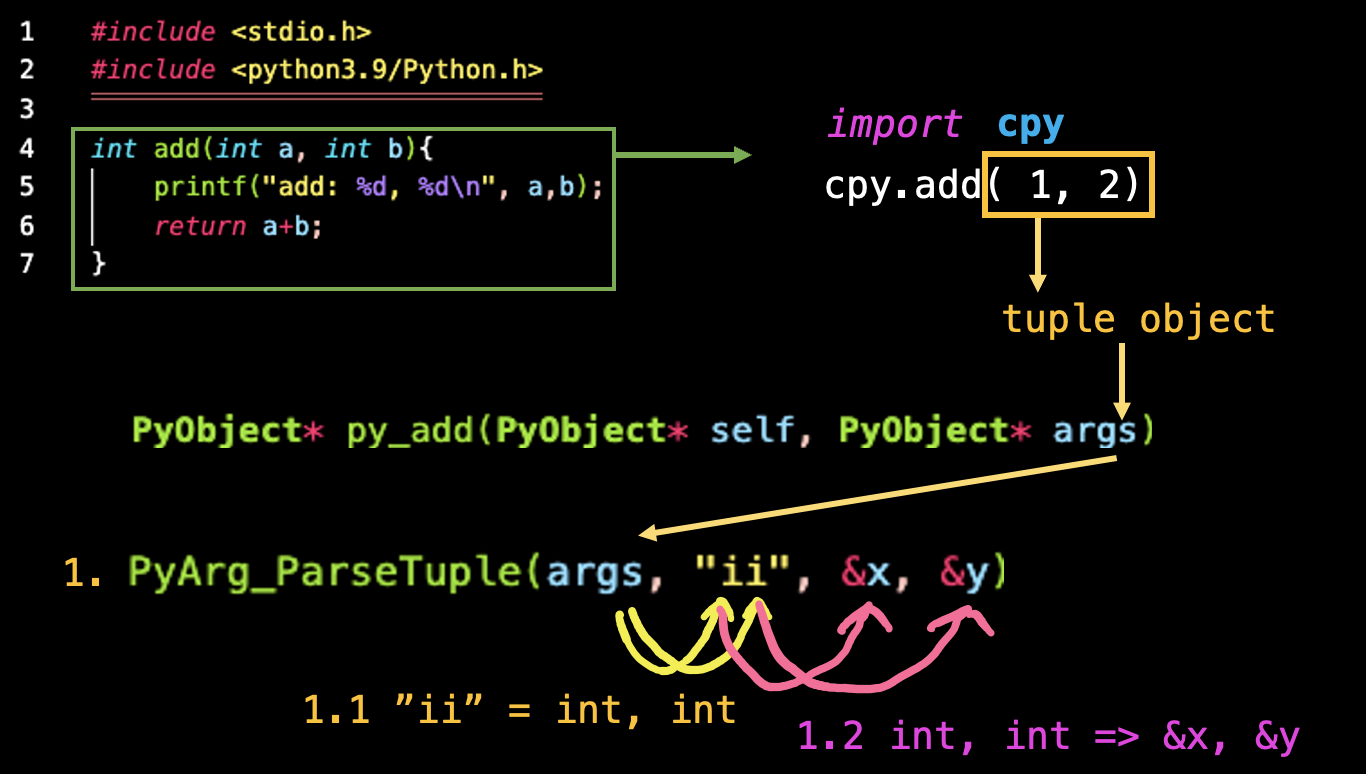
- PyArg_ParseTuple()로 다루기
- PyTupleObject*로 다루기
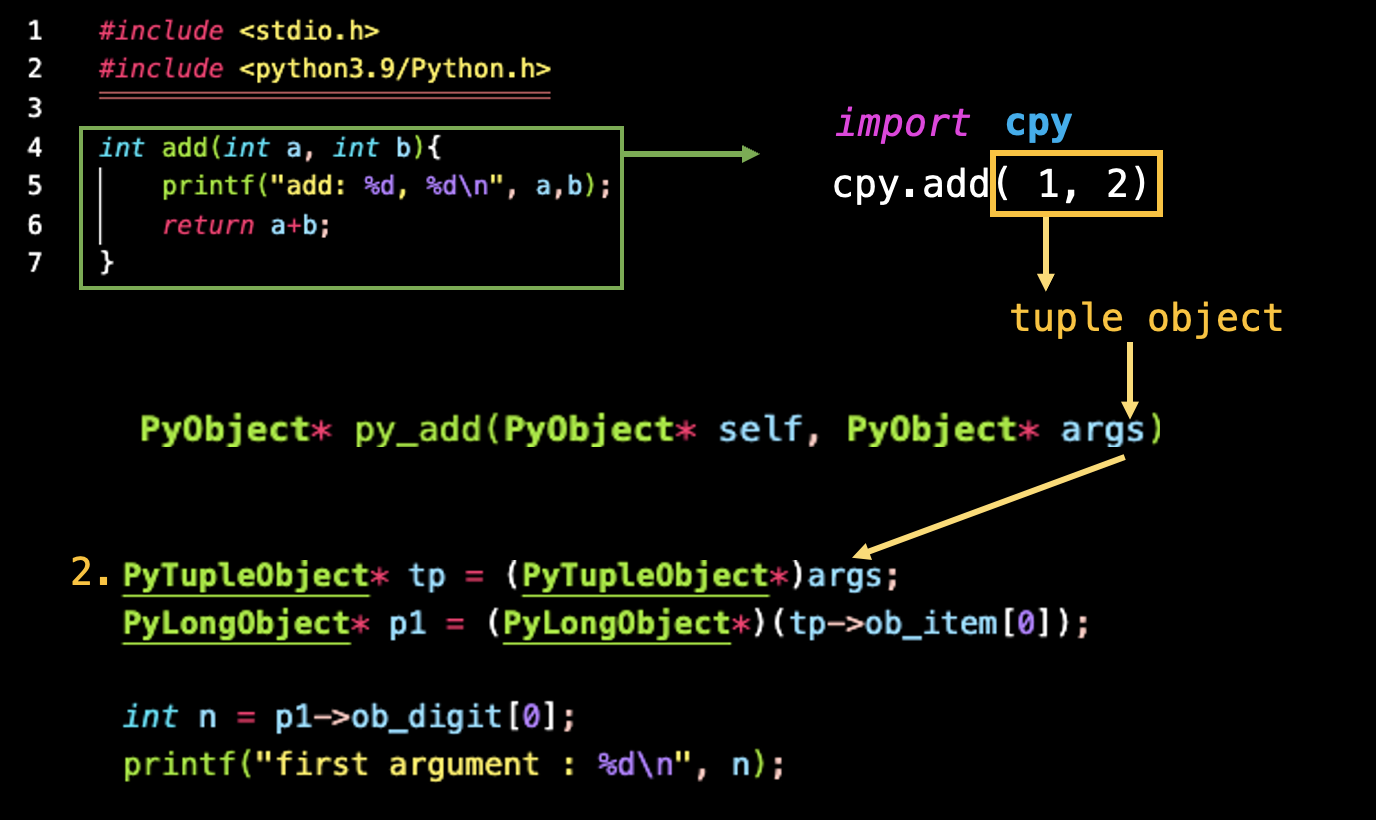
- PyTupleObject*로 다루기
- 여자처자해서 args를 다루고 return
- 여자처자해서 args를 다루고 return
/*
* cpy.c
*/
#include <stdio.h>
#include <python3.8/Python.h>
#define HANDLING_1
//#define HANDLING_2
int add(int a, int b){
printf("add: %d, %d\n", a, b);
return a+b;
}
PyObject* py_add(PyObject* self, PyObject* args){
#ifdef HANDLING_1
// Handling Python Args I.
/*
* 1. Get Python args (Tuple) to PyTupleObject* tp.
* 2. p1 (PyLongObject*) point to tp(Tuple)->[0] (First element in the Tuple)
*/
PyTupleObject* tp = (PyTupleObject*)args;
PyLongObject* p1 = (PyLongObject*)(tp->ob_item[0]);
PyLongObject* p2 = (PyLongObject*)(tp->ob_item[1]);
int n1 = p1->ob_digit[0];
int n2 = p2->ob_digit[0];
int result = add(n1,n2);
#endif
#ifdef HANDLING_2
// Handling Python Args II.
/*
* 1. PyArg_ParseTuple(args, -> "ii" (int, int), -> &x, &y);
* It makes easier deal with python args than over Handling I.
*/
int x,y;
if (!PyArg_ParseTuple(args, "ii", &x, &y))
return NULL;
int result = add(x,y);
#endif
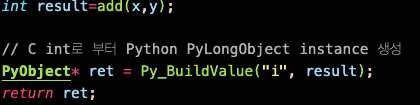
// Create PyLongObject instance from the C int result
PyObject* ret=Py_BuildValue("i", result);
// You should return 'PyObject*'
return ret;
}
1.2. PyMethodDef로 'C 모듈'내 '메서드 정보' 정의
- PyMethodDef Methods[ ] = { ... } 현재
cpy.c에 있는 메서드(함수)의 정보를 담은 배열- 1)c 함수(여기서는 add)와 2)'c 함수 add' 를 처리하는 PyObject를 다루는 함수(여기서는 py_add)의 정보를 담은 배열을 만들어야한다.
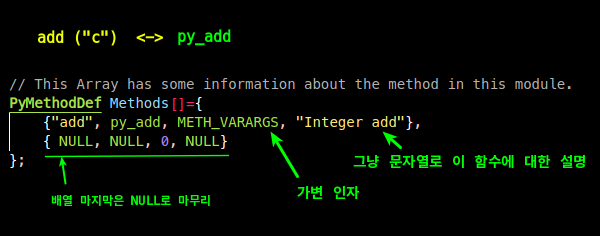
// This Array has some information about the method in this module.
PyMethodDef Methods[]={
    {"add", py_add, METH_VARARGS, "Integer add"},
    { NULL, NULL, 0, NULL}
};
1.3. PyModuleDef로 'C 모듈' '자체의 정보' 정의
- struct PyModuleDef [모듈이름]_module = { struct } 로 C Module 자체의 정보 정의해야함
- "Module Name", "doc string", 메서드 배열(위, PyMethodDef) 담음
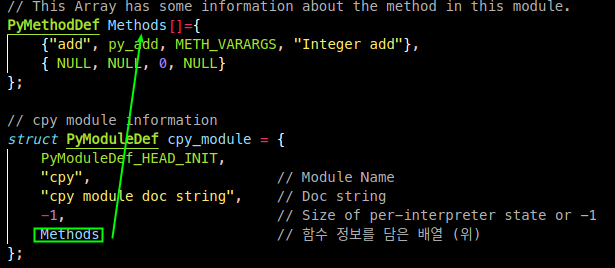
- "Module Name", "doc string", 메서드 배열(위, PyMethodDef) 담음
struct PyModuleDef cpy_module = {
    PyModuleDef_HEAD_INIT,
    "cpy",                      // Module Name
    "cpy module doc string",    // Doc string
    -1,                         // Size of per-interpreter state or -1
    Mothods                     // 함수 정보를 담은 배열 (위)
};
1.4. PyMODINIT_FUNC 로 모듈 초기화!
- PyMODINIT_FUNC PyInit_[모듈이름]() { .... } 로 '모듈 초기화 함수 정의'
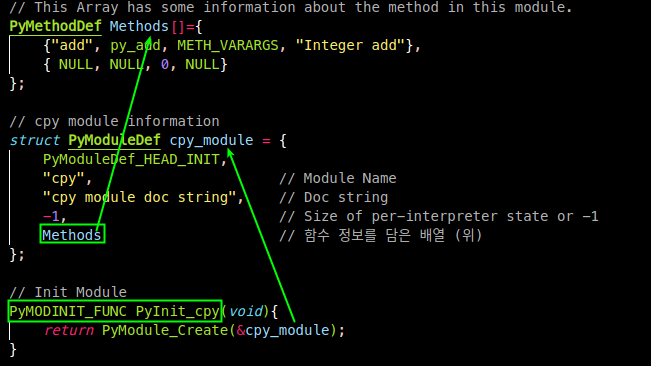
// Init Module
PyMODINIT_FUNC PyInit_cpy(void){
    return PyModule_Create(&cpy_module);
}
1.5 'C' 모듈 전체 코드
/*
 * cpy.c
 */

#include <stdio.h>
#include <python3.8/Python.h>


#define HANDLING_1
//#define HANDLING_2

int add(int a, int b){
    printf("add: %d, %d\n", a, b);
    return a+b;
}

PyObject* py_add(PyObject* self, PyObject* args){

#ifdef HANDLING_1
    // Handling Python Args I.
    /*
     * 1. Get Python args (Tuple) to PyTupleObject* tp.
     * 2. p1 (PyLongObject*) point to tp(Tuple)->[0] (First element in the Tuple)
     */
    PyTupleObject* tp = (PyTupleObject*)args;
    PyLongObject* p1 = (PyLongObject*)(tp->ob_item[0]);
    PyLongObject* p2 = (PyLongObject*)(tp->ob_item[1]);

    int n1 = p1->ob_digit[0];
    int n2 = p2->ob_digit[0];

    int result = add(n1,n2);

#endif

#ifdef HANDLING_2
    // Handling Python Args II.
    /*
     * 1. PyArg_ParseTuple(args, -> "ii" (int, int), -> &x, &y);
     *    It makes easier deal with python args than over Handling I.
     */

    int x,y;
    if (!PyArg_ParseTuple(args, "ii", &x, &y))
        return NULL;
    int result = add(x,y);
#endif

    // Create PyLongObject instance from the C int result
    PyObject* ret=Py_BuildValue("i", result);
    // You should return 'PyObject*'
    return ret;

}

// This Array has some information about the method in this module.
PyMethodDef Methods[]={
    {"add", py_add, METH_VARARGS, "Integer add"},
    { NULL, NULL, 0, NULL}
};

// cpy module information
struct PyModuleDef cpy_module = {
    PyModuleDef_HEAD_INIT,
    "cpy",                      // Module Name
    "cpy module doc string",    // Doc string
    -1,                         // Size of per-interpreter state or -1
    Methods                     // 함수 정보를 담은 배열 (위)
};

// Init Module
PyMODINIT_FUNC PyInit_cpy(void){
    return PyModule_Create(&cpy_module);
}
2. setup.py: 빌드 정보파일, 빌드
- 2번째 단계는 위 'C로된 모듈'을 '빌드' 해야한다.
- 그냥 빌드하지말고, 아래와 같이, setup.py를 만들어 빌드한다.
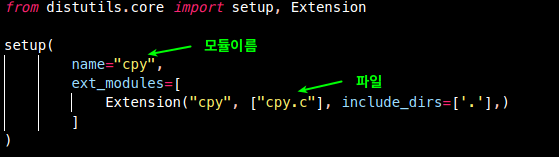
from distutils.core import setup, Extension

setup(
        name="cpy",
        ext_modules=[
            Extension("cpy", ["cpy.c"], include_dirs=['.'],)
        ]
)
- 이단계 에서, 현재 두가지 파일이 만들어졌다.

2.1 빌드!
- 빌드 및 설치:
$ python setup.py install - 빌드 설치 분리:
| Description | command | 비고 |
|---|---|---|
| build | $ python setup.py build | default compiler: Windows(mingw32), Linux(gcc) |
| build(compiler 변경) | $ python setup.py build --compiler=<Compiler> | |
| install | $ python setup.py install |
2.1 빌드 실행 결과
$ python setup.py build
running build
running build_ext
building 'cpy' extension
gcc -pthread -Wno-unused-result -Wsign-compare -DNDEBUG -g -fwrapv -O3 -Wall -fPIC -I. -I/home/dhyang/.pyenv/versions/3.9.6/include/python3.9 -c cpy.c -o build/temp.linux-x86_64-3.9/cpy.o
creating build/lib.linux-x86_64-3.9
gcc -pthread -shared -L/home/dhyang/.pyenv/versions/3.9.6/lib -L/home/dhyang/.pyenv/versions/3.9.6/lib build/temp.linux-x86_64-3.9/cpy.o -o build/lib.linux-x86_64-3.9/cpy.cpython-39-x86_64-linux-gnu.so- Obj 파일 만들고, binary를 만듬
 build dir 생성
build/temp.linux-x86_64-3.9:cpy.o생성build/lib.linux-x86_64-3.9:cpy.cpython-39-x86_64-linux-gnu.so파일 생성
2.2. Install
$ python setup.py install
running install
running build
running build_ext
running install_lib
copying build/lib.linux-x86_64-3.9/cpy.cpython-39-x86_64-linux-gnu.so -> /home/dhyang/.pyenv/versions/3.9.6/lib/python3.9/site-packages
running install_egg_info
Writing /home/dhyang/.pyenv/versions/3.9.6/lib/python3.9/site-packages/cpy-0.0.0-py3.9.egg-info
3. python에서 사용해보기
- sample.py
import cpy
n=cpy.add(1,2)
print(n)- 결과


pllpokko@alumni.kaist.ac.kr