설문조사 애플리케이션에 사용될 4개의 view 를 만든다.
- 질문 “색인” 페이지 – 최근의 질문들을 표시.
- 질문 “세부” 페이지 – 질문 내용과, 투표할 수 있는 서식을 표시
- 질문 “결과” 페이지 – 특정 질문에 대한 결과를 표시
- 투표 기능 – 특정 질문에 대해 특정 선택을 할 수 있는 투표 기능을 제공
참고자료
View 추가하기
-
애플리케이션 폴더안의 Views.py에 사용자에게 보여줄 View를 작성한다.
# /workspace/Edu_02/mysite/polls/urls.py from django.shortcuts import render # Create your views here. def index(request): # 여기에 추가적인 작업 작성가능 return HttpResponse("Hello, world. You're at the polls index.") def detail(request, question_id): return HttpResponse("You're looking at question %s." % question_id) def results(request, question_id): response = "You're looking at the results of question %s." return HttpResponse(response % question_id) def vote(request, question_id): return HttpResponse("You're voting on question %s." % question_id)- View는 Request라는 인자를 받고 HttpResponse를 리턴하는 두가지 기능을 지원한다. (404에러를 반환할 수도 있다) Return하기 전에 중간에 여러 작업을 추가할 수도 있다.
-
작성한 View들과 매핑될 URL을 작성해준다.
# /workspace/Edu_02/mysite/polls/urls.py from django.urls import path from . import views urlpatterns = [ # ex: /polls/ path('', views.index, name='index'), # ex: /polls/5/ path('<int:question_id>/', views.detail, name='detail'), # ex: /polls/5/results/ path('<int:question_id>/results/', views.results, name='results'), # ex: /polls/5/vote/ path('<int:question_id>/vote/', views.vote, name='vote'), ]- '<int:question_id>/' 의 형식은 장고에서 지원하는 기본 URL형식이며 이 주소로 접속하면 뒤의 views.[파일] 의 기능을 실행하게 된다.
View가 실제로 무언가 하도록 만들기
-
Question을 출판일자로 정렬하여 5개를 가져와 콤마로 연결하겠다는 내용을 Views.py에 코딩한다.
# /workspace/Edu_02/mysite/polls/urls.py from django.http import HttpResponse from .models import Question # Create your views here. def index(request): latest_question_list = Question.objects.order_by('-pub_date')[:5] output = ', '.join([q.question_text for q in latest_question_list]) return HttpResponse(output)- 이렇게 할 경우 Views에서 바로 반환을 한다. 하지만 보통 Views 파일을 여기에 모두 작성하게 되면 관리가 힘들어지므로 따로 분리해서 작성 후 URL을 매핑하게 된다.
-
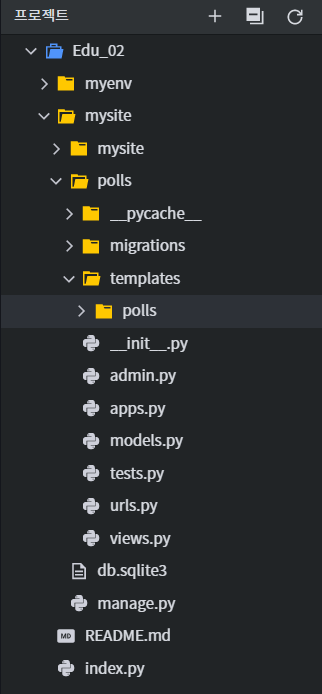
polls/templates/polls 폴더를 생성해준다. 장고는 이름이 일치하는 첫번째 템플릿을 선택하기 때문에 경로를 명확한 명칭으로 지정해주어야 한다.
-
템플릿 폴더안에 index 명령에 Response할 HTML 파일을 작성해준다.
# /workspace/Edu_02/mysite/polls/templates/polls/index.html {% if latest_question_list %} <ul> {% for question in latest_question_list %} <li><a href="/polls/{{ question.id }}/">{{ question.question_text }}</a></li> {% endfor %} </ul> {% else %} <p>No polls are available.</p> {% endif %} -
표시할 파일이 바뀌었으니 Views.py에서 표시할 파일을 수정해준다.
# /workspace/Edu_02/mysite/polls/views.py from django.http import HttpResponse from .models import Question from django.template import loader #<< 템플릿 추가 # Create your views here. def index(request): latest_question_list = Question.objects.order_by('-pub_date')[:5] template = loader.get_template('polls/index.html') context = { 'latest_question_list': latest_question_list, } return HttpResponse(template.render(context, request))- context에서 데이터를 찾아 템플릿에 반환해준다.

render()의 사용법
-
템플릿에 context 를 채워넣어 표현한 결과를
[HttpResponse](https://docs.djangoproject.com/ko/4.1/ref/request-response/#django.http.HttpResponse)객체와 함께 돌려주는 구문은 자주 쓰는 용법이다. 따라서 Django는 이런 표현을 쉽게 표현할 수 있도록 단축 기능(shortcuts)을 제공합니다.index()뷰를 단축 기능으로 작성하면 다음과 같다.# /workspace/Edu_02/mysite/polls/views.py from django.http import HttpResponse from .models import Question from django.shortcuts import render #<< render 사용 # Create your views here. def index(request): latest_question_list = Question.objects.order_by('-pub_date')[:5] template = loader.get_template('polls/index.html') context = { 'latest_question_list': latest_question_list, } return render(request, 'polls/index.html', context)- 마지막 return의 문구만 더 직관적으로 바뀌는 것 뿐이다.
404에러 발생시키기
-
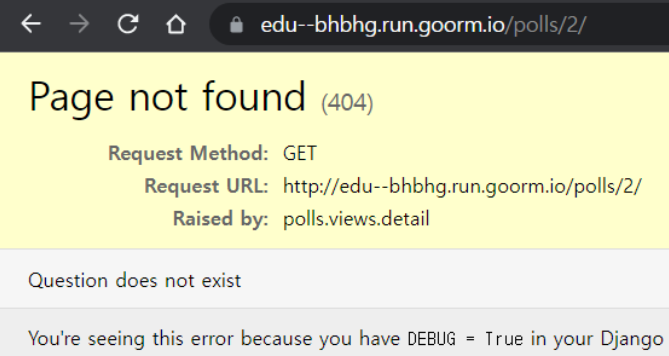
에러가 발생할 경우 미리 예외 메세지를 지정할 수 있다. 없는 URL을 입력했을 때 “Question does not exist” 메세지를 표시하게 Views.py를 수정해본다.
# /workspace/Edu_02/mysite/polls/views.py from django.http import HttpResponse, Http404 # 404추가 from .models import Question from django.shortcuts import render #<< render 사용 #... def detail(request, question_id): try: question = Question.objects.get(pk=question_id) except Question.DoesNotExist: raise Http404("Question does not exist") return render(request, 'polls/detail.html', {'question': question}) -
HTML 파일에는 표시만 가능하게 간단한 파일을 작성해둔다.
# /workspace/Edu_02/mysite/polls/templates/polls/detail.html {{ question }} -
실행해본다.
get_object_or_404() 사용법
-
만약 객체가 존재하지 않을 때 get() 을 사용하여 Http404 예외를 발생시키는것은 자주 쓰이는 용법이다. Django에서 이 기능에 대한 단축 기능을 제공하는데, detail() 뷰를 단축 기능으로 작성하면 다음과 같다.
# /workspace/Edu_02/mysite/polls/views.py from django.shortcuts import get_object_or_404, render from .models import Question # ... def detail(request, question_id): question = get_object_or_404(Question, pk=question_id) return render(request, 'polls/detail.html', {'question': question}) -
get_object_or_404() 함수는 Django 모델을 첫번째 인자로 받고, 몇개의 키워드 인수를 모델 관리자의 get() 함수에 넘긴다. 만약 객체가 존재하지 않을 경우, Http404 예외가 발생한다.
-
작동은 동일하다

Template 시스템 사용하기
-
detail 화면을 작성해본다. 이 화면에선 context에서 question 값을 가져와서 뿌려줄 것이다. 일단 위에서 만들기만 한 detail.html을 내용이 있게 수정한다.
/workspace/Edu_02/mysite/polls/templates/polls/detail.html <h1>{{ question.question_text }}</h1> <ul> {% for choice in question.choice_set.all %} <li>{{ choice.choice_text }}</li> {% endfor %} </ul>- 템플릿 시스템은 변수의 속성에 접근하기 위해 점-탐색(dot-lookup) 문법을 사용한다. 예제의 {{ question.question_text }} 구문을 보면, Django는 먼저 question 객체에 대해 사전형으로 탐색하고 탐색에 실패하게 되면 속성값으로 탐색한다. (이 예에서는 속성값에서 탐색이 완료) 만약 속성 탐색에도 실패한다면 리스트의 인덱스 탐색을 시도한다.
- {% for %} 반복 구문에서 메소드 호출이 일어난다. question.choice_set.all은 Python에서 question.choice_set.all() 코드로 해석되는데, 이때 반환된 Choice 객체의 반복자는 {% for %}에서 사용하기 적당하다.
Template에 하드코팅 된 URL 변경하기
-
작성한 HTML파일 안에 URL들이 "/polls/{{ question.id }}/" 형식으로 고정값이 할당되어 있다. 이런경우 URL이 바뀌면 일일히 HTML 파일을 다 수정을 해주어야 한다는 어려움이 있다. 이러한 불편함을 방지하고자 urls.py에 app이름을 명시해두고 path 함수에 지정한 url의 별명을 가져다가 지정해 관리할 수 있다.
# /workspace/Edu_02/mysite/polls/urls.py

from django.urls import path

from . import views

app_name = 'polls' # << 애플리케이션 지정
urlpatterns = [
    # ex: /polls/
    path('', views.index, name='index'), # << name을 가져다 사용한다
    # ex: /polls/5/
    path('<int:question_id>/', views.detail, name='detail'),
    # ex: /polls/5/results/
    path('<int:question_id>/results/', views.results, name='results'),
    # ex: /polls/5/vote/
    path('<int:question_id>/vote/', views.vote, name='vote'),
]
# /workspace/Edu_02/mysite/polls/templates/polls/index.html {% if latest_question_list %} <ul> {% for question in latest_question_list %} <li><a href="{% url 'detail' question.id %}">{{ question.question_text }}</a></li> {% endfor %} </ul> {% else %} <p>No polls are available.</p> {% endif %}- {% url %} template 태그를 사용하여 url 설정에 정의된 특정한 URL 경로들의 의존성을 제거할 수 있다.
