❗카프카의 잘못된 사용 예제입니다. 카프카의 학습을 위해 적용한 예제로 사용을 철회하진 않을 것이나 다음과 똑같은 상황이라면 카프카를 사용하지 않을 것입니다.
카프카 잘못된 설계 고찰❗
요청 사항
- 포인트 발급 및 사용 시 그 데이터가 유실되지 않아야 한다.
- 포인트 발급 및 사용은 비동기로 처리한다.
기술 선택
나는 Kafka를 선택했다.
- 비동기 처리 가능
- 브로커 서버를 여러 개 만들어 레플리카 설정 값을 2이상으로 둔다면 데이터를 안정적으로 보관 가능
위와 같은 이유로 선택했다.
Broker
Docker를 통해 카프카를 실행할 것이다. 설정값을 먼저 살펴 본 후 카프카에서 네트워크 설정을 알아보자.
로컬에서 테스트를 위한 docker compose 파일을 작성했다. 멀티모듈 최상단 docker 패키지에 위치한다.
version: '3.8'

services:
  zookeeper:
    image: confluentinc/cp-zookeeper:7.0.1
    container_name: zookeeper
    ports:
      - "2181:2181"
    environment:
      ZOOKEEPER_CLIENT_PORT: 2181
      ZOOKEEPER_TICK_TIME: 2000

  broker:
    image: confluentinc/cp-kafka:7.0.1
    container_name: kafka0
    ports:
      - "9092:9092"
      - "29092:29092"
    depends_on:
      - zookeeper
    environment:
      KAFKA_BROKER_ID: 1
      KAFKA_ADVERTISED_HOST_NAME: 127.0.0.1
      KAFKA_ZOOKEEPER_CONNECT: 'zookeeper:2181'
      KAFKA_LISTENER_SECURITY_PROTOCOL_MAP: LISTENER1:PLAINTEXT,LISTENER1_INTERNAL:PLAINTEXT
      KAFKA_LISTENERS: LISTENER1://kafka0:9092,LISTENER1_INTERNAL://kafka0:29092
      KAFKA_ADVERTISED_LISTENERS: LISTENER1://localhost:9092,LISTENER1_INTERNAL://kafka0:29092
      KAFKA_INTER_BROKER_LISTENER_NAME: LISTENER1_INTERNAL
      KAFKA_OFFSETS_TOPIC_REPLICATION_FACTOR: 1
      KAFKA_TRANSACTION_STATE_LOG_MIN_ISR: 1
KAFKA_TRANSACTION_STATE_LOG_REPLICATION_FACTOR: 1- 로컬에서 브로커를 실행시키기 위해서는
주키퍼->카프카순서로 실행시켜야한다. - 만약 브로커를 더 만들고 싶다면 services 하위 broker를 더 추가하면 된다.
- 이전에 정리한 카프카의 기본 개념에서(카프카 기본개념)레플리카 팩터는 파티션 단위로 이루어지며 최대 브로커의 개수만큼 설정할 수 있다고 했다. 즉 내가 3개의 브로커, 레플리카 팩터 1을 설정했다면 1개의 브로커만이 파티션을 가질 것이다.
KAFKA_LISTENER_SECURITY_PROTOCOL_MAP값은 통신 프로토콜로 어떤 리스너가 어떤 프로토콜을 사용하는지 key, value로 매핑해줄 수 있다.
도커환경에서 네트워크 설정
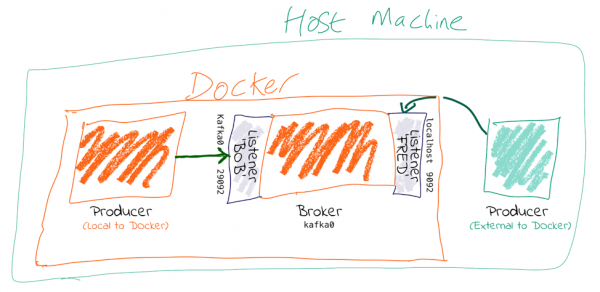
도커내 환경에서는 2개의 네트워크 설정이 필요하다.
- 도커 내부 네트워크
- 도커 외부 네트워크
현재 나의 설정에서는 LISTENER1, LISTENER1_INTERNAL 두개의 설정이 있으며 LISTENER1이 외부 통신용, LISTENER1_INTERNAL이 내부 통신용이다. KAFKA_INTER_BROKER_LISTENER_NAME 설정값에 꼭 내부 통신 리스너를 명시해주어야한다.
KAFKA_LISTENERS: 브로커가 클라이언트 요청을 수신할 수 있는 호스트 및 포트를 지정하는 데 사용된다.
KAFKA_ADVERTISED_LISTENERS: 클라이언트가 Kafka 브로커에 연결할 때 사용하는 호스트 및 포트를 정의한다. 즉, 클라이언트가 연결할 수 있는 공개적인 주소를 지정하는 데 사용된다.
나는 도커를 사용하기 때문에 브로커로 바로 붙을 수 없다. 따라서 외부에서 접속 가능한 값을 api서버에 세팅해 주어야 하는데 이때 KAFKA_ADVERTISED_LISTENERS에 설정된 리스너 중 외부 통신용 리스너를 사용하면된다.
다음의 명령어를 참고하여 도커 컴포즈를 로컬에서 실행하면 된다.
docker-compose -f kafka-docker-compose.yml up
docker-compose -f kafka-docker-compose.yml up --build
docker-compose -f kafka-docker-compose.yml down
다음 --describe 옵션을 통해 생성된 토픽을 확인할 수 있다.
docker exec -it kafka0 kafka-topics.sh --bootstrap-server kafka0:29092 --topic create-user-point --describe토픽 생성
필요한 토픽은 총 6개
- create-study-point
- add-study-point
- sub-study-point
- create-user-point
- add-user-point
- sub-user-point
다음의 명령어를 통해 토픽을 생성할 수 있다.
docker exec -it kafka0 kafka-topics.sh --create --bootstrap-server kafka0:29092 --topic create-user-pointProducer
study-internal:async모듈에 작성했다.study-internal:async모듈은 교체를 용이하게 하기 위해 아무 모듈도 의존하지 않는다.- api서버에서 카프카에 대한 의존을 줄여보고자 async 모듈 안 인터페이스와 그 구현체를 작성하여 api서버는 이 인터페이스만 의존하게 하였다.
interface StudyPointService {
    fun createStudyRoom(studyRoomId: Long, point: Int)
    fun joinStudyRoom(studyRoomId: Long, userId: Long, point: Int)
}
@Component
class StudyPointProducer(
private val kafkaTemplate: KafkaTemplate<String, String>
): StudyPointService {
override fun createStudyRoom(studyRoomId: Long, point: Int) {
kafkaTemplate.send("create-study-point", studyRoomId.toString(), point.toString())
}
@Transactional(propagation = Propagation.REQUIRES_NEW)
override fun joinStudyRoom(studyRoomId:Long, userId: Long, point: Int) {
kafkaTemplate.send("add-study-point", studyRoomId.toString(), point.toString())
kafkaTemplate.send("sub-user-point", userId.toString(), point.toString())
}
}다음의 명령을 통해 프로듀서를 테스트해 볼 수 있다.
docker exec -it kafka0 kafka-console-producer.sh --broker-list kafka0:29092 --topic create-user-pointConsumer
study-consumer모듈을 작성했다.@KafkaListener를 사용하여 파티션의 레코드를 처리한다.study-domain모듈을 의존한다.
@Component
class StudyPointConsumer (
    private val studyRoomPointRepository: StudyRoomPointRepository,
    private val studyRoomRepository: StudyRoomRepository,
    private val studyRoomPointLogRepository: StudyRoomPointLogRepository,
) {
    @KafkaListener(topics = ["create-study-point"], groupId = "point")
    fun createStudyPoint(data: ConsumerRecord<String, String>) {
        val studyRoomId = data.key().toLong()
        val point = data.value().toInt()
        val studyRoom = studyRoomRepository.findByIdOrNull(studyRoomId)!!

        studyRoomPointRepository.save(StudyRoomPoint(studyRoom, point))
        saveStudyRoomPointLog(studyRoom, point, ADDED, SYSTEM)
    }
...
}
다음의 명령을 통해 컨슈머를 테스트해 볼 수 있다.
docker exec -it kafka0 kafka-console-consumer.sh --bootstrap-server kafka0:29092 --topic create-user-point --property print.key=true --from-beginningTransaction
카프카를 통해 처리되는 로직은 다음과 같다.
- 스터디방 생성 시 스터디방 포인트 생성(현재는 0포인트 지급)
- 스터디방 인증 시 유저 포인트 지급
- 스터디방 가입 시, 스터디방 포인트 증가, 유저 포인트 감소
이 중 스터디방 가입 시, 스터디방 포인트 증가, 유저 포인트 감소는 카프카 이벤트의 트랜잭션 처리가 필요하다.
카프카 트랜잭션 정리한 것을 바탕으로 스프링 이벤트를 활용한 트랜잭션 처리를 해보겠다.
카프카 트랜잭션을 위한 설정
우선 Producer Transaction Prefix Id 설정, Consumer Trasaction 격리 레벨 설정이 필요하다.
Producer Transaction Prefix Id 설정
@Bean
    fun producerFactory(): ProducerFactory<String, String> {
        val config = HashMap<String, Any>()
        config[ProducerConfig.BOOTSTRAP_SERVERS_CONFIG] = bootstrapServers
        config[ProducerConfig.KEY_SERIALIZER_CLASS_CONFIG] = StringSerializer::class.java
        config[ProducerConfig.VALUE_SERIALIZER_CLASS_CONFIG] = StringSerializer::class.java
        config[ProducerConfig.ACKS_CONFIG] = "1"
        config[ProducerConfig.TRANSACTIONAL_ID_CONFIG] = "point-transaction-id"

        return DefaultKafkaProducerFactory(config)
}TRANSACTIONAL_ID_CONFIG를point-transaction-id로 설정한다.
Consumer Trasaction 격리 레벨 설정
@Bean
    fun consumerFactory(): ConsumerFactory<String, String> {
        val config = HashMap<String, Any>()
        config[ConsumerConfig.BOOTSTRAP_SERVERS_CONFIG] = "localhost:29092"
        config[ConsumerConfig.GROUP_ID_CONFIG] = "point"
        config[ConsumerConfig.KEY_DESERIALIZER_CLASS_CONFIG] =
            org.apache.kafka.common.serialization.StringDeserializer::class.java
        config[ConsumerConfig.VALUE_DESERIALIZER_CLASS_CONFIG] =
            org.apache.kafka.common.serialization.StringDeserializer::class.java
        config[ConsumerConfig.ISOLATION_LEVEL_CONFIG] = "read_committed"
        return DefaultKafkaConsumerFactory(config)
}ISOLATION_LEVEL_CONFIG를read_committed로 설정한다.
트랜잭션 적용하기
카프카 이벤트 코드
@TransactionalEventListener(phase = TransactionPhase.AFTER_COMMIT)
    fun joinStudyPoint(event: StudyRoomJoinedEvent) {
        studyPointService.joinStudyRoom(event.studyRoomId, event.userId, event.studyPoint)
}@TransactionalEventListener를 통해 commit 후 카프카 트랜잭션을 새로 적용한다.
이벤트 안의 카프카 프로듀서 코드
@Transactional(propagation = Propagation.REQUIRES_NEW)
    override fun joinStudyRoom(studyRoomId:Long, userId: Long, point: Int) {
        kafkaTemplate.send("add-study-point", studyRoomId.toString(), point.toString())
        kafkaTemplate.send("sub-user-point", userId.toString(), point.toString())
    }
@Transactional(propagation = Propagation.REQUIRES_NEW)을 추가하여 의도적으로 카프카 트랜잭션이 시작한다는 것을 알리고 싶었다.