오늘 학습한 내용
- Gateway Filter를 통한 인증/인가 처리
- Auth Service 생성
- Gateway Filter에서 jwt 토큰 처리
- 동작 확인
Gateway Filter를 통한 인증/인가 처리
Spring Cloud Gateway의 Pre Filter를 통해 각 서비스로 요청을 보내기 전에 JWT 인증/인가를 처리할 수 있다.
Spring Security를 통해 jwt 토큰을 처리하는 Auth Service를 생성하고, Gateway의 Pre Filter에서 이를 호출해서 처리하도록 구성한다.
Auth Service 생성
Auth Config
@Configuration
@EnableWebSecurity
public class AuthConfig {

    // SecurityFilterChain 빈을 정의합니다. 이 메서드는 Spring Security의 보안 필터 체인을 구성합니다.
    @Bean
    public SecurityFilterChain securityFilterChain(HttpSecurity http) throws Exception {
        http
            // CSRF 보호를 비활성화합니다. CSRF 보호는 주로 브라우저 클라이언트를 대상으로 하는 공격을 방지하기 위해 사용됩니다.
            .csrf(csrf -> csrf.disable())
            // 요청에 대한 접근 권한을 설정합니다.
            .authorizeRequests(authorize -> authorize
                // /auth/signIn 경로에 대한 접근을 허용합니다. 이 경로는 인증 없이 접근할 수 있습니다.
                .requestMatchers("/auth/signIn").permitAll()
                // 그 외의 모든 요청은 인증이 필요합니다.
                .anyRequest().authenticated()
            )
            // 세션 관리 정책을 정의합니다. 여기서는 세션을 사용하지 않도록 STATELESS로 설정합니다.
            .sessionManagement(session -> session
                .sessionCreationPolicy(SessionCreationPolicy.STATELESS)
            );

        // 설정된 보안 필터 체인을 반환합니다.
        return http.build();
    }
}
위와 같이 WebSecurity를 만들고 SecurityFilterChain을 선언한다. 로그인에는 인증이 필요 없도록 처리한다.
jwt를 사용할 것이기 때문에 CSRF를 비활성화하고, 세션을 비활성화(STATELESS)한다.
AuthController
@RestController
@RequiredArgsConstructor
public class AuthController {

    private final AuthService authService;

    /**
     * 사용자 ID를 받아 JWT 액세스 토큰을 생성하여 응답합니다.
     *
     * @param user_id 사용자 ID
     * @return JWT 액세스 토큰을 포함한 AuthResponse 객체를 반환합니다.
     */
    @GetMapping("/auth/signIn")
    public ResponseEntity<?> createAuthenticationToken(@RequestParam String user_id){
        return ResponseEntity.ok(new AuthResponse(authService.createAccessToken(user_id)));
    }

    /**
     * JWT 액세스 토큰을 포함하는 응답 객체입니다.
     */
    @Data
    @AllArgsConstructor
    @NoArgsConstructor
    static class AuthResponse {
        private String access_token;

    }
}
컨트롤러에서는 Service 레이어에서 발행한 jwt 토큰을 응답 객체로 만들어 response body에 이를 담아 반환한다.
실습에서는 GET으로 로그인을 처리했지만, POST로 처리하는 것이 권장된다.
당연하겠지만 로그인 시 패스워드도 처리해야 하며, GET은 주소에 패스워드가 노출되기 때문이다. 현재 실습에서는 패스워드는 건너뛰고 user_id만을 통해 처리하도록 구현했다.
AuthService
import io.jsonwebtoken.Jwts;
import io.jsonwebtoken.io.Decoders;
import io.jsonwebtoken.security.Keys;
import org.springframework.beans.factory.annotation.Value;
import org.springframework.stereotype.Service;

import javax.crypto.SecretKey;
import java.util.Date;

@Service
public class AuthService {

    @Value("${spring.application.name}")
    private String issuer;

    @Value("${service.jwt.access-expiration}")
    private Long accessExpiration;

    private final SecretKey secretKey;

    /**
     * AuthService 생성자.
     * Base64 URL 인코딩된 비밀 키를 디코딩하여 HMAC-SHA 알고리즘에 적합한 SecretKey 객체를 생성합니다.
     *
     * @param secretKey Base64 URL 인코딩된 비밀 키
     */
    public AuthService(@Value("${service.jwt.secret-key}") String secretKey) {
        this.secretKey = Keys.hmacShaKeyFor(Decoders.BASE64URL.decode(secretKey));
    }

    /**
     * 사용자 ID를 받아 JWT 액세스 토큰을 생성합니다.
     *
     * @param user_id 사용자 ID
     * @return 생성된 JWT 액세스 토큰
     */
    public String createAccessToken(String user_id) {
        return Jwts.builder()
                // 사용자 ID를 클레임으로 설정
                .claim("user_id", user_id)
                .claim("role", "ADMIN")
                // JWT 발행자를 설정
                .issuer(issuer)
                // JWT 발행 시간을 현재 시간으로 설정
                .issuedAt(new Date(System.currentTimeMillis()))
                // JWT 만료 시간을 설정
                .expiration(new Date(System.currentTimeMillis() + accessExpiration))
                // SecretKey를 사용하여 HMAC-SHA512 알고리즘으로 서명
                .signWith(secretKey, io.jsonwebtoken.SignatureAlgorithm.HS512)
                // JWT 문자열로 컴팩트하게 변환
                .compact();
    }
}
jwt 토큰에 아이디와 role을 넣어주고, 발행자, 발행시간, 만료시간을 설정한다. SHA512 알고리즘으로 서명하고 compact로 변환해 생성한 jwt 토큰을 반환한다.
Gateway Filter에서 jwt 토큰 처리
build.gradle에 의존성 추가
implementation 'io.jsonwebtoken:jjwt:0.12.6'를 dependencies에 추가한다.
application.yml 변경
server:
  port: 19091  # 게이트웨이 서비스가 실행될 포트 번호

spring:
  main:
    web-application-type: reactive  # Spring 애플리케이션이 리액티브 웹 애플리케이션으로 설정됨
  application:
    name: gateway-service  # 애플리케이션 이름을 'gateway-service'로 설정
  cloud:
    gateway:
      routes:  # Spring Cloud Gateway의 라우팅 설정
        - id: order-service  # 라우트 식별자
          uri: lb://order-service  # 'order-service'라는 이름으로 로드 밸런싱된 서비스로 라우팅
          predicates:
            - Path=/order/**  # /order/** 경로로 들어오는 요청을 이 라우트로 처리
        - id: product-service  # 라우트 식별자
          uri: lb://product-service  # 'product-service'라는 이름으로 로드 밸런싱된 서비스로 라우팅
          predicates:
            - Path=/product/**  # /product/** 경로로 들어오는 요청을 이 라우트로 처리
        - id: auth-service  # 라우트 식별자
          uri: lb://auth-service  # 'auth-service'라는 이름으로 로드 밸런싱된 서비스로 라우팅
          predicates:
            - Path=/auth/signIn  # /auth/signIn 경로로 들어오는 요청을 이 라우트로 처리
      discovery:
        locator:
          enabled: true  # 서비스 디스커버리를 통해 동적으로 라우트를 생성하도록 설정

eureka:
  client:
    service-url:
      defaultZone: http://localhost:19090/eureka/  # Eureka 서버의 URL을 지정


service:
  jwt:
    secret-key: ${JWT_SECRET_KEY}
auth-service에 대한 라우팅 정보를 추가하고, jwt secret key 정보를 추가한다. secret key는 환경변수로 처리했다.
Filter 추가
@Slf4j
@Component
public class LocalJwtAuthenticationFilter implements GlobalFilter {

    @Value("${service.jwt.secret-key}")
    private String secretKey;

    @Override
    public Mono<Void> filter(ServerWebExchange exchange, GatewayFilterChain chain) {
        String path = exchange.getRequest().getURI().getPath();
        if (path.equals("/auth/signIn")) {
            return chain.filter(exchange);  // /signIn 경로는 필터를 적용하지 않음
        }

        String token = extractToken(exchange);

        if (token == null || !validateToken(token)) {
            exchange.getResponse().setStatusCode(HttpStatus.UNAUTHORIZED);
            return exchange.getResponse().setComplete();
        }

        return chain.filter(exchange);
    }

    private String extractToken(ServerWebExchange exchange) {
        String authHeader = exchange.getRequest().getHeaders().getFirst("Authorization");
        if (authHeader != null && authHeader.startsWith("Bearer ")) {
            return authHeader.substring(7);
        }
        return null;
    }

    private boolean validateToken(String token) {
        try {
            SecretKey key = Keys.hmacShaKeyFor(Decoders.BASE64URL.decode(secretKey));
            Jws<Claims> claimsJws = Jwts.parser()
                    .verifyWith(key)
                    .build().parseSignedClaims(token);
            log.info("#####payload :: " + claimsJws.getPayload().toString());

            // 추가적인 검증 로직 (예: 토큰 만료 여부 확인 등)을 여기에 추가할 수 있습니다.
            return true;
        } catch (Exception e) {
            return false;
        }
    }
}
filter 메서드를 오버라이드하고, 로그인은 필터를 적용하지 않도록 설정한다. 토큰 검증에 실패했을 경우에는 401 에러를 발생시킨다.
extractToken 메서드에서는 request header의 Authorization 헤더에 들어 있는 value를 가져온다. Bearer {jwt_token} 형식이므로, 앞의 7글자(공백 포함)를 빼면 jwt 토큰이 추출된다.
validateToken 메서드에서는 토큰 서명을 검증한다. 현재는 서명만 검증하지만, 추가적인 검증 로직을 추가할 수 있다.
동작 확인
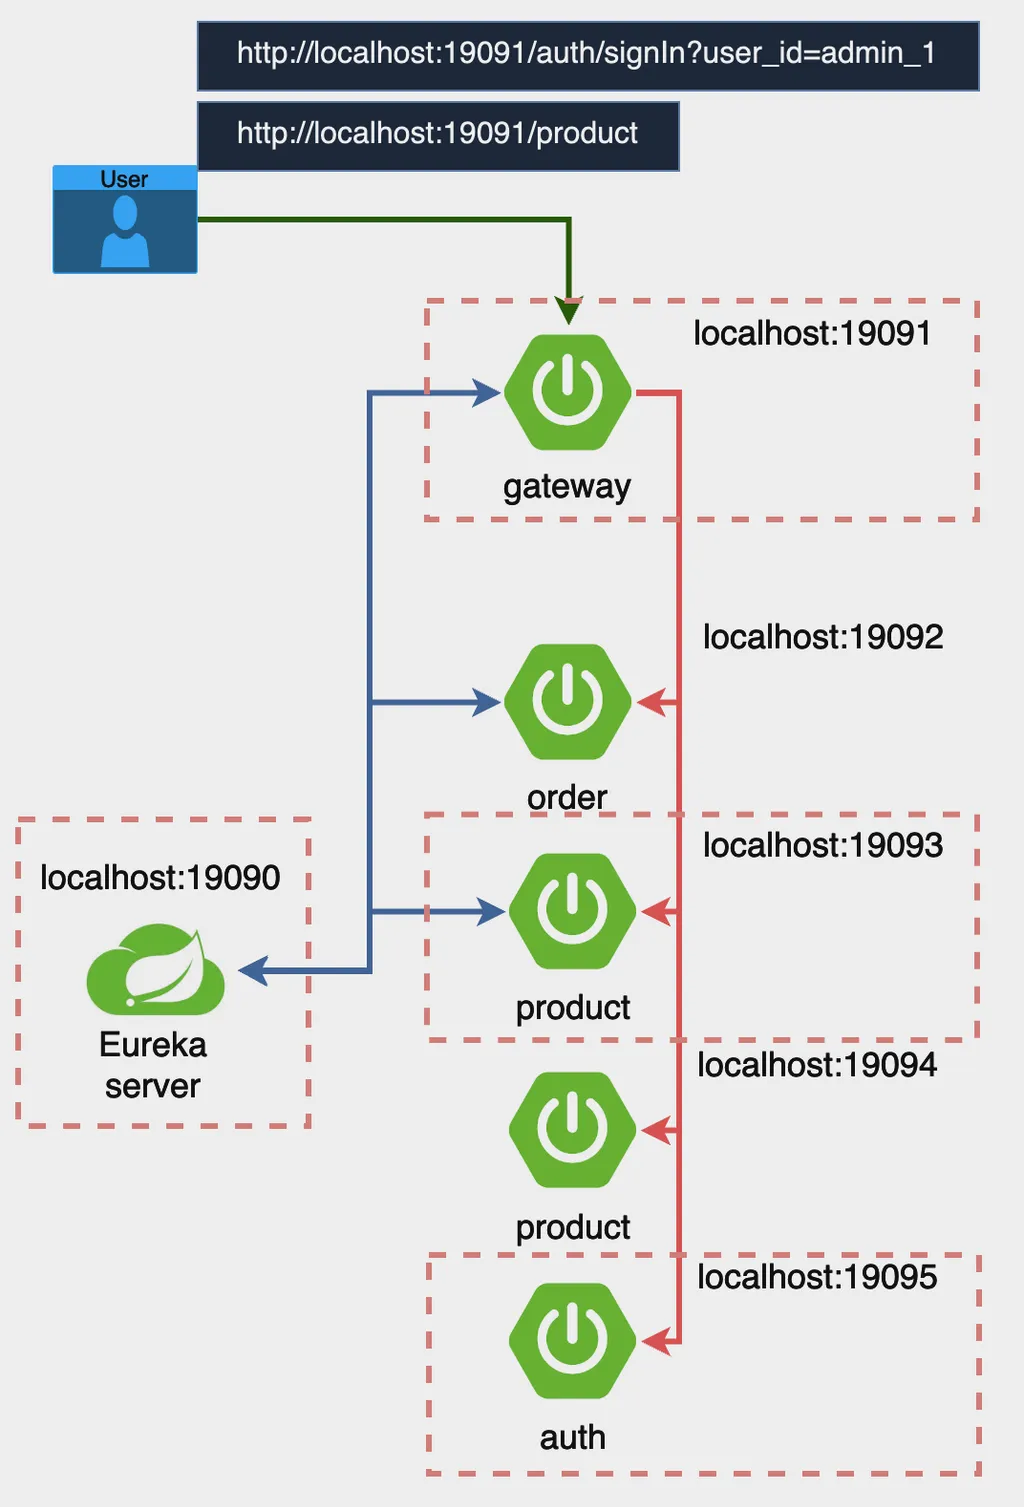
Eureka server ⇒ Gateway ⇒ AuthService ⇒ ProductService 순으로 실행한다.
ProductService는 Gateway 실습에서 사용했던 것을 그대로 사용했다.
Eureka Server 접속
Eureka Server에 접속해 인스턴스를 확인한다.

상품 요청
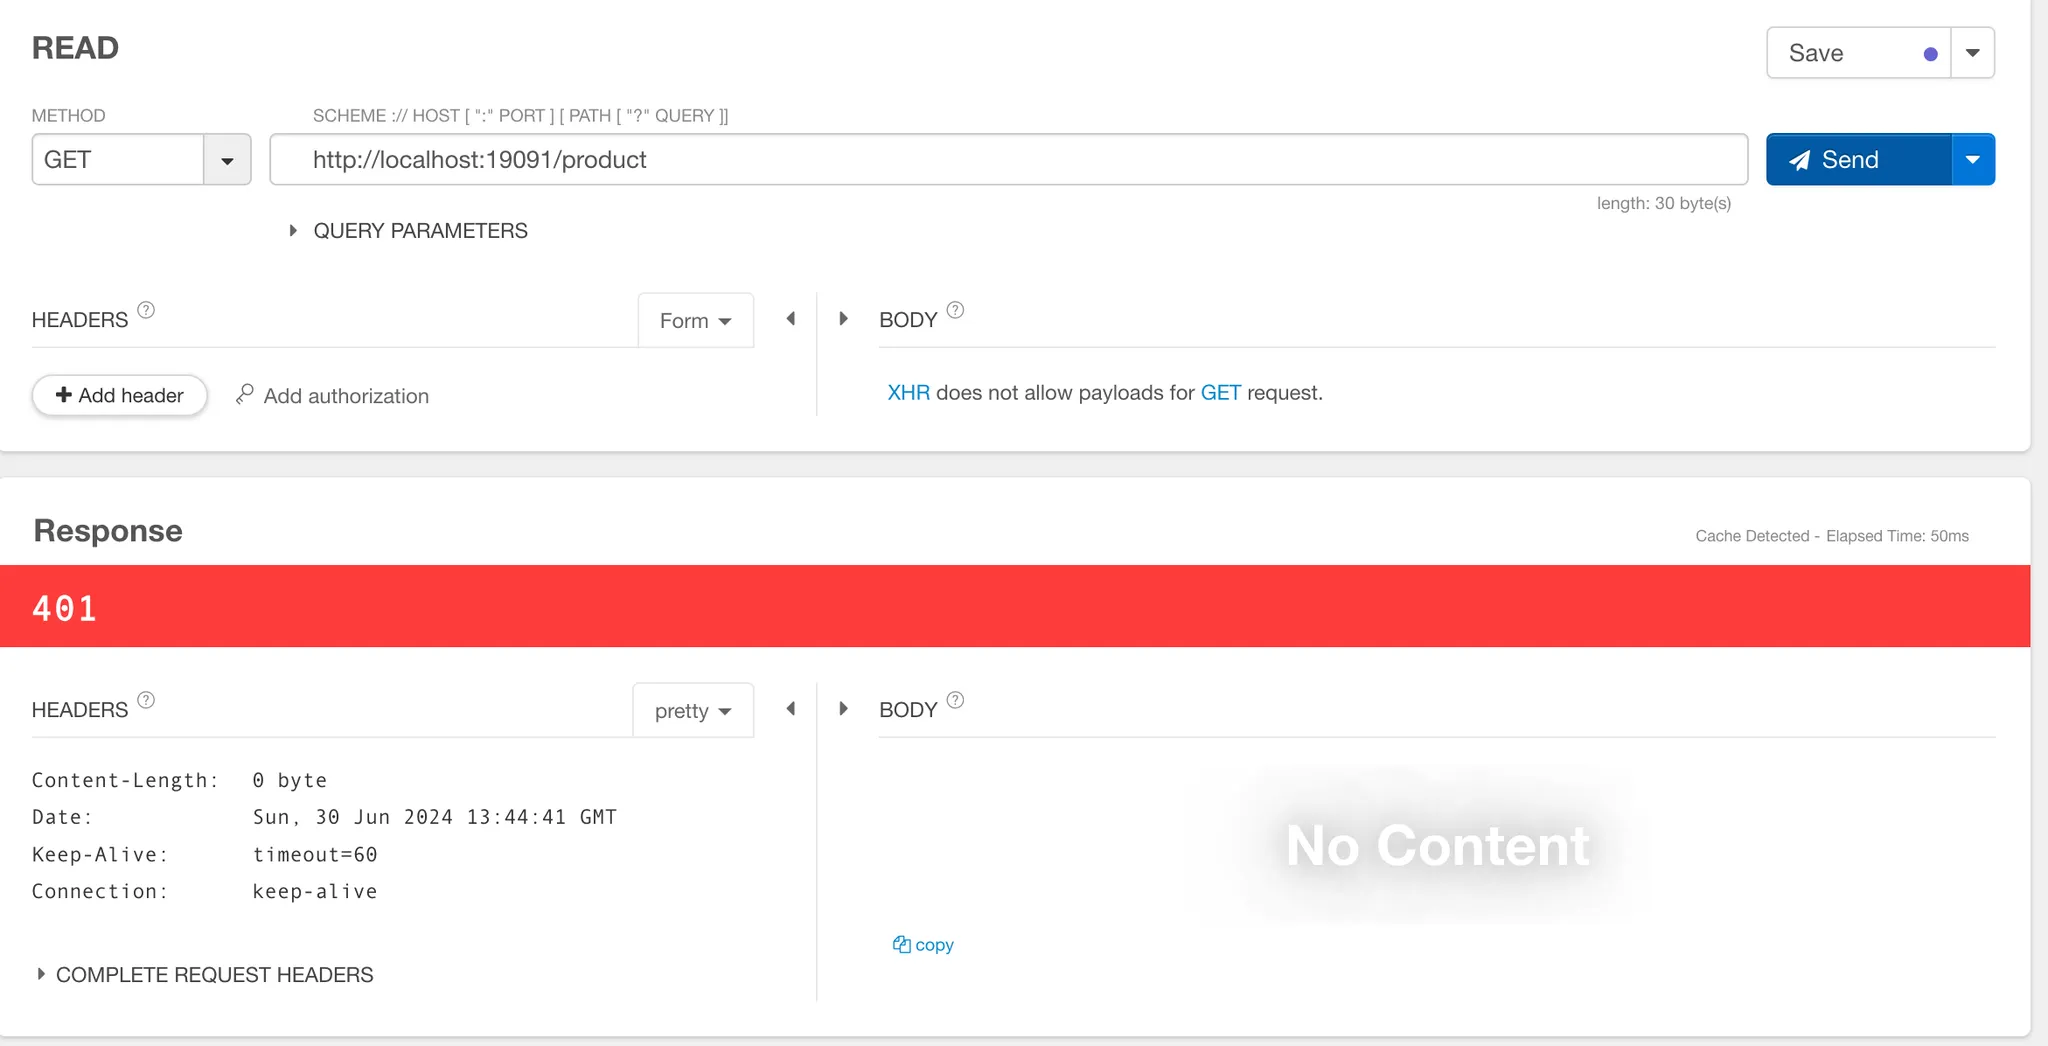
Gateway로 Product를 요청한다. 로그인이 진행되지 않아 401 에러가 발생하는 것을 확인할 수 있다.
로그인 요청
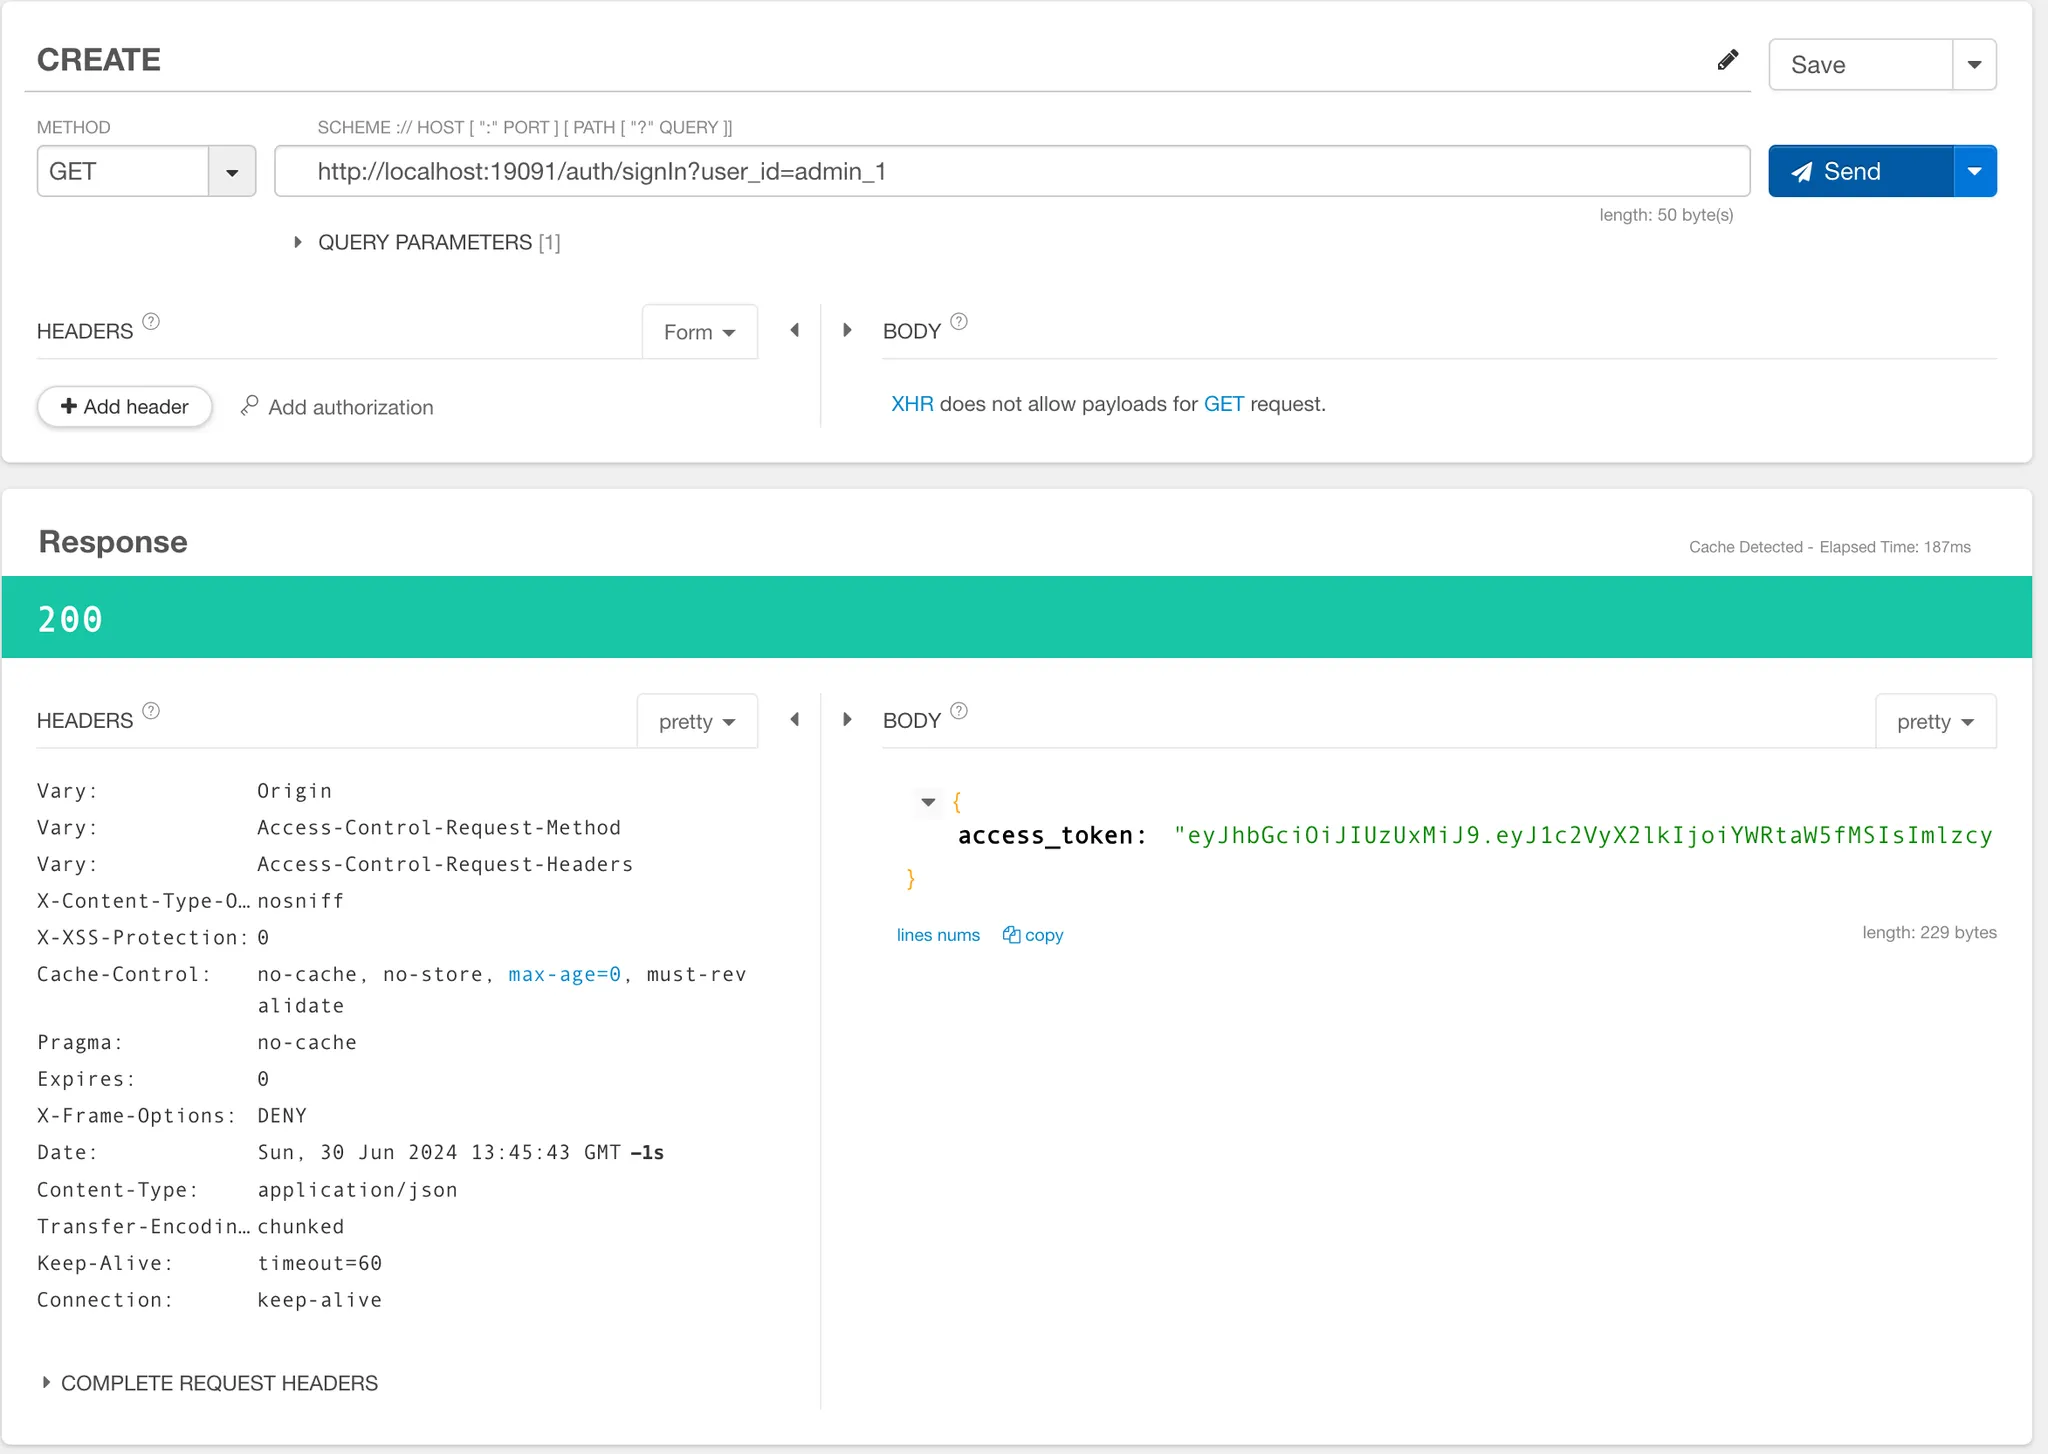
로그인을 요청한다. GET방식이기에 Query Parameter로 user_id를 넣어준다. 앞에서도 언급했지만 POST방식으로 구현하는 것이 권장된다.
response body에 access token이 담겨져 오는 것을 확인할 수 있다.
로그인 처리 후 상품 요청
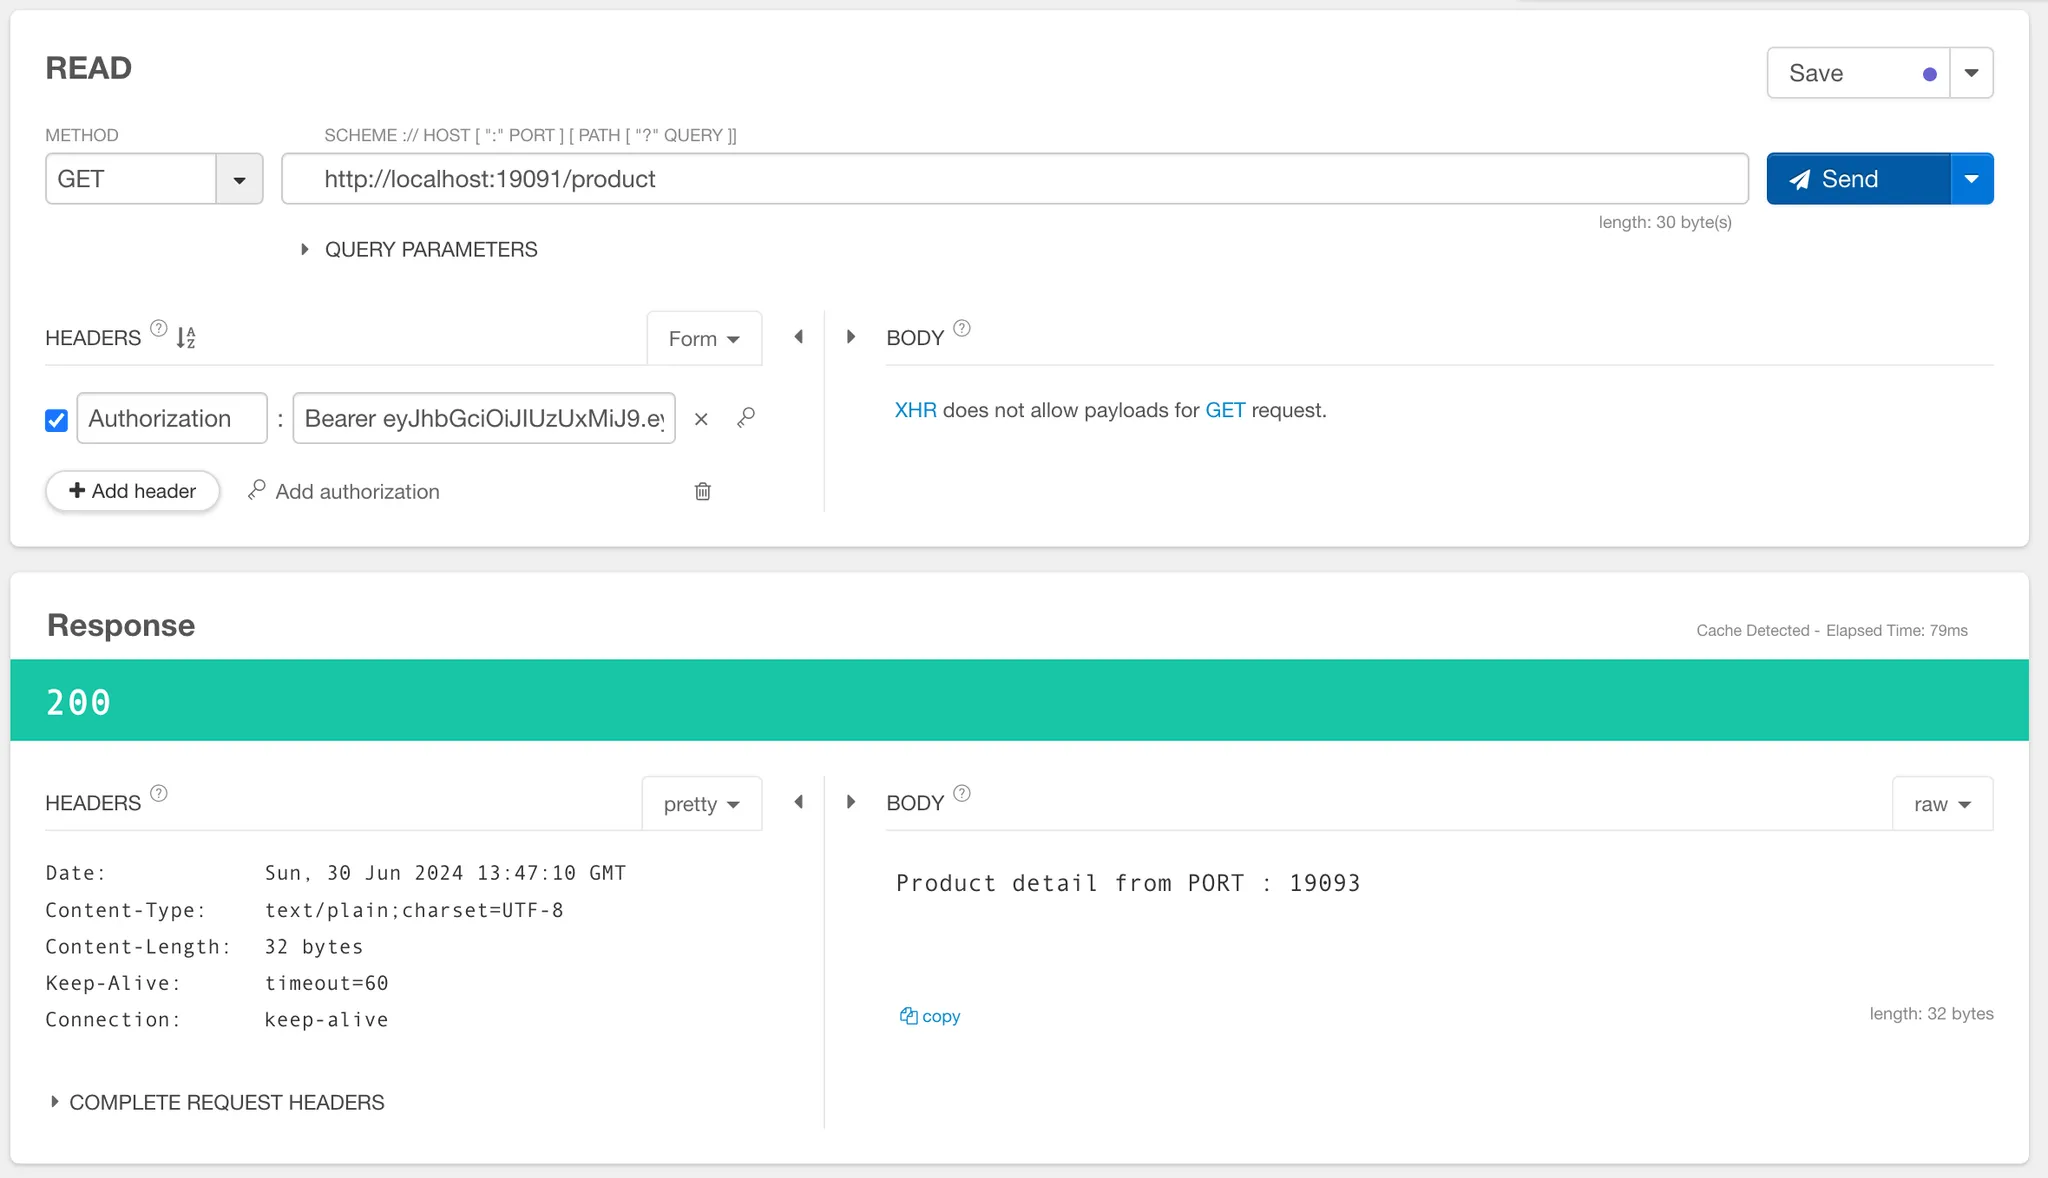
request header의 Authorization에 Bearer {발급받은 jwt token}를 넣어준다.
성공적으로 요청이 수행되는 것을 확인할 수 있다.