FlexGrid 정렬·필터링 구현 방법
Developer Solution

Wijmo FlexGrid는 allowSorting 속성 하나로 단일·다중 열 정렬을 활성화하고, wijmo.grid.filter.FlexGridFilter 클래스 한 줄로 모든 열에 Excel과 동일한 필터 UI를 추가할 수 있습니다. 직접 DOM을 조작하거나 별도의 상태 관리 코드 없이도, 10만 행 이상의 대용량 데이터에서도 즉각적인 정렬·필터링 성능을 제공합니다. 이 글에서는 CDN 기반 순수 JavaScript 환경을 기준으로 기본 정렬부터 다중 열 동시 정렬, 프로그래매틱 정렬 제어, Excel 스타일 필터까지 단계별로 완벽하게 다룹니다.
이 글의 예제는 모두 CDN 기반 순수 JavaScript(Vanilla JS) 환경 기준입니다. 네임스페이스 형식은
wijmo.grid.filter.FlexGridFilter처럼 전역wijmo객체를 사용합니다. npm/모듈 환경에서는import { FlexGridFilter } from '@mescius/wijmo.grid.filter'로 대체하세요.
핵심 내용
allowSorting속성 세 가지 값(AllowSorting.None,SingleColumn,MultiColumn)으로 정렬 동작을 제어한다AllowSorting.MultiColumn설정만으로 여러 열을 동시에 정렬하고, 헤더에 정렬 순서 인덱스가 자동 표시된다CollectionView.sortDescriptions에SortDescription객체를 추가하면 코드에서 프로그래매틱하게 정렬을 제어할 수 있다wijmo.grid.filter.FlexGridFilter인스턴스를 생성하는 것만으로 모든 열에 Excel 스타일 필터 아이콘이 추가된다getColumnFilter()+FilterType으로 특정 열만 정렬·필터를 비활성화하는 세밀한 제어가 가능하다- CDN에서
wijmo.culture.ko.min.js를 로드하면 필터 다이얼로그 등 모든 UI 텍스트가 한국어로 표시된다
FlexGrid 정렬 기본 설정 방법
FlexGrid에서 정렬을 활성화하는 방법은 allowSorting 속성을 지정하는 것입니다. 기본값은 AllowSorting.SingleColumn으로, 별도 설정 없이 열 헤더 클릭만으로 정렬이 동작합니다.
| 값 | 설명 |
|---|---|
AllowSorting.None | 열 헤더 클릭으로 정렬 불가 |
AllowSorting.SingleColumn | 한 번에 한 열만 정렬 (기본값) |
AllowSorting.MultiColumn | 여러 열 동시 정렬 가능 |
Step 1: HTML 구조 작성
FlexGrid를 렌더링할 컨테이너 <div>를 준비합니다. id 속성은 JavaScript에서 그리드를 초기화할 때 사용합니다.
HTML
<div id="theGrid" style="height: 380px;"></div>Step 2: 데이터 준비
샘플 데이터를 반환하는 getData() 함수를 작성합니다. 각 항목은 id, country, sales, expenses, active 속성을 갖습니다.
function getData() {
    var countries = ['한국', '미국', '일본', '독일', '영국', '프랑스'];
    var result = [];
    for (var i = 0; i < 50; i++) {
        result.push({
            id: i + 1,
            country: countries[i % countries.length],
            sales: Math.round(Math.random() * 100000),
            expenses: Math.round(Math.random() * 50000),
            active: i % 3 !== 0
        });
    }
    return result;
}
Step 3: FlexGrid 초기화
wijmo.grid.FlexGrid 생성자에 컨테이너 선택자와 옵션 객체를 전달합니다. allowSorting으로 그리드 전체의 정렬 동작을 설정하고, 컬럼 정의의 allowSorting: false로 특정 열만 정렬을 비활성화할 수 있습니다.
function initGrid() {
    new wijmo.grid.FlexGrid('#theGrid', {
        allowSorting: wijmo.grid.AllowSorting.SingleColumn,
        autoGenerateColumns: false,
        columns: [
            { binding: 'id',       header: 'ID',   width: 60, allowSorting: false }, // 이 열은 정렬 비활성화
            { binding: 'country',  header: '국가',  width: 100 },
            { binding: 'sales',    header: '매출',  width: 110, format: 'n0' },
            { binding: 'expenses', header: '비용',  width: 110, format: 'n0' },
            { binding: 'active',   header: '활성',  width: 70 }
        ],
        itemsSource: getData()
    });
}

initGrid();
열 헤더를 클릭하면 오름차순 → 내림차순으로 정렬됩니다. Ctrl+Click으로 정렬을 해제할 수 있습니다. 아래 예제에서 국가, 매출, 비용 열 헤더를 클릭해보세요. ID 열은 allowSorting: false로 정렬이 비활성화됩니다.
<div id="theGrid" style="height: 380px;"></div>JavaScript
function getData() {
    var countries = ['한국', '미국', '일본', '독일', '영국', '프랑스'];
    var result = [];
    for (var i = 0; i < 50; i++) {
        result.push({
            id: i + 1,
            country: countries[i % countries.length],
            sales: Math.round(Math.random() * 100000),
            expenses: Math.round(Math.random() * 50000),
            active: i % 3 !== 0
        });
    }
    return result;
}

function initGrid() {
    new wijmo.grid.FlexGrid('#theGrid', {
        allowSorting: wijmo.grid.AllowSorting.SingleColumn,
        autoGenerateColumns: false,
        columns: [
            { binding: 'id',       header: 'ID',   width: 60, allowSorting: false },
            { binding: 'country',  header: '국가',  width: 100 },
            { binding: 'sales',    header: '매출',  width: 110, format: 'n0' },
            { binding: 'expenses', header: '비용',  width: 110, format: 'n0' },
            { binding: 'active',   header: '활성',  width: 70 }
        ],
        itemsSource: getData()
    });
}

initGrid();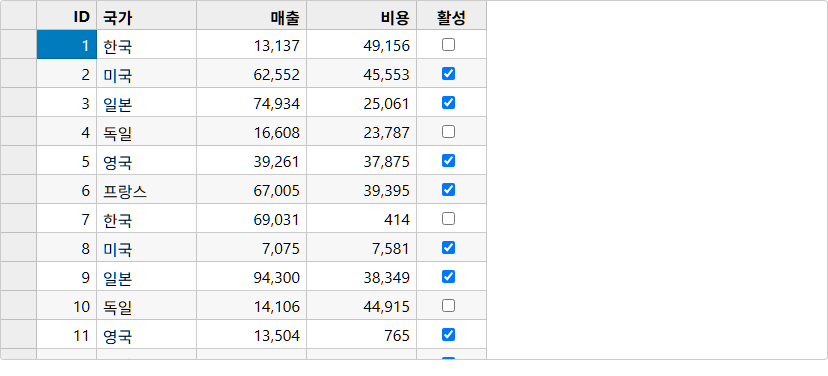
요약:
allowSorting속성으로 그리드 전체 정렬 동작을 결정하고, 컬럼 정의의allowSorting: false로 특정 열만 정렬을 비활성화한다.
여러 열 동시 정렬 구현 방법 (AllowSorting.MultiColumn)
여러 열을 동시에 정렬하려면 allowSorting을 wijmo.grid.AllowSorting.MultiColumn으로 설정합니다. 이 설정 하나만으로 "국가별 → 같은 국가 내 매출 내림차순" 같은 복합 정렬이 가능합니다.
Step 1: HTML 구조 작성
이전 예제와 동일하게 그리드 컨테이너 <div>를 준비합니다.
<div id="theGrid" style="height: 380px;"></div>Step 2: CSS — 정렬 우선순위 번호 스타일 지정
다중 열 정렬이 활성화되면 헤더에 정렬 우선순위 번호(1, 2, 3...)가 표시됩니다. .wj-cell.wj-header .wj-sort-index 클래스를 재정의하면 이 번호의 스타일을 바꿀 수 있습니다.
.wj-cell.wj-header .wj-sort-index {
    font-size: 10px;
    color: red;
    font-weight: bold;
}
Step 3: AllowSorting.MultiColumn 설정
allowSorting 값만 AllowSorting.MultiColumn으로 바꾸면 됩니다. 나머지 코드는 기본 정렬 예제와 동일합니다.
function initGrid() {
    new wijmo.grid.FlexGrid('#theGrid', {
        // MultiColumn으로 변경 — 한 줄 차이로 다중 열 정렬 활성화
        allowSorting: wijmo.grid.AllowSorting.MultiColumn,
        autoGenerateColumns: false,
        columns: [
            { binding: 'id',       header: 'ID',   width: 60 },
            { binding: 'country',  header: '국가',  width: 100 },
            { binding: 'product',  header: '제품',  width: 100 },
            { binding: 'sales',    header: '매출',  width: 110, format: 'n0' },
            { binding: 'expenses', header: '비용',  width: 110, format: 'n0' }
        ],
        itemsSource: getData()
    });
}
다중 열 정렬이 활성화되면 헤더에 정렬 방향 아이콘 옆에 정렬 우선순위 번호(1, 2, 3...)가 표시됩니다. 사용자 조작 방법은 다음과 같습니다.
- 클릭: 해당 열 정렬 추가 또는 방향 전환
- Ctrl+Click: 해당 열의 정렬만 제거
- Ctrl+Shift+Click: 모든 열의 정렬 초기화
아래 예제에서 국가 클릭 후 매출 헤더를 클릭하면 국가별·매출별 다중 정렬이 적용되고, 헤더에 빨간색 우선순위 번호가 표시됩니다.
.wj-cell.wj-header .wj-sort-index {
    font-size: 10px;
    color: red;
    font-weight: bold;
}<div id="theGrid" style="height: 380px;"></div>JavaScript
function getData() {
    var countries = ['한국', '미국', '일본', '독일', '영국'];
    var result = [];
    for (var i = 0; i < 80; i++) {
        result.push({
            id: i + 1,
            country: countries[i % countries.length],
            product: '제품 ' + (Math.floor(i / 5) + 1),
            sales: Math.round(Math.random() * 100000),
            expenses: Math.round(Math.random() * 50000)
        });
    }
    return result;
}

function initGrid() {
    new wijmo.grid.FlexGrid('#theGrid', {
        allowSorting: wijmo.grid.AllowSorting.MultiColumn,
        autoGenerateColumns: false,
        columns: [
            { binding: 'id',       header: 'ID',   width: 60 },
            { binding: 'country',  header: '국가',  width: 100 },
            { binding: 'product',  header: '제품',  width: 100 },
            { binding: 'sales',    header: '매출',  width: 110, format: 'n0' },
            { binding: 'expenses', header: '비용',  width: 110, format: 'n0' }
        ],
        itemsSource: getData()
    });
}

initGrid();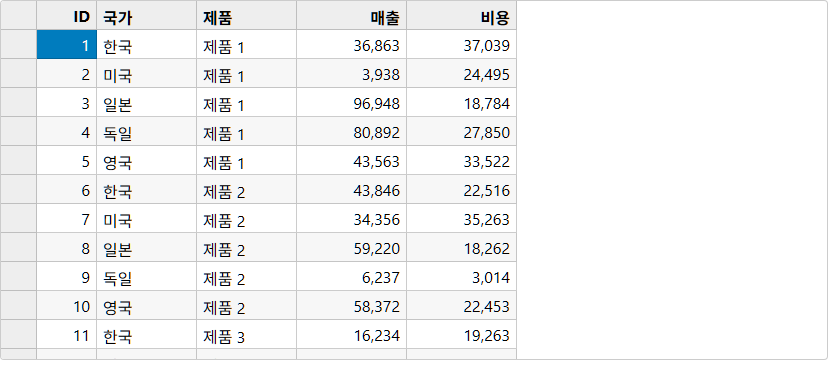
요약:
AllowSorting.MultiColumn설정만으로 다중 열 동시 정렬이 활성화되며, 헤더에 정렬 우선순위 인덱스가 자동으로 표시된다.
CollectionView의 sortDescriptions를 코드로 직접 제어하는 방법
버튼 클릭이나 초기 로드 시점에 프로그래매틱하게 정렬을 적용하려면, CollectionView.sortDescriptions에 SortDescription 객체를 추가합니다. sortDescriptions는 ObservableArray 타입이라 변경 즉시 그리드가 자동으로 갱신됩니다.
Step 1: HTML 구조 작성 — 버튼과 그리드
정렬을 직접 제어할 버튼 두 개와 그리드 컨테이너를 배치합니다.
HTML
<div style="margin-bottom: 8px;">
    <button onclick="applySort()">국가·매출 정렬 적용</button>
    <button onclick="clearSort()">정렬 초기화</button>
</div>
<div id="theGrid" style="height: 360px;"></div>
Step 2: CollectionView 직접 생성
일반 배열 대신 wijmo.collections.CollectionView를 명시적으로 생성하여 itemsSource로 사용합니다. 이렇게 해야 sortDescriptions를 직접 참조해 정렬을 제어할 수 있습니다.
var theGrid;

function initGrid() {
    var cv = new wijmo.collections.CollectionView(getData());

    theGrid = new wijmo.grid.FlexGrid('#theGrid', {
        allowSorting: wijmo.grid.AllowSorting.MultiColumn,
        autoGenerateColumns: false,
        columns: [
            { binding: 'id',       header: 'ID',   width: 60 },
            { binding: 'country',  header: '국가',  width: 100 },
            { binding: 'sales',    header: '매출',  width: 110, format: 'n0' },
            { binding: 'expenses', header: '비용',  width: 110, format: 'n0' }
        ],
        itemsSource: cv
    });
}
Step 3: SortDescription으로 정렬 기준 추가
wijmo.collections.SortDescription 생성자의 첫 번째 인자는 정렬할 속성 이름(문자열), 두 번째 인자는 오름차순 여부(true = 오름차순, false = 내림차순)입니다.
function applySort() {
    var cv = theGrid.collectionView;
    cv.sortDescriptions.clear(); // 기존 정렬 초기화

    // 첫 번째 기준: 국가 오름차순
    cv.sortDescriptions.push(
        new wijmo.collections.SortDescription('country', true)
    );
    // 두 번째 기준: 매출 내림차순
    cv.sortDescriptions.push(
        new wijmo.collections.SortDescription('sales', false)
    );
}
Step 4: 정렬 초기화 함수
sortDescriptions.clear()를 호출하면 모든 정렬 기준이 제거되고 원래 데이터 순서로 돌아갑니다.
function clearSort() {
    theGrid.collectionView.sortDescriptions.clear();
}
아래 예제에서 버튼을 클릭해 정렬 적용/초기화를 직접 확인해보세요. 초기 로드 시 이미 국가 오름차순·매출 내림차순으로 정렬된 상태로 표시됩니다.
<div style="margin-bottom: 8px;">
    <button onclick="applySort()">국가·매출 정렬 적용</button>
    <button onclick="clearSort()">정렬 초기화</button>
</div>
<div id="theGrid" style="height: 360px;"></div>
JavaScript
var theGrid;

function getData() {
    var countries = ['한국', '미국', '일본', '독일', '영국', '프랑스'];
    var result = [];
    for (var i = 0; i < 60; i++) {
        result.push({
            id: i + 1,
            country: countries[i % countries.length],
            sales: Math.round(Math.random() * 100000),
            expenses: Math.round(Math.random() * 50000)
        });
    }
    return result;
}

function applySort() {
    var cv = theGrid.collectionView;
    cv.sortDescriptions.clear();
    cv.sortDescriptions.push(new wijmo.collections.SortDescription('country', true));
    cv.sortDescriptions.push(new wijmo.collections.SortDescription('sales', false));
}

function clearSort() {
    theGrid.collectionView.sortDescriptions.clear();
}

// onclick 핸들러가 전역 스코프에서 호출되므로 window에 노출
window.applySort = applySort;
window.clearSort = clearSort;

function initGrid() {
    var cv = new wijmo.collections.CollectionView(getData());

    theGrid = new wijmo.grid.FlexGrid('#theGrid', {
        allowSorting: wijmo.grid.AllowSorting.MultiColumn,
        autoGenerateColumns: false,
        columns: [
            { binding: 'id',       header: 'ID',   width: 60 },
            { binding: 'country',  header: '국가',  width: 100 },
            { binding: 'sales',    header: '매출',  width: 110, format: 'n0' },
            { binding: 'expenses', header: '비용',  width: 110, format: 'n0' }
        ],
        itemsSource: cv
    });

    applySort(); // 초기 로드 시 정렬 적용
}

initGrid();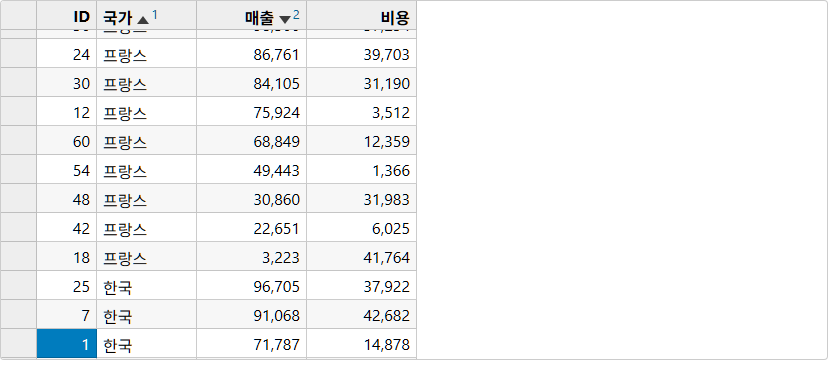
요약:
CollectionView.sortDescriptions에SortDescription객체를 추가·제거하면 코드 어디서든 정렬을 즉시 적용할 수 있으며, 그리드는 자동으로 업데이트된다.
FlexGridFilter로 Excel 스타일 필터 추가하는 방법
wijmo.grid.filter.FlexGridFilter는 CDN의 wijmo.grid.filter.min.js 모듈이 제공하는 클래스로, 생성자에 그리드 인스턴스를 넘기기만 하면 모든 열 헤더에 필터 아이콘이 자동으로 추가됩니다.
필터 다이얼로그는 두 가지 탭을 제공합니다.
- 값 필터(Value): 해당 열의 고유 값 목록에서 체크박스로 선택
- 조건 필터(Condition): "포함", "시작", "같음" 등 조건식으로 필터링
한글 문화권 적용: CDN에서
wijmo.culture.ko.min.js를 로드하면 필터 다이얼로그의 버튼 문구("적용", "취소", "모두 선택" 등)와 날짜·숫자 형식이 한국어로 자동 표시됩니다.
Step 1: HTML 구조 작성
그리드 컨테이너를 준비합니다. wijmo.grid.filter.FlexGridFilter는 JavaScript로만 추가되므로 HTML에는 별도 태그가 필요 없습니다.
HTML
<div id="theGrid" style="height: 400px;"></div>Step 2: FlexGridFilter 생성 — 한 줄로 전체 열 필터 활성화
new wijmo.grid.filter.FlexGridFilter(grid) 한 줄이 전부입니다. 그리드 인스턴스를 생성한 직후에 호출합니다.
function initGrid() {
    var grid = new wijmo.grid.FlexGrid('#theGrid', {
        allowSorting: wijmo.grid.AllowSorting.MultiColumn,
        autoGenerateColumns: false,
        columns: [
            { binding: 'id',       header: 'ID',      width: 60,  allowSorting: false },
            { binding: 'country',  header: '국가',     width: 100 },
            { binding: 'category', header: '카테고리',  width: 110 },
            { binding: 'sales',    header: '매출',     width: 120, format: 'n0' },
            { binding: 'expenses', header: '비용',     width: 120, format: 'n0' },
            { binding: 'rating',   header: '평점',     width: 80  }
        ],
        itemsSource: getData()
    });

    // wijmo.grid.filter.FlexGridFilter — 한 줄로 모든 열에 Excel 스타일 필터 활성화
    var filter = new wijmo.grid.filter.FlexGridFilter(grid);
}
Step 3: FilterType으로 열별 필터 타입 세밀하게 제어
getColumnFilter(binding) 메서드로 특정 열의 필터 설정에 접근하고, wijmo.grid.filter.FilterType 열거형으로 필터 타입을 지정합니다.
// 평점 열: 가능한 값을 미리 지정 (1~5점)
var ratingFilter = filter.getColumnFilter('rating');
ratingFilter.valueFilter.uniqueValues = [1, 2, 3, 4, 5];

// 매출 열: 조건 필터만 표시 (값 목록이 너무 많아 조건식이 유용)
var salesFilter = filter.getColumnFilter('sales');
salesFilter.filterType = wijmo.grid.filter.FilterType.Condition;

// ID 열: 필터 비활성화
var idFilter = filter.getColumnFilter('id');
idFilter.filterType = wijmo.grid.filter.FilterType.None;
FilterType 열거형 정리:
| 값 | 설명 |
|---|---|
FilterType.Both | 값 필터 + 조건 필터 모두 표시 (기본값) |
FilterType.Value | 값 체크박스 목록만 표시 |
FilterType.Condition | 조건식 입력만 표시 |
FilterType.None | 해당 열 필터 비활성화 |
아래 예제에서 열 헤더의 깔때기 아이콘을 클릭해 필터를 적용해보세요. 필터 다이얼로그 텍스트가 한국어로 표시됩니다.
<div id="theGrid" style="height: 400px;"></div>JavaScript
function getData() {
    var countries = ['한국', '미국', '일본', '독일', '영국', '프랑스', '호주'];
    var categories = ['전자', '의류', '식품', '가구', '스포츠'];
    var result = [];
    for (var i = 0; i < 100; i++) {
        result.push({
            id: i + 1,
            country: countries[i % countries.length],
            category: categories[i % categories.length],
            sales: Math.round(Math.random() * 500000) + 10000,
            expenses: Math.round(Math.random() * 200000) + 5000,
            rating: Math.floor(Math.random() * 5) + 1
        });
    }
    return result;
}

function initGrid() {
    var grid = new wijmo.grid.FlexGrid('#theGrid', {
        allowSorting: wijmo.grid.AllowSorting.MultiColumn,
        autoGenerateColumns: false,
        columns: [
            { binding: 'id',       header: 'ID',      width: 60,  allowSorting: false },
            { binding: 'country',  header: '국가',     width: 100 },
            { binding: 'category', header: '카테고리',  width: 110 },
            { binding: 'sales',    header: '매출',     width: 120, format: 'n0' },
            { binding: 'expenses', header: '비용',     width: 120, format: 'n0' },
            { binding: 'rating',   header: '평점',     width: 80  }
        ],
        itemsSource: getData()
    });

    var filter = new wijmo.grid.filter.FlexGridFilter(grid);

    var ratingFilter = filter.getColumnFilter('rating');
    ratingFilter.valueFilter.uniqueValues = [1, 2, 3, 4, 5];

    var salesFilter = filter.getColumnFilter('sales');
    salesFilter.filterType = wijmo.grid.filter.FilterType.Condition;

    var idFilter = filter.getColumnFilter('id');
    idFilter.filterType = wijmo.grid.filter.FilterType.None;
}

initGrid();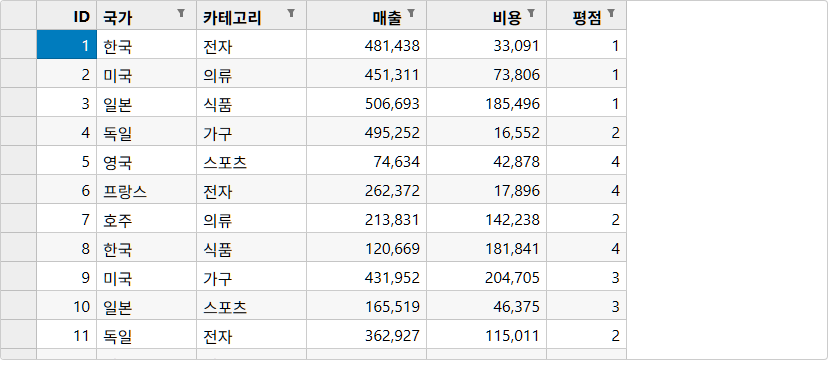
요약:
new wijmo.grid.filter.FlexGridFilter(grid)한 줄로 모든 열에 Excel 스타일 필터가 활성화되며,getColumnFilter()와FilterType열거형으로 열별 필터 타입을 세밀하게 제어할 수 있다.
특정 열만 정렬·필터 비활성화하는 방법
ID 열이나 내부 코드 열처럼 정렬·필터가 의미 없는 열은 열 수준에서 비활성화하는 것이 UX에 유리합니다.
정렬 비활성화 — 컬럼 정의에서:
columns: [
    { binding: 'id',       header: 'ID',      width: 60, allowSorting: false }, // 정렬 비활성화
    { binding: 'country',  header: '국가',     width: 100 },
    { binding: 'sales',    header: '매출',     width: 110, format: 'n0' }
]
필터 비활성화 — FlexGridFilter 생성 후:
var filter = new wijmo.grid.filter.FlexGridFilter(grid);

// 특정 열만 필터 비활성화
filter.getColumnFilter('id').filterType = wijmo.grid.filter.FilterType.None;

// 또는, 필터 표시 열을 목록으로 지정 (나머지는 자동으로 숨겨짐)
filter.filterColumns = ['country', 'category', 'sales'];
filterColumns 배열을 지정하면 목록에 포함된 열에만 필터 아이콘이 표시됩니다. 열 하나하나 FilterType.None을 지정하는 것보다 간편합니다.
요약: 컬럼 정의의
allowSorting: false로 정렬을,getColumnFilter().filterType = FilterType.None또는filter.filterColumns배열로 필터를 열 단위로 제어한다.
정렬·필터 이벤트 활용 방법
정렬·필터 변경 시점에 커스텀 로직(서버 재요청, 로그 기록, UI 업데이트 등)을 실행하려면 이벤트 핸들러를 등록합니다.
// 정렬 직전 이벤트 — args.cancel = true로 정렬 취소 가능
grid.sortingColumn.addHandler(function(sender, args) {
    console.log('정렬 시작:', args.getColumn().binding);
});

// 정렬 완료 후 이벤트 — 현재 정렬 상태 읽기
grid.sortedColumn.addHandler(function(sender, args) {
    var sortDescs = sender.collectionView.sortDescriptions;
    sortDescs.forEach(function(sd, index) {
        console.log((index + 1) + '순위: ' + sd.property + ' ' + (sd.ascending ? '오름차순' : '내림차순'));
    });
});
var filter = new wijmo.grid.filter.FlexGridFilter(grid);
// 필터가 실제로 데이터에 적용될 때마다 실행
filter.filterApplied.addHandler(function(sender, args) {
console.log('필터 적용 후 데이터 건수:', grid.collectionView.items.length);
});요약:
sortingColumn/sortedColumn이벤트로 정렬 전후 커스텀 로직을 실행하고,FlexGridFilter.filterApplied로 필터가 실제로 데이터에 적용된 시점을 감지할 수 있다.
자주 묻는 질문 (FAQ)
Q. Wijmo FlexGrid에서 정렬을 활성화하려면 어떻게 하나요?
allowSorting 속성을 wijmo.grid.AllowSorting.SingleColumn(기본값) 또는 MultiColumn으로 설정합니다. 기본값이 SingleColumn이므로 별도 설정 없이도 열 헤더를 클릭하면 정렬됩니다. 정렬을 완전히 막으려면 AllowSorting.None을 사용합니다.
new wijmo.grid.FlexGrid('#grid', {
    allowSorting: wijmo.grid.AllowSorting.SingleColumn, // 기본값, 생략 가능
    itemsSource: data
});
Q. FlexGrid에서 여러 열을 동시에 정렬하는 방법은 무엇인가요?
allowSorting을 wijmo.grid.AllowSorting.MultiColumn으로 설정합니다. 이후 열 헤더를 클릭할 때마다 해당 열이 정렬 우선순위에 추가되고 헤더에 순서 번호가 표시됩니다. 코드로 제어하려면 CollectionView.sortDescriptions에 wijmo.collections.SortDescription 객체를 순서대로 추가합니다.
var cv = grid.collectionView;
cv.sortDescriptions.clear();
cv.sortDescriptions.push(new wijmo.collections.SortDescription('country', true));   // 1순위: 국가 오름차순
cv.sortDescriptions.push(new wijmo.collections.SortDescription('sales', false));    // 2순위: 매출 내림차순
Q. FlexGridFilter로 Excel 스타일 필터를 추가하는 방법은?
CDN에서 wijmo.grid.filter.min.js를 로드한 후, wijmo.grid.filter.FlexGridFilter 인스턴스를 생성하면 됩니다. 생성자에 그리드 인스턴스를 전달하는 것만으로 모든 열 헤더에 필터 아이콘이 자동으로 추가됩니다.
// CDN 환경 (본 예제 기준)
var filter = new wijmo.grid.filter.FlexGridFilter(grid);

// npm/모듈 환경
import { FlexGridFilter } from '@mescius/wijmo.grid.filter';
var filter = new FlexGridFilter(grid);
Q. 필터 다이얼로그를 한국어로 표시하는 방법은?
CDN에서 한글 문화권 파일을 로드하면 필터 다이얼로그의 버튼("적용", "취소" 등)과 날짜·숫자 포맷이 자동으로 한국어로 표시됩니다.
<script src="https://cdn.mescius.com/wijmo/5.latest/controls/cultures/wijmo.culture.ko.min.js"></script>Q. FlexGrid에서 특정 열만 정렬·필터를 비활성화하는 방법은?
정렬 비활성화는 컬럼 정의에 allowSorting: false를 추가합니다. 필터 비활성화는 FlexGridFilter 생성 후 getColumnFilter('binding').filterType = wijmo.grid.filter.FilterType.None으로 지정하거나, filter.filterColumns 배열에 필터가 필요한 열 목록만 지정합니다.
{ binding: 'id', header: 'ID', allowSorting: false }  // 정렬 비활성화

filter.getColumnFilter('id').filterType = wijmo.grid.filter.FilterType.None;  // 필터 비활성화
Q. CollectionView의 sortDescriptions를 코드로 직접 제어하는 방법은?
grid.collectionView.sortDescriptions.clear()로 기존 정렬을 초기화한 후, sortDescriptions.push(new wijmo.collections.SortDescription(property, ascending))로 새로운 정렬 기준을 추가합니다. sortDescriptions는 ObservableArray이므로 변경 즉시 그리드가 자동으로 갱신됩니다. refresh()를 별도로 호출할 필요가 없습니다.
Wijmo FlexGrid의 정렬과 필터링은 allowSorting 속성 하나, wijmo.grid.filter.FlexGridFilter 클래스 한 줄로 시작해 CollectionView.sortDescriptions, FilterType 열거형으로 깊이 있는 커스터마이징까지 단계적으로 확장할 수 있습니다. 한글 문화권(wijmo.culture.ko.min.js)을 적용하면 필터 다이얼로그가 한국어로 표시되어 국내 사용자 경험이 크게 향상됩니다. 다음 글에서는 FlexGrid의 그룹핑과 집계(Aggregation) 기능을 다룹니다.
Wijmo 홈페이지: 바로가기
Wijmo 무료 체험판: 30일 무료 체험 시작하기
온라인 튜토리얼: Wijmo 튜토리얼 & 데모
온라인 문의: MESCIUS 온라인 상담