지난번엔 스토리북이 사용자 접근성 테스트를 하는 방법에 대해 알아보았다. 여기서 추가적으로 다음 workflow를 만들고 싶은 욕심이 생겼다.
Storybook 사용자 접근성 테스트 통과 > Chromatic 배포 > Vercel 배포
즉 테스트를 통과해야만 크로마틱으로 스토리북이 정적 배포가 되고, 크로마틱 배포가 끝난다음 Vercel로 Production 배포가 되게끔하고 싶었다.
workflow에 의존성 설정하기
만약 A라는 워크플로우가 끝난다음 B가 실행되도록 하고 싶다면 needs 프로퍼티를 사용하면된다.
chromatic:
  needs: storybook-test
이렇게 하면 storybook-test가 통과해야 chromatic 작업으로 넘어간다.
1. storybook-test 다음 chromatic 작업으로 넘어가기
storybook 공식 사이트에서 제공해주는 github workflow를 그대로 복붙해주면 된다.
# .github/workflows/storybook-tests.yml

name: 'Storybook Tests'
on: push
jobs:
  storybook-test:
    timeout-minutes: 60
    runs-on: ubuntu-latest
    steps:
      - uses: actions/checkout@v4
      - uses: actions/setup-node@v4
        with:
          node-version-file: '.nvmrc'
      - name: Install dependencies
        run: yarn
      - name: Install Playwright
        run: npx playwright install --with-deps
      - name: Build Storybook
        run: yarn build-storybook --quiet
      - name: Serve Storybook and run tests
        run: |
          npx concurrently -k -s first -n "SB,TEST" -c "magenta,blue" \
            "npx http-server storybook-static --port 6006 --silent" \
            "npx wait-on tcp:127.0.0.1:6006 && yarn test-storybook"
  chromatic:
    needs: storybook-test
    name: Run Chromatic
    runs-on: ubuntu-latest
    steps:
      - name: Checkout code
        uses: actions/checkout@v4
        with:
          fetch-depth: 0
      - uses: actions/setup-node@v4
        with:
          node-version: 20
      - name: Install dependencies
        # ⚠️ See your package manager's documentation for the correct command to install dependencies in a CI environment.
        run: npm ci
      - name: Run Chromatic
        uses: chromaui/action@latest
        with:
          # ⚠️ Make sure to configure a `CHROMATIC_PROJECT_TOKEN` repository secret
          projectToken: ${{ secrets.CHROMATIC_PROJECT_TOKEN }}
이때 가장 아래에 있는 CHROMATIC_PROJECT_TOKEN은 github의 secret 에서 설정해줘야 한다.
Chromatic -> manage 메뉴로 이동해서 본인의 프로젝트 토큰을 복사 & 붙여넣기 해주면 된다. 관련 내용은 이미 작성해놓았으니 해당 포스터를 참고하자.
2. vercel 배포 제어하기
여태 모든 프로젝트는 main 브랜치에 배포하면 vercel이 알아서 자동으로 배포해주는 방식을 택했다. 하지만 이런 자동 배포 기능을 끌 수도 있다.
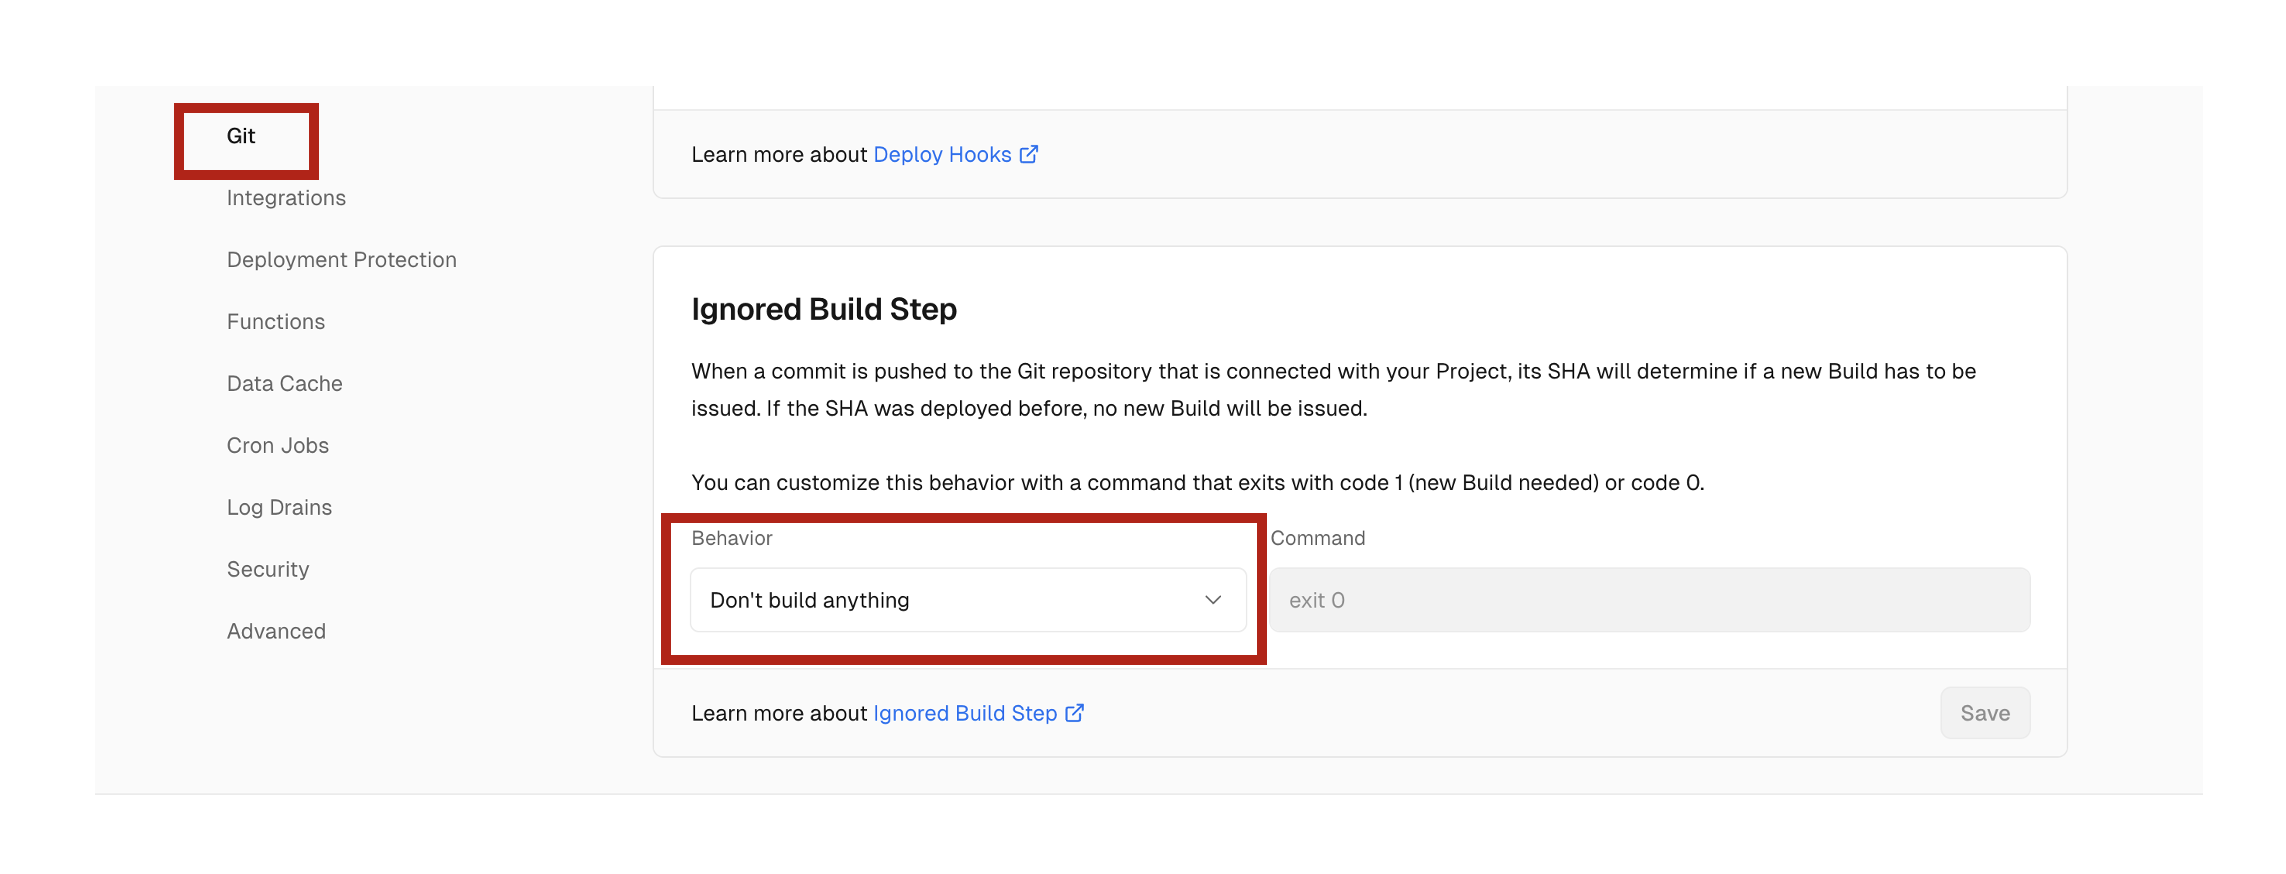
이렇게 설정한 다음 Vercel에서 제공하는 Github Action을 그대로 사용하자.
name: Vercel Production Deployment
env:
  VERCEL_ORG_ID: ${{ secrets.VERCEL_ORG_ID }}
  VERCEL_PROJECT_ID: ${{ secrets.VERCEL_PROJECT_ID }}
on:
  push:
    branches:
      - main
jobs:
  Deploy-Production:
    runs-on: ubuntu-latest
    steps:
      - uses: actions/checkout@v2
      - name: Install Vercel CLI
        run: npm install --global vercel@latest
      - name: Pull Vercel Environment Information
        run: vercel pull --yes --environment=production --token=${{ secrets.VERCEL_TOKEN }}
      - name: Build Project Artifacts
        run: vercel build --prod --token=${{ secrets.VERCEL_TOKEN }}
      - name: Deploy Project Artifacts to Vercel
        run: vercel deploy --prebuilt --prod --token=${{ secrets.VERCEL_TOKEN }}
잘 보면 우리가 설정해줘야 할 환경변수가 3개 있다. 이 토큰을 찾는데 시간이 조금 걸려서... 헷갈리지 말라고 적어둔다.
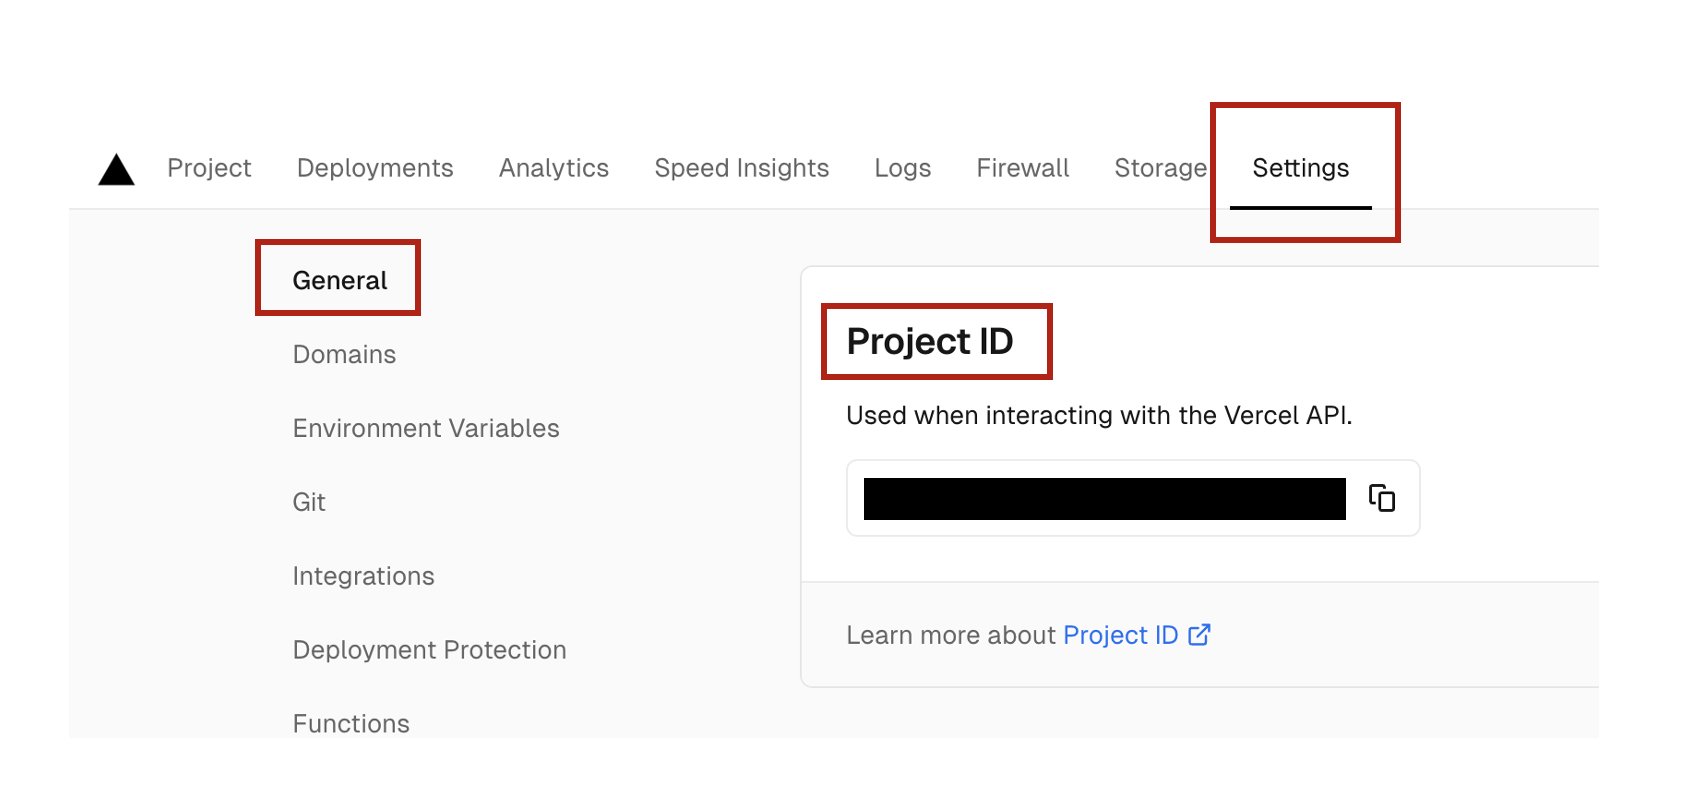
VERCEL_PROJECT_ID
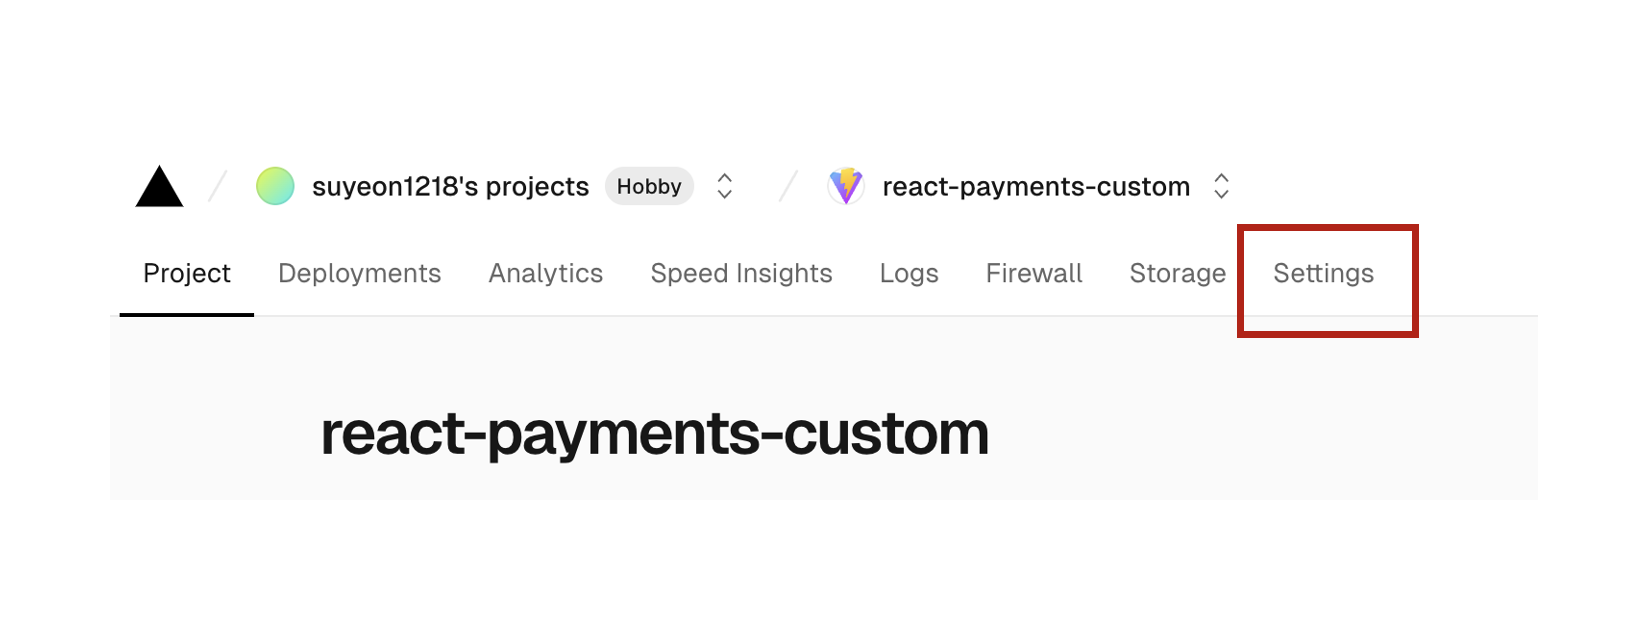
- 배포한 페이지의 대시보드로 들어간다.
- setting > general > project ID
VERCEL_ORG_ID
-
유저 setting 페이지로 들어간다.

-
Overview > 현재 팀의 Manage 버튼을 선택한다.

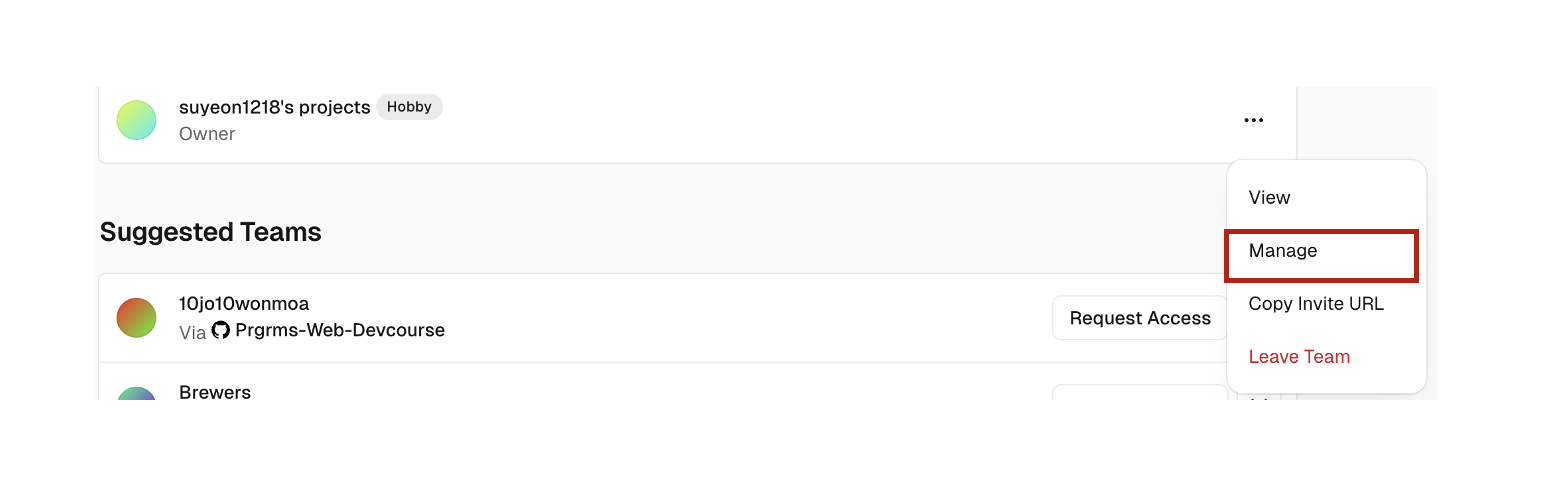
- general > Team ID를 복붙한다.

VERCEL_TOKEN
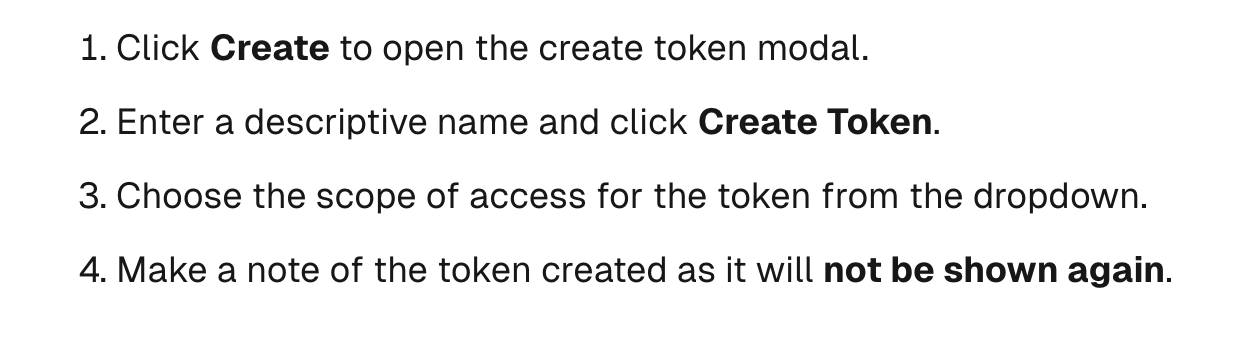
Token 카테고리로 들어가서 토큰을 발급받는다.
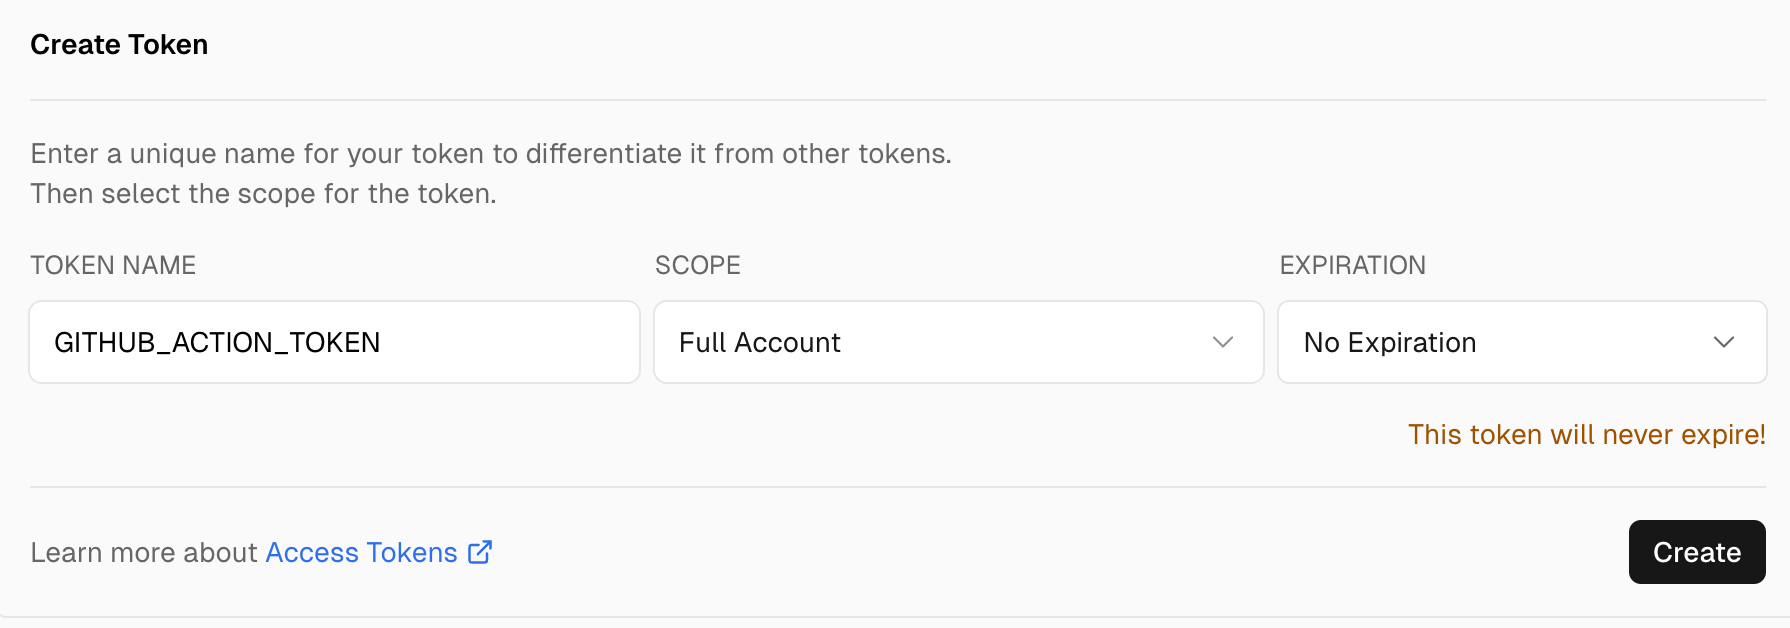
주의해야할 점은... 이렇게 한번 발급받은 토큰은 처음에만 보여주고 그다음부턴 보여주지 않으므로 어딘가 복붙해놓는 게 좋다. (4번째 룰 참조)
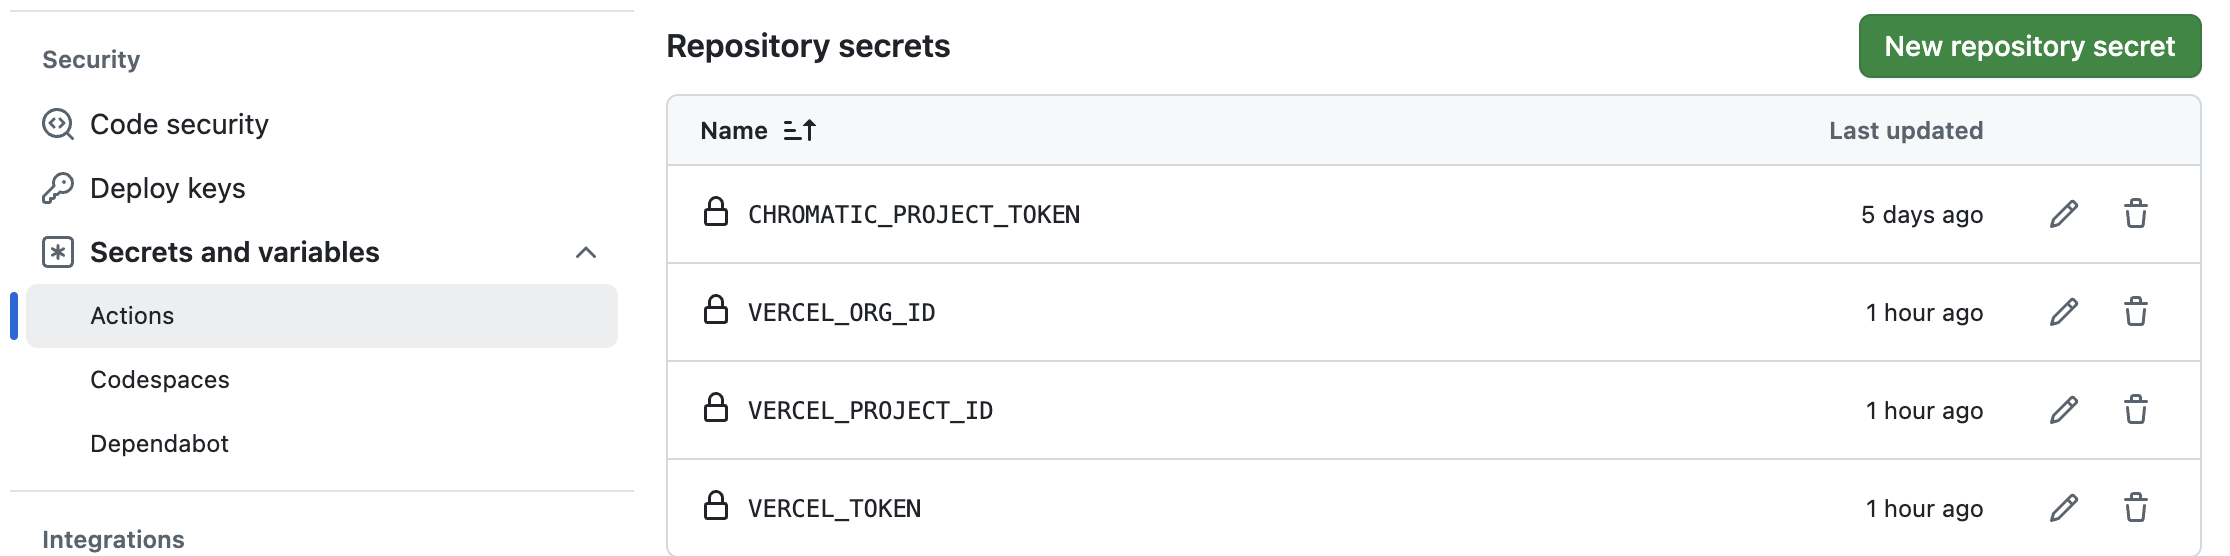
Github secret 등록하기
해당 시크릿 키들을 Github에 등록해주면 끝난다.
3. vercel workflow 의존성 주입
마찬가지로 need 를 사용해서 의존성을 주입한다.
# .github/workflows/storybook-tests.yml

name: 'Vercel Deploy with Test'
on:
  push:
    branches:
      - main
env:
  VERCEL_ORG_ID: ${{ secrets.VERCEL_ORG_ID }}
  VERCEL_PROJECT_ID: ${{ secrets.VERCEL_PROJECT_ID }}
jobs:
  storybook-test:
    timeout-minutes: 60
    runs-on: ubuntu-latest
    steps:
      - uses: actions/checkout@v4
      - uses: actions/setup-node@v4
        with:
          node-version-file: '.nvmrc'
      - name: Install dependencies
        run: yarn
      - name: Install Playwright
        run: npx playwright install --with-deps
      - name: Build Storybook
        run: yarn build-storybook --quiet
      - name: Serve Storybook and run tests
        run: |
          npx concurrently -k -s first -n "SB,TEST" -c "magenta,blue" \
            "npx http-server storybook-static --port 6006 --silent" \
            "npx wait-on tcp:127.0.0.1:6006 && yarn test-storybook"
  chromatic:
    needs: storybook-test
    name: Run Chromatic
    runs-on: ubuntu-latest
    steps:
      - name: Checkout code
        uses: actions/checkout@v4
        with:
          fetch-depth: 0
      - uses: actions/setup-node@v4
        with:
          node-version: 20
      - name: Install dependencies
        # ⚠️ See your package manager's documentation for the correct command to install dependencies in a CI environment.
        run: npm ci
      - name: Run Chromatic
        uses: chromaui/action@latest
        with:
          # ⚠️ Make sure to configure a `CHROMATIC_PROJECT_TOKEN` repository secret
          projectToken: ${{ secrets.CHROMATIC_PROJECT_TOKEN }}
  Deploy-Production:
    needs: chromatic
    runs-on: ubuntu-latest
    steps:
      - uses: actions/checkout@v3
      - name: Install Vercel CLI
        run: npm install --global vercel@canary
      - name: Pull Vercel Environment Information
        run: vercel pull --yes --environment=production --token=${{ secrets.VERCEL_TOKEN }}
      - name: Build Project Artifacts
        run: vercel build --prod --token=${{ secrets.VERCEL_TOKEN }}
      - name: Deploy Project Artifacts to Vercel
        run: vercel deploy --prebuilt --prod --token=${{ secrets.VERCEL_TOKEN }}
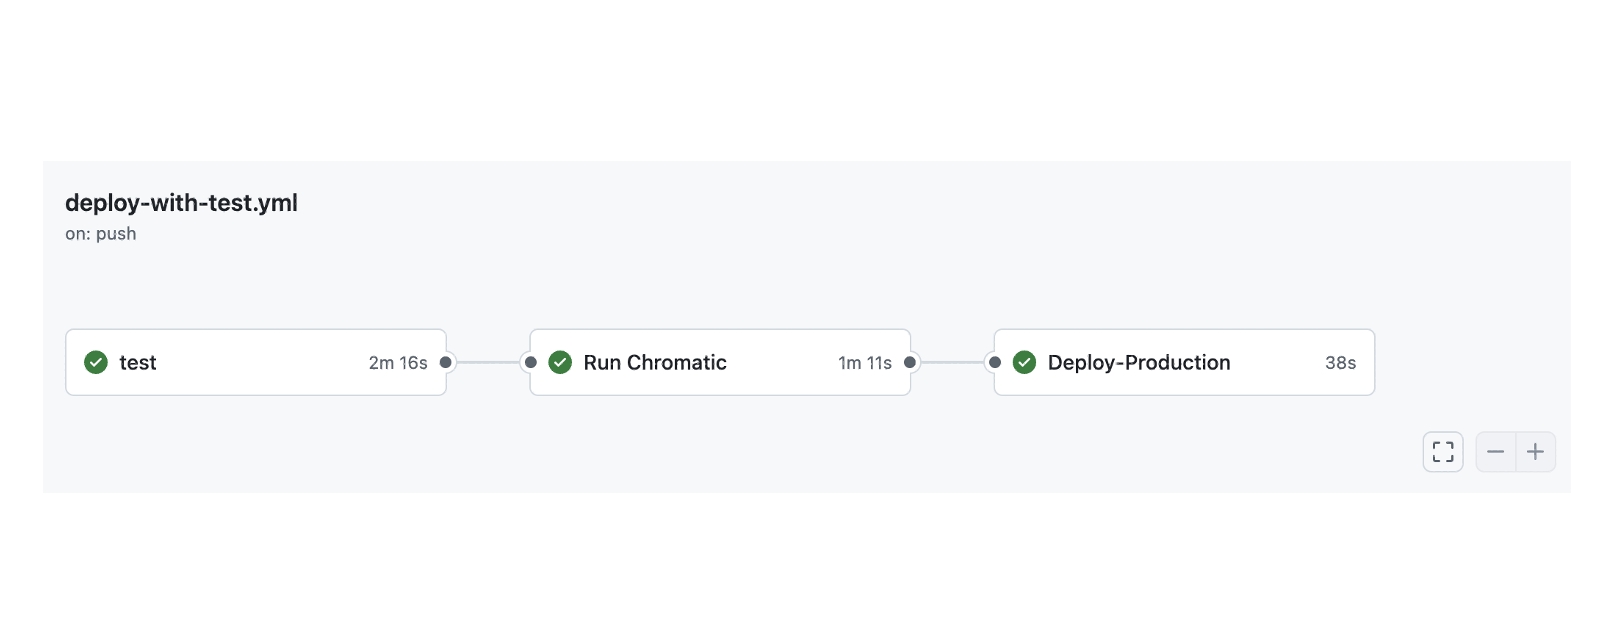
동작확인하기
이렇게 작성을 한뒤 push를 하면 dependency가 잘 만들어진 걸 확인할 수 있다.
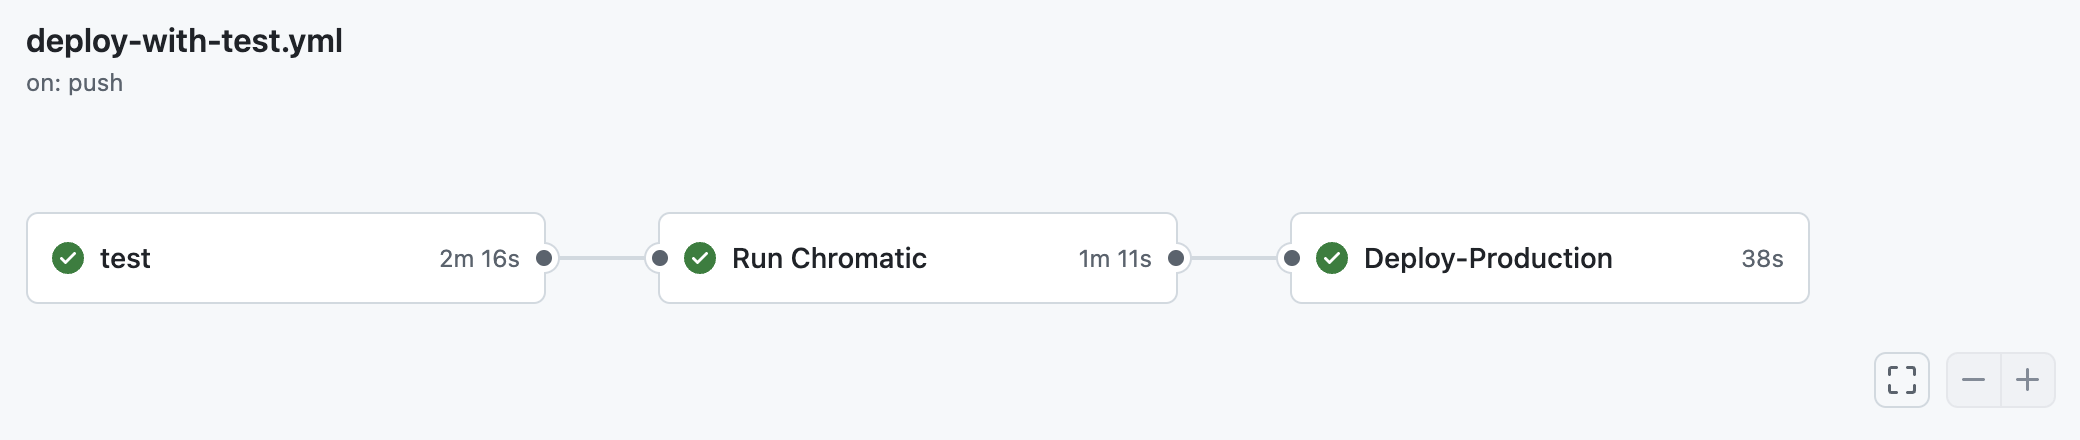
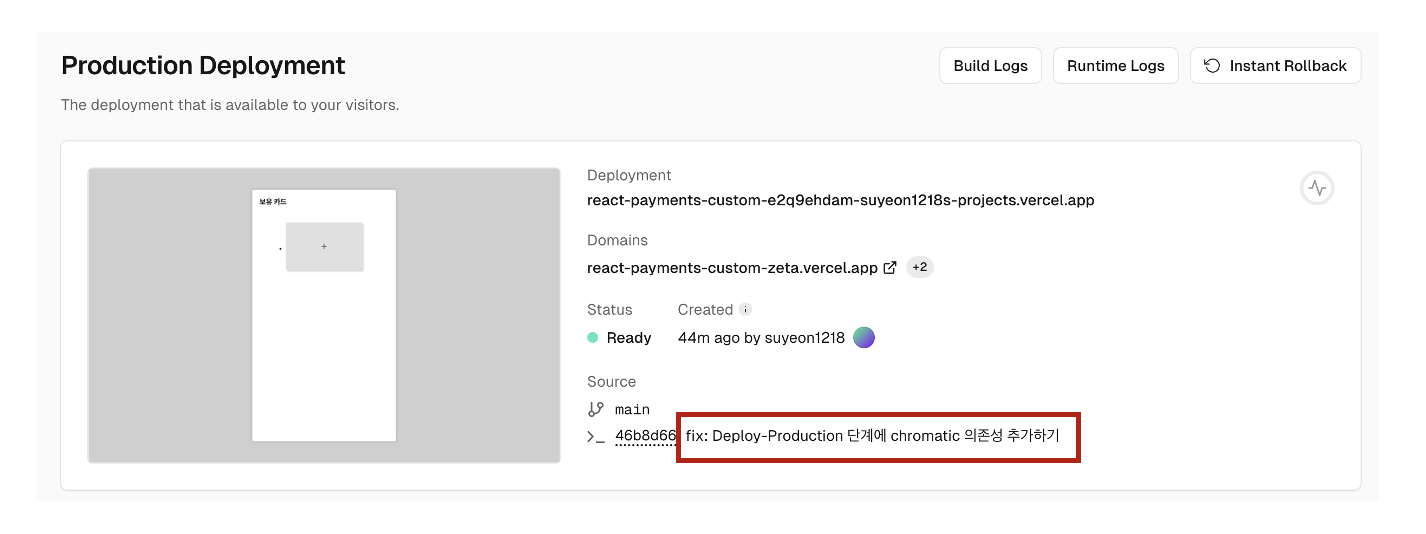
그리고 Deploy Production 단계가 끝나면 배포도 잘 이뤄진다.
소감
처음엔 막연히 모든 테스트가 통과해야지 vercel를 배포할 수 있으면 좋겠다! 는 마음가짐으로 workflow를 작성했는데 작성을 하다보니 생각이 바뀌었다. 배포는 main 브랜치에서만 이뤄져야 하는데 테스트들은 보통 PR 작성 시에 이뤄지기 때문이다...
테스트는 PR 작성시 이뤄지고 main에 merge가 된 경우 chromatic과 vercel 배포가 이뤄지는 방식이 가장 옳은 것 같다. (이건 클린 코드 스터디에서 판 포크 레포지토리라 굳이 브랜치 전략을 사용하지 않았으므로... 해당 workflow를 분리하지 않는 방향으로 가기로 했다.)
그래도 CI/CD workflow에 대해 막연한 두려움을 갖고 있었는데 직접 설정하고 프로퍼티를 수정해보면서 이론으로만 공부했을 때 보다 훨씬 더 가깝게 느껴진다. 이제 다른 프로젝트에도 얼마든지 github workflow를 작성할 수 있을 것 같다! 😁