프로덕션을 위한 15가지 FastAPI 모범 사례 (번역)
Code Collider의 "프로덕션을 위한 15가지 FastAPI 모범 사례" 영상을 번역한 글입니다. https://www.youtube.com/watch?v=kmJz8w5ij8Y
1. 블로킹 작업 시엔 비동기를 지양하자
대표적인 블로킹 작업은 다음과 같이 파일 I/O, HTTP Request, 동기 클라이언트로 DB 쿼리 등이 있다.
time.sleep(10)  # 명시적 sleep
open("file.txt").read()  # File I/O
requests.get("https://api.com")  # HTTP Request
MongoClient().db.collection.find_one()  # 동기 클라이언트로 DB 쿼리
하지만 FastAPI의 엔드포인트에서 async 을 통해 해당 작업을 처리한다면, 아래와 같은 코드에선 앱이 10초간 응답하지 못한다.
❌
@app.get("/")
async def endpoint():
	time.sleep(10)
왜냐하면 FastAPI는 async 엔드포인트 함수를 메인 스레드에서 실행하기 때문에 해당 작업이 완료될 때까지 메인 스레드가 다른 작업을 처리하지 못한다.
async 엔드포인트 + 블로킹 작업 문제를 해결하기 위해서는 async def 엔드포인트가 아닌 def 엔드포인트를 사용해 FastAPI가 해당 동기 엔드포인트를 감지하고 내부적으로 관리하는 Thread Pool에서 관리하도록 해야한다.
✅
@app.get("/")
def endpoint():
	time.sleep(10)
2. 비동기 지원 코드를 최대한 사용하자
논 블로킹(Non-blocking) 코드를 최대한 많이 사용해서 엔드포인트를 async 으로 활용할 수 있도록 하자.
time.sleep 대신 asyncio.sleep 을, requests 대신 httpx.AsyncClient 를, MongoClient 대신 AsyncIOMotorClient 를 사용하자.
❌
async def endpoint():
    time.sleep(1)

    requests.get(url)

    client = MongoClient()
    client.db.collection.find_one()
✅
async def endpoint():
	await asyncio.sleep(1)

    async with httpx.AsyncClient() as client:
    	await client.get(url)

    client = AsyncIOMotorClient()
    await client.db.collection.find_one()
3. 무거운 작업은 엔드포인트에서 하지 말자
앞서 설명한 블로킹 + async 예시와 같이, 무거운 작업을 엔드포인트에서 수행하면 서버가 잠시 응답을 못할 수 있다.
CPU/GPU를 많이 사용하는 작업(이미지 처리, 영상 처리, 머신러닝)을 엔드포인트에서 처리하면 해당 작업이 완료될 때까지 서버가 멈춘다.
머신러닝
NVIDIA Triton, TensorFlow Serving, TorchServe와 같은 도구를 통해 추론 작업은 별도로 처리하고, FastAPI는 요청 검증과 요청을 해당 추론 엔진에 전달하는 역할만 하는 형태를 추천한다.
오래 걸리는 작업
Queue + Worker 시스템을 사용해 다음과 같이 처리하는 것을 추천한다.
- FastAPI가 오래 걸리는 작업은 메세지 큐에 전달
- 별도의 워커(Worker)가 해당 작업을 큐에서 꺼내 처리
- 완료된 결과를 데이터베이스에 보관
- FastAPI에서 완료된 결과를 데이터베이스를 통해 조회
4. 1~3까지의 규칙은 FastAPI 의존성 주입시에도 적용된다
FastAPI 의존성 주입시에도, 1~3까지의 규칙은 동일하게 적용된다.
1. def -> 블로킹 작업시에 ✅
2. async -> 가볍고, 논-블로킹 작업시에 ✅
3. 무거운 작업은 되도록 금지 ❌
5. 유저가 기다리도록 하지 말자
유저가 응답을 받기 위해 필요한 작업이 아니라면, 엔드포인트에서 해당 작업을 제거시켜야 한다.
❌
@app.post("/register")
async def register_user(user_data: UserCreate):
	# ...
    await send_email(user_data.email)
    await event_user_registered(user_data.email)
    return {"message": "OK"}
대신, FastAPI에서 제공하는 BackgroundTasks를 사용해서 처리하자.
✅
@app.post("/register")
async def register_user(user_data: UserCreate, bg_tasks: BackgroundTasks):
	# ...
    bg_tasks.add_task(send_email, user_data.email)
    bg_tasks.add_task(event_user_registered, user_data.email)
    return {"message": "OK"}
BackgroundTasks를 가급적 쓰지 말아야 할 상황은 다음과 같다.
- 전송이나 처리가 보장되어야 할 때
- 재시도 로직이 필요할 때
- 서버가 망가져도 사라지면 안 되는 작업일 때
6. Swagger & ReDoc을 프로덕션에서 절대 노출하지 말자
공개된 API가 아니라면, FastAPI가 자동으로 생성하는 Swagger와 ReDoc문서를 개발환경에서만 노출하고, 프로덕션에서는 꺼두는 것이 좋다.
그렇지 않는다면 아직 완전히 개발되지 않은 API가 노출될 수 있고, 민감한 API가 그대로 노출되어 헤커에게 "이 문을 뚫고 가려면 자물쇠를 따야해요", "자물쇠 열쇠는 이러한 형태의 열쇠여야 해요" 와 같은 친절한 설명을 해줄 수 있다.
✅
app = FastAPI(
	docs_url=None if PRODUCTION else "/docs",
    redoc_url=None if PRODUCTION else "/redoc",
    openapi_url=None if PRODUCTION else "/openapi.json",
)
7. Pydantic 커스텀 모델을 사용하자
Pydantic 커스텀 모델을 사용하면 반복되는 Config 작업을 줄이고 해당 커스텀 모델에서 간편하게 관리할 수 있다.
✅
class CustomBaseModel(BaseModel):
	class Config
    	alias_generator = to_camel
        populate_by_name = True
        json_encoders = {
        	datetime: datetime.isoformat,
            Decimal: str,
            ObjectId: str
        }

class UserSchema(CustomBaseModel):
	# ...
8. 응답 모델을 명시적으로 반환하려고 하지말자
FastAPI가 내부적으로 다음과 같은 단계로 응답을 자동으로 검증하기 때문에, response_model에 Pydantic 모델을 적고 해당 모델을 또 반환하는 것은 아무런 이득이 없다.
- 반환 값을 가져온다
{...}나[...]와 같은dict,list형태로 변환한다response_model을 통해 해당 값을 검증한다- JSON으로 직렬화한다
❌
@app.get("/user", response_model=UserOut)
async def get_user():
	# ...
    return UserOut(**user_data)
✅
@app.get("/user", response_model=UserOut)
async def get_user():
	# ...
    return user_data  # {"id": 1, "name": "Alice"}
9. 엔드포인트에서 검증하지 말고, Pydantic을 사용해라
Pydantic을 사용하지 않는 검증이 더 쉽게 보일 수도 있지만, 비슷한 로직을 다양한 장소에서 반복해서 적게 되고, 일관된 에러 관리를 하기 위해 노력해야 하고, 왜 요청이 실패했는지 모르는 "이상한 상황"이 발생하기 쉬워진다. 제일 중요한 문제는 OpenAPI는 숨겨진 인증 로직을 모른다는 것이다.
❌
class UserIn(BaseModel):
	email: str
    age: int

@app.post("/users")
async def create_user(user: UserIn):
	if not EMAIL_REGEX.match(user.email):
    	raise HTTPException(...)
    if user.age < 18:
    	raise HTTPException(...)
✅
class UserIn(BaseModel):
	email: EmailStr
    age: int = Field(gte=18)

@app.post("/users")
async def create_user(user: UserIn):
	# ...
커스텀 검증 로직
만약 커스텀 검증 로직이 필요하다면, 아래와 같은 접근을 추천한다.
class UserIn(BaseModel):
	email: EmailStr
    age: int = Field(gte=18)

    @validator("email")
    def must_be_corporate(cls, v):
    	if not v.endswith("@company.com"):
        	raise ValueError("Must be a company email")
        return v
10. DB가 필요한 검증은 의존성 주입을 사용해라
DB 쿼리가 필요한 검증 로직(대표적으로 해당 유저의 게시물인지 검증할 때 등등...)을 엔드포인트에 넣지 않는 것이 좋다.
대신 의존성 주입을 사용하자. 의존성 주입을 사용하면 여러 개의 엔드포인트에서 동일한 검증 로직을 사용할 수 있는 이점이 생긴다.
❌
@app.put("/posts/{post_id}")
async def update_post(...):
	post = await db.get(post_id)
    if post.user_id != current_user.id:
    	raise HTTPException(...)
✅
async def validate_owner(
	post_id: int,
    user = Depends(get_user)
):
	post = await db.get(post_id)
    if post.user_id != user.id:
    	raise HTTPException(403)
    return post

@app.put("/posts/{post_id}")
async def update_post(
	post = Depends(validate_owner)
):
11. 엔드포인트마다 DB 연결을 생성하지 말자
엔드포인트마다 새로운 DB 연결을 생성하는 것보단, DB 커넥션 풀(Connection Pool)을 사용하고 해당 커넥션 풀을 의존성 주입을 통해 접근하는 것이 좋다.
❌
async def endpoint():
	conn = await get_new_db_conn()
    # ...
✅ App state에 DB 커넥션 풀 저장
DB 커넥션 풀을 lifespan 함수에서 생성한 다음, app.state에 보관한다. 이후
의존성 주입을 통해 해당 연결을 받아온다.
이 방법을 사용하면 서버 종료시 자원 정리가 간편해지고, 특히 여러 개의 데이터베이스를 사용하는 상황에서 편하다.
@asynccontextmanager
async def lifespan(app: FastAPI):
	app.state.pool = await create_pool()
    yield
    await app.state.pool.close()

async def get_conn(request: Request):
	async with request.app.state.pool.acquire() as conn:
    	yield conn

@app.get("")
async def endpoint(db_conn = Depends(get_conn)):
	# ...
✅ 전역 커넥션 풀 (legacy)
수명(lifespan) 이벤트에서 DB 커넥션 풀을 관리하는 방법이다. 하지만 App state에 DB 커넥션 풀을 저장하는 방식이 대체로 추천된다.
pool = None

@asynccontextmanager
async def lifespan(app: FastAPI):
	global pool
    pool = await create_pool()
12. 수명 이벤트를 통해 애플리케이션 레벨의 자원을 관리하자
수명(lifespan) 이벤트를 통해 자원을 관리하면, 시작되었을 때의 로직과 정리할 때의 로직이 한 곳에 모이기 때문에 관리가 용이하다. 또한 서버가 중간에 다운되어도 yield 이후의 작업이 실행되는 장점이 있다.
❌
@app.on_event("startup")
def setup():

@app.on_event("shutdown")
def cleanup():
✅
@asynccontextmanager
async def lifespan(app: FastAPI):
	... 	# <- DB, Redis, etc..
    yield   # <- 앱은 여기에서 실행됨
    ... 	# <- 모든 자원 정리
13. 민감한 정보를 코드에 포함시키지 말자
env 파일과 설정 클래스를 정의해서 민감한 정보(secret)를 처리하는 것이 좋다.
❌
# secret.py
API_KEY = "..."
PASSWORD = "..."
TOKEN = "..."
✅
# .env
API_KEY = "..."
PASSWORD = "..."
TOKEN = "..."- env 파일을 통해 민감한 정보(secret)를 관리하자.
# .gitignore
.env.gitignore에 해당 env 파일을 추가해 Git에 올라가지 않도록 하자.
# .env.example
API_KEY = "..."
PASSWORD = "..."
TOKEN = "...".env.example파일을 추가로 만들어 어떤 정보를.env파일에 입력해야하는지 알려주는 "템플릿"을 제공하자.
env 파일엔
USE_ADVANCED_RANKING_ALGO = true와 같은 로직을 결정하는 정보보단,DEBUG = true,PORT = 8000,DATABASE_URL과 같은 정적 정보만 포함하는 것이 좋다.
설정 클래스 만들기
os.environ["DEBUG"] 를 통해 env 에 접근하는 것보단, 별도의 설정 클래스를 만드는 것을 추천한다. 아래와 같이 pydantic_settings를 사용해 설정 클래스를 만들면 어떤 정보가 잘못 입력되었는지 찾기 쉽고, 개발 환경과 프로덕션 환경에서의 정보를 관리하기도 쉽다.
from pydantic_settings import BaseSettings

class Settings(BaseSettings):
	db_url: str
    api_key: str
    debug: bool

settings = Settings()
Dynaconf
추가로 Dynaconf를 통해 간편하게 설정을 관리할 수 있다.
[default]
DEBUG = false
DATABASE_URL = "postgres://..."

[development]
DEBUG = true
DATABASE_URL = "sqlite://..."

[production]
DATABASE_URL = "postgres://..."
from dynaconf import Dynaconf
# Load
settings = Dynaconf(
settings_files=['settings.toml'],
environments=True,
env='development'
)
# Access
print(settings.DEBUG)
print(settings.DATABASE_URL)14. print 대신 구조화된 로깅을 사용하자
로깅 레벨을 설정할 수도 없고, 기타 컨텍스트와 timestamp를 담기 어려운 print 대신, Python의 표준 Logging 모듈이나 Loguru, structlog와 같은 로깅 라이브러리를 사용하는 것이 좋다.
이와 같은 로깅 라이브러리를 사용하면 아래와 같이 프로덕션 환경에선 INFO 단계 이상의 로그만 출력하고, 개발 환경에선 DEBUG 단계 이상의 로그만 출력하도록 설정할 수도 있다.
LOG_LEVEL = logging.DEBUG if ENV == "development" else logging.INFO또한 미들웨어를 사용해 request별 컨텍스트 로깅을 용이하게 관리할 수도 있다.
class LoggingMiddleware(BaseHTTPMiddleware):
	async def dispatch(self, request: Request, ...):
    	structlog.contextvars.clear_contextvars()
        structlog.contextvars.bind_contextvars(
        	request_id=str(uuid.uuit4())
        )
        logger.info("request_reveived",
        	method=request.method,
            path=request.url.path
        )
        response = await call_next(request)
        logger.info("request_completed", status_code=response.status_code)
        return response

app.add_middleware(LoggingMiddleware)structlog.configure(
processors=[
merge_contextvars,
TimeStamper(fmt="iso"),
add_log_level,
JSONRenderer(),
],
)
@app.get("/hello")
async def hello():
logger.info("inside_hello_handler")
return {"message": "Hello, world"}로깅 결과 예시
{"method": "GET", "path": "/hello", "event": "request_received",
"request_id": "d22f859d-443d-9a19-5b8073dd27b6", "level": "info",
"timestamp": "2025-06-28T17:13:08.5019542"}

{"event": "inside_hello_handler", "request_id":
"d22f859d-443d-9a19-5b8073dd27b6", "level": "info",
"timestamp": "2025-06-28T17:13:08.503055Z"}

{"status_code": 200, "event": "request_completed", "request_id":
"d22f859d-443d-9a19-5b8073dd27b6", "level": "info", "timestamp":
"2025-06-28T17:13:08.503240Z"}
(로깅엔 민감한 정보들을 포함하지 않아야 한다)
멀티 인스턴스 환경에서
여러 개의 인스턴스 서버가 있다면, 로그를 중앙화시키는 것이 좋다. 예를 들어 여러 개의 인스턴스의 로그를 FileBeat를 통해 Elastic Search로 보내고 관리할 수 있다.
15. FastAPI 배포 꿀팁
Gunicorn & Uvicorn
개발 환경에선 Uvicorn을 사용한 FastAPI 실행도 좋지만, 프로덕션 환경에선 Gunicorn과 Uvicorn을 같이 사용하는 것을 추천한다.
# 개발 환경
uvicorn main:app --reload

# 프로덕션 환경
gunicorn main:app ... --worker-class uvicorn.workers.UvicornWorker
uvloop
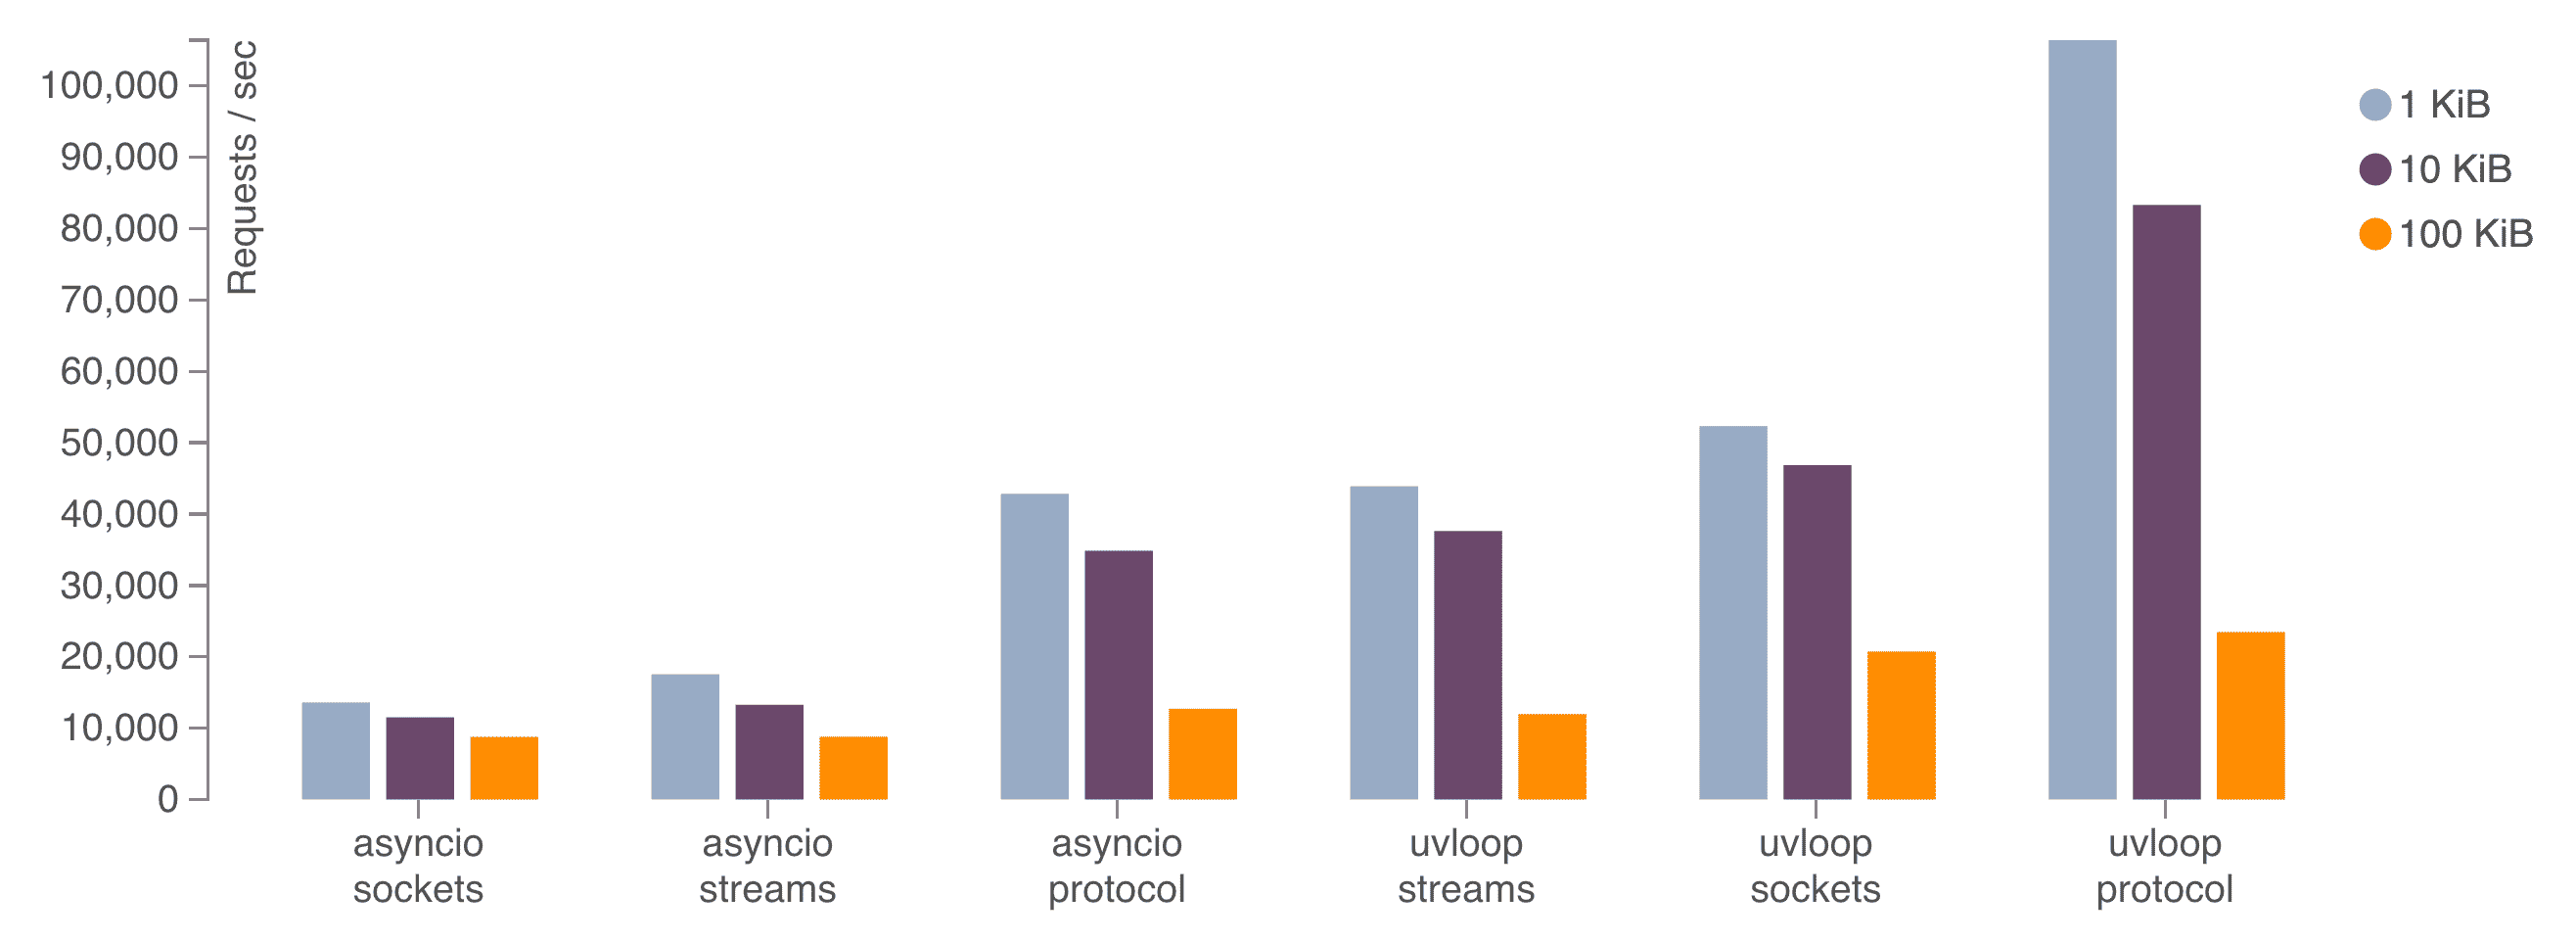
uvloop은 Node.js에서도 사용하는 libuv를 사용해서 빠른 이벤트 루프를 제공하는 라이브러리이다.
uvloop을 가상 환경에 설치하는 것을 추천한다. 설치할 시 FastAPI는 자동으로 uvloop을 탐지하고 기본적으로 제공되는 asyncio 대신 uvloop을 사용한다.
Worker 설정
일반적으로 추천되는 worker 수는 (CPU 코어 갯수 * 2) + 1 이다. 하지만 이 공식은 절대적인 공식이 아닌 만큼, 실제 어느 정도의 worker 에서 서버가 가장 빠른지 측정하는 과정이 필요하다.
gunicorn main:app
	--workers <workers count>
    --worker-class uvicorn.workers.UvicornWorker
    --bind 0.0.0.0:8000
Docker
Docker로 애플리케이션을 컨테이너화시켜, 애플리케이션 스케일링을 용이하게 할 수 있으니 추천한다.